Transcription
Downloaded from www.Manualslib.com manuals search engine
Audio4x25W RMS200x110.5 x 190 mmNTSC/PAL/AUTO(optional)6receiverDownloaded from www.Manualslib.com manuals search engine
232424252525252930313334Downloaded from www.Manualslib.com manuals search engine
(1) Short press TEL button on the remote control or 1 button on the front panel,it will show last phone number on the LCD, then it will execute the dialing.(2) Short press REDIAL button on the remote control, it will dial the last phone number.Bluetooth with NFC functionAuxiliary inputs on front and rearUSB input with charging function2 zone multi room audio output2 x RCA audio/video outputs for connecting 2 additional TVs1 x subwoofer outputClock5.1 Incoming call ringing, short press TEL button on the remote control or 1 button onthe front panel to accept the call.5.2 To reject Incoming call ringing, short press HANG UP button on the remote controlor 2 button on the front panel to REJECT the call.5.3 During a phone call, short press HANG UP button on the remote controlor 2 button on the front panel to end the call.Note: When an incoming call is present the caller’s phone number will be displayedon the screen.(with mobile phone) or receiving a call, the car audio will temporarily wake up.7. To play an audio file from a external Bluetooth device(mobile phone) on the wallmount Stereoterminated with an insulated end to avoid wires shorting or earthing whichAfter the device has been paired successfully and Wall mount Stereo screen displaysLINK OKIf your mobile device supports A2DP you will then be able to stream music fromyour Bluetooth device so it can be played by stereo speaker.You must select on your mobile Bluetooth device to play the audio through Bluetooth.If your mobile device supports AVRCP then you will be able to control the basic phoneaudio output functions by the Wall mount Stereo controls. Eg . Play Pause .Note: During other modes(execpt Bluetooth conversation),press BT MODE button on thefront panel to switch the mode with others.8.To setup your Stereo using NFC(only support mobile phone with NFC function)Do not attempt to disassemble or adjust this product, contact a service centerfor assistance.(1) Turn on the NFC function of your mobile phone and m ake sure the screen is activeand unlocked.(2) With the NFC detection area of your phone touch with the NFC detection areaof the Stereo, you can connect or disconnect your mobile phone with the Stereoconveniently.Note: For the first time pair and connect, it will ask you to input a password.The password is “0000”.Downloaded from www.Manualslib.com manuals search engine
4wipe it off before using. side ote: Press BT MODE button on the front panel to switch between Unit and Phoneduring BT phone conversation.Short press CLEAR button to cancel the wrongly input number if necessaryShort press TEL button to execute the dialing.Downloaded from www.Manualslib.com manuals search engine,result in injury or fire.
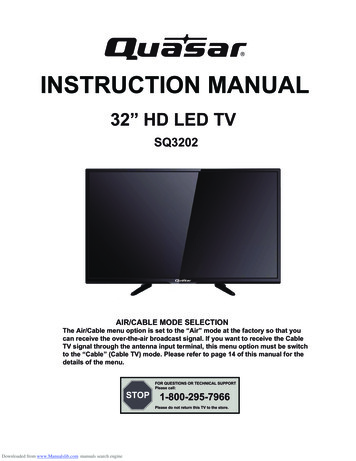
30AV IN MODE BUTTONUP BUTTONNEXT BUTTONRIGHT BUTTONPREVIOUS BUTTON/CLEAR BUTTONDOWN BUTTON9AM/FM RADIO MODE BUTTONRANDOM BUTTONREPEAT BUTTONLEFT BUTTONPROGRAM BUTTONDownloaded from www.Manualslib.com manuals search engine
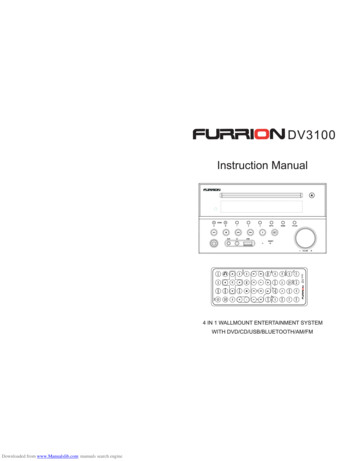
1.6 Locations and Names of the USBRESETVOLUMEthe relative content of SYSTEM SETUP menu for details.789101112 1314 15 161. DISC SLOT2. IR REMOTE CONTROL SENSOR3. 1/2/3 BUTTON1 TEL /REDIAL BUTTON2 HANG UP BUTTON4.ZONE A/B BUTTON5./BUTTON6.PLAY/PAUSE BUTTONRADIO REGION SELECT BUTTON7.POWER BUTTON8.STOP BUTTON9.AUX IN SOCKETDownloaded from www.Manualslib.com manuals search engine1710.HEADPHONE SOCKET11. USB SOCKET12.BT MODE BUTTON/EQ BUTTON13.MICROPHONE IN14.RESET BUTTON15.INPUT MODE BUTTON16.5/RANDOM BUTTON17.VOL KNOB/SEL BUTTON18.6/TITLE BUTTON19.4/REPEAT BUTTON20.LCD DISPLAY21.EJECT BUTTON22.NFC DETECTION AREA
28Description of icons on the LCD displayCONTRASTIt is for adjusting the contrast of the video outputHUEIt is for adjusting the hue of the video output.SATURATIONIt is for adjusting the saturation of the video output.SHARPNESSIt is for adjusting the sharpness of the video output.1.USB iconAfter inserting a USB storage, USB icon is lit.2.DVD iconAfter inserting a DVD disc, DVD icon is lit.3.DISC iconAfter inserting a disc(DVD,VCD,CD), DISC icon is lit.4.MP3 iconIf a disc or a USB storage contains MP3 format files, MP3 icon is lit.5.RDM iconIn random playback mode, RDM icon is lit.6.MONO iconIn mono audio mode, MONO icon is lit.7.STEREOIn stereo audio mode, STEREO icon is lit.8. ZONE 1 iconWhen selecting the ZONE A speakers, ZONE 1 icon is lit.9.ZONE 2 iconWhen selecting the ZONE B speakers, ZONE 2 icon is lit.10. FOLDER iconIf a USB storage contains more than 2 folders(contains playback file),FOLDER icon is lit.11.PLAYBACK iconDuring disc or USB playback state, PLAYBACK icon is lit.12.PAUSE iconDuring disc or USB pause playback state, PAUSE icon is lit.13.MUTE iconWhen the Stereo is on mute state, MUTE icon is lit.14. BLUETOOTH iconWhen the Stereo is paired and connected successfully, BLUETOOTH icon is lit.15.FLAT iconWhen selecting flat audio mode playback, FLAT icon is lit.16.ROCK iconWhen selecting rock audio mode playback, ROCK icon is lit.17.CLASSIC iconWhen selecting classic audio mode playback, CLASSIC icon is lit.18.CINEMA iconWhen selecting cinema audio mode playback, CINEMA icon is lit.19.LOUD iconWhen selecting loud audio mode playback, LOUD icon is lit.20.RPT iconIn repeat playback mode, RPT icon is lit.Downloaded from www.Manualslib.com manuals search engine5.17.5 SPEAKER SETUPDOWNMIXIt is for selecting your desired sound effect when there is no center speakerand subwoofer. There are 3 modes: LT/RT, STEREO, VSS.LT/RT: When playing a disc with PRO LOGIC Dolby stereo effect, choose theitem, so it will output audio signal with vivid theatre effect.STEREO: If you choose the item, when outputting audio signal with 5.1 channels,it will output the left and right channels of signal ; when outputting audio signalwith 2 channels, it will output the common 2 channels of stereo signal.VSS: If you choose the item, when playing a disc recorded with 5.1 channels,the main channel speakers can output audio signal with VSS effect.5.17.6 DIGITAL SETUPDYNAMIC RANGEAfter selecting the compression mode of LINE OUT, set the item, so you canadjust the linear compression ratio. If you set it to be FULL, the Peak-to-Peakvalue of the audio signal is the minimum; if you set it to be OFF, the Peak-toPeak value is the maximum.DUAL MONOIt is for selecting a desired audio output mode for the left and right ways of signal.It is mainly for Karaoke of Ac3. There are 4 modes in all as follows:STEREO, MONO L, MONO R, MIX MONO.
27Press MUTE button on the remote control to mute the audio,“MUTE” will flash in the display. Press MUTE again to cancel.an audio language.Press INPUT MODE button repeatedly to select Tuner,Disc(Afterinserting a disc),USB(After inserting a USB storage), BT,AV IN and AUX mode.Press EQ button to select between CINEMA,ROCK CLASSIC,FLAT.Press and hold CLOCK button on the remote control to enterCLOCK Setup, rotate VOL KNOB to adjust hour. Press it brieflyto minute setting and rotate it to adjust. Once time is set,the unitwill automatically set after a few seconds.Press and hold LOUD button on the remote control to turn onor off LOUD mode.Press ZONE A or B button to select speaker output,“ZONE 1 ” or “ZONE 2 ” will displayon the LCD once it is selected.RESETDownloaded from www.Manualslib.com manuals search engine
926For the DVD System Menu, there are 6 setup pages in all. They display as follows:5 .17.1 SYSTEM SETUPArea FrequencySelectionPress and hold PLAY/PAUSEbutton for 5 secondsto set AM/FM radio region(Europe/USA1/USA2)Pressorbutton to move radiofrequence down or up one step at a time.Press and holdorbutton tosearch the next strongest station automatically.Press and hold INPUT MODE button on the front panelor briefly press AM/FM button on the remote control toselect between FM1,FM2.FM3,AM1,AM2.Storing and RecallingStation PresetsPress and hold APS button on the remote control toautomatically store the six strongest station in thecurrent band.(Up to 18 FM stations and 12 AM stationscan be stored)Briefly Press APS button on the remote control to scanpresets 1-6 in the current band.Press LOC button on the remote control to turn on/offLOC.Stereo/MonoIn FM mode,press ST button on the remote control toselect the Stereo or Mono sound mode.Downloaded from www.Manualslib.com manuals search engineTV SYSTEMThe Stereo supports output of various TV system.If your TV has only NTSC or PAL system, the screen will blink and becomecolorless when a wrong TV system is selected. In this case go to TV SYSTEMand select NTSC, PAL or AUTO to match the system of your TV.TV TYPEThe setup item is for matching TV screen size.4:3 PS: Choose the item when connecting a TV set with 4:3 screen. When playingthe pictures with 16:9 size, the left and right parts of the video will be cut out,and display in full screen.4:3 LB: Choose the item when connecting a TV set with 4:3 screen. When playingthe pictures with 16:9 size, the top and bottom parts of the TV screen will beturned into a black square respectively.16:9: Choose the item when connecting a TV set with 16:9 wide screen.PASSWORDThis setup item is for locking or unlocking the rating level of the Parental Control.The defaulted state is locked. The defaulted password is 0000.You can set a new password that you like: Select the PASSWORD item and thenpress the button to enter it, then input the original password 0000, and thenpress the OK button to unlock it. Press the button to enter it again, then inputa new password that you like and then press the OK button to make it effective.Before the other persons see the Manual, you should get the password in mindand cut out the part of PASSWORD in the Manual.RATINGThe item is for setting a new rating level of the Parental Control.1. Select the PASSWORD item and then press the button to enter it, then inputthe password mentioned above, and then press the OK button to unlock thesetting of the rating level of the Parental Control.2. Select the RATING item and then press the button to enter it, then use thedirection buttons to select your desired rating level, then press the OK buttonto confirm.3. Select the PASSWORD item again and then press the button to enter it, theninput the password, and then press the OK button to lock the new setting ofthe rating level of the Parental Control.DEFAULTThis item is for making all setup items change back to original status.
253. During JPEG playback, press one of the direction buttons to change the angle ofviewing picture that is displaying as follows: : 90 deg cw; : 90deg ccw; :UP -- DOWN; v: LEFT -- RIGHTDuring JPEG playback, press PROG button on the remote control to change the mode ofrefresh picture. During JPEG playback, press STOP button to stop playing and returnto the root menu.* During JPEG playback, the following buttons are not available: SLOW-FWD,SUBT, TITLE/PBC, ANGLE, STEP, AUDIO, RDM and A-B.* In JPEG mode,the other operations are same as ones in MP3/WMA mode.5.14 MP4 Operation1. The root menu is displayed on TV when beginning to switch on DISC mode, then it willautomatically play the first file.During playback, press STOP button to stop playing and return to the root menu.2. When displaying the root menu, press the direction buttons to select your desiredFOLDER or file, then press OK or PLAY/PAUSEbutton to open the FOLDER, orplay the selected file.When displaying the root menu, you can also use the number buttons to select theserial number of the file and play the file.* ANGLE, PROG, RDM, and TITLE/PBC buttons are not valid.* The other functions are same as ones in DVD disc; but the “Repeat” function is sameas one in MP3/WMA.5.15 ESP and ID3 FunctionThere is ESP function for all formats of discs.In MP3/WMA mode, during playback, the information of the file name, folder name,song s title, artist and album will be scrolling on the LCD display. As long as thecurrent playing MP3 music contains relevant ID3 tag information in version 1.0/2.0format, the 3 items underlined above will be scrolling on the LCD display; otherwise,they will not.5.16 USB OperationPower on the DVD player, then insert the USB storage, then the monitor will displaythe root menu of the USB storageThis device support picture(JPG format),audio(MP3 or WMA format) and Video(MP4 format), all the operations are same as ones of the corresponding format.10Disc USB OpreationInsert DiscWith the label facing up,insert a disc into the disc slot.The disc will automatically begin playback.Eject DiscPress EJECT to eject the disc.Track SelectPressorbutton to move toprevious or next track/chapter.Fast Forward Press and holdorbutton toand Backward fast backwards or forward.PausePlaybackPressPressto temporarily stop the playback.again to resume playback.StopPlaybackPress once to pause the playback,pressto resume;presstwice to stop playback, then pressto startplayback from the beginning of the first chapter/track.RepeatPress RPT to repeat current playing track/chapter.Press RPT to resume.RandomPress RDM to play each track in random order.Press RDM again to resume.TitleIn DVD/VCD mode,press TITLE on the remote control todisplay the title list.Note:The USB input with charging function ( not all products can be charged from the unit)BLUETOOTH OPERATION5.17 The DVD System Menu Setup Operation1. Press SETUP button on the remote control to access the DVD System Menu onthe monitor.2. There are 6 setup pages in all for the System Menu. Press the or button to selectan desired setup page.3. Press the or v button to select an setup item in the selected setup page.4. Press the button to enter the setup item. Then press the v or button to select adesired mode of the setup item, finally press OK button to confirm it.* Press the button to return to the upper level.* Press SETUP button on the remote control again or use the direction buttons to highlight theitem of the EXIT SETUP and then press OK button to exit the System Menu.Downloaded from www.Manualslib.com manuals search engineDial orAccept CallReject orEnd CallPress the 1 button on the front panel to accept, dial or rediala call.Press the 2 button on the front panel to reject or end a call.
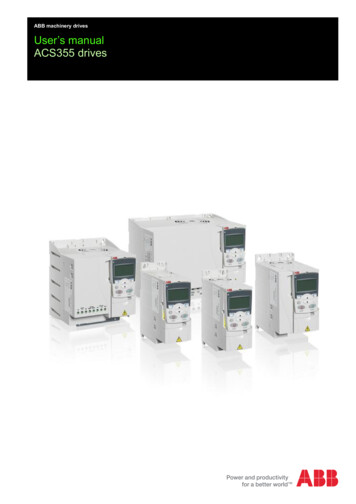
11245.12 Program Playback1.7 Wiring Diagram1It allows you to enter the order in which you want some chapters/tracks inDVD/VCD/MP3/WMA/CD disc to play.1 During playback, press PROG button on the remote control to enter a programinterface as follows:For DVD discs /MP3/WMAFor VCD/CD discsWIRING CONNECTING SOCKET A2BLACKWIRING CONNECTING SOCKET BThe Description of the Wiring Diagram for Socket A and Socket BWIRING CONNECTING SOCKET AWIRING HARNESS PLUG AWIRING CONNECTING SOCKET BWIRING HARNESS PLUG B2 Use the direction buttons to move cursor onto the desired place for inputtingthe sequence number.3 Use the number button to input desired sequence number of title/chapter/track with desired sequence.4 Use the direction button to move cursor onto PLAY, then press OK button on theremote control to play the programmed titles/chapters/tracks in programmedorder; only pressing PLAY/PAUSEbutton also can play the programmedtitles/chapters /tracks in programmed order.* To exit program playback, firstly press STOP button, then press PLAY/PAUSEbutton to enter sequence playback; or press PROG button twice again.* To remove the all programmed sequence numbers, move the cursor ontoCLEAR, then press OK button on the remote control.* To change the programmed sequence, move the cursor onto the item youwant to change, input the desired sequence number.* During VCD playback, if it is in PBC ON mode, at the same time of enteringthe state of program playback, it turns off PBC mode.5.13 Playback the Picture CD in JPEG Format1. The root menu is displayed on the monitor when beginning to switch on DISCmode. At the time, it plays MP3/WMA file.( TITLE or PBC button is notavailable).In the root menu, the left file sort icon is for MP3/WMA file; the middle file sorticon is for VIDEO file; the right file sort icon is for JPEG file. If one of these 3file sort does not exist, you can not move cursor onto the file sort icon.2. When displaying the root menu, press the direction buttons to select yourdesired FOLDER, file or file sort icon, then press OK or PLAY /PAUSEbutton to open the FOLDER, or play the selected file, or play only this sort offile. When displaying the root menu, you can also use the number buttons toselect the serial number of the file and play the file.When you select a JPEG file sort icon, press one of the direction buttons toselect the first JPEG file, then press the v button to select the desired JPEG file,finally press OK or PLAY/PAUSE button to display the JPEG picture in full screenfrom the selected JPEG picture.Downloaded from www.Manualslib.com manuals search engine
4,ZOOM OFF.Press one of the direction buttons to select the area you want to enlarge.WIRING CONNECTING SOCKET A VIEW5.9 Change the Caption LanguagePURPLEWhen playing DVD discs, press SUBT button on the remote control repeatedly toselect the language of the caption or turn off the caption.(depend on the disc used.)PURPLEWhen playing VCD/MP3/WMA/CD discs, the button is not available.5.10 Change the Audio Language1. When playing DVD discs, press AUDIO button on the remote controlrepeatedly to select the desired language type(depend on the disc used)2. When playing VCD discs, press AUDIO button on the remote control repeatedly toselect the sound mode of the MONO L, MONO R, and Stereo, no language function.3. When playing CD/WMA/MP3 discs, AUDIO on the remote control button is invalid.5.11 Look over the Playback Status1. When playing DVD discs, press OSD button on the remote controlrepeatedly to turn on/off the playback status. When it is on, it will display theinformation such as: the serial number of the playing title, the serial numberof the playing chapter, the elapsed time of the playing chapter, the remainingtime of the playing chapter, the elapsed time of the playing title, the remainingtime of the playing title, etc.2. When playing VCD/CD discs, press OSD button on the remote controlrepeatedly to turn on/off the playback status. When it is on, it will display theinformation such as: the serial number of the playing track, the elapsed timeof the playing track, the remaining time of the playing track, the elapsed timeof the disc, the remaining time of the disc.Downloaded from www.Manualslib.com manuals search engineWIRING CONNECTING SOCKET B VIEWPIN NOCOLORFUNCTION1YELLOW 12V DC MEMORY B 2PINKAUTO ANTENNA3RED 12V DC IGNITION SWITCH4BLACKPOWER GROUND(-12DC)
22135.5 Playback from a specified chapter/track or a specified timeWIRES FROM RV,BOAT OR TRUCK1. When playing DVD discs, press SEARCH button on the remote control todisplay an interface and highlight the title item, then use the number buttonsto input the serial number of the title; use the direction buttons to highlight thechapter item, then use the number buttons to input the serial number of thechapter; finally press OK or PLAY/PAUSEbutton to play the selectedchapter.2. When playing VCD/MP3/WMA/CD discs, press SEARCH button on the remotecontrol to display an interface and highlight the track item, then use the numberbuttons to input the serial number of the track; finally press OK or PLAY/PAUSEbutton to play the selected track .5.6 Playback in RandomWhen playing DVD/VCD(PBC OFF)/MP3/WMA/CD discs, press RDMbutton to switch between RANDOM ON /RANDOM OFF. When in RANDOMON mode, it will play in random.5.7 Playback in Different Angle1. When playing VCD/MP3/WMA/CD discs, ANGLE button on the remotecontrol is not available.2. When playing DVD discs, press ANGLE button on the remote controlrepeatedly to view in different angle.(This function is only for the DVDdiscs with ANGLE function)5.8 Playback in Zoom ModeIn DVD/VCD mode, during playback, press ZOOM button on the remotecontrol repeatedly to enlarge a certain area of the images on the screenwith these multiples:POWER AND SPEAKER WIRES FROM STEREO CONNECTORDownloaded from www.Manualslib.com manuals search engine
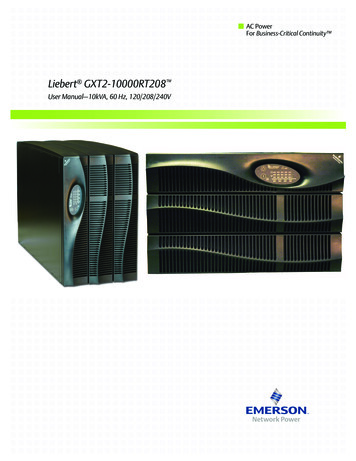
2114During slow forward, press PLAY/PAUSEplayback.button to resume normal1.8 Mounting InstallationThe function is only for video.Location* Choose a mounting location away from humid areas, water sources, appliances or any5.3. Playback with still frameIf the unit is currently running DVD.VCD disc,press STEP button on the remotecontrol consecutively to display the still frame forward with step by step.Press PLAY/PAUSEbutton to resume normal playback.equipment that can radiate heat.* Select an area on a wall or cabinet which is free from cable, fuel or brake lines and ensurethe area behind the wall mount stereo has a vent hole or if it is an enclosed box and hasadequate room around the rear of the unit for cooling.* Ensure when the stereo is mounted in the cut out that the wires at the rear of the unit are notpressed against the heat sink5.4 Playback Repeatedly5.4.1 ONE/ALL Repeat1.In the mode of DVD disc playback:Press RPT button to select REP CHAPTER, REP TITLE, REP ALLor REP OFF.2.In the mode of VCD(PBC OFF)/CD disc playback:press RPT button to select REP ONE, REP ALL or OFF.Installing the unit.* Before finally installing the unit, connect the wiring temporarily and make surethe unit and the system work properly.*Fix the unit with screw according to following diagram.SCREWWhen it is in the state of PBC ON, during VCD disc playing, the RPTbutton is not available.3.PLASTIC SHELLOF THE FRONT PANELIn the mode of MP3/WMA disc playback:Press RPT button to select REP ONE, REP DIR, REP ALL or OFF.5.4.2 A-B RepeatPress A-B button on the remote control if you want to repeat a specificsegment on a disc that you define:1.2.Press A-B button at a point (A) where you want it to be the start pointof the repeat segment. Press A-B button again at a point (B) where youwant it to be the terminal point of the repeat segment. Then it will play thesegment repeatedly.To cancel A-B repeat mode and resume normal playback, press A-Bbutton for the third time.Note:During DVD/VCD/MP3/WMA/CD playback, points A and B must be within thesame track.Downloaded from www.Manualslib.com manuals search engineSCREW1. Remove plastic shell of the front panel from the unit.2. Fix the unit with 4 pieces #8 pan head self tapping screw.3. Put back plastic shell of the front panel to the unit.
20152. Common Operation1.Turning On and Off the unitBy pressing the power button will turn on or enter standby mode2.Selecting a Source:1) Use INPUT MODE button on the front panel.Press INPUT MODE button repeatedly to select Tuner,Disc(Afterinserting a disc),USB(After inserting a USB storage), BT,AV INand AUX mode.In VCD mode1. When starting to turn on the PBC function, it will play from the beginning ofthe disc till it display the PBC menu on TV screen if the disc include the PBCmenu.2. Press the number buttons to select your desired track to play.In MP3/WMA mode1. The root menu is displayed on the monitor screen all the time(and the TITLE/PBC button is not available).2. Press the direction buttons to select your desired FOLDER, then pressOK or PLAY/PAUSEbutton to open the FOLDER, and then press thedirection buttons to select your desired file, finally press OK button toplay the selected file.Note: By pressing BT button to enter into the Bluetooth mode directly.Press again to back to current playback mode.2 ) Use the corresponding buttons on the remote control.DVD / USB - once a DVD or USB is inserted into the unit, the unit will automatically switchto display this source menu. Press this function button on the remote control to selectDVD if a disk is already inserted and the unit is playing from another source.AM/FM - by pressing this button on the remote control will scroll through the FM1, FM2, FM3,AM1, AM2.To switch this units AM/FM receiver between USA and Europe frequenciesbutton for 5 seconds until the region is displayedp ress and hold PLAY/PAUSEon the screen.In CD mode, the TITLE/PBC button is disabled.4.7 Terminate the Playback1. Press EJECT button to eject disc.2. Press and hold POWER button on the front panel or briefly pressPOWER button on the remote control to turn off the Stereo.5. Advanced Disc, USB OperationAUX/AV IN-these buttons on the remote control allow you to scroll through the AUX /AV INinputs fitted to the stereo.AUX - connection on the front of the unit (Audio and Video input function)AV IN - connection on the rear of the unit to connect an external audio source3.Volume AdjustRotate VOLUME KNOB clockwise to increase volume, rotate anticlockwise to reducevolume.4. MutePress MUTE button to mute what ever source is playing and display mute on the screen.Press MUTE button again to release unit from mute.5. Clock Set1) To display the clock on the LCD display, press CLOCK button on the remote control2) To adjust or set the clock, press and hold CLOCK button on the remote controluntil the clock set feature is displayed on the LCD display of the stereo then useVOLUME KNOB on the unit or and - on the remote control to adjust the time,push in the volume knob on the stereo or press SEL button on the remote controlto change from setting hours to minutes. Once time is set the stereo will automaticallyset after a few seconds if not pressing any functions.Downloaded from www.Manualslib.com manuals search engine5.1 Playback with SpeedDuring normal playback, Press and holdorbutton onbutton on the remotethe front panel repeatedly or press and hold/control repeatedly to fast backwards or forwards at the followingspeeds: x2, x4, x8,x16, x20, normal.During speed playback, press PLAY/PAUSEplayback.button to resume normal5.2 Playback with Slow SpeedDuring playback , press SLOW FWD button on the remote control to executethe Slow Forward function.With each consecutive pressing of SLOW FWD button, the playbackspeed decreases. The speed levels in Slow Forward as follows:x1/2,,x1/3,x1/4,x1/5,x1/6,1/7,normal.
19164.2 Pause PlaybackWhen playing DVD/VCD/CD/MP4/MP3/WMA discs, press PLAY/ PAUSEbutton on the front panel or remote control to pause the playback, pressPLAY/PAUSEbutton again to resume normal playback.4.3 Stop PlaybackWhen playing DVD/VCD/MP3/WMA/CD discs, press STOP button once topause the playback, then press the PLAY button to resume the normal playback;press STOP button twice to stop the playback, then press PLAY/PAUSEbutton to start playback from the beginning of the first chapter/track.4.4 Select Chapter/Track with theorbutton or/Buttonorbutton on the front panel or/ButtonPresson the remote control during playback to select the previous or next chapter/trackto playback.orbutton or press/ButtonNote: Pressmultiple times to advance multiple chapters/tracks backward or forward .4.5 Select Chapter/Track with the Number ButtonsWhen playing DVD/VCD(PBC OFF)/MP3/WMA/CD discs, press one of the1 9 and the 0 number buttons to directly select and play the 1st to 9th track /chapter.If you want to play the track/chapter with serial number bigger than 9,use the 10 , 1 9 and 0 button. For example 1, to play the 13th track/chapter, firstly press the 10 button once, then press the 3 button. Forexample 2, to play the 34th track/chapter, firstly press the 10 button for 3times, then press the 4 button.Note: pressing and holding the 10 or -10 buttons will allow you to move up ordown 10 tracks at a time(only for MP3/WMA).4.6 Select Chapter/Track with the Root/PBC Menu (If the disc includes theroot/PBC menu)1.2.3.When playing DVD discs:Press TITLE button on the remote control to display the title list.Press the direction buttons to select your desired title, and then press OKor PLAY/PAUSEbutton to open the root menu of the selected title.Press the direction buttons to select your desired chapter, finally press theOK or PLAY/PAUSEbutton to play the selected chapter.During playback, pressing TITLE button on front panel or long pressingTITLE button on the remote can directly display the root menu of the title that isplaying.Downloaded from www.Manualslib.com manuals search engine6. To select a preset EQ modePress and hold EQ button on the front panel or briefly press EQ buttonon the remote control to select the preset music equalizer curves:CINEMA, ROCK, CLASSIC, FLAT. The sound effect will be changed.7. To turn on/off LOUD modePress and hold LOUD button on the remote control to turn on/off LOUDmode.8.To adjust the sound equalizer curvesTo adjust the sound equalizer curves, briefly and repeatedly press SEL button onthe remote control to select the sound equalizer curves of VOL, BAS(withoutpreset EQ), TRE (without preset EQ), BAL,BEEP(ON/OFF), then rotate theVOL KNOB on the front panel or press the and - on the remote control to adjustlevel.9.ZONE A/B BUTTONPressing ZONE A or B button will turn on or off the audio source in each ofthe different areas which your speakers are connected. “ZONE 1 ” or“ZONE 2 ” will display on the LCD once it is selected.10.Press thebutton or TITLE button up to the previous menu.11.To reset the unitWhen the display is incorrect, or the function buttons are not effective orsound is distorted, then use a sharp point to press RESET button, thatwill make the unit be reset to factory default and re-instate the correct functions.
173. Radio Operation1. FREQUENCY SELECTbutton for about 5 seconds toIn RADIO mode. Press and hold PLAY/PAUSEselect your desired frequency EUROPE,USA1 or USA2.2. AM/FM BUTTONIn RADIO mode, press and hold INPUT MODE button on the front panel or briefly pressAM/FM button on the remote control to select your desired radio band of FM1, FM2, FM3,AM1, AM2 , and
manuals search engine. Title: ManualsLib - Makes it easy to find manuals online! . Subject: Search through 700.000 manuals online & and download pdf manuals. Keywords: manuals, instruction manuals, user manuals, service manuals, user guides, pdf manuals, owners manuals, installation guides Created Date: