Transcription
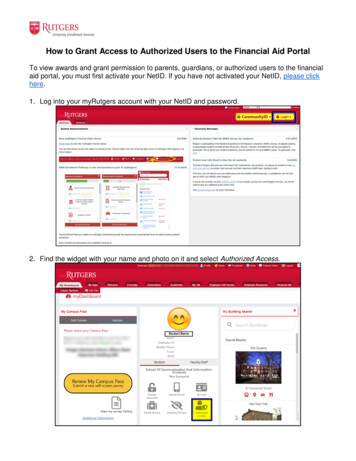
How to Grant Access to Authorized Users to the Financial Aid PortalTo view awards and grant permission to parents, guardians, or authorized users to the financialaid portal, you must first activate your NetID. If you have not activated your NetID, please clickhere.1. Log into your myRutgers account with your NetID and password.2. Find the widget with your name and photo on it and select Authorized Access.
3. This will take you to the “My Authorized Users” page. If you don’t have any authorized usersadded, it will look like this:Note: You can only have 3 active authorized users who can view/modify your account.4. To add a user, click the Add a User button.5. A confirmation message will pop up notifying you that it is your decision who can/cannothave access to your financial aid portal and that you are providing your consent to allowRutgers to disclose information regarding your educational and/or financial aid as authorizedby you in the following screens. Check the box to confirm and then click confirm.Note: If you do not want an authorized user (like a parent/guardian) to have access to yourfinancial aid information, you do not have to add a user and can click cancel.
6. After confirming, you will be directed to the “Add a New Authorized User” form. Fill out theform for the person you are granting access to (their name, email, relationship to you, etc.)and create a 4-digit pin code they will use to verify their identity when calling or visitinguniversity departments for assistance regarding information they have been authorized toview.*Additional relationship fields for authorized users
7. In the dashboard items section, check the box next to “Financial Aid Records,” then decidewhat level of permission you’d like to give your authorized user.a. If you want a parent/guardian to be able to submit and sign documents in the financialaid portal, please grant them custodial access.b. If you want a parent/guardian to have access to only view your financial aid portal, butnot submit or sign documents, please grant them read only access. Note: read onlyaccess does not provide the ability to submit or sign documents.Note: while this guide specifically goes over how to grant access to financial aid records, you can alsoclick any of the other Dashboard Items or Non-Dashboard Items that you wish your authorized user tohave access to.
8. Click Submit.9. This will redirect you back to the “My Authorized Users” page where you will seeconfirmation that your authorized user has been granted access, their 4-digit pin, and,specifically, what they have access to.10. Your authorized user will receive an email with instructions how to create aCommunityID, log into the myGuest dashboard, and how to use their 4-digit pin.
3. This will take you to the "My Authorized Users" page. If you don't have any authorized users added, it will look like this: Note: You can only have 3 active authorized users who can view/modify your account. 4. To add a user, click the Add a User button. 5. A confirmation message will pop up notifying you that it is your decision who .