Transcription
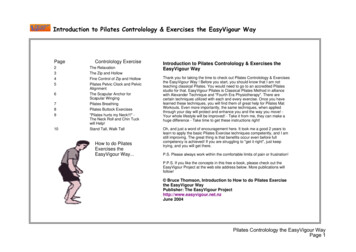
Introduction to Pilates Controlology & Exercises the EasyVigour WayPage2345678910Controlology ExerciseThe RelaxationThe Zip and HollowFine Control of Zip and HollowPilates Pelvic Clock and PelvicAlignmentThe Scapular Anchor forScapular WingingPilates BreathingPilates Buttock Exercises"Pilates hurts my Neck!!!" The Neck Roll and Chin Tuckwill Help!Stand Tall, Walk TallHow to do PilatesExercises theEasyVigour Way.Introduction to Pilates Controlology & Exercises theEasyVigour WayThank you for taking the time to check out Pilates Controlology & Exercisesthe EasyVigour Way ! Before you start, you should know that I am notteaching classical Pilates. You would need to go to an accredited Pilatesstudio for that. EasyVigour Pilates is Classical Pilates Method in alliancewith Alexander Technique and "Fourth Era Physiotherapy". There arecertain techniques utilized with each and every exercise. Once you havelearned these techniques, you will find them of great help for Pilates MatWorkouts. Even more importantly, the same techniques, when appliedthrough your day will protect and enhance you and the way you move! Your whole lifestyle will be improved! - Take it from me, they can make ahuge difference - Take time to get these instructions right!Oh, and just a word of encouragement here. It took me a good 2 years tolearn to apply the basic Pilates Exercise techniques competently, and I amstill improving. The great thing is that benefits occur even before fullcompetency is achieved! If you are struggling to "get it right", just keeptrying, and you will get there.P.S. Please always work within the comfortable limits of pain or frustration!P.P.S. If you like the concepts in this free e-book, please check out theEasyVigour Project at the web site address below. More publications willfollow! Bruce Thomson, Introduction to How to do Pilates Exercisethe EasyVigour WayPublisher: The EasyVigour Projecthttp://www.easyvigour.net.nzJune 2004Pilates Controlology the EasyVigour WayPage 1
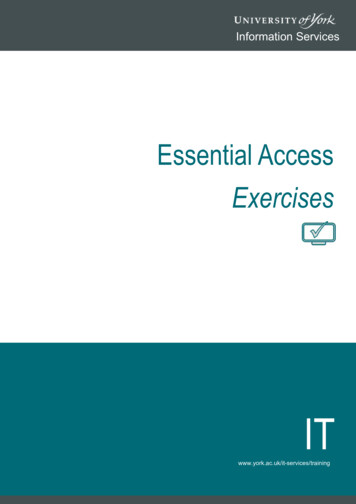
The Relaxation ScriptThe Relaxation Script: Start1.2.3.4.2.3.4.5.6.7.8.9.(Breathing In): Raise your shoulders towardyour ears.(Breathing out): Lower your shoulders towardsyour hips.(Breathing normally): Let your shoulders totallyrelax.Feel your body widen and lengthen.Imagine sand trickling out of your back pockets.Imagine sand trickling out from double pocketson your shirtImagine sand trickling from the middle of theback of your neck.Say quietly to yourself: "There is no tensionfrom my toes. to my tail bone. to the frownon my forehead.Repeat the relaxation exercise as often as youneed to to get the relaxation to occur. Get toknow and enjoy the feeling!(relaxation scripts, Scroll right .)The Alexander Technique, and "Inhibiting"."Inhibiting" is pausing to apply a relaxation script at theprecise moment that you are likely to tense up. It's thatsimple. Take the example of a snooker champion justbefore hitting the ball. He pauses just at the moment ofplay. He "inhibits" unnecessary tension by use of a triedand trusted relaxation script. (He might use therelaxation exercises described above, because they canbe done standing), thus:Lie in the Relaxation Position (see diagram).Use a comfortable mat or carpet.Support your head with a folded up towel orbath mat, about 3 cm thick.Keep your feet and knees in line with your hips,or a little wider if that is more comfortable.Place hands on abdomen (see diagram) Take adeep breath, hold, then release it slowly.The Relaxation Script: Action1.Relaxation Script: PositionWhat the Relaxation Script Does:zzProvides a quick and simple relaxation scriptthat can be applied anywhere.Teaches "posture-movement awareness". Bydoing a relaxation exercise, you are learn to feelthe patterns of muscle tension in the body, andalso the feel of relaxation from tension.Comment on Relaxation TechniquesDoing nothing seems a strange way to learn a newexercise program! Nevertheless, you need a relaxationtechnique! You need to "not do" what is bad and to "do"what is good. "Doing" inappropriate muscle tension whether during rest or while in movement - is definitelybad! Thus a relaxation technique is the first thing youshould apply before any exercise! Indeed you shouldapply a quick relaxation technique before and duringeach and every movement during the day!zzHe "inhibits" unecessary tension.His mind and body tune into each other. This is"posture-movement awareness".He is now ready to do his (Alexander style) "Ordering":those quiet mind to body instructions. For example, hethinks to himself: "Bend at the hips. to achievealignment of pocket. with target ball. with white ball .with que . with eye ." You get the picture!This page introduces you to "inhibiting", or "relaxation atrest and in action". Please review the references below.Relaxation and the "relaxation script" is a very bigsubject, and is worthy of further study.Reference:1.2.3.4.The Official Body Control Pilates Manual Available from:http://www.bodycontrol.co.uk/FM Alexander: The Use of the Self; Orion Paper Backs,Reissued 2001 ISBN 0 75284 391 5John E. Sarno: Healing Back Pain : The Mind-BodyConnectionRelaxation Scriptsrelaxation script, Bruce Thomson EasyVigour ProjectPilates Controlology the EasyVigour WayPage 2
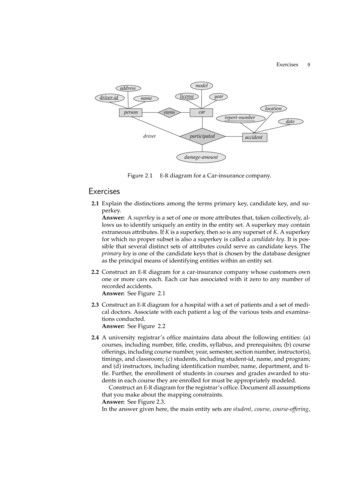
Lumbar stabilization exercises(1): The Zip & HollowThe Zip and Hollow:- Start PositionThe Pilates Zip and HollowStart Position1. Lie on your back in the relaxation positionwith your knees bent toward your chest.2. Put your hands on the area of yourabdomen that would be covered by thefront part of a bikini. (the “bikini patch”.3. Have your thumbs touching at the navel,and your fingers touching at the midline,about 6 cm below the navel.The Zip and Hollow:- Action(Chronic low back pain stabilization exercises, Zip and Hollow,transversus abdominis, Scroll right .)There are four muscles that are major "jointstabilizers" for the lower back:zzzzThe Transversusabdominis:(The Corset Muscle)1. Now imagine that you have to zip into aViewed from the front.Right:very tight pair of jeans: Viewed from the side.Below:2. Hollow the area under you thumbs andfingers toward your spine. There may onlybe a very small movement. (Maintain PelvicNeutral!)3. Now imagine (if it hasn’t aready happened),that the area under your fingers is beingzipped together like that tight pair of jeans!(keep the rest of your body relaxed, andmaintain Pelvic Neutral!)What it does(If you are having trouble making the abovehappen, try leaving just one hand over the “bikinipatch”, and sucking your thumb with the othersuck gently for stage (2), and hard for stage (3)Sounds weird, but it does help!).CommentsThis is an isometric abdominal exercise. Use it throughthe day to facilitate Transversus abdominis protection ofthe lower back - Further reading, refer ref (4).Watch PointsMany Pilates and physiotherapeutic programs promotethe "Zip and Hollow" together with Multifidus activation inchronic low back pain stabilization exercises, but neglectthe other muscles of lumbar stability. That's not good! see comments!The Transversus abdominis(1).The Multifidus(1).The Gluteus maximus, together with its cocontracters(2).The Psoas muscle (part of the "Iliopsoas"muscle group)(3).If you are serious about exercises for low backpain stabilization, you need to learn how toactivate all of these muscles!Reference1.2.3.4.The Official Body Control Pilates Manual Available from:http://www.bodycontrol.co.uk/SGT Gibbons, MJ Comerford, PL nces/Publications/Psaos.htmM Comerford: Interpretation of Modified Force ClosureModel nter%202002.pdfDynamic Lumbar stabilization exercises: Fine Control ofthe Zip and Hollow(Abdominal muscle exercise & chronic low back pain stabilizationexercises: The Zip and Hollow for the transversus abdominis, Bruce Thomson, EasyVigour Project scroll up .Pilates Controlology the EasyVigour WayPage 3
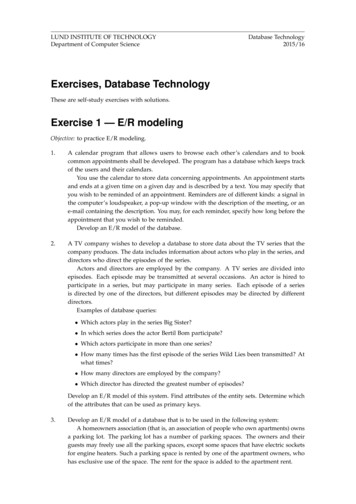
Lumbar stabilization exercises (2): Fine Control of Zip & HollowFine Control of the Zip and Hollow- StartPositionFine Control of Zip & Hollow:-A Dynamic Stabilization Exercise:zzzLie in the Relaxation Position in pelvic neutral.Imagine four buttons along the mid line of yourabdomen:1. On the pubic symphysis.2. Mid-way between the pubic symphysisand the belly button.3. On the belly button.4. Just below the breast bone.CommentsFine Control of the Zip and Hollow- Action1.2.3.4.5.6.7.Applying a gentle zip and hollow throughthe day means that the transvsersusabdominis will automatically trigger whenrequired to dynamically fulfil its role inlumbar stability.Lengthen up through the spine and tuck yourchin slightly.Gently zip and hollow over button 1.Gently zip and hollow from buttons 1 to 2.Gently zip and hollow from button 1 to 3.Gently zip and hollow over the entire mid line ofyour abdomen.Watch Points:Now slowly increase the force of the zip andhollow over the entire length of your abdominalMaintain a relaxed and properly positioned body,mid-line -increase gradually, and keep the restspecifically:of your body relaxed!Now relax back to a gentle level 1 or 2 zip andz Avoid that "tight assed" feel!hollow. Try to maintain this level throughout yourz Don't let the Rectus abdominus (the "washboardday!abs") cut in.z Gently anchor your scapulas!z Maintain Pelvic Neutral.z You should be able to breathe easily.(Dynamic Lumbar stabilization exercises for the lower abdominalmuscles, Scroll right .)(Dynamic Lumbar stabilization for the lower abdominal muscles:100 Bruce Thomson, EasyVigour Project)The most subtle part of the zip and hollow is tocontract the front part of your pelvic floor muscleswithout gripping about the anus or under the tailbone (that's that "tight assed" feel).zzIn women, it should feel like sucking waterup into the vagina!In men, the movement is "raising theurethra" - imagine wading into a very coldriver!Zip and Hollow throughout the day!zzOnce you have mastered the gentle zip andhollow while in the relaxation position, try itlying on your stomach, and standing.During most activities, such as walking,jogging or gardening, you only need to zipand hollow to level 1 or 2.Referencez Pilates Lumbar stabilization exercises (1): The Zip andHollowPilates Controlology the EasyVigour WayPage 4
Pilates Pelvic Clock, Pelvic Alignment ExercisesPelvic Neutral: Start1.What this Exercises do:(1) Relaxation PositionLie down in the Relaxation PositionzzBefore we can find “Pelvic Neutral” alignment, we needto explore the full range of pelvic tilt.Places the joint between the hips and the spine(lumbo-sacral joint) at its mid-point.Teaches the feel of pelvic neutral.CommentPelvic Neutral: ActionzzCaution! Do not push your pelvic tilt beyond the levelof mild discomfort! The first thing we are going to do isexplore the full range of pevic tilt.1.2.3.4.(3) Clock looking(2) Clock LookingImagine there is a clock face attached to thetoward 6front of your pelvis and looking forward.toward 12Make your clock face "look upward" toward yourhead by tilting your pelvis so that 6 o'clock ishigher than 12 o'clock. Hold, and take a coupleof shallow breathes.Now make your pelvic "clock face" lookdownward by tilting your pelvis so that 6 o'clockis below 12 o'clock . Hold and take a couple ofshallow breathes.(4)Clock looking straight aheadNow come back to the centre of your pelvicrange of movement. You should still have asmall natural arch in your back (not quiteenough to get your fingers under). Relax, andget the feel of pelvic neutral into your mind!zYou and your body do not automaticalyknow a joint's strong middle point, but theycan be taught!Further information on Pelvic Alignment Exercises,refer:"Left Looking, or twisted Pelvis"Reference1.The "pelvic clock face" is now looking straight ahead.This is Pelvic Neutral!(Pilates Pelvic Clock & Pelvic Alignment Exercises, Scrollright .)This is the first of the pelvic alignment exercises!The lumbo-sacral joint is one of the mostvulnerable joints in the body. 50% of lumbar discherniations occur at this point!All joints are strongest and least prone todamage at or around their “mid-point”. Thelumbo-sacral joint is no exception to this rule!2.Shirley A Sahrmann: Diagnosis and Treatment ofMovement Impairment Syndromes; Publ. Mosby 2002The Official Body Control Pilates Manual Available from:http://www.bodycontrol.co.uk/ Bruce Thomson EasyVigour Project (scroll up .)Pilates Controlology the EasyVigour WayPage 5
Pilates BreathingBreathing Experiments, Start Position:1.2.3.4.5.Sit in a high backed kitchen or office chair withyour buttock well back in the seat and the leanback so that your back is fully supported.Think "spine lengthen upward".Place your left hand over the left side of your ribcage - thumb touching the ribs at the back, andindex finger touching ribs at the front.Place your right hand over your solar plexus.Now try two different styles of breathing!(1) Chair Sitter's Breathing- Action:1.2.Breathe slowly and deeply. Relax - do nothyperventilate!Which parts move as you breathe? - Yourabdomen? - Perhaps the front of your chest?(2) Pilates Breathing (Back & SidesBreathing):1.2.3.Gently zip and hollow your lower abdomen.(refer "Zip and Hollow" and "Zip, Fine Control").Breathe slowly and deeply, through your noseand stay relaxed - again, do not hyperventilate!Which parts move as you breathe now? Yourupper abdomen? The sides of your chest?Possibly also the ribs at the back of your chestare now also moving?(3) Pilates BreathingTechnique: Wringing thebreathe out:Place your fingers as in thelower two diagrams. This willalow you to monitor themovement of your ribs justbelow the sternum. Take adeep breathe in, and note theexpansion between yourfingers. Now breathe out, andnote the decreased gapbetween your fingers. Pauseand wring the breathe out byclosing the gap between yourfingers further, and afteranother pause, do it again!Why do Pilates StyleBreathing?:Pilates himself had asthma asa child, and he adapted thisstyle of breathing from yoga(7,8). Back and sidesbreathing is alsorecommended by AlexanderTeachers(6). Simple enough toteach as breathing exercisesfor both children and seniorswith asthma.(pilates breathing exercises, scroll right )It also promotes spinal stability. See followingdiscussion, also page 26.Pilates Breathing Stabilizes your LumbarSpine.Refer back to your experience when you tried "ChairSitter's Breathing". When you breathed in, you noticedthat your rib cage tilted so as to "look upward" and thatyour mid spine (the middle of your back) arched. Canyou understand how a deep breath can push yourmiddle spine outside of its strong middle range, & howPilates breathing can stop that? - Here are examples:-(1) Pilates Breathing brings Control andPoise to Professional Singers:At an amateur singing competition, contestants werereminded not to move shoulders and arms whilebreathing in - You wouldn't see Pavarotti doing that, norwould you see Pilates do it!(2) Pilates Breathing brings Control andStability to those who Run:20 years ago I trained hard for a half marathon. I nevermade it. I developed mid and lower back pain withsensory loss to the side of my foot - signs of L5-S1 discprotrusion. For many years after that, my mid lumbarspine felt vulnerable if I took deep breaths duringrunning. Pilates breathing fixed that - I don't feelvulnerable nowadays.Reference:1.2.3.4.The Official Body Control Pilates Manual Available from:http://www.bodycontrol.co.uk/Wilfred Barlow: "The Alexander Principle" Arrow BooksLtd. Reprinted 1987 ISBN 0 09 910160 2ABC of Yoga.com: Advanced Breathing TechniquesBiography of Joseph Pilates Bruce Thomson EasyVigour Project scroll up .Pilates Controlology the EasyVigour WayPage 6
Buttocks ExercisesButtocks Exercises(1) While Standing, StartPosition:-Buttocks Exercises(2) At "Heel Strike":1.1.2.3.Stand upright and relaxed with your feet hipwidth apart and your toes pointing slightlyoutwards and unlock your knees.Your pelvis should be in "neutral".Gently zip and hollow your lower abdomen.2.Stand as for "Engage Gluteus maximus whileStanding".Start walking: Each time your foot lands, engageyour Gluteus maximus on that side.Buttocks Exercises(3) Walking on SharpPebblesAction:1.1.Tense your gluteals, & hold for 3 seconds - youcan check that the Gluteus maximus hasengaged by placing a hand over the relevantarea (see picture below) - repeat 3-5 times.2.Monitoring for Gluteal EngagementGluteal AnatomyMonitoring GluteusactivityMake sure that you are in bare feet, and imaginethat you are walking on sharp, painful pebbles!You should find that { Your foot lands very gently!{ Heal and toe land at the same time!{ Knee over foot, not behind it!Pause just after your foot has landed and at themoment that you are standing on one foot, andtake note whether your Gluteus maximus isengaging! - (2-4 minutes is a good workout).Buttocks Exercises(4) While bare FootRunning on Tar Seal:(Not for the faint hearted!) Engage the Gluteus maximusas the foot touches the ground, and land your footquietly, with the knees and hips bending a little morethan you are used to. Your knees should not collapseinwards: The kneecap looks straight over the second toeof your foot. One minute to start with: don't overdo it!Solve your lower back pain! - Learn towalk like the Kalahari Bushman.Comment (1) - What Gluteus maximusContraction Does:It takes rough surface walking to "trigger" the latentstabilizing power of the Gluteus. With "Walking onSharp Pebbles", you will have noticed that your Gluteusmaximus tended to engage, your knees tended not tocollapse inwards, and your foot arches found it easy toform just as they are supposed to. Modern shoeing andsmooth sidewalks have taken away this natural"buttocks firming" stimulus. Worse still, the "lazyGluteus" is even lazier when the back is sore or theankle is sprained(3). The laziness of this lower back &hip stabilizer is a disaster for modern musculo-skeletalhealth(1,2). Hence the need for Gluteus maximusengagement with exercises to firm the buttocks!Comment (2) - Buttocks firming is definitelypart of the traditional Pilates workout! - just listen to Mari Winsor in her phenomenallysuccessful Pilates Video Series ('Sculpt your BodySlim') as she describes the Roll Up: ("Squeeze yourtushe and engage your power house"!)Comment (3): The Gluteus maximus is adynamic stabilizer! Only engage the Gluteus maximus at heel strike, whensquatting, bending forward or climbing stairs! Keep itrelaxed at all other times.1.2.3.Shirley A Sahrman: "Movement Impairment Syndromes"Publ. Mosby, 2002 ISBN 0-8016-7205-8Bruce Thomson: Engage Gluteus maximus!Bullock-Saxton JE; Janda V; Bullock MI:Int J Sports Med1994; 15 (6) Aug: 330–334(Exercises, thighs, buttocks, & Bruce Thomson, EasyVigourProject)(Walking exercises thighs as well as buttocks Scroll right .)Pilates Controlology the EasyVigour WayPage 7
The Scapular Anchor for Scapular WingingThe Scapular Anchor:- Start Position1.2.3.Stand relaxed and point with your arm at a spoton the floor about one meter in front of yourfeet.While relaxing your right shoulder, let your armelongate toward the spot on the floor.Reach your left hand up behind your back andtouch the lower left corner of your right shoulderblade. It should be easy to find because it willbe sticking out from your back (this is calledscapular winging).The ScapularAnchor inPictures:- StartPosition andActionComment: Management of ScapularWinging: This exercise works the "ScapularAnchors": The Lower Trapezius & the Serratus anterior.These muscles are often weak, causing the shoulderblade to be poorly positioned. Poor shoulder bladepositioning contributes to muscle strains & rotator cuffinjuries(1). Use your scapular anchors throughout theday! - Your shoulder muscles will perform better, & youwill save yourself a lot of pain!.Pictures: Top Row - Scapular winging - the corner ofPictures: Left - The lower trapezius. Right - Thethe scapular has lifted away from the underlying ribs.Bottomn row - Scapular winging corrected.Serratus anterior (viewed from the front).The Scapular Anchor:- Action1.2.3.4.While continuing to point at the spot on thefloor, attempt to bring the lower left corner ofyour shoulder blade back close to your back.You will have to work hard to do this.Point at a spot on the floor 45 degrees to theright of your feet, and hold the lower left point ofyour shoulder blade close to your back. Use theleast amount of muscle tension that will do this.Bring your right arm back down to your side, &hold the lower left point of your shoulder bladeclose to your back. Use the least amount ofmuscle tension that will do this. This shouldtake very little effort.As a final check, use your left hand to checkthat your right Latissimus dorsi is relaxed.(Exercises alone will not fix or prevent scapular winging & roundshoulders - you need to become "posturally aware" as well. Insevere cases of scapular winging, there may be a surgicallytreatable nerve deficit - see ref (2) - Scroll right .)Pictures: Left - The Latissimus dorsi. Right - How tolocate the Latissimus dorsi.Reference1. Shirley A Sahrmann: Diagnosis of and Treatment of MovementImpairment Syndromes Publ. Mosby 20022. Steven Fromm: Treatment, Management, Pictures, ScapularWinging http://freespace.virgin.net/steven.fromm/ Bruce Thomson, EasyVigour Project scroll up .Pilates Controlology the EasyVigour WayPage 8
"Pilates hurts my Neck!!!" - The Neck Roll and Chin Tuck will Help!The Neck Roll and Chin Tuck:- StartPosition1.2.3.The Neck Roll and Chin Tuck:- Action2.3.4.Place the "Buddha" or "Mona Lisa" smile onyour face, let your tongue widen at its base andyour neck gently lengthen at the back.Let your shoulder blades melt into the floor. Acouple of slow deep breaths will aid this.Now slowly roll your head. First to the right,then slowly to the left.Repeat a few times.Once your neck is free:1.2.Start PositionNeck RollChin TuckLie in the relaxation position, knees bent andarm resting on lower abdomen.Gently anchor the scapulas.You may use a thin pillow under your head, buttry not to.First relax and free up your neck:1.The Chin Tuck:Bring your head to the centre.Tuck your chin in. Keep your head on the floorand let the back of your neck lengthen. Imagineyou are holding a ripe peach under your chin.This is a small, relaxed and subtle movement.Comment: Take a side view look at yourself!zzzDiagram left: a tucked chin, but the back of theneck is shortened - typical of the "pompouslawyer".Diagram Middle: a relaxed chin and headprojected forward - typical of the hump backed"dowager widow".Diagram right: a gently tucked chin with necklengthening upwards. This is the ideal "strongmiddle positioning" of head and neck! Lessthan 10% of people achieve this(47,48).Diagrams of Head and Neck Positioning:Head "Back andDown"Head "Forwardand Down"Head "Forwardand Up""But Pilates Hurts myNeck!".Don't be discouraged.Pilates is wonderful forfinding weaknesses, andeven sports pro's find Pilatesdifficult to start with. Here arethree suggestions:(1) During the moves thathurt, keep you head restingon the floor (diagram 1).(2) After class, gently workon the sore neck by doingthe "chin tuck and lookbetween knees" by itself as aPilates exercise (diagram 3).(3) During your day, avoid"head forward and down".For example, when bringinga soup spoon to your mouth,bend at your hips to let yourwhole torso come forward,lengthen your neck & tuckyour chin.("Pilates hurts my Neck!" - scroll right .)modified Pilates 100 when your neck hurts,keep your head on thefloor!Diagram 2: Not thisway!Diagram 3: The safechin tuck!Reference1.2.You are now ready to perform the Pilates One Hundredwith the head and neck in best positioning and withminimum tension!Diagram 1: The3.Joseph Ventura: POSTURE.pdf; A document bundledwith trial software available from:http://www.posturepro.com/PPweb/ itm00001.htmF Matthias Alexander: The Use of the Self; Orion PaperBacks, Reissued 2001 ISBN 0 75284 391 5Shirley A Sahrmann: Diagnosis and Treatment ofMovement Impairment Syndromes; Publ. Mosby 2002Chin tucks and "Pilates hurts my neck" Bruce Thomson,EasyVigour ProjectPilates Controlology the EasyVigour WayPage 9
Stand Tall, Walk TallThis exercise is presented at the end of the Introductionto EasyVigour Pilates, but would fit just as well in amanual of training for How to do the AlexanderTechnique. For extra information, try this search (alsoreference "4" at the end of this page) -Alexander Technique, Releasing andLengthening TallerStand Tall, Walk Tall:Start Position:(Note the "forward and down" position ofthe subject's head! He needs to readitem (2) in the start position notes! - readalso the exercise: The Chin Tuck!Stand Tall, Walk Tall - Start Position :1.2.3.4.5.6.7.8.9.Like all Pilates exercises, do this bare foot!Imagine that there is a buoyancy balloon in yourhead located above and between your ears. Letthe balloon elongate your neck away from youshoulders. Feel the back of your neck elongate& your chin tuck slightly.Anchor your scapulas."Attach" an imaginary weight to your tailbone.Your spine is now elongating between aweighted tail bone and a "lighter than air" skull.Your back still keeps its natural curve. Yourpelvis should be in "neutral".Gently zip and hollow your lower abdomen.Gently engage your Gluteus maximus musclesUnlock your knees, and check in the mirror thatthe knee caps are not pointing inwards.Place your feet hip width apart with the insidesof your feet parallel.Let your foot arches form by pushing your toes& the balls of your toes firmly toward theground.(do Alexander Technique, Alexander Technique, Releasing andLengthening Taller, Scroll right .)Action (Swayback):In this example, the person is notengaging the gluteal muscles.CommentsIn fact, it will take a course of EasyVigour PilatesExercises and Instructions to achieve the walk tallinstructions!When I started to develop the EasyVigour Pilatesmethod, I had all the faults (and more!) that arepictured to the left. Running and Power walking feltrough. I was carrying a lot of pain. The EasyVigourPilates method has changed that. I hope that themethod can help you too!What it doeszMakes walking as smooth and effortless asdriving a Citroen car!ReferenceAction (Much Improved):- In thisexample, the person is engaging thegluteals at heal strike, and is well on theway to "Releasing and LengtheningTaller" but is still somewhat tense.Stand Tall, Walk Tall:- Action1.2.3.Try to do all the "stand tall" instructions whilewalking!Also make sure that the knee comes forward withthe lower leg and Tensor fascia lata muscletotally relaxed!Impossible isn't it! -1.2.3.4.B I Kodisch: Back Pain Solutions: How to help Yourselfwith Posture-Movement Therapy and EducationPubl.Extensional Publ. Pasadena, Ca 2001 ISBN 09700664-5-7Bruce Thomson: OBP of Tennis ElbowB & W Conarble: How to Learn the Alexander Technique,3rd ed. Publ. Andover Press, PO Box 6838 OH 43205ISBN 0-9622595-4-3Philip Goddard: THE ALEXANDER TECHNIQUE A briefguide to the basics(do Alexander Technique, Alexander Technique Releasing andLengthening Taller) Bruce Thomson, EasyVigour Project scroll up .Pilates Controlology the EasyVigour WayPage 10
higher than 12 o'clock. Hold, and take a couple of shallow breathes. 3. Now make your pelvic "clock face" look downward by tilting your pelvis so that 6 o'clock is below 12 o'clock . Hold and take a couple of shallow breathes. 4. Now come back to the centre