Transcription
PolaroidSONAROneStepSX-70LandCamera
Polaroid introduces sonarfocusing-the ultimate inone-step photographyThat unexpected moment, thatperiect smile, will never again belost whi Ie you pause to set the lens.The instant you see you r picture,just aim and shoot. With sonarfocusing, the camera sets the lensinstantly, automatically.Now, nothing interieres with seeingthe shot and taking it.(See "How sonar focusing works "inside this foldout.)2
How sonar focusing worksAs you beg in to press the shutterbutton, your camera releases soundwaves to the central part of the scene(approximate area marked in blue).The frequencies are far beyond ourrange of hearing and travel at thespeed of sou nd (1 ,100 feet persecond).The split second it takes for thesound to reach your subject andthe echo to return is fed into a tinyelectronic computer inside thecamera.The computer uses this time measurement to calculate the distancebetween the camera lens and yoursubject, then signals a motor to turnthe lens until your subject is insharp focus .This extraordinary chain of eventstakes place in less than 113 of asecond . . echo returns to camera .- - Total Time34
ContentsCall us, freePlease spend a few minutesreading this·booklet. It could meanthe difference between takingconsistently good pictures ordisappointing ones.If you ever have a question aboutyour camera or your pictures, callus toll free .366781011How sonar focusing worksFilm and flashFeaturesTo open and close the cameraCamera partsTo load the filmTo hold the camera12 How sonar focusing lets you"preview" the picture13 To aim and shoot14 Use flash for mostindoor pictures15 Watch for your camera's " useflash or tripod" indicator16 You can use flash in daylight18 Indoor flash hints20 Daylight picture hints24 Close-ups25 Time exposures26 Tips on outdoor lighting28 To set the lens manually31 Need help? Call CustomerSeNice32 Troubleshooting38 Care of your system39 Electronic flash40 Accessories40 Copies and enlargements41 Full warranty800-225-1384from anywhere in the continentalU.S.A. except Massachusetts andAlaska. From those states , call collect- (617) 864 -4568. In Canada,call toll free-800-261-6970. OurCustomer SeNice representativescan be reached every weekdayfrom 8 a.m. to 5 p.m., your local time.5
Film and flashFeaturesYour camera uses Polaroid SX-70Land film and FlashBars. Each filmpack provides ten color picturesand contains a battery that powersthe camera. Each FlashBar hasten bulbs.New with sonar focusing: Automatic and precise focusingin any light, even total darkness.You'll never waste a flash or filmwith this camera. It will not let abulb fire when a film pack is emptyand will not take a picture whenall the bulbs on one side of theFlashBar have been fired. Yourcamera also finds the next goodbulb in a partly used FlashBar.Please read the important electronic flash statement on page 39.--.POLAROID SX·70 LAND FILM Can "preview" before you shootto see what you'll get in thefinished picture. Built-in "use flash ortripod"indicator.Standard with SX-70: Through-the-Iens viewing. Automatic exposure control fordaylight and flash pictures. Pictures from 10.4 inches toinfinity (flash to 20 feet). Can shoot as fast as every1.5 seconds. 4-element, 116mm, precisionglass lens. Variable aperture from f/8 to f/74. Variable shutter speed from 1/180second to 14 seconds or more. Flash in daylight to eliminateshadows. Automatic time exposures to14 seconds or more.6
To open and closethe cameraOpening: Hold the camera in thepalm of your left hand. Lift the thinend of the viewfinder cap and pull itstraight up until the cover support(A) locks.Closing: Push the cover supporttoward the rear of the camera. Pressdown on the viewfinder cap untilboth sides of the camera latch.37
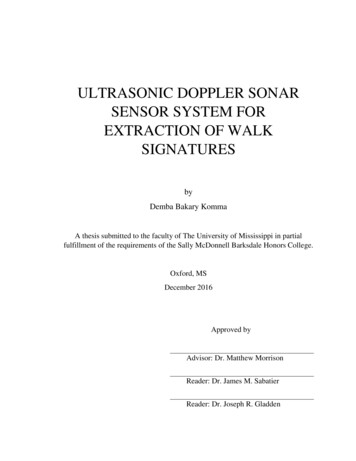
Camera parts1 FlashBar socket8 Picture exit slot2 Transducer(sends the soundwaves and receives theecho)9 Sensor(for the "use flash ortripod" indicator insidethe viewfinder)3 Manual focus switch4 Manual focus wheel5 Shutter button6 Lens(4 element, 116mm, f/8)10 Lighten/Darken control(use only in speciallighting situations;see page 26)11 Electric eye12 Film door7 Distance scale23495101188
13 Viewfinder cap17 Remote shutterbutton connector14 Viewfinder eyepiece15 Neckstrap connectors (follow theinstructions on theneckstrap sleeve)16 Picture counter(goes to 10whenyou load a new orpartly used filmpack into the camera;counts down to showhow many picturesare left)18 Yellow bar(opens film door)19 Tripod socket(is on the bottom ofthe camera; acceptsa standard tripodscrew)1718199
To load the filmPush down on the yellow bar (A).The film door will drop open.Hold the film pack by its edgesonly. (Gripping the pack above andbelow the yellow tab may damagethe film.)Push the film pack into the camerauntil the narrow strip (8) snapsopen. Close the film door. Thecamera will eject the film cover.To remove an empty pack. pullthe yellow tab.8
To hold the cameraGrip it firmly in the palm of yourleft hand. thumb and fingers behindthe hinge (A).Place your right thumb on the semicircle. index finger on the shutterbutton. and curl the other fingersinto your palm.It's important to hold the cameraas shown. Then. when you squeezethe shutter button, your fingers wi IInot press against the bellows orblock the picture exit slot in front.11
How sonar focusing letsyou "preview" the pictureTo familiarize yourself with sonarfocusing and "previewing," standa few feet from your subject. Thenlook through the viewfinder. Noticethat the scene appears unsharp.What you now see in the viewfinderis a "preview" of what the finishedpicture will look like. If it isn't exactlywhat you want, release the button,change position or camera angle,then lightly press again for another" preview" When you're ready toshoot, hold steady and squeezethe button all the way.Lightly press the shutter button partway and hold it there. You'll hear abrief whirring sound as the lensbrings your subject into sharp view."Previewing" helps you to plan a(If film is ejected, you pressed toohard and accidentally took a picture.) picture carefully. For qu ick snapshots, however, there's no need tohesitate. Just aim and shoot as described on the opposite page.12
To aim and shootBring your eye close to the viewfinder eyepiece so you can see allfour corners of the black frameinside.Squeeze the shutter button allthe way. Hold the camera steadyuntil the film is ejected.Remove and handle the developingpicture by its wide white border.13
Use flash for most indoorpicturesInsert a FlashBar into the FlashBarsocket. Always do this with thecamera pointing away from you .Indoors, you can take flash picturesof subjects 10.4 inches to 20 feetfrom the camera.14You'll get particularly good flashpictures of people when they are4 to 6 feet away and near a colorfulbackground.Flash pictures should not betaken where the atmospherecontains gases or dust that maybe ignited by a spark.
Watch for your camera's"use flash or tripod" indicatorWhen you're not using flash , a redlight may appear in the right side ofthe viewfinder as you beg in to pressthe shutter button.If you see the red light. release theshutter button . Then use flash orplace the camera on a tripod for atime exposure.It warns that the lighting on thescene is not bright enough forhand-held picture taking . Outdoors,the red light will most likely appearwhen it is heavily overcast. at duskor when you're shooting in a shadedarea. It will also appear indoors inmost room lighting15
You can use flashin daylightThis exciting feature, called"fill-flash," can correct lightingsituations that might otherwise haveproduced disappointing results.Although you can use "fill-flash"when your subjects are 4 to 12 feetfrom the camera, you'll get particularly good results when theyare 4 to 6 feet away.Here are the typical ways "fill-flash"can help in daylight:Strong sunlight can create harshfacial shadows. Flash can fill in theshadowed areas with even, flattering light.Your subject may be forced tosquint when facing bright sunlight.To get the natural expression youwant , take your subject out of directsunlight and use "fill-flash."When the sun is behind your subject (but not shining directly intothe lens), your subject usually willbe too dark in the picture. "Fill-flash"can provide the added light yoursubject needs.16
Indoor flash hintsWatch the backgroundTo assure that it will be well litby the flash, the background shouldbe colorful and near your subject.When the background is dark, orfar behind your subject, or beyondthe flash range, it will be too darkin the picture18
Arrange groups carefullyAll the people in a group should beabout the same distance from thecamera. Then everyone will be litevenly by the flash.To avoid a flash reflectionWhen shooting toward a reflectiveobject or background (mirror. window, eyeglasses, etc.). stand toone side of your subject and shootfrom an angle to avoid a flashreflection in the picture (see below) .However, when the reflective surface is smooth and flat and is thecentral part of your main subject(glass enclosed art, wall hanging.etc.), shooting at an angle maycause the sound waves to reflectaway from the camera . If this happens, the lens will be set incorrectlyand your picture may be unsharp.To avoid this, you can set the lensmanually (see page 28)19
Daylight picture hintsIt's easy to take beautiful daylightpictures. Just keep these pointsin mind : In bright sunlight, stand so thesun is behind you or to the side. Move in close. You'l l get part icularly good results when yoursubject is about 4 to 5 feet fromthe camera. Then important detailsfill the picture and backgroundsare less distra cting. Don 'l just wait for a specialoccasion. Photograph your subjects when they least expect it.Your ca mera is perfect for th istype of shot- just aim and shoot.20
, Save action pictures for bright.sunl it days Then your camera 'sshutter will work at top speed . Andfor best results, have your subjects move toward you rather thanac ross the picture Give your subjects something todo. Then they'll feel relaxed, notstiff or posed.21
Daylight picture hints continued You don 't always need directsunlight to get great results. Thisportrait was taken on a brightovercast day. Since the light isdiffused , shadows are soft, makingit a flattering light for close-ups. Include color. Use props. Ask .your subjects to wear bold , solidcolors or pose them near a colorful background. When shooting scenics, includesomething in the foreground toserve as a natural frame orto showdepth or scale. Watch the background. It shouldcomplement your subjects, notdistract from them. Keep it simple.22
Close-upsYour camera is designed to opena new world of beautiful , excitingclose-up pictures. You can takethem in daylight or with flash and noother camera does it so easi Iy.With no accessories , you can comeas close as 10.4 inches. Picturestaken at that distance wi II show yoursubject at half its actual size.For medium close-ups (pets,children, etc), look through theviewfinder and as you move inclose, lightly press the shutlerbutton partway several times to" preview" the picture at various distances . When you see the pictureyou want, just press the button allthe way.To shoot at the closest possible distance , look through the viewfinderand come closer to your subject than10.4 inches. Lightly press the shutter button partway and hold it there .You 'll hear the camera set the lensfor 10.4 inches.Move the camera back and forthunti l your subject is as sharp andclear as possible. When it is, pressthe button all the way to take thepicture.To avoid possible discomfort fromthe flash , extreme close-ups ofpeople should be made in naturallight rather than with flash.24
Time exposuresYour camera can make automatictime exposures up to 14 secondsor more.Keep the camera steady by placingit on a firm support-a tripod is best-and use the Polaroid RemoteShutter Button #112. The tripodsocket is on the bottom of the camera .To take the picture, press the shutterbutton for at least a second ; thenrelease it. The camera will do therest.For best re su lts indoors, stand sobright I ig hts are beh ind you or tothe side.Although pictures taken indoorswithout fla sh may not faithfullyreprodu ce the colors of the subject,they often have a charm and beautyall their own .25
Tips on outdoor lightingOutdoors, your camera's electriceye controls the lens opening andshutter speed to let just the rightamount of Iight reach the fi 1m.The electric eye works best whenthe scene is evenly lit. It can be"fooled" by uneven lighting asdescribed below.Bright backgrounds: Wh ite wall ,sw imming poo l, beach or snowscenes, etc .When a bright background is alarge part of the scene and reflectsmore I ight than your subject. theelectric eye sets the camera for thebackground causing your subjectto appear too dark in the picture(top right)You can do one of two things beforetaking the picture: move closer to your subjec t to reduce the effect of the background(bottom right) turn the Lighten/Darken controltoward Lighten (shown below) tolighten your subject.\)'''i' l(Sett ing : 1 mark toward Lighten)26
Dark backgrounds: Green foliage ,dark wall . etc .When a dark background is a largepart of the scene and reflects lesslight than your subject, the electriceye will again set the camera forthe background. Now. your subjectmay appear too light (top right).(Setting: 1 mark toward Darken)
To set the lens manuallyA few special situations call forsetting the lens manually:subject appears unsharp in theviewfinder, set the lens manually . When shooting straight on throughglass, it will block the soundwaves from reaching your subject.The lens will focus on the glassand your subject may appearfuzzy. Screens or bars couldcause the same result.To set the lens manually: Pressthe bottom of the manual focusswitch (A) Then use the manualfocus wheel (B) as described onthe opposite page. When shooting at an angletoward a flat, smooth surface(glass enclosed art, wall hanging,etc.), the sound waves may reflectaway from the camera causingthe lens to be set incorrectly.The red bar on top of the switchsignals that you've disconnectedthe sonar focusing system. Toreactivate it, press the top of theswitch or close the camera. Thelens will reset itself for sonarfocusing.Before shooting in these situations,lightly squeeze the shutter buttonpartway and hold it there . If your000000000000000 o o o:?ooooooooo 00000000000000000000A-- :::::iiiiiiiiiiIB --- r::::::::: 1IiII28.,
To use the focus wheel: Look atthe most important part of the scene.Roll the focus wheel all the way inone direction, then all the way inthe other. Notice that the imagechanges from fuzzy to sharp andback to fuzzy.Return the wheel to the point whereyour subject began to look sharpand clear. Now roll it a bit in eachdirection until you're sure yoursubject is as sharp and clear aspossible. You can check your abilityto focus accurately by comparingthe setting on the distance scalearound the lens with the actualcamera-to-subject distance.29
30
Need help? Call CustomerServiceII you ever have a question aboutyour camera or your pictures, callus toll Iree . .800-225-1384Irom anywhere in the continentalU.S.A. except Massachusetts andAlaska. From those states, call collect - (617) 864-4568. In Canada,call toll Iree-800-261-6970. OurCustomer Service representativescan be reached every weekdayIrom 8 a.m. to 5 p.m., your local time.Or, write to Polaroid Corporation,Customer Service, Cambridge,Mass. 02139, or to Customer Serviceat any 01 the locations I isted onthe back cover. Include your address, phone number and cameramodel.All our Service Centers offer walk-inservice, too, including while-youwait repairs in most cases. II youcan get to us easily, bring yourcamera and pictures in.31
TroubleshootingRepeated spots: If a repeatedspot or bar pattern appears on thepicture, the rollers inside the cameraneed cleaning.It's best to check the rollers eachtime you load film.To clean the rollers: In dim light,open the film door and depress thelight shield (A). Rotate the rollers(8). Remove any specks of dirt witha clean, lint-free cloth, moistenedwith water if necessary. Check theraised ends (C) on the top roller;dirt can collect there too.Should you need to clean thepicture exit slot (0), insert a stiffpiece of paper (like the fi 1m cover)in front of the rollers and under thelight shield. Push, until it comes outthe picture exit slot.32o8A
Part of the picture is missing:This happens when you damagethe film by squeezing the packabove and below the yellow tab . Asyou load the camera, remember tohold the fi lm pack by its edgesPart of the picture is fogged: Ifyou press again st the bellows whil etaking a picture, you may block themovement of parts inside thecame ra. The next picture you takecould be partially or totally wh ite orcould have streaky light patterns.Hold the camera as shown onpage 11.33
Fuzzy pictures can be caused by .Moving the camera during picture taking . It is important to holdthe camera steady until the filmis ejected from the camera.2 Shooting through glass. Theglass will block the sound wavesfrom reaching your subject andthe lens will focus on the glass.Set the lens manually (seepage 28) .3 The sound waves striking a foreground object and noi reachingyour subject. As you press theshutter button, the sound wavestravel to the central part of thescene (see page 3). Be sure theyhave a clear path to your subject.4 Taking a picture in dim light.When the red light appears inthe right side of the viewfinder,remember to use flash or take atime exposure (see page 15).5 Your subject moving duringpicture taking. You'll get the bestaction pictures when your subject is moving toward you , ratherthan across the picture.6 Shooting at an angle toward asmooth, flat surface. The soundwaves have reflected away fromthe camera. Set the lens manually (see page 28).34
If the camera doesn't eject thefilm cover or film The battery in your film packmay be dead or weak. Try a freshpack. If the film cover doesn'tcome out of the second pack, thecamera may need repair. See thenext page. If you press the shutter button fora flash picture and nothing happens, all the bulbs on the frontside of the FlashBar may havebeen fired. Change the FlashBar.If the camera doesn 't work whenan unused side faces front, turnthe FlashBar around or insert anew one. If it works then, one sideof the FlashBar was defective. Ifyou have any questions. pleasecall Customer Service (seepage 31). If the camera sets the lens but thefilm does not come out; or if thecamera does not reset the lenspast infinity (00) when you releasethe shutter button. close thecamera then reopen it. The jamshould clear.36If the camera stops during a cycleIn rare cases, the camera maystop in the middle of an operatingcycle. When this happens, you maynot be able to close the camerafully. Never try to force it shut.There are two reasons why thecamera may stop. One is jabbingat the shutter button instead ofholding it until the film comes out.The remedy is simple-squeezethe button again and hold it. If thecamera still doesn't complete itscycle, open the film door in dimI ight. pull the pack out about aninch, push it in again and closethe door. The counter will reset to10. The camera should completeits cycle. ejecting the top piece offilm , which will have been exposed .The other reason is that the batteryin the fi 1m pack is weak. Test this byinserting an empty pack if possible.ora new one.If you insert a fresh pack, the filmcover may be partly ejected preventing the door from closing . Remove it and close the door. If youcan close the door but the cover isejected part way. open the door andremove the cover by turning therollers forward. Never try to forcethe cover through the rollers withoutfirst opening the door.
If your camera needs repairIf you believe your camera needsrepair, before you send it to usplease call Customer SeNice (seepage 31) and explain the problem.We just may be able to save you thetime and trouble of returning it.Your Polaroid Land camera dealerwi II be happy to return your camerafor repair. Or if you prefer, you maybring the camera to a PolaroidSeNice Center, which offers walk-inseNice. Many repairs can be madewhile you wait. You can also talk toour representatives about any picture problems you may have.Film replacementReturn any film pack that has adead or weak battery to Polaroid orto your dealer, and we will replaceit - provided the fi 1m has not passedthe expiration date on its box.If you're taking your cameraoutside the U.S.A.Try to anticipate your needs andtake along an adequate supply ofSX-70 film and FlashBars. Or, beforeleaving, check with the nearestPolaroid Customer SeNice officefor places of supply in othercountries.Or, you may mail the camera toPolaroid for repairs. Pack it carefully. Address it to the nearestPolaroid SeNice Center (see backcover). Send it by insured parcelpost. To make it easier we will , atyour request, send a sturdy preaddressed shipping carton to youanywhere in the U.SAWhen returning your camera, besure to include a note clearlydescribing the camera problemand, if you can, sample pictureswhich illustrate it.Polaroid SeNice Centers try to givethe fastest possible seNice andhighest quality workmanship. Thegoal is to repair and ship all comeras within five working days.Depending on distance and mailseNice, you can expect to haveyour camera back in 10 to 14 days.37
Care of your systemThe cameraTreat your camera with care. Roughhandling may damage delicateparts. Keep the camera closed whennot in use. The lens and viewfinderwill seldom need cleaning. If theydo, blow off any dust, then wipethem gently with a clean, lint-freecloth. From time to time, clean therollers inside the film door with asimilar cloth, moistened with waterif necessary (see page 32).The filmPolaroid SX-70 Land film, like allfilm, should be kept cool. If possible,store below 75 F (24"C). For longerstorage, keep below 65 F (18"C). Inits sealed box, the film can berefrigerated (not frozen). Let itreach room temperature beforeusing it. This will take at least anhour.To preserve its freshness, keep thefilm sealed in its protective boxuntil ready for use. Then, take thesame care of a loaded camera asyou do your film. Keep the camerain a cool place (but not in arefrigerator).38The picturesWhen your developing picturecomes out of the camera, handle itby its wide white border. Don'tbend, crush or fold the picture.Don't cut the picture's borders, thiscan ruin the picture.The brilliant pictures made withyour SX-70 system are among themost stable and resistant to fadingever known in photography.Fingerprints on your pictures canbe easily removed. Simply "mist"the surface with your breath, thenpolish lightly with a tissue or a softclean cloth.
Electronic flashYour camera was designed to useFlashBars and with a FlashBar it willproduce well exposed pictures overthe full flash range from about 10 in.to 20 ft.Because of the special electroniccircuitry in SONAR OneStep cameras,an electronic flash unit must havematching electronic characteristicsin order to give good picture resultswith this camera.As of August, 1978, such electronicflash units were not available.However, it is expected that unitsdesigned to give excellent resultswith SONAR OneStep cameras (overa shorter flash range) wi II be marketed in the near future.Polaroid Customer Service willhave a I ist of electronic flash un itsdesigned to work with SONAR OneStep cameras and you can get thisinformation by calling toll free (seepage 31) .Electronic flash units other thanthose listed by Customer Servicemay not give consistently goodresults and may cause SONAROneStep cameras to malfunction.There is a general rule that appliesto any electron ic flash unit. If you getpoor picture results with it, try aFlashBar. If you get good pictureswith a FlashBar, but not with electronic flash , the cause of the problemis the electronic flash, not the cameraor the film.39
AccessoriesPicture taking can be even morefun with the accesso ries listedbelow, available from your cameradealer. Polaroid#112 Polaroid Polaroid PolaroidRemote Shutter Button#119A Tele 1.5 Lens#132 Self-Timer#2323 Carrying CaseCopies and enlargementsHigh-quality cop ies and enlargements may be ordered throughyour camera dealer or directly fromPolaroid Copy Service (the orderform is on the back of the film cover)40
Full one-year warrantyIf your camera proves to be defective within the warranty period wewi II repair it or at our option replaceit with a similar camera withoutcharge. The warranty applieswhether you do or do not return aregistration card to us.The warranty period is one yearfrom the original date of purchase.To verify the warranty period, youshould keep the sales slip orother proof of the purchase date.Without this information . the warranty period is two years from themanufacturing date on the camera.If. within the warranty period. yourcamera is mailed to us for servicefrom inside the U.SA. it will bereturned with a postal refund approximately equal to the cost ofinsured parcel post. We will alsogive you a free pack of fi 1m.This warranty does not cover damage caused by accident. misuse.or tampering with the camera. anda charge wi II be made for suchrepairsFor warranty service: The cameramust be returned to and repairedby a Polaroid Service Center orAuthorized Service Center. You canreturn the camera through yourPolaroid camera dealer. If that isnot convenient. see page 37 forinformation on how to return thecamera. or call Customer Servicetoll-free at 800-225-1384 (fromMassachusetts and Alaska. call617 -864-4568 collect. From Canada .call toll free-800-261-6970)This warranty gives you specificlega l rights . and you may also haveother rights which vary from stateto state.This warranty excludes all consequential damages. Some statesdo not allow the exclusion or limitation of incidental or consequential damages, so the foregoing limitation or exclusion maynot apply to you.41
Polaroidservice centersand officesCaliforniaPolaroid Corporation2040 E. Maple AvenueE I Segundo 90245Telephone : (2t3) 322-6206Additional Service Centenl :Besides Polaroid's own ServiceCenters listed here. lhere aremany other authorized ServiceCenters in Ihe U.SA To localeIhe one closesl to you. ca llCustomer Service (see page3t).AustraliaPolaroid Australia Pty. Ltd.Eden Park Eslale3t Waterloo RoadGeorgiaNorth Ryde . N.SW 2113Polaroid CorporationMailing address:5601 Fulton Industrial Blvd .SW PO Box t63Atlanta 30336North Ryde. N.SW 2113Telephone: (404) 346-t 7t 7AustriaPolaroid Ges.mbHHawaIIKege Igasse 27Polaroid Corporation1031 Wien. Pos a ch 349Suite t5384 t Bishop StreetHonolulu 968t3Telephone : (808) 524-39t tIllinoisPolaroid Corporalion2020 Swill DriveOak Brook 6052tTelephone . (312) 654-5252MassachusettsPolaroid Corporal ion784 Memorial DriveCambridge. Mass. 02139Telephone:Wilhin Massachusens.ca II co lIect 864 -4 568.Out of slate. toiliree800-225-1384New JerseyPolaroid Corporationp.o. Box 607W -95 Century RoadParamus 07652Telephone' (201) 265-6900OhioPolaroid Corporation4640 Manufacluring RoadC leveland 44 135Telephone: (216) 267 -7600TexasPolaroid Corporalion9029 Governors RowDallas 75247Telephone: (214) 63t-95ooPuerto RicoPolaroid Caribbean Corp.Charlyn Industria l ParkRoad 190. Km 1.7Carolina 00630Telephone: (809) 768-1119Mailing address:P.O. Box 2032Carolina 00630BelgiumPolaroid (Belgium) S A-NV113 Rue Colonel BourgKolonel Bourgstraat 1131140 Bruxelles-BrusselBrazilPolaroid do BraSil Ltda.Rua Almiranle Marques Leao 408Sao Paulo 01330. S.P.Mai ling address.Caixa Postal 2908Sao Paulo 01000ItalyPolaroid (lialla) S.pAViaPiave I I21051-Arcisale (Varese)JapanNippon PolaroidKabushikl KaishaMori Bldg. No. 303-2-2. ToranomonMinato-kuTokyo (105)MexicoMiche lmex SA'Apanado Postal #6-952Mexic06D F.The NetherlandsPolaroid (Europa) BVDeBoe Ie laan 321083 t-U AmsterdamPostbus 79491008 AC AmsterdamRepairs:Para lie lweg 37b7511 EE EnschedeNew ZealandPolaroid New Zealand Ltd.Augustus House15 Augustus TerraceParnell. Auckland IMailing address:P.O. Box 37 -046Parnell . AUCkland ICanadaPolaroid Corporalionof Canada. Limited350 Carlmgview DriveRexdale . Ontario M9W 5G6Telephone: (416) 675-3680NorWayPolaroid (Norge) AlSInduslriveien 8BPostboks801473 SkarerPolaroid Service Centre8449 Main StreetVancouver. B.C. V5X 3M8Te lephone: (604) 324-5150PanamaPolaroi d Interamerican . SAP.O. Box 2167Colon Free ZoneDenmarkPolaroid ASBlokken 753460 Birkertx1SingaporePolaroid Singapore (Pte) Ltd.M-4 The Orchard290 Orchard RoadSingapore 9FrancePolaroid (France) SAOffice:57. rue de Villiers92202 Neui lIyRepairs:1. (ue AmblOise Crolzal951oo-1.I . Argenleu ilGennanyPolaroid GmbHSprend linger Landstrasse 1096050 Ol1enbachGreat BritainPolaroid (U.K.) Ltd.Ashley RoadSI. AlbansHertfordshire AL I 5PAHong KongPolaroid (Far East) limited10th FI Block "B"Watson'S Estate8 Watson Road. North PointHong KongMai ling address :Box22Pasi r Panjang Post O iceSingapore 5SwedenPolaroid ASEkholmsvagen 3412724 SkM10lmenSwitzerlandPolaroid AG.Hardlurmstrasse. 1758037 ZurichVenezuelaMicron CA'Apartado 70250Ed. America. 4ATransversal. Urb.HorizonteCaracas 107. Authorized Service Centers
one-step photography That unexpected moment, that periect smile, will never again be lost whi Ie you pause to set the lens. The instant you see your picture, just aim and shoot. With sonar focusing, the camera sets the lens instantly, automatically. Now, nothing interieres with seeing the shot and taking it. (See "How sonar focusing works"