Transcription
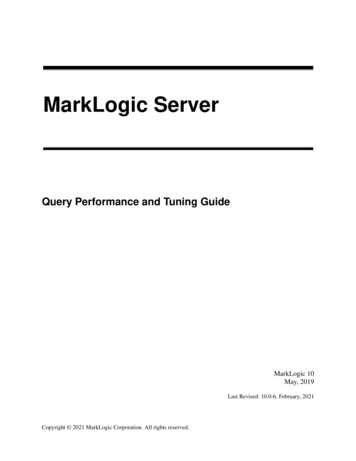
A RROW TUNING ANDM AINTENANCE G UIDEThe Complete Archer’s ResourceThis section includes step-by-step tuning proceduresfor obtaining optimum performance and accuracy fromyour bow and arrow setup. Also included are equipment setup tips, and suggested solutions to most bowtuning problems.PagePreliminary Bow Setup . 1Standard Tuning MethodsBare Shaft Planing Test . 4Paper Tuning Arrow Test . 6Short Distance Fine Tuning Test . 8Trouble-Shooting Arrow Groups . 8Bow & Arrow Adjustments . 10Broadhead Tuning . 11Fine Tuning . 12Micro Tuning . 14Maintenance & AssemblyThis section provides instructions for properly cuttingshafts and installing components. Arrow maintenanceprocedures are also included.Subject 2.50EditionChoose Your Shooting Style.TuningSubject2ndPageMeasuring and Cutting Shafts . 15Aluminum Shaft Component Installation . 18Aluminum/Carbon Component Installation . 20Carbon ICS Component Installation . 23External Component Installation . 24Installing Nock Systems . 26Additional Information . 30INTRODUCTION TO TUNINGSuccessful tuning can only be achieved by using aproperly spined arrow shaft. Initially, it is best to startwith a shaft recommended by one of Easton's ArrowShaft Selection Charts or by one of Easton's computerselection programs, the Arrow Flight Simulator orShaft Selector “Plus.” Final verification is achievedduring the tuning process. Any problems due to animproperly spined shaft will become evident duringtuning. Before tuning be sure that shafts are straight,are properly fletched, and have perfectly alignednocks (see pages 15 thru 30).Tuning procedures for the three most popular shootingsetups are described and abbreviated throughout themanual as follows: recurve bows, using finger release (RF) compound bows, using finger release (CF) compound bows, using a release aid (CR)You will notice that some of the techniques of bow tuningapply to all types of bow setups and others apply to justone or two types. When separate tuning procedures arerequired for specific setups, find your setup within thetopic and follow those specialized instructions.Install All AccessoriesBefore you start any bow tuning procedures, be sure toinstall all accessories on your bow, i.e., the correctbowstring, bow sight, stabilizers, arrow rest, cushionplunger, etc. In other words, install all the items youintend to use when shooting. Any adjustments made tothe bow or changes in bow components can affect thetune of your equipment. When tuning, it is very importantto change only one variable at a time!PRELIMINARY BOW SETUPThe first phase in achieving well tuned equipment isgood preliminary equipment setup. If the initial setup isdone correctly, bow tuning can be an easy process. Byfollowing the bow setup guidelines in the initial preparation of your equipment, you can eliminate most or all ofthe possible disturbances which cause tuning problems,including false tuning indicators. A false tuning indicatorwould be having a high nocking point indication whenthe problem is actually poor clearance.Install the Nocking PointInstall a moveable nocking point on the bowstring.Clamp-on types are ideal. Initially, position the nockingpoint on the bowstring about 1/2" (1.3 cm) above squarefor RF and CF and approximately 1/4" above square(0.63 cm) for CR. See Fig. 1.Fig. 1- Nocking Point Position1/2" RF, CF1/4" CR90
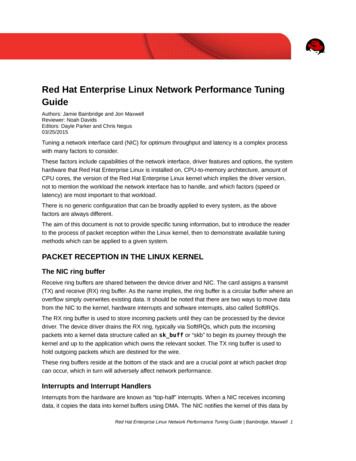
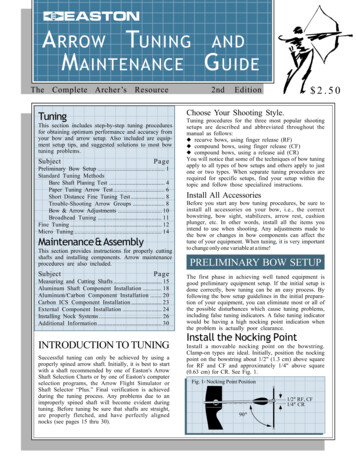
2Arrow Tuning and Maintenance GuideFind the Limb CentersIn order to have a reference point from which to adjustthe arrow's left/right position on the bow, it is necessaryto find and mark the exact center of the limbs on arecurve bow, or what is termed the “balanced limbcenter” on a compound bow.Recurve BowsTo find the limb center for recurve bows, place apiece of masking tape across the inside of each limba few inches from the riser. With an ink pen, make asmall vertical mark on the tape in the exact center ofeach limb.To find the balanced limb center location for thepreliminary setup of your compound bow, place apiece of masking tape across the inside of eachlimb a few inches from the riser. Accurately measure the width of the limb (at the tape) and place a verysmall pen (or pencil) mark on the tape in the exact centerof each limb. Next, measure 3/16" (4.8 mm) to the left ofthe mark (for right-handed archers) and make a largervertical mark on the tape. (Left-handed archers place alarger mark 3/16" (4.8 mm) to the right of the limb centermark.) This second mark will be used for arrow centering. (See Fig. 2.) This procedure is done to compensatefor the amount the eccentric wheel or cam is offset fromthe actual center of the limb. The 3/16" (4.8 mm) measurement is an average “offset” difference for most compound bows and does not need to be a precise measurement in the preliminary setup stage, as you will locate thetrue balanced limb center when performing the finetuning procedures.Center LocationActuallimb center(right mark)Balancedlimb center(left mark)Measured 3/16"from actual centerFig. 3 - NodesArrow Nodes - As the arrow oscillates, the nodes remain indirect alignment to the target. This diagram clearlyillustrates the front and rear node positions of the arrow.The front node is usually closer to the front end of thearrow than the rear node is to the nock end. This is due tothe mass weight of the point—nodes will always be locatedcloser to the heavier mass.Rear NodeFront NodeDirect Lineto TargetTop View of ArrowCompound BowsFig. Compound BowBalanced Limb2Aligning the NodesWheelBow limbTapeFig. 4Finger Release (RF, CF)Line to targetWhen there isno pressure onthe cushionplunger, thefinger-releasedarrow is alignedslightly outsidethe center ofthe bowstring.Line to targetAs thecushionplungercompresses,the nodes ofthe arrowcome indirectalignment tothe target.Fig. 5Fig. 6CompoundMechanicalRelease (CR)Misaligned Arrow RF, CF, CR(Incorrect Arrow Rest Position)Bow limbBowstringto targetalignmentRear nodepositionWheelFront nodepositionTape“Centering” the ArrowThe objective of arrow centering is to have the arrowleave the “theoretical” or “balanced” limb center of thebow. In actuality, it's the two nodes of the arrow shaft thatshould leave the center of the bow in direct alignment tothe target. Releasing the string with fingers creates ahorizontal bending motion within the arrow. Releasingthe string with a release aid causes a slight up/downbending motion instead. Because of this, the arrows mustbe positioned differently for each style of release. (SeeNode Alignment diagram to the right). A description ofthese position adjustments follows.Line to targetThe arrow tip isaligned down thecenter of thebowstring. Nodesof the arrow are inalignment to thetarget. (Since thearrow bendsvertically whenusing a release, thenodes stay inalignment downthe center of thebowstring.)The arrow isnot positionedto leave thecenter of thebow—it is outtoo far. Nodesare not inalignment tothe target.
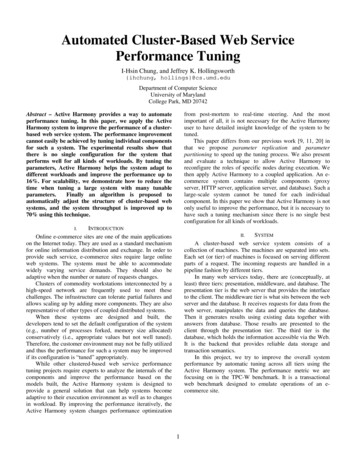
Tuning—Bow SetupAdjust the Arrow'sLeft/Right PositionAdjust the Arrow Rest(recurve and compound)With Finger Release (RF, CF)Align the “tip” of the arrow point 1/16" to 1/8" (1.63.2 mm) or less outside the bowstring with thebowstring properly centered according to Fig. 7. Thearrow tip is placed slightly outside the string to providecompensation for the amount the cushion plunger or sideloading device compresses into the bow when the arrowis released. See Fig. 4.With a finger release, the arrow bends horizontally, firstbending in toward the bow, then bending away from thebow, which causes the arrow shaft to leave the arrow rest.In the next bending sequence, the arrow nock disengagesfrom the bowstring. The arrow is then on its way, freelyoscillating all the way to the target. The amount ofoscillation decreases as the arrow travels farther from thebow.With Mechanical Release (CR)Align the “tip” of the arrow point down thecenter of the bowstring. See Fig. 5. The centerline (axis) of the arrow must start out in a directline with the bowstring when the bowstring is aligned tothe balanced limb center. See Fig. 7.The arrow rest support arm position is critical to achieving good arrow clearance.With Finger Release (RF, CF)Most Flipper/Rest setups have an adjustable armfor the arrow rest. If this adjustment is availableon the rest you're using, the arrow rest support armshould be adjusted so that it is not visible past the outsideof the arrow shaft when observed from an overhead view.See Fig. 8.With Mechanical Release (CR)On launcher type rests, commonly used oncompound bows with release aids, be sure thatthe arrow support arm is narrow enough toallow the two lower vanes to pass over the rest withoutmaking contact. (See the Fig. 9.) This is very importantfor archers using release aids because the arrow is mostoften supported on the rest for its full length of forwardtravel. For the smaller diameter aluminum/carbon orcarbon shafts with less space between vanes, it may benecessary to significantly reduce the width of the launcherblade.Fig. 8Arrow Rest - Overhead View (RF, CF)Correct PositionBOWWhen using a release, the arrow most often bendsvertically, rather than horizontally. Therefore, there is noneed to compensate for any inward compression of thearrow rest or cushion plunger. Follow the bow tuningmethods in the Fine Tuning and Micro Tuning sectionson pages 12-14 to find the best in/out position for yourarrow shaft, which allows the arrow nodes to be in directalignment to the target.The diagrams in Fig. 7 indicate the correct in/out arrowposition for your shooting style.Arrow restNOTE:Be sure enoughof the flipperarm is extendedto safely holdthe arrow on therest.Fig. 7 - Arrow CenteringRecurve BowFinger ReleaseCompound BowFinger ReleaseArrowTipArrowTipArrow Tipin linewithbowstringNockNockNockIncorrect Position(out too far)BOWAdjust the horizontal (in/out) position of the cushionplunger or arrow rest assembly so that the tip (center) ofthe arrow point is correctly aligned with the type ofequipment you shoot.Arrow restNOTE:Be sure that thearrow rest hasenough heightabove the arrowshelf to allow forvane clearance.Compound BowMechanicalRelease AidFig. 9Bowstring alignedwith limb center3Bowstring aligned withbalanced limb centerArrow Rest - Back View, Vane Clearance (CR)Correct Good VaneClearanceIncorrect Poor VaneClearance
4Arrow Tuning and Maintenance GuideAdjusting for Outsert Components (CR)When using carbon arrow shafts which have externally fitted nocks, it may be necessary to adjust yournocking point up slightly to allow the nock to clearthe arrow rest. The nock diameter is significantlylarger than the shaft diameter on these arrows. A slightlyhigher nocking point lifts the arrow off of the arrow restand keeps the nock from coming in contact with it,eliminating a potential clearance problem.Riser-Mounted Clickers (rf, cf)For clicker shooters, be sure that the arrow is wellsupported on the rest and not held in place by the tensionof the clicker only. It is important to draw the bow a fewtimes without the clicker to make sure the arrow can bedrawn and let down without the arrow falling off thearrow rest.Align the Bow-sight PinInitially, set the sight pin on your bow sight over thecenterline of the arrow shaft.Set the Cushion PlungerNot every type of bow setup uses a cushion plunger.Some archers use rests without a cushion plunger. Forexample, many tournament archers use a Springy rest,and some traditional archers use other styles of arrowrests that do not have side pressure tension adjustments.If your setup incorporates a cushion plunger, start withthe spring tension set at medium.Set the Brace Height(Recurve bows)Start with the brace height at the lower end of themanufacturer’s recommendation or use the following chart. To locate the optimum brace height foryour particular bow, “twist up” the bowstring tomake it shorter. This raises the brace height.BOW LENGTH64"66"68"70"BEGINNING BRACE HEIGHT88881/ 4"/ 8"1/ 2"5/ 8"3-88881/ 2"/ 8"3/ 4"7/ )cm)cm)cm)All bows are different, even ones of the same make andmodel. Therefore, it is important to locate a brace heightthat fits your particular bow and shooting style. Shoot afew arrows at the suggested beginning brace height, thenunstring the bow, add 3-4 twists to the bowstring andshoot again. Continue this process until the bow feelssmoothest and quietest when shooting.If the bowstring is too short to allow a brace height at thelower setting, you may wish to use a slightly longer string.If the string is too long to allow a higher brace height (andstarts to knot-up from too many twists), you may wish totry a slightly shorter bowstring. There are many custombowstring makers who produce strings to your exactspecifications including length, type of material, typeand color of serving, etc.The brace height determines the specific point at whichthe arrow separates from the bowstring and the amountof bend the arrow has when the separation occurs. Thebest brace height for your recurve or compound bow isone that allows the most compatible launch position forthe arrow at the end of the bow’s “power stroke.” Locatingthe best brace height for your bow can significantlyimprove arrow grouping and shooting consistency.Set the Brace Height(Compound bows)Brace height is set by the compound bow manufacturer. Sometimes changing the brace height to aslightly higher or lower position will improvearrow flight and grouping. This can be accomplished by changing the length of the string, asdescribed previously for recurve bows. Remember, however, that changing the brace height of a compound bowaffects the draw weight and draw length of the bow.Nock-to-Bowstring TensionThe nock tension (“snap fit”) necessary to separate thenock from the bowstring serving can be very critical,especially on light draw-weight bows (30 lbs. and under).Nock tension should be tight enough so the arrow caneasily support its own weight when the arrow is hangingvertically on the bowstring (nock against the nockingpoint). To check this, hang your arrow vertically from thebowstring, and give the string a sharp tap with your fingeron the serving about 1-2" (2.5-5 cm) from the arrow nock.The arrow should separate from the string. If it does not,the nock is probably too tight for most target archery. Forhunting, a slightly tighter nock-to-bowstring fit is oftenpreferred.STANDARD TUNINGMETHODSNow that you have completed the preliminaryadjustments you can start the tuning process. Fourmethods of bow tuning are described (pp. 4 thru 14) —theBare Shaft Planing Test, the Paper Tuning Arrow Test,Short Distance Tuning, and Broadhead Tuning.Bare Shaft Planing Test(Finger release - RF, CF)In addition to tuning, the bare shaft test is alsouseful for determining if the correct shaft hasbeen selected. If the left/right adjustments outlined under “Fishtailing” do not cause the unfletchedshafts to group with or very near the fletched shafts, thena weaker or stiffer spined shaft (based on where thearrows have impacted) must be selected.Arrows that do not fly well and do not group tightly areusually affected by one or more of the following problems:
Standard Tuning—Bare Shaft Planing Test1. They may PORPOISE in flight.2. They may FISHTAIL in flight.3. They may not CLEAR the bow properly as the arrowleaves the bowstring.4. They may MINNOW in flight (a specific type ofclearance problem).PorpoisingIt is important to correct for Porpoising first. If the arrowleaves the bowstring with the nock too high or too low,a motion known as Porpoising occurs. Porpoising iscaused by an incorrect nocking point location. Use theBare Shaft Planing Test to find the correct nocking pointlocation. Shoot at least three fletched shafts at a distanceof 15 to 20 yards (or meters). Then shoot two identicallyaimed unfletched shafts. Once you get the bare shafts toimpact close to the fletched arrows at 20 yards (ormeters), you may want to try shooting 25-30 yards (ormeters) for a finer tuning indication.If the unfletched shafts impact above the identicallyaimed fletched shafts, move the nocking point up on thebowstring until both fletched and unfletched shafts strikeat the same elevation. See Fig. 10.If the unfletched shafts impact below the identicallyaimed fletched shafts, move the nocking point down onthe bowstring until the unfletched shafts hit at the sameelevation or slightly lower than the fletched shafts.*To assure you have eliminated Porpoising, repeat thetest, shooting first the fletched, then the unfletched shafts,and make adjustments to the nocking point until bothfletched and unfletched shafts impact at the sameelevation.Fig. 10Porpoising5FishtailingIf the arrow leaves the bow with the nock end leaning toone side or the other, Fishtailing occurs. The nock end ofthe arrow will appear to move from side to side as thearrow follows its flight path. See Fig. 11.Use the Bare Shaft Planing Test to correct Fishtailing.Shoot three fletched shafts at a distance of 15 to 20 yards(meters), then shoot two identically-aimed, unfletchedshafts.If the unfletched shafts impact left (stiff) of the identicallyaimed, fletched shafts, as seen in Fig. 11 (for a righthanded archer), either decrease the spring tension on thecushion plunger, increase bow weight slightly (if yourbow weight is adjustable), or increase arrow point weight.If the unfletched shafts impact right (weak) of theidentically-aimed, fletched shafts, as seen in Fig. 11 (fora right-handed archer), increase the spring tension on thecushion plunger, decrease bow weight slightly (if yourbow weight is adjustable), or decrease arrow point weight.Your equipment is basically tuned when the bare shaftsand fletched shafts impact at the same or very near thesame location. Once you have completed the finer tuningmethods listed for Fine Tuning and Micro Tuning onpages 12-14, do not be surprised if the bare shaft impactchanges. It is common on a well-tuned bow to have thebare shaft impact a little low and slightly stiff (to the leftof the fletched shafts for a right-handed archer).Occasionally, a good tune may be achieved with the bareshaft impacting slightly weak (to the right of the fletchedshafts for right-handed archers), but this is less common.When correcting Fishtailing using the Bare Shaft PlaningTest, you may have a problem adjusting the unfletchedshaft's impact to that of the fletched shaft. Your arrowsmight be too weak (the unfletched shaft impacts to theright of the fletched shaft for right-handed archers) or toostiff (the unfletched shaft impacts to the left of the fletchedshaft for right-handed archers). If, after completing thistest, the bare shaft impact is more than 6 inches (15 cm)to the right (weak) or left (stiff) of the fletched shafts at 20yards (18 m), you will need to make some modificationsto the equipment to achieve a better tune. Follow thesuggestions on how to better match the arrow to yourbow in the “Adjustments Within the Bow and ArrowSystem” section on page 10.ClearanceProper clearance is absolutely essential for optimumgrouping, consistency and accuracy. This is especiallytrue with ultra-light weight arrows like the UltraLitealuminum, the A/C/E and A/C/C HyperSpeed shafts.Nocking point too low*Nocking point too high** It is sometimes desirable to have the bare shaft impact just slightlybelow the identically-aimed fletched shafts. Bare shafts that impact aboveidentically-aimed fletched shafts indicate a low nocking point. If thenocking point is too low, it may force the arrow fletching down into thearrow rest, creating Clearance problems.After you have performed the Bare Shaft Planing orPaper Tuning Arrow Test, it is a good idea to check foradequate clearance. To check for clearance, use drypowder foot spray, dry deodorant spray or similar product,applied to the last quarter of the arrow shaft, fletching,arrow rest assembly and sight window near the arrowrest. Do not disturb the powder sprayed on the arrow and
6Arrow Tuning and Maintenance Guide2. Make sure your arrow rest support arm does notprotrude past the outside of the arrow shaft when thearrow is resting on the support arm and is lying againstthe cushion plunger or side loading device. See Fig. 8.Fig. 11Fishtailing3. Choose a lower profile fletching.4. Follow the procedures for Tuning Adjustments withinthe Bow and Arrow System on page 10 for equipmentmodifications to achieve a better tune.5. Move the cushion plunger or side loading deviceslightly out from the bow to help increase clearance ifthe other tuning modifications have no effect.Paper Tuning Arrow Test(Recurve or compound - RF, CF, CR)Stiff ArrowWeak ArrowUnfletched shafts impact left(RH archer, opposite for LH)Unfletched shafts impact right(RH archer, opposite for LH)Fig. 12Minnowingbow while preparing to shoot. The arrow should be shotinto a firm target so that it will not penetrate to thefletching.If you are not achieving good arrow clearance, and thearrow fletching and bow make contact, optimum groupingcannot be achieved. By examining the areas where thedry powder spray is scraped off, the nature of anyinterference can be determined, and the position of thefletching as the arrow leaves the bow can be identified.Easton has introduced a new term indicating clearanceproblems called Minnowing. Like Fishtailing orPorpoising, Minnowing indicates a specific arrow flightdisturbance. Minnowing will appear to look much likeFishtailing except that the tail of the arrow appears tomove from side to side more quickly, and the amount ofside swing is usually much less than in Fishtailing. (SeeFig. 12.) Minnowing indicates inadequate clearance andis caused by the rear portion of the arrow (usuallyfletching) contacting the arrow rest assembly.Correcting Clearance ProblemsThe following procedures can help you correct clearanceproblems that cause Minnowing:1. If the arrow fletching is hitting the arrow rest, tryrotating your arrow nock 1/32 of a turn. Continuerotating the nock in 1/32- turn increments untilclearance is achieved.Archers using mechanical release aids (CR) should reviewthe following reminder notes before starting the PaperTuning Test.1. Align the arrow down the center of the bowstring withthe tip of the arrow point correctly positioned asindicated in Fig. 7, page 3.2. Initially position the sight pin over the centerline ofthe arrow.3. When using a release aid the arrow normally bendsmore vertically than horizontally, so good clearanceis essential. Usually, the entire arrow contacts the restwhen it is shot and the fletching must be positioned toclear the rest.“SHOOT-THROUGH” RESTS - It may be necessary toadjust the width of the arrow rest support arm(s) so thefletching will pass cleanly over or through.“SHOOT-AROUND” RESTS - Vane-to-nock indexing isvery important and should be adjusted to achievemaximum clearance.The Paper Tuning Arrow Test is the most commonlyused bow tuning test for archers using compound bowswith release aids. This test also works well for fingerrelease:1. Firmly attach a sheet of paper to a picture frame typerack approximately 24" X 24" (60 x 60 cm).2. Position the center of the paper about shoulder heightwith a target mat about six feet behind the paper tostop the arrows.3. Stand approximately 4 to 6 feet (7.8-1.5 m) from thepaper.4. Shoot a fletched arrow through the center of the paperwith the arrow at shoulder height (parallel to thefloor).5. Observe how the paper is torn.This tear indicates good arrow flight. Thepoint and fletching enter the same hole.
Standard Tuning—Paper Tuning Arrow TestThis tear indicates a low nocking point.To correct, raise the nocking point 1/16"(1.6 mm) at a time and repeat the procedure until the low vertical tear is eliminated.This tear indicates a high nocking point,clearance problem, or a very weak arrow ifyou are using a release aid. To correct,lower the nocking point 1/16" (1.6 mm) ata time until the high tear is eliminated. If,after moving the nocking point a few times,the problem is unchanged, the disturbance is most likelycaused by a lack of clearance or by an arrow which is tooweak (if using a release aid). To identify a clearanceproblem, check to see if the arrow fletching is hitting thearrow rest. (See “Clearance” on page 5.)CR - If no clearance problem exists and you are using amechanical release, try:1. A more flexible arrow rest blade if using a launchertype rest or reduce downward spring tension onadjustable tension launcher rests.2. Decreasing peak bow weight if there is an indicationthe arrow spine is too weak.3. Reducing the amount the shaft overhangs the contactpoint on the arrow rest.4. Choosing a stiffer arrow shaft.This tear indicates a stiff arrow reaction forright-handed archers using finger release(RF, CF). Left-handed finger release archerswill have an opposite pattern. This is anuncommon tear for right-handedcompound archers using a mechanicalrelease (CR). However, it can occur and generallyindicates that the arrow rest position is too far to the rightor that there is possible vane contact on the inside of thelauncher rest.Finger Release (RF, CF) To correct:1. Increase bow weight/peak bow weight.2. Use a heavier arrow point and/or insertcombination.3. Use a lighter bowstring (less strands or lighter material,like Fast Flight ).4. Use a weaker spine arrow.5. Decrease cushion plunger tension or use a weakerspring on “shoot around” rests.6. CF only - Move the arrow rest slightly in toward thebow.Mechanical Release Aid (CR) To correct:1. Move the arrow rest to the left. Continuemoving the rest to the left in small incrementsuntil the right tear is eliminated.2. Make sure the arrow has adequate clearance past thecable guard and cables.73. Make sure the bow hand is well relaxed to eliminateexcessive bow hand torque.This tear indicates a weak arrow reactionor clearance problem for right-handedfinger release (RF, CF) archers. Left-handedfinger release archers will have the oppositepattern. For right-handed compoundarchers using mechanical releases (CR),the left tear is common and usually indicates a weakarrow reaction and/or clearance problem. If a high-lefttear exists, (see next tear illustration) make sure youcorrect the nocking point first before proceeding further.Finger Release (RF, CF) To correct:1.Check for Clearance (See page 5).2.Decrease bow weight/peak bow weight.3. Use a lighter arrow point and/or insert combination.4. Use a heavier bowstring (more strands or heaviermaterial).5. Use a stiffer spine arrow.6. Increase cushion plunger tension or use a stifferspring on “shoot around” rests.7. CF only - Move the arrow rest slightly out, away fromthe bow.Mechanical Release Aid (CR) To correct:1. Move the arrow rest to the right. Continueto move the rest to the right in small incrementsuntil the left tear is eliminated.2. Make sure the bow hand is well relaxed to eliminateexcessive bow hand torque.3. Decrease peak bow weight.4. Choose a stiffer spine arrow.This tear shows a combination of morethan one flight disturbance. Use theprocedures that apply to the tear patternfor your style of shooting, and combine therecommendations, correcting the verticalpattern (nocking point) first, then thehorizontal. If you experience a tuning problem (especiallywith the nocking point location) and are unable to correcta high/low tear in the paper, have your local pro shopcheck the “timing” (roll-over) of your eccentric wheels orcams.For archers using release aids, it may, in some cases, benecessary to apply adjustments opposite from thosedescribed. The type of arrow rest and release aidcombination used can alter the dynamic flex of the arrowto produce tear patterns contrary to those indicated(although it is uncommon).Once you have achieved a good tune at 4 to 6 feet (1.21.8 m), move back 6 feet (1.8 m) more and continue toshoot through the paper. This ensures that the tune iscorrect and that the arrow was not just in a recovery positionwhen it passed through the paper at the first distance.
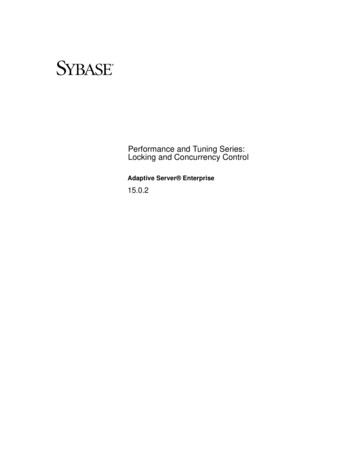
8Arrow Tuning and Maintenance GuideSHORT DISTANCE TUNING(Recurve and compound - RF, CF, CR)Many times it is not possible to shoot long distances whenyour equipment needs to be tuned. The following methodresults in a very good equipment tune at short distances.Use this tuning method after you have completed one ofthe basic bow-tuning methods—either the Bare ShaftPlaning or Paper Tuning Arrow Test.Fig. 13Up-Down ImpactStart at approximately 12 to 15 yards (meters) from thetarget. Use a 40 cm or 60 cm target face and place it withthe face side in so you are shooting at a plain white target.Up-Down ImpactUsing fletched arrows only, shoot approximately 6 to 8arrows along the top edge of the target face. This stepdetermines if your nocking point is correct. See Fig. 13.Normally, small tuning problems show up at close range,because the arrow has its maximum vibration at shortdistance. This test assists you in identifying these arrowflight problems and makes it possible to make fineradjustments than with the previous tuning procedures.If you are unable to consistently hit the top edge of thetarget face, there is probably a small tuning disturbancein the equipment. To correct, make a 1/ 32" (.8 mm)nocking point adjustment either up or down and shootagain. Continue making nocking point adjustments in1/32" (.8 mm) increments (no more than 1/32" (.8 mm) at atime).If your arrows are hitting the top edge of the paper moreconsistently and you are achieving a straight, horizontalline of arrows across the top of the paper
centerÓ on a compound bow. Recurve Bows To find the limb center for recurve bows, place a piece of masking tape across the inside of each limb a few inches from the riser. With an ink pen, make a small vertical mark on the tape in the exact center of each limb. Compound Bows To find the balanced limb center location for the