Transcription
Undet for SketchUp User ManualOverview . 3Main Undet for SketchUp functionality: . 4Installation and Activation . 6System requirements . 6Software installation . 7License activation procedure . 8Node-locked license . 9Dongle license (Annual and perpetual licenses) . 10Network (floating) license (Annual and perpetual licenses) . 10Graphical user interface and control . 11Undet project creator (Undet Indexer) . 12Undet for SketchUp toolbars interface . 14Undet Project Management toolbar. 15Undet Clipping Box toolbar . 15Undet Density toolbar. 18Undet Coloring toolbar . 22Undet Scenes toolbar. 23Undet References toolbar . 24Menu on Right Mouse Click . 28Undet Extensions menu . 29Coordinate system management. 31FAQ. 321. When I open an Undet project my clipping box is empty? Why? . 322. Why does an Undet license dialog pop-up each time when I open Undet for SketchUp?. 333. Do Undet projects support large coordinate systems (State, airborne LiDAR)? . 334. Can I scale / resize point clouds with Undet for SketchUp? . 34
OverviewUndet for SketchUp is a plug-in that allows you to use point clouds of any size directly in SketchUp.Watch software overview video on YouTube:
Main Undet for SketchUp functionality:High performance with large point cloudsCreate point cloud projects with Undet Indexerfrom a wide range of scanners: airborne, mobilemapping, terrestrial or any other 3D sensors.Limitless project sizeComprehensive point cloud data managementCombine individual scan stations into groups: foreach floor/level, outside or separate scans.Control visibility of created groups or individualscans stations/files.Interactive coloring managementUse the different color settings to get the clearestpossible view:- RGB Intensity By plane or height - Adjust transparency- Change point cloud point size
Interactive visibility managementUse the clipping box to navigate between pointclouds. The clipping box can be moved to any areaof a point cloud to see a more detailed view byusing the arrows attached to the sides of theclipping box.Create new clipping box: By Line, By Rectangle.Enrich SketchUp scenes with point cloudsAdd point clouds to SketchUp Scenes:- Point clouds clipping box- Coloring settings- Density settingsAll options can be saved for each scene regardlessof the different point cloud settingsAutomatic features extraction- Extract ground terrain points from unclassifiedpoint clouds and create surface mesh.- Corner lines- Planes
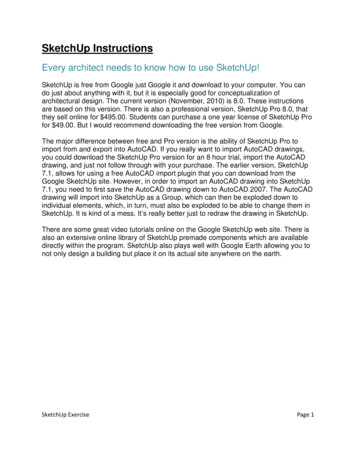
Installation and ActivationUndet for SketchUp is a plug-in for SketchUp software that can be installed only on Windows PC’s withSketchUp installed.Supported SketchUp Versions: 2017, 2018, 2019.System requirementsOperating System: Windows OS 64 bit. MAC is not supported.Supported SketchUp versions: SketchUp 2017 – 2019.Technical requirements: Minimal technical requirements are the same as for SketchUp, but since Undet isdealing with point clouds, which is often heavy and data rich (millions of points having XYZ coordinates,Intensity and RGB values) some specs are worth upgrading.RAM: The bigger the point cloud project the more RAM will be needed. Most users working with smallscale point clouds will be fine with 8 GB of RAM. When dealing with tens of gigabytes of scan data 16 GBof RAM will be welcomed. Heavy duty point cloud professionals utilizing hundreds of gigabytes in a singleproject will appreciate 32 GB of RAM or more.Hard Drive: An SSD is far faster than a HDD. If your project is located on a drive in a server machine, LANwill reduce performance considerably. Thus, copy your project to the local drive for better performance.CPU: Multiple threads are not supported, therefore, you need to pay attention to single threadperformance.GPU: While your CPU can render graphics, it'll do so at a much slower rate than a GPU. Thus, werecommend using graphical processors like NVidia or AMD. There is no need to go for the fanciest series.A moderate gaming card should suffice.
Software installationFirst, you need to download and install Undet indexer (Undet project creator), if you don’t have any pointcloud data to create an Undet project, below you will find several already created Undet demo projects.To open the Undet project in SketchUp please install and download the Undet plug-in (Undet forSketchUp).1. Download Indexer (project creator): Undet Indexer.exe2. Download Undet for SketchUp: Undet for SketchUp.exeAdditional useful information:Tutorial on how to create an Undet project: Undet indexer User ManualUndet for SketchUp help: Undet for SketchUp User ManualHow to start video tutorial: Undet for SketchUp Overview3D modeling tutorial video: How to Model from Point Clouds in SketchUp?Undet demo project (point cloud): Small Chapel DEMO 463 MbUndet demo project (point cloud): Wooden Church (Internal & external) DEMO 1.2 GBUndet demo project (point cloud): UAV City Area DEMO 385 MbUndet demo project (point cloud): Simply Building including 1st floor DEMO 1.3 GBUndet demo project (point cloud): Railway Bridge DEMO 660 MbNotes:Some antivirus software may disturb the installation process. If installation was blocked by your antivirussoftware, we recommend that you temporarily disable your antivirus software during the Undet for Revitinstallation process.Undet requires the latest Microsoft Framework, which is a heavy update that might take some time toinstall. But if your PC is up to date it should take just a couple minutes.
License activation procedureAfter installing Undet for SketchUp, you will, by default, begin a 2 day free trial.Undet for SketchUp license option:Node-locked license (1 – month license)USB Dongle license (Annual and perpetual licenses)Network (floating) license (Annual and perpetual licenses)1 – A month license can be bought using PayPal from our websitehttp://act.undet.com/for-sketchup/activate - (instructions on how to order the 1-month license).Annual and perpetual licenses can be bought from our sales team info@undet.com. Or by clicking “GetActivation” in the Undet for SketchUp License Manager, which will direct you to our website.
Node-locked licenseNode-locked licenses are unique for each computer and are tied to the system hardware. If you are toreplace major system components you may not be able to activate software on the renewed system withthe same codes*The Undet software Node-locked license type requires your system digital codes to be activated.- Site code:- MID:Undet license manager can be opened in Extensions - Undet menu by clicking “About”* In this case, please contact our support team at info@undet.com
Dongle license (Annual and perpetual licenses)A USB Dongle has a hardware-based protection lock. The dongle contains license details for a particularversion of the Undet for SketchUp application. The dongle can be moved and used on differentcomputers which have Undet for SketchUp software installed.The dongle license can be bought and integrated with annual and perpetual Undet for SketchUp licenses.Network (floating) license (Annual and perpetual licenses)A floating licensing is a software licensing approach in which a limited number of licenses for a softwareapplication are shared among a larger number of users over time. The license server can manage licensesover a local area network with a network dongle license.An Undet for SketchUp license can’t be borrowed from a server for offline use.The network dongle license can be bought separately and integrated with annual and perpetual Undet forSketchUp licenses.
Graphical user interface and controlUndet tools and functions are placed in the toolbars and in the additional Undet extension menu.- Extensions - Undet menu- Undet toolbars
Undet project creator (Undet Indexer)First to import a point cloud into SketchUp you need to create an Undet project with Undet Indexer.Undet Indexer is standalone software to create an Undet project file from a wide range of scanners orscan data files. An Undet project database is created to handle massive point clouds and allow efficientmanagement.Supported formats *.E57, *.FLS, *.ZFS, *.LAS, *.LAZ, *.PTS, *.DP, *.FPR, *.LSPROJ, *.FWS, *.CL3, *.CLR,*.RSP, ASCII / NEZ (X,Y,Z/i/RGB).Link to download Undet Indexer Download Link to Undet Indexer (project creator) User Manual Read PDF To open Undet Indexer in Undet Project Management toolbar click.The indexer window will appear before importing scan data, first you must select the project type basedon your scan data set: LiDAR data management and analysis (The most common choice for large airborne LiDAR projects)Topography, corridor mapping, 3D city modeling (The most common choice for infrastructureprojects)Buildings, Infrastructure objects, plants (The most common choice for terrestrial scanners)Detailed scanned objects (The most common choice for small detailed objects such as monuments,parts of buildings or areas with a footprint up to 100m2)The Undet database has a double-file structure - Preview points and Full points. Selecting the right projecttype speeds up the indexing process, without losing full point cloud points and affects only the previewview. Preview points are created from all imported scan data by using GRID, its size depends on the
selected project type. The default GRID size for each project is chosen for optimal indexing speed andfaster preview navigation to find a place to load all points using the "clipping box".Undet loads all points in the "clipping box" when the point count is less than the maximum point count.The maximum point count can be set manually in the Undet Density toolbar according to your systemhardware parameters. If your clipping box is too big to load all points you will only see the preview points.Default “max point count” settings:Undet for SketchUpInterval from 8 – 24 million points [can be tuned with performance slider]LiDAR data management and analysis (The mostcommon choice for large airborne LiDARprojects)Preview points grid – 100 x 100 cmTopography, corridor mapping, 3D city modeling(The most common choice for infrastructureprojects)Preview points grid – 30 x 30 cmBuildings, Infrastructure objects, plants (Themost common choice for terrestrial scanners)Preview points grid – 3 x 3 cmDetailed scanned objects (The most commonchoice for small detailed objects such asmonuments, parts of buildings or areas with afootprint up to 100m2)Preview points grid – 1 x 1 cmNote regarding Undet project creation:Selecting the right project type speeds up the indexing process, without losing full point cloud points andaffects only the preview view.Link to Undet Indexer (project creator) User Manual Read PDF
Undet for SketchUp toolbars interfaceThe main Undet tools are placed in the toolbars, which can be enabled / disabled with a right mouse clickin the toolbar space.
Undet Project Management toolbar- Open Undet point cloud project- Exporting point cloud image to SketchUp Layout file- Opens Undet project creator (Undet Indexer)- Close active Undet point cloud project- Open Undet for SketchUp User ManualUndet Clipping Box toolbarUse the Clipping Box to navigate between point clouds. Undet loads all points in the Clipping Box whenthe point count is less than the maximum point count. The maximum point count can be set manually inthe Undet Density toolbar according to your system hardware parameters. If your clipping box is too bigto load all points you will only see the preview points.- Enabled / disabled Undet Clipping Box- Creates new Clipping Box by defining a center point- Creates new Clipping Box around selected SketchUp objects- Creates new Clipping Box by defining a line and its thickness- Creates new Clipping Box by defining a rectangle- Resets Clipping Box to the full project extents- Tools to resize active Clipping Box using grips- Tools to move active Clipping Box using grips
- Tools to rotate active Clipping Box using gripsWhen choosing Clip by Line, you will need to enter the line thickness.Tip: hold “Shift” for orthogonal mode when defining a line for the Clipping Box.The clipping box can be moved to any area of a point cloud to see a more detailed view by using thearrows attached to the sides of the clipping box.
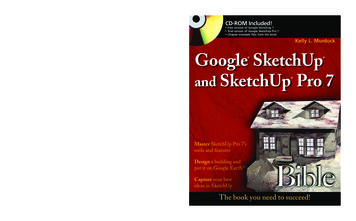
Examples with different project GRID (enabled / disabled clipping box)LiDAR data management and analysis (UAV data)Preview pointsAll points loaded with clipping box (view section)Buildings, Infrastructure objects, plantsPreview pointsAll points loaded with clipping box (view section)
Undet Density toolbar- Hide / show point cloud- Opens scan data management settings- Optimizes point cloud density settings for higher performance- Optimizes point cloud density settings for higher visibility- Opens manual point cloud density settingsScan data management settingsIn the Scan data management settings a user can manage visibility and group scan data files into chunks.Note: Use „Ctrl” and „Shift” for multiple selections from the scan list in order to group Data.- Add group of selected point cloud data file- Rename selected file- Remove selected point cloud data file from createdgroup- Check / uncheck to show / hide points from selectedscan data file- Enable / disable selected scan station position centersymbol
Optimized higher performance / higher-visibility settingsThese commands are preserved with pre-set settings for faster control and can be edited manually in thepoint cloud density settings:Example:Point cloud density settings after clicking:Point cloud density settings after clicking:Optimizes point cloud density settings for higherperformanceOptimizes point cloud density settings for highervisibility
Manual control of point cloud densityUndet loads all points in the Clipping Box when the point count inside the clipping box is less than themaximum point count. The maximum point count can be set manually in the Undet Density toolbaraccording to your system hardware parameters. If your clipping box is too big to load all points you willonly see the preview points. Once the Clipping box is smaller Undet switches to All points automatically.Density slider: controls the density of preview points.Full Points slider: controls the maximum point count in the Clipping Box.- Placing the full points slider on the left side,means you are not be able to see All points, youwill only see Preview points regardless of theClipping Box size and project total point count(maximum default preview point count 8, Goodperformance)-Placing the full points slider in the middle, meansthat Undet will load all points if the active ClippingBox area is less than 50% of maximum point count(by default 12 million points)- Placing the full points slider on the right side,means that Undet will load all points if the activeClipping Box area is less than 100% of maximumpoint count (by default 24 million points)
Density bar (slider) Controls the density of preview points. To increase/decrease preview points (GRID),possible only in Project creation step.Example: with different DENSITY slider settingsPreview points densityPreview points densityLoaded All points. When density bar becomes inactive, this means you see All points from the originaldata in the active Clipping Box area. No missing points!
Undet Coloring toolbar- Colors point cloud by RGB (true colors)- Colors point cloud by Intensity- Colors point cloud by plane. Define plane in Settings.- Colors point cloud by Height (Z value)- Colors point cloud in Black/white- Opens Coloring SettingsPoint Cloud point size: 1 – 25 pixelsTransparency settings 0 – 100 %Shading: intervals depend on gradient palletColor Palette (Gradient): various color bandAuto Contrast adjusts Point Cloud contrastPlane: Setting to define Plane coloringPlane depth slider: Move from left to right increasesdepth by plane.- Select for reference plane- Flips reference planeSet fixed size interval to Color point cloud by planemode according to chosen gradient.
Undet Scenes toolbar- Saves point cloud Clipping Box settings (Coloring settings, Density settings, View section boxgeometry, Data classes and Visibility) active SketchUp SCENE.- Removes point cloud Clipping Box settings from active selected SketchUp SCENE.- Exporting SketchUp Scenes animation to image set by choosing Resolution, Frames Rate andAntialiasing;- Plays animation of your created SketchUp SCENES with different saved point cloud ClippingBox settings.Watch a video that shows more about Undet Scenes
Undet References toolbar- Creates point type object snapping to point cloud and allows you to set axes start point- Creates point type object snapping to point cloud- Draw new line by snapping to point cloud- Opens automatic feature extraction settings- Extracts a corner line between point cloud planes, by selecting click1 and click2
Automatic feature extraction settingsStep size value should be 3-5x bigger than point clouddensity (distance between neighboring points).A Bigger step means, a bigger distance between pointcloud points for plane extraction. By selecting a biggervalue, you will be able to extract large planes (forexample: walls, columns, roof plane windows frames)A Smaller step means, a smaller distance between pointcloud points for plane extraction. By selecting a smallvalue, you will be able to extract smaller planes (forexample: windows frames, door frames)- Resets step size to defaultCurvature Tolerance. If the surface is bumpy or curvy byincreasing tolerance you will be able to create a detailedmesh and capture small bumps and curves.Keep Vertical means that the extracted plane will stay inthe vertical position.- Select initial point location to extract plane- Extracted plane scale function- Extracted plane rotate function- Extracted plane press&pull function- Finds and creates surface mesh according toextracted planeWatch a video that shows more on automated extraction and meshing
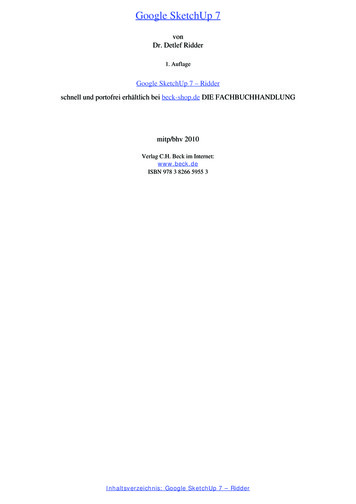
Example: Plane Recognition settingsWell recognized plane (Step size 0.04 m)Badly recognized plane (Step size 0.24 m)Example: Surface creation with small step size(Step size 0.34 m)Detailed ground mesh created until first biggerbump(Step size 0.34 m)Detailed ground mesh created in all areas
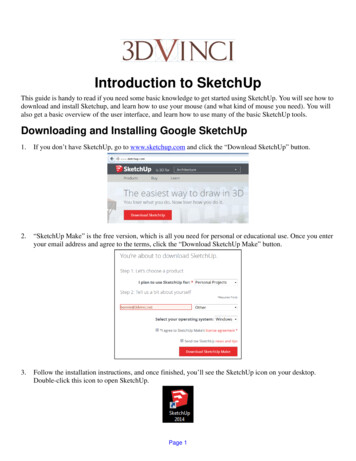
Example: Surface creation with bigger step size. A Bigger step means a more decimated mesh without smallbumps and curves.(Step size 1.34 m)Detailed ground mesh created until first biggerbump(Step size 1.34 m)Detailed ground mesh created in all areasA ground surface mesh can be created from an unclassfied point cloud
Menu on Right Mouse ClickBy clicking the right mouse button on a selected scan station marker (green triangles in picture below),you will see an additional Undet menu.Show selected data classes – Shows selected scan station point cloud dataHide selected data classes – Hides selected scan station point cloud dataHide selected station markers – Hides selected scan station markersIsolate selected data classes – Isolates selected scan stations point cloud dataIsolate selected station markers – Isolates selected scan station markersGroup - Group or Ungroup selected scan station
Undet Extensions menuOpen – Opens Undet point cloud projectExport to Layout – Exports Point Cloud image to SketchUp Layout file;New – Opens a standalone Undet point cloud project creator (Undet Indexer), if you don‘t have UndetIndexer you can download it here ;Close - Close Undet Point Cloud project;Coordinate Systems – Opens Coordinate Systems settings;Resize – Activates clipping box grips for resizing;Move – Activates clipping box grips for moving;Rotate – Activates clipping box grips for rotating;New Clipping Box – Creates new view Section by defining a center point;New by Selection – Creates new view Section around selected SketchUp objects;
Reset – Resets Clipping Box to the full extent of the point cloud;Clip/Unclip – Activates UNDET view Section;Clipping Box Edges – Activates / Deactivates clipping box edges;Hide/Show Settings – Hides or Shows point cloud;Scan Data – Opens scan data grouping settings;High Performance – Optimizes density for higher performance;High Visibility – Trades performance for higher density;Density – Opens density settings;RGB – Colors point cloud in Natural colors;Intensity - Colors point cloud by Intensity;Plane – Colors point cloud by plane. Define plane in Settings;Height – Colors point cloud by Height;Greyscale – Colors point cloud in Greyscale;Settings – Opens Coloring Settings;Save to Scene – Saves your Point cloud settings: Coloring settings, Density settings, View section boxgeometry, Data classes and Visibility to selected scene;Remove from Scene – Removes all Point cloud settings from selected scene;Export Animation Image Set – Exports SketchUp Scenes to image set by choosing Resolution, Frames Rateand Antialiasing;Play Animation - Shows the animation of your created scenes in different Point cloud settings;Axes – Snaps SketchUp drawing Axes to point cloud point;Point – Snaps a point cloud point;Line – Snaps a line between two-point cloud points;Feature Extraction Settings – Opens Feature Extraction recognition parameters;Corner line – Extracts a corner line between two-point cloud planes;About – Information about your license and Undet for SketchUp version;Help – User guide;Check for updates – Checks if there are updates available for your software version;Configure Automatic Updates – Configuration of Automatic updates;
Coordinate system managementIf your Undet project scan data files are in a large / state coordinate system (for an example UAV,Airborne LiDAR), when opening a project in SketchUp a pop-up will request to Shift the project (0,0,0)point. You can find the Undet Coordinate System settings at: Extensions - Undet - Coordinate Systems.System name: Here you can choose differentcoordinate systems. You can change your projectcoordinate system at any time.Shift from start and rotation angles: You canmanually insert these values to shift and rotateyour project.- Manually move point cloud- Manually rotate point cloud- Restore original coordinates valuesNote: If you close an Undet project, the manually inserted coordinate transformation values will be lost.Please save them manually in a text file or take a screenshot of your transformation parameters.For example: if you try to open an Undet project in a large coordinate system, Undet will suggest shiftingthe point cloud data to coordinates (0,0,0). You will be able at any time to change the coordinate systemfrom (0,0,0) to the original with large numbers.We do not recommend to create deliverables using the point cloud in a large coordinate system. It maycause errors in the modeling tools and start screen view glitching while zooming.
FAQ1. When I open an Undet project my clipping box is empty? Why?An empty clipping box means problems with Nvidia Quadro and some Radeon video drivers or in rarecases conflict situations with other plug-ins.Please try these options:1. To work with Undet for SketchUp, please run Undet software from our ICON „Undet for SketchUp2019“, our shortcut will activate drivers for Quadro / Radeon video cards.2. Please update video card drivers and try the first step.If the problem still persists we will need to connect to your computer for individual customization.Regarding this issue please contact us at info@undet.com.
2. Why does an Undet license dialog pop-up each time when I open Undet for SketchUp?An Undet license dialog box will appear when opening Undet for SketchUp if Caps Lock is activated.Please switch off Caps Lock and license manager should not appear when opening the software.3. Do Undet projects support large coordinate systems (State, airborne LiDAR)?Yes, if you have scan data files in large / state coordinate systems (for example UAV, Airborne LiDAR, etc)you can create an Undet project.In all Undet plugins, there are "coordinate system transformation" tools.For example: if you try to open the Undet project in a large coordinate system, Undet will suggest shiftingpoint cloud data to coordinates (0,0,0). At any time you will be able to change the coordinate system forthe project (0,0,0) to the original with large numbers.We do not recommend creating deliverables using the point cloud in large coordinate systems. This isbecause it may cause errors when using modeling tools and start screen view glitching while zooming.
4. Can I scale / resize point clouds with Undet for SketchUp?Undet keeps initial file structure and scale. By using the "coordinate system transformation" tools youcan shift and rotate the Undet project, but scaling is disabled.All scan data files should be registered and on the same scale and coordinate system.
Supported SketchUp versions: SketchUp 2017 - 2019. Technical requirements: Minimal technical requirements are the same as for SketchUp, but since Undet is dealing with point clouds, which is often heavy and data rich (millions of points having XYZ coordinates, Intensity and RGB values) some specs are worth upgrading.