Transcription
SketchUp InstructionsEvery architect needs to know how to use SketchUp!SketchUp is free from Google just Google it and download to your computer. You cando just about anything with it, but it is especially good for conceptualization ofarchitectural design. The current version (November, 2010) is 8.0. These instructionsare based on this version. There is also a professional version, SketchUp Pro 8.0, thatthey sell online for 495.00. Students can purchase a one year license of SketchUp Profor 49.00. But I would recommend downloading the free version from Google.The major difference between free and Pro version is the ability of SketchUp Pro toimport from and export into AutoCAD. If you really want to import AutoCAD drawings,you could download the SketchUp Pro version for an 8 hour trial, import the AutoCADdrawing, and just not follow through with your purchase. The earlier version, SketchUp7.1, allows for using a free AutoCAD import plugin that you can download from theGoogle SketchUp site. However, in order to import an AutoCAD drawing into SketchUp7.1, you need to first save the AutoCAD drawing down to AutoCAD 2007. The AutoCADdrawing will import into SketchUp as a Group, which can then be exploded down toindividual elements, which, in turn, must also be exploded to be able to change them inSketchUp. It is kind of a mess. It’s really better just to redraw the drawing in SketchUp.There are some great video tutorials online on the Google SketchUp web site. There isalso an extensive online library of SketchUp premade components which are availabledirectly within the program. SketchUp also plays well with Google Earth allowing you tonot only design a building but place it on its actual site anywhere on the earth.SketchUp ExercisePage 1
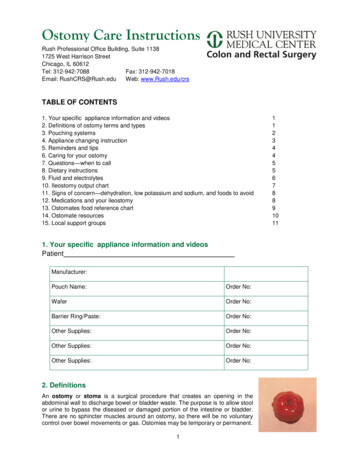
1. Open SketchUp2. If the screen is not set as shown below, make the following changes:a. Turn on the “Large Tool Set” Toolbar: Select the View pulldown menu Toolbars Large Tool Setb. Turn on the “Views” Toolbar: Select the View pulldown menu Toolbars Viewsc. Turn on the “Shadows” Toolbar: Select the View pulldown menu Toolbars Shadowsd. Turn on the “Styles” Toolbar: Select the View pulldown menu Toolbars Stylese. Turn off perspective view for the start of the project: select Camerapulldown Parallel Projection3. Go to the plan view by clicking on the Plan icon:SketchUp InstructionsPage 2
4. Your screen will look like this:5. Draw a line: Use the pencil tool6. You can draw in X (red) or Y (green) or Z (blue) direction. If you want to makethe line exactly 20’-6” long, pick the start point, then point the cursor in thedirection you want to the end point to be located then type in 20’6 on thekeyboard. Inputting distances for lines is the same as AutoCAD: click a point,then point the cursor in the direction you want to draw the line, then type thedistance.7. Note that the native units of SketchUp are inches, just like AutoCAD, in otherwords, if you type a distance of 100 and do not put the foot symbol after it (’) itwill be interpreted by SketchUp as 100 inches. If you mean feet, type the footmark (’). To separate fractions of an inch from whole inches, leave a space.8. At any time while you are drawing an entity, for example, a line or rectangle, youcan type the dimensions in the "VCB" box and the entity will be drawn to thosedimensions.SketchUp InstructionsPage 3
a. If you want to draw a line that is 9 feet 6 inches long, start to draw the linein the direction you want, then type: 9' 6" (you don't need to click in the"VCB" box in order to type in it, just start typing), and then press Enter.b. If you want to draw a rectangle that is 6 feet 6 inches wide by 4 feet 6inches deep, begin to draw the rectangle, type: 6' 6", 4' 6" (again, youdon't need to type in the "VCB" box), and then press Enter.9. As you draw lines when a start or end point of the line aligns with another point,SketchUp will signal graphically by drawing a red, green or blue line from point topoint – like the illustration below:14. Draw a plane Draw a rectangleChange to a 3d view: select the isometric icon: The drawing will look like this:SketchUp InstructionsPage 4
Select the Push-Pull tool: Click the left mouse button on the top face and pull it up. If you want to beprecise about the distance, type a number (add the foot mark if you meanfeet). Turn on shadows:SketchUp InstructionsPage 5
Note that you can set the month of the year and the time of day for settingthe sun direction. You can change the color of any modeled surface. To do that, select thePaint Bucket:SketchUp InstructionsPage 6
The Materials dialogue box will appear. Select “Colors” from the pull-down list:SketchUp InstructionsPage 7
Make sure that “Shaded” button is turned on: Select a color from the color palette and pick a plane that you want tocolor: If you turn the X-Ray icon on, also, you can see into the object:SketchUp InstructionsPage 8
Other ways of viewing your objects are “Wireframe,” “Hidden Line,” and“Shaded.”19. To move, rotate or scale an object, first select the whole object using the selecttool . You can pick one part at a time or select with a window or a crossingwindow. If you want to select several parts one at a time, hold down the shift key.To unselect an a part of object that has been selected, hold the shift key downand reselect it. If you want to cancel the selection, just right click the mouse on ablank area of the drawing.20. Then pick the “Move” or “Rotate” or “Scale” tool:SketchUp InstructionsPage 9
21. To lengthen a line, click on the Move tool, click on the end of the line you want tolengthen (there will be a green grip appear) and move it to a new location.22. To copy an object, use the Move tool, but hold down the Ctrl key while moving.23. To mirror, select the objects, right click and pick “Flip Along” then select red,green or blue direction. You cannot mirror along a diagonal axis, so you have tomirror first then rotate the object. If you want to mirror an object and keep theoriginal, make a copy of it first.24. Saving: pick the Save icon or select File and then Save. The first time you saveyou will be prompted for a name for the file as well as a location in which to saveit.25. How to draw a building with a gable roof. Draw a rectangleExtrude it verticallyDraw a line down midpoint of one top edge to the otherUse the Move command to drag that line vertically (along the blue axis)26. How to draw a building with a hip roof Draw a rectangleExtrude it verticallyDraw a line down midpoint of one top edge to the otherDraw a square from one corner to the lineSketchUp InstructionsPage 10
Draw the diagonal of the square (45 degrees)Draw the other diagonal (45 degrees)\Erase the squareSketchUp InstructionsPage 11
Repeat on the other sideGrab the top ridge with the Move tool and move up (along the Blue axis)SketchUp InstructionsPage 12
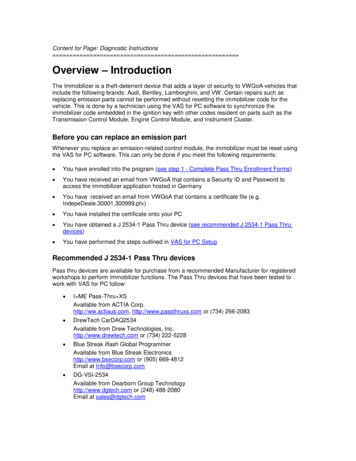
Bob’s your Uncle27. How to create Multiple Copies (Linear Arrays) The Move Tool can be used to create arrays, or a series of copies ofgeometry.To create multiple copies of one or more entities: Select the “Select” Tool.The cursor will change to an arrow.Select the entities to be copied.Select the “Move” Tool.Press and hold the Ctrl key on your keyboard. This action informsSketchUp that you want to duplicate the selected entities.Click on the selected entities to copy.Move your mouse to copy the entities. A copy of the selected entities willfollow as you move your mouse.Click at the destination point to finish your copy operation. The copiedentities are now selected and the original entities are deselected.Type a multiplier value to create additional multiple copies. For example,typing in 2x (or *2) will create one additional copy (or 2 copies total, theone you manually copied plus one you automatically copied using thisstep) instead of just one.28. How to draw roads: Start with a large rectangle, which will be the ground planeDraw lines on it 25’ apart.Connect the cornersDraw an arc at each intersectionErase the excessMake closed at ends to turn into a planeExtrude 3’ vertically down. (I know this is too large of a curb height, but wewant to make a visible depth to the road).SketchUp InstructionsPage 13
29. How to use the "Follow Me" ToolDraw a rectangle 30’ in the X direction and 40’ in the Y direction.Pull it up 6’Draw a line 6” up and 12” to right to form the first riser and tread.SketchUp InstructionsPage 14
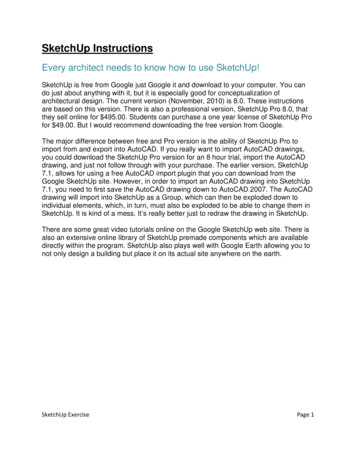
Copy these two lines by selecting them first, then select the move command, andpick the first point as the bottom of the riser, the press and hold the control key downand pick the right end of the horizontal line, then type x11. This will array the steps11 times.Note that the top portion of the cube can now be pushed and pulled separately fromthe bottom. That is required to use the FollowMe tool.SketchUp InstructionsPage 15
Select the FollowMe tool.Place the cursor over the top part of the cube above the steps and click with leftbutton.Place the cursor and follow it along the top edge of the cube – you will see the edgeline turn red.SketchUp InstructionsPage 16
Follow all along the left and far edge:This is the result:You could follow it all the way around if you had enough width to do stairs all around.SketchUp InstructionsPage 17
Pretty cool – this takes some practice. So go ahead, practice!SketchUp InstructionsPage 18
Below is an explanation of the tools:SketchUp InstructionsPage 19
30. Shading and view commands:31. SketchUp and Google earthYou can place a SketchUp model anywhere on the earth using Google Earth.Here is how:Open SketchUpDraw a model in SketchUpImport the site from Google Maps by selecting the icon in the SketchUp menu bar withthe yellow arrow pointing down.An “Add Location” Dialogue box will appear:SketchUp InstructionsPage 20
Type in the address of the location you want, and then click on “Select Region” button.You can then adjust the pins at the corners and, then select the “Grab” button.SketchUp InstructionsPage 21
If you don't like the background, click on it so the border turns red, then right click andselect "unlock" from the context cursor menu. The border will then turn blue. Now selectthe delete key on the keyboard.Here is the original 3d image in Google Earth:SketchUp InstructionsPage 22
Below is the image SketchUp after importing the Google Earth site to SketchUp:You can move, rotate or scale your drawing on the Google Maps background, but youwill not be able to change the background. After you have the building where you wantit, and want to see how it will look in Google Earth in 3d, export it along with the site toGoogle Earth by selecting the "Place Model" icon in the SketchUp menu bar with theorange arrow pointing up.SketchUp InstructionsPage 23
Now here is how your "placed" model will look in 3d in Google Earth:Note that you can continue to make changes to the model in SketchUp and then use"Place Model" again to update it.Answer “Yes” to update the image in Google Earth.Note that you cannot cast shadows in Google Earth.SketchUp InstructionsPage 24
32. SketchUP animations and Power Pointa. Open SketchUp and make a drawingb. Create Scenes in SketchUp by selecting View Animation Add Scenec. Zoom, move viewpoint, add color, change time of day or add to model insome other way and add another scene.d. After you have added all the scenes you want for your animation, selecte. File Export Animation. Give it a name and a path to save. It will save yourfile as an .avi file.f. Open Power Point and make a new show.g. Click on the Insert tab Movie. Browse to the avi file you just created andselect it. In the Microsoft Office Power Point dialogue box that pops up "Howdo you want the movie to start in the slide show," select the button"Automatically."SketchUp InstructionsPage 25
Frequently Asked QuestionsQuestion 1: Why is my model being clipped and sliced as I rotate or zoom in?1. This is a known glitch in the software called Camera Clipping Plane. First, don'tworry; although it can be distracting, this doesn't cause any actual damage toyour model.2. There are several situations in which you might encounter this:3. One is when the field of view (FOV) is set very wide. You can adjust the FOVbetween 1 and 120 degrees (the default is 35 degrees in Google). It's easy tounintentionally change the FOV by pressing the Shift key while you are zoomingin or out using the Zoom tool.4. Another situation that can cause clipping is when the Perspective camera modeis turned off. In that case, click the "Zoom Extents" button (it looks like amagnifying glass with four red arrows pointing outward). The camera zooms outto display the entire model, and the clipping is eliminated.5. A third situation is when the scale of your model is very small or very large. Inthis case, you can change the scale of your model.6. This can also happen if your model is very far away from the origin point (thepoint where the red, green, and blue axes intersect). In that case, you can moveyour model closer to the origin point. To do this: select all of the geometry in yourmodel, use the Move tool to grab a corner point of the selected geometry that ison the ground plane, start to move the selected geometry, and then type "[0,0,0]"(including the square brackets) in the "Value Control Box" (which is in the lowerright corner of the SketchUp window). This causes the selected point to bemoved to the origin point.7. I have found that the easiest way to fix it is to simply Zoom Extents(Camera, Zoom-Extents, or Ctrl-Shift-E)SketchUp InstructionsPage 26
Question 2: How do I Change the scale of an entire model?1. If you have drawn a model composed of many entities, for example, an entire2.3.4.5.house made of many edges, faces, and other entities, and then want to changethe scale of the entire model, there's an easy way to do this:Pick an individual entity that you can use as a reference, for
There is also a professional version, SketchUp Pro 8.0, that they sell online for 495.00. Students can purchase a one year license of SketchUp Pro for 49.00. But I would recommend downloading the free version from Google. The major difference between free and Pro version is the ability of SketchUp Pro to import from and export into AutoCAD. If you really want to import AutoCAD drawings, you .