Transcription
Notre Dame Design DeckSketchUp TutorialN3D Safety CodeAll posted safety guidelines must be followed at all times.IntroductionThis tutorial walks through the creation of a 3D model using SketchUp. It is intended forbeginners to 3D modeling.Installing SketchUpDownload SketchUp from http://www.sketchup.com/ (You want to download SketchUp Make)Introduction to SketchUpLaunch the program. You may need to select a template. Any template should work, but Iusually choose “Simple Template – Feet and Inches”. You will see a screen with a ground, a horizon, a man (for scale), and lines for the axes.Creating the ND Monogram1
Notre Dame Design DeckSketchUp TutorialModifying the Camera Camera modification is done in a similar way to all 3D modeling programs. The easiestmethod is to use a 3-button mouse.Orbit Tool: Click the middle mouse button and drag to rotate the camera. If not using a 3-button mouse, this can also be done by pressing O or clicking on theOrbit tool at the top of the screen. Then click and drag the mouse to rotate the view.Pan Tool: Hold the shift key, then click the middle mouse button and drag to move the cameralaterally. This can also be done by pressing H or by clicking on the Pan Tool at the top of thescreen, and then clicking and dragging.Zooming: Roll the scroll wheel to zoom in and out. This can also be done by typing Z, or by clicking on the Zoom Tool in the toolbar. Thenclick and drag up or down to zoom in or out.Preset Views: You can modify the camera in additional ways using the camera menu at the top of thescreen, including selecting a standard camera view, such as top, bottom, front, etc.Go ahead and modify the camera so that you have a good view of the origin.2
Notre Dame Design DeckSketchUp TutorialAdding 2D Shapes All of the 2D primitive shapes are listed in the toolbar at the top of the screen. SelectRectangle. Click on the origin to specify the first corner of the rectangle. You can specify the dimensions of the rectangle now, including the units. Dimensions areseparated with a comma.o For example, you could type 6’6”,6.5’ for 6 foot-6 inches x 6 foot-6 inches or5m,24cm for 5 meters x 24 cmType in 0.73”,0.81” to specify a rectangle that is 0.73 x 0.81 inches. You can see that thedimensions you type appear in a box in the very bottom right corner of the screen. Pressenter to finalize the dimensions and create the rectangle. Also, feel free to delete the manby clicking on him and pressing the Delete key.You will likely have to zoom in very far to get a good view of the new rectangle, as it isso small.Rather than typing in dimensions, you could also use the mouse to specify the oppositecorner. The dimensions displayed in the lower right corner will change as the mouse ismoved. However, this is less accurate than typing in the dimensions you would like.Tape Measure Tool The tape measure tool can be used to create guidelines for use in drawing. Click on the Tape Measure Tool in the toolbar, or press T.3
Notre Dame Design DeckSketchUp Tutorial Click once on the left edge of the rectangle, then move your mouse inside the rectangleand type 0.2”, and press enter. This creates a guideline that is .2 inches from the edge. Create three more guidelines: One offset 0.20” from the right side of the rectangle, andtwo offset 0.11” from the top and the bottom.Line Tool Draw a horizontal line on the top guideline that is 0.078” long, off the left edge. Do thisby first clicking on the Line Tool, then clicking on the intersection between the guidelineand the left edge. Then move your mouse out along the guideline. It will snap to theguideline and a popup will say “On Line”. Type in the measurement and press enter. Then draw a line all the way down to the bottom guideline. It will turn green to indicatethat you are drawing parallel an axis. Lastly, draw a line to the left edge of the rectangle.4
Notre Dame Design DeckSketchUp Tutorial Next, draw a 0.078” line from the right side, and draw a vertical line all the way to thebottom edge. Draw two lines that extend the length of the rectangle along the vertical guidelines.Protractor Tool Use the Protractor Tool to create an angled guidline that is offset 30 degrees from thevertical axis. Do this by selecting the Protractor, then click on the Endpoint shown. Next,click upward along the guideline. Then type 30 and press enter.5
Notre Dame Design DeckSketchUp Tutorial Draw a line from the endpoint along the new angled guideline until it meets the leftguideline.Selection and Move Tools Choose the Selection Tool (Shortcut: Spacebar), and then click on the diagonal line wejust drew. Select the Move Tool (Shortcut: M). Next, hold down the Ctrl key (Option on Mac). Dragthe line by the endpoint until it meets the top edge. Holding down the Ctrl Key creates acopy of the line. If Ctrl does not work, try the Alt key.6
Notre Dame Design DeckSketchUp Tutorial Draw a 0.078” horizontal line from the edge shown. Next draw a line that meets thebottom edge. Repeat for the top edge. We no longer need the guidelines. Under the Edit Menu, select Delete Guides.7
Notre Dame Design DeckSketchUp Tutorial Using the Eraser Tool (Shortcut: E), delete the highlighted lines. Delete them one by one.If you make a mistake, use Undo under the Edit menu or press Ctrl Z.Creating the “D” Off to the right of the “N”, create a 1” x 0.5” rectangle. Make three guides: One offset 0.185” from the left edge and two 0.11” offset from thetop and bottom edges. With the line tool: On the top guide, draw a 0.06” horizontal line from the left edge.Continue that line downwards until the bottom guide. Finish it off on the left edge.8
Notre Dame Design DeckSketchUp Tutorial Draw a rectangle that intersects the guides and is 0.7” wide. Do this by selecting theRectangle Tool, clicking in the upper left intersection, then moving your mouse to theright and to the lower guideline. Then type in 0.7” and press enter. Create two guides that are offset 0.033” vertically from the rectangle that was just drawn.Next, click on the intersection between the guide and the right edge of the innerrectangle. Move your mouse left along the top/bottom edge of the rectangle until it turnspink. This indicates that it is a 45 degree angle. Do this at both the top and the bottom. Repeat this for the outer rectangle, using the upper/lower guideline this time.9
Notre Dame Design DeckSketchUp Tutorial Delete the guidelines using the edit menu. Then erase the highlighted lines below (one byone). Also erase the inner surface. Erase the inner surface. This can be done by right clicking on it and clicking Erase.Assembling the Monogram Create a guideline that is offset 0.168” to the left of the top left corner of the “N”. Thencreate a guideline that is offset 0.15” below the top left corner.10
Notre Dame Design DeckSketchUp Tutorial With the Selection Tool, double-click the “D”. Then, with the Move Tool, drag it by theupper left corner to the intersection of the newly created guidelines. Erase the highlighted edges (One at a time). Using the selection Tool, double-click themonogram. Right-click it and click Make Group. Save the file as monogram.skp using File - SaveCreating the Coin Open a New file.Create a circle at the origin with a 0.675” radius (Again, you will have to zoom very farin to see this).11
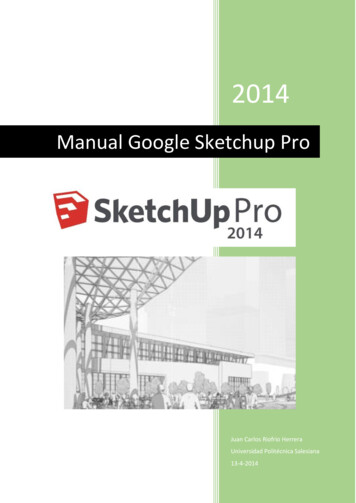
Notre Dame Design DeckSketchUp TutorialExtruding Shapes Select the Push/Pull Tool. Click on the circle, type 0.125”, and press Enter. This extrudesthe circle upwards to form a cylinder.Offset Tool Select the Offset Tool (Shortcut: F). Click the edge of the circle. Then, move your mousetowards the inside of the circle, type 0.05” and press Enter. Select the Push/Pull Tool again, and push the inner circle inwards 0.0625”. With the Select Tool, Triple-click the model. Right-click and select Make Group. Save your model as coin.skp12
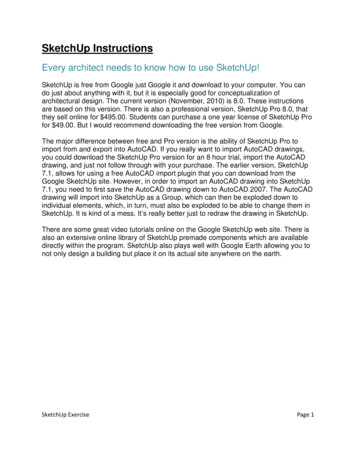
Notre Dame Design DeckSketchUp TutorialAssembling the CoinImporting Models Create a new file. Under the File menu, select Import Look for coin.skp and import it. Make sure to set the File Type to SketchUp Files. Click on the origin, and zoom in to view the coin. Next, import monogram.skp. Thistime, click on the coin, and ensure that the cursor popup says “On Face in Group”. Justestimate the placement of the monogram so that it is roughly centered. Double click on the monogram to enter the group. Double click again until dots appear inthe monogram, meaning that it can be edited. Use the Push/Pull tool to pull it up to theheight of the coin. One method to accomplish this is to start pulling it, and then to hoveryour cursor over the edge of the coin until the cursor snaps to that height. The coin is now finished. Save the file as ND Coin.skp13
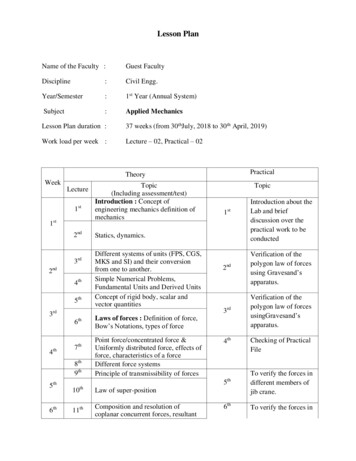
Notre Dame Design DeckSketchUp TutorialExporting an STL SketchUp does not by default support importing/exporting STL models, but these are avery commonly used format for 3D models, particularly when 3D printing. There is aplugin that you can add which implements this functionality.Go to Window- Extension WarehouseWe want the SketchUp STL extension. Beneath the Welcome box, in the ‘Categories’area, click on ‘3D Printing’. SketchUp STL should be listed here. If not, use the searchbar to find it.After selecting this extension, click on the Install button in the upper right-hand corner. Ifthis button instead says ‘Sign In’, then you can go ahead and sign in with a Googleaccount, such as your ND account. After signing in, the button should change to say‘Install.’ Click on it.14
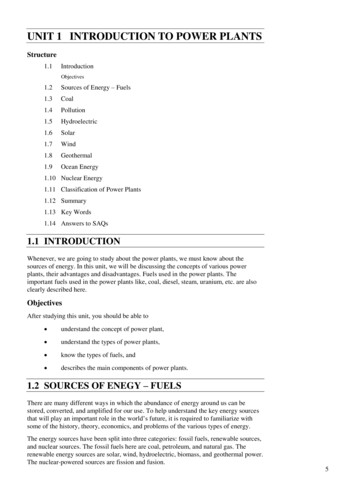
Notre Dame Design DeckSketchUp Tutorial You now have the ability to both import and export STL files with SketchUp. Be sure to delete the man who is standing in the scene before exporting, or he will beexported as well. This can be done by clicking on him with the Select tool and pressingDelete. With ND Coin.skp open, select the ‘Export STL’ menu option. A popup asking whetherto export entire model should appear. Select Yes.An Export Options dialog appears. Make sure you change export unit to Millimeters.Though we designed our model in inches, an STL file is unit-less, and MakerWareassumes models are specified in millimeters. Select OK. 15
Notre Dame Design DeckSketchUp Tutorial Save the file as ND Coin.stl and press Enter. A final popup will appear summarizing theexport.The file can now be opened in MakerWare for 3D Printing. See the 3D Printing tutorialfor details.If you would like additional tutorials for using SketchUp, there is an excellent series ofvideos at http://www.sketchup.com/learn/videos16
SketchUp does not by default support importing/exporting STL models, but these are a very commonly used format for 3D models, particularly when 3D printing. There is a plugin that you can add which implements this functionality. Go to Window- Extension Warehouse We want the SketchUp STL extension. Beneath the Welcome box, in the ‘Categories’ area, click on ‘3D Printing’. SketchUp STL .