Transcription
IESVE Plug-in for Google SketchUpVersion 3 User GuideINTEGRATED ENVIRONMENTAL SOLUTIONS LIMITEDInternational Sustainability ConsultingDevelopers of the IES Virtual Environment Date: July 2010BOSTON, MA GLASGOW, SCOTLAND DUBLIN, IRELAND LONDON, ENGLAND MELBOURNE, AUSTRALIA SAN FRANCISCO, CA DUBAI, UAE
ContentsIntroduction . 4IESVE Toolbar . 5Thin Walls and Thick Walls . 5Set Building Properties: . 7Set data for the entire building. 7Select Groups: . 13Define the attributes of group(s): . 13Identify Rooms & Set Room Properties: . 14Identify Rooms . 14Set Room Properties. 14Select a Room: . 15Display Properties Room: Room Name . 15Toggle all Room names visibility . 16Toggle View of Shading Surfaces Only. 16Toggle VE Model shading . 17Toggle X Ray . 18Highlight Disconnected Edges . 18Highlighted Disconnected Surfaces . 18Clear Highlights. 18Show or Hide Unselected Faces . 18IESVE Menu. 19Set Building Properties, Select Groups etc. 19Identify Rooms in Selected Faces Only . 19Set VE Rooms Analysis Options. 20Tidy up Model . 20Access Virtual Environment suite tools. 21VE-Ware . 21VE-Toolkits. 21VE-Gaia/VE-Pro . 21Help / IES VE Website:. 21Definitions Floors, roofs, walls: . 21Definitions Windows / holes / doors: . 21Using Google Earth to set location and Terrain:. 22Common drawing issues: . 24page 2IESVE Plug-in for Google SketchUpUser Guide
ContentsNot all of my zones/buildings have been identified [Part 1 – Simple Cube]: . 24Not all of my zones/buildings have been identified [Part 2 – Google Warehouse models]: . 25page 3IESVE Plug-in for Google SketchUpUser Guide
IntroductionIntroductionWelcome to the IES Virtual Environment plug-in to Google SketchUp. This plug-in links SketchUp 6, 7 and SketchUpPro 6, 7 to the Virtual Environment suite of tools: VE-Ware, VE-Toolkits, VE-Gaia and VE-Pro. This document isintended as a brief introduction to the plug-in to let you get started.More detailed videos, how tos, help, forums and tutorials can all be found on SketchUp Plug-inSketchUp:Plug-in:IES VE :page 4IESVE Plug-in for Google SketchUpVersion 3 User Guide
IESVE ToolbarIESVE ToolbarThe plug-in appears as a toolbar in SketchUp. The toolbar has 11 features which will be described in more detail below:Thin Walls and Thick WallsThe IESVE plug-in for SketchUp can be used with models that have been drawn using either a Thick Walls or Thin Wallsmethod.Thin Walls – Available in both SketchUp Free and SketchUp Pro, this is the most basic way of drawing models where asingle surface represents a floor, wall, roof element.page 5IESVE Plug-in for Google SketchUpVersion 3 User Guide
IESVE ToolbarThick Walls – Available only for SketchUp Pro users, this mode allows realistic buidling models to be analysed using theplug-in where floors, walls and roofs have been modelled with a thickness as in the real-life building.page 6IESVE Plug-in for Google SketchUpVersion 3 User Guide
Set Building PropertiesSet Building Properties:Set data for the entire buildingLocation is important for building performance analysis because location and climate dictate the performance of thebuilding. Set the location by clicking Select Location from the dialog. This opens the VE Location Browser:page 7IESVE Plug-in for Google SketchUpVersion 3 User Guide
Set Building PropertiesThe VE Location browser allows you to choose major cities throughout the world. The browser has three levels:Continent [Africa, Antarctica, Asia etc]; Country / State / Territory [UK, Arizona, Manitoba etc]; then City [London, Phoenix,Winnipeg etc]. Select a location closest to your project. The local carbon fuel mix and weather data is derived by selectingthe location. The resource fuel mix translates into the carbon emissions factor per fuel type for the project that is used todetermine the carbon footprint.Once the location is selected, the latitude and longitude will be updated automatically, if you would like a more exactlatitude and longitude, you can use Google Earth (It will be explained later in the guide).Within the Set Building Properties dialog, you will also need to set the Building’s Constructions, Building Type andBuilding HVAC Service.Building ConstructionsConstructions:Building Type:HVAC Service:What constructions are used in your building? What glazing types do you wish to use?What is the principle function of the building you are designing?How is you building heated and cooled?page 8IESVE Plug-in for Google SketchUpVersion 3 User Guide
Set Building PropertiesBuilding TypeHVAC Servicepage 9IESVE Plug-in for Google SketchUpVersion 3 User Guide
Push Through Doors and WindowsPush Through Doors and Windows (SketchUp Pro Thick Walls only)When a model has been constructed in Thick Walls mode windows and doors can be added as Groups or Components.Ensure the Group/Component has the correct category definition using the IESVE Toolbar Select Groups or SelectComponents button to define them (see later) then place the Groups/Components on the outer surface of walls.With the Window or Door Group/Component selected then select the Push Through button and the Group/Component willbe pushed through to the inner surface of the wall and will be correctly recognised by the plug-in when rooms areidentified.page 10IESVE Plug-in for Google SketchUpVersion 3 User Guide
Build a Storey from a Floor PlanBuild a Storey from a Floor Plan (SketchUp Pro Thick Walls only)Use the Build a Storey tool to extrude any 2-dimensional floor plan (for example a DXF floor plan) into a full height 3dimensional Thick Walls model.Step 1Start with a 2-D floor plan (this can be a dxf, dwg or simply a 2-D sketch).Step 2Select the floor plan then click the Build a Storey from aFloor Plan button on the IESVE Toolbar. The Build aStorey settings dialog will be displayed.Enter the Height of each Storey, the Ceiling/Slab Thickness and Number of Storeys then click Go.page 11IESVE Plug-in for Google SketchUpVersion 3 User Guide
Build a Storey from a Floor PlanStep 3The building will be extruded as defined by the settings.Each Storey has room layout as specified in the original floor plan and the number of storeys, storeyheight and slab thickness (thick walls) are as defined in the settings dialog.Note: the user settings dialog has an option to use the current settings as default, tick this to usethese values as default the next time the Build a Storey tool is used.page 12IESVE Plug-in for Google SketchUpVersion 3 User Guide
Select GroupsSelect Groups:Define the attributes of group(s):When you have components or groups in your model, you need to go into the ‘Select Components’ or ‘Select Groups’.You need to identify if the specific group(s) or component(s) will be analyzed as room surfaces, whole rooms, shade,door, window, or excluded.Room: Surfaces defined as room will form part of room boundaries. Rooms define the analysis model that is exported to VE .Room surfaces is used when the Group contains surfaces that form only part of a room shell.Whole room(s) is used when the Group contains all the surfaces that bound the room (or set of rooms).It is advised to use whole room(s) wherever possible when modelling to achieve the best results when using the IESVEplug-in for SketchUp. This will allow rooms to be quickly found by the plug-in and gives the best quality geometry exportto VE .Shade: Objects defined as Shade are treated as shading surfaces within the model and therefore taken into account forshading analysis, not for thermal analysis.Door: Group or component will be translated as a door in the VE analysis model.Window: Group or component will be translated as a window in the VE analysis model. Note that the group orcomponent will need to have a material opacity between 1-99 in order to translate as window in VE-Pro.Excluded: All Groups and Components are per default excluded from export and will not appear within the analysismodel.Note: Groups/Components defined as Door or Window can be placed on Thick Walls buildings using the Push Throughtool (as described in previous section).page 13IESVE Plug-in for Google SketchUpVersion 3 User Guide
Identify Rooms & Set Room PropertiesIdentify Rooms & Set Room Properties:Find all rooms in the model & set data for individual roomsIdentify RoomsIdentify rooms is used to find all the bounded rooms in the model. Bounded rooms are geometrical surfaces that fullyenclose a space or volume. The simplest form of this would be that a cube needs six sides to fully enclose the room. Anon-bounded box (or selected surfaces) will be treated as Shading Surfaces.Note: Shading devices will be used by the VE to shade the building. Examples of shading devices are overhangs or brisesoleil. Surrounding buildings will also shade your building.When rooms have been identified the IES VE Analytical model is displayed (in X-ray mode by default) and the VE Room Properties list is displayed showing details of all rooms that have been identified.Set Room PropertiesSet room properties; this dialog helps you set the constructions, type of use and HVAC system for the room(s) that youhave selected. (Rooms can be selected from the list or by using the Select a Room button)Use the SAVE Icon to save Room Names. Sort rooms and floors by clicking on the “Level” and “Room” column headings.If construction set or HVAC service are not defined, it will inherit the constructions and HVAC system from the buildingproperties that was previously defined.page 14IESVE Plug-in for Google SketchUpVersion 3 User Guide
Identify Rooms & Set Room PropertiesSelect a Room:Left click when the VE Room properties dialog is open to select rooms you want to edit.Right click to get further options:Display Properties Room: Room Name Selection of this menu item opens the room properties menu for the selected room:page 15IESVE Plug-in for Google SketchUpVersion 3 User Guide
Identify Rooms & Set Room PropertiesInsert FloorsInsert floors is useful to split a single massing volume into single or multiple floors. One floor is drawn as a default tostart, click on ‘Identify Rooms’, after the room has been found, right-click on the room, select ‘Insert Floors’. Select‘Check to insert as many Storeys as will fit’, floors will be inserted based on the overall height of the volume automatically.Toggle all Room names visibilitySelection of this menu item toggles the display of the room names on and off:Toggle View of Shading Surfaces OnlySelect this option to display or hide all shading surfaces on the analytical model.page 16IESVE Plug-in for Google SketchUpVersion 3 User Guide
Identify Rooms & Set Room PropertiesToggle VE Model shadingThe Virtual Environment has a convention to describe zones that will be modelled as thermal zones, and surfaces thatwill be modelled as shading surfaces. Thermal zones are enclosed volumes, traditionally coloured blue in the VirtualEnvironment . Shaded surfaces are non-enclosed volumes, or single surfaces, traditionally coloured yellow in the Virtual Environment To be able to identify these entities in SketchUp the Toggle VE Model shading menu shows theSketchUp Model in the traditional colours of a VE Model:The blue zones are thermal zones; these will be included in the energy calculations; the yellow zones are shadingelements (obstructions). The two types shown on this drawing are the parapet walls and the adjacent building. Theparapet is created as a single surface, the adjacent building has no floor (shown below):page 17IESVE Plug-in for Google SketchUpVersion 3 User Guide
Identify Rooms & Set Room PropertiesToggle X RaySelect this option to display the IES VE analytical model with all surfaces in X-ray mode or not.Highlight Disconnected EdgesUse this tool to help troubleshoot rooms that were not found by the plug-in. Any edges that are not connected arehighlighted blue.Highlighted Disconnected SurfacesUse this tool to help troubleshoot rooms that were not found by the plug-in. Any surfaces that are not connected arehighlighted red.Clear HighlightsSelect this option to remove the highlighting on any disconnected surfaces or edges.Show or Hide Unselected FacesThis option allows the model to be hidden with only faces selected by the user left to assist with any further modelling theuser wishes to do.page 18IESVE Plug-in for Google SketchUpVersion 3 User Guide
IESVE MenuIESVE MenuTo access the IESVE Menu commands select Tools IES.Set Building Properties, Select Groups etcThese menu options perform the same functions as the toolbar buttons documented in earlier sections of this user guide.Identify Rooms in Selected Faces OnlyUse this tool to run the room finding algorithm on a reduce set of faces. Select the faces that bound the rooms you wantto analyse then select his option.Note: this tool can be most useful when troubleshooting sections of the geometry that do not find rooms as expected.page 19IESVE Plug-in for Google SketchUpVersion 3 User Guide
IESVE MenuSet VE Rooms Analysis OptionsThis opens the VE Analysis Settings dialog.Analysis Type – Select Thin Walls or Thick Walls depending on how the model has been drawn.Analyse Visible Layers only – when ticked the Room Finding algorithm will only consider rooms on layers that are set tovisible in the SketchUp Layer Settings.Maximum Wall Thickness – when in Thick Walls mode this value will treat any space with thickness lower than thisvalue as a wall volume.Vertical-Horizontal Transition Angle – the angle that defines whether a sloped surface is a Wall (vertical) or a (roof).Minimum Room Height – when identifying rooms any space lower than this height is ignored.Minimum Floor Area – when identifying rooms any space with a floor area lower than this value is ignored.Tidy up ModelThe Tidy Model options allow the user to remove superfluous lines that may slow down or inhibit the room identificationprocess, ensuring a faster and higher quality model transfer to VE .Delete Detached Lines – Delete any lines in the model that do not form part of a surface boundary.Delete Polygons with a Single Face – Removes any closed loops within a surface.Delete all Text (exc. Room Names) – Deletes all extra text from the SketchUp model (leaves room names as identifiedby the IESVE plug-in)page 20IESVE Plug-in for Google SketchUpVersion 3 User Guide
Access Virtual Environment Suite ToolsAccess Virtual Environment suite toolsClick these buttons to link to VE-Ware, VE-Toolkits, VE-Gaia or VE-Pro.VE-WareClick this button to launch VE-Ware [more info: VE-Ware]VE-Ware is free building energy and carbon assessment software, also contains Free VE-SBEM for UK regulationcompliance.VE-ToolkitsClick this button to launch VE-Toolkits [more info: VE-Toolkits]VE-Toolkits offer early stage analysis for quick iterative assessments covered by a range of Toolkits includingSustainability, LEED, Green Star and more.VE-Gaia/VE-ProClick this button to launch VE with access to VE-Gaia and VE-Pro [more info: VE-Pro, VE-Gaia]VE-Gaia offers a step-by-step workflow analysis, iteration and reporting interface which weaves a clear route through theVE engine. VE-Pro is our most powerful, flexible and most in-depth suite of building performance analysis tools.Help / IES VE Website:Click to access the Help files, or to access the IES website [www.iesve.com]Definitions Floors, roofs, walls:Ground Floor Slab: horizontal surface that is not in contact with a room belowRoof: horizontal surface that is not in contact with any room aboveUpper floors: horizontal surface that is in contact with a room aboveExterior Wall: vertical surface that is not in contact with any adjacent roomInterior Wall: vertical surface that is in contact with an adjacent roomExterior Window: a window on an exterior wallInterior Window: a window on an interior wall or floorSkylights: a window on a roofDefinitions Windows / holes / doors:Door: a face drawn on another surface; opacity 100.Window: a face drawn on another surface with an opacity setting less than 1-99.Hole: a face “cut-out” or deleted from another surface; or an opacity of 0NOTE: Exterior holes are treated as windows by the Virtual Environment suite of tools.page 21IESVE Plug-in for Google SketchUpVersion 3 User Guide
Using Google Earth to Set Location & TerrainUsing Google Earth to set location and Terrain:Google Earth can be used to set the Latitude and Longitude of the SketchUp model, as well as using the terrain as part ofyour topographical surface for analysis. Firstly you need to install the Google Earth plug-in into SketchUp.(http://www.SketchUp.com/index.php?id 408)Once installed follow the steps below!Step 1: Open Google EarthStep 2: Navigate to the building locationStep 3: Get the current view from SketchUp.Step 4: Open Set Building properties [Latitude andLongitude will have updated]Note: you will need to add the City name.page 22IESVE Plug-in for Google SketchUpVersion 3 User Guide
Using Google Earth to Set Location & TerrainStep 5: If you would like to translate your terrain as partof the topographical surface. In the Layers dialog, turnon the Layer ‘Google Earth Terrain’ and turn off ‘GoogleEarth Snapshot’, you will should see the actual terrain.Step 6: Go to the ‘Select Groups’ dialog, and select‘Shade’ with the Google Earth Terrain.Step 7: Click on ‘Identify Rooms’, and your terrain willtranslate as shading surfaces for your model.page 23IESVE Plug-in for Google SketchUpVersion 3 User Guide
Common Drawing IssuesCommon drawing issues:Not all of my zones/buildings have been identified [Part 1 – Simple Cube]:More often than not the cause of this is the surfaces that make up your building or room have not bounded the space.Let’s explain this using the simplest of room shapes – the cube. Let’s approach the drawing in two ways and *forget* tocompletely enclose the cube:Step 1: Draw a rectangleStep 2: Use Push/Pull to create a cubeStep 3: Identify Rooms: SUCCESS!!Diagnosis: Blue surfaces indicate zones [In the VirtualEnvironment or via Toggle VE Shading]Step 1: Draw a rectangleStep 2: Use Push/Pull to create walls (but delete roof)Step 3: Identify Rooms: FAILURE!!Diagnosis Yellow surfaces indicate shading surfaces [Inthe Virtual Environment or via Toggle VE Shading]page 24IESVE Plug-in for Google SketchUpVersion 3 User Guide
Common Drawing IssuesNot all of my zones/buildings have been identified [Part 2 – Google Warehouse models]:Again more often than not the cause of this is the surfaces that make up your building or room have not bounded thespace. Let’s explain this time by using some Google Warehouse models and then using the Virtual Environment todiagnose the problem.Step 1: Open Google Warehouse modelStep 2: Identify Rooms: Partial Success!!Step 3: Open VE or select or via Toogle VE Shading,blue is a zone yellow a shading deviceDiagnosis: Spin the model and look at the base – there isno face here bounding the buildingNOTE: if all you need to model is the lower building and the tall building is only required for shading than this approach iscorrect!!No rooms in model: If a user only creates non-bounded rooms it is possible that no rooms will be created, the user willsee the message and advice below:page 25IESVE Plug-in for Google SketchUpVersion 3 User Guide
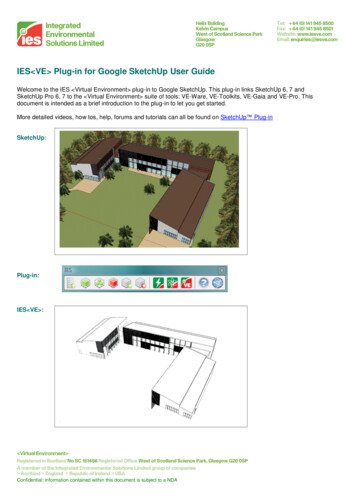
Welcome to the IES Virtual Environment plug-in to Google SketchUp. This plug-in links SketchUp 6, 7 and SketchUp Pro 6, 7 to the Virtual Environment suite of tools: VE-Ware, VE-Toolkits, VE-Gaia and VE-Pro. This document is intended as a brief introduction to the plug-in to let you get started. More detailed videos, how tos, help, forums .