Transcription
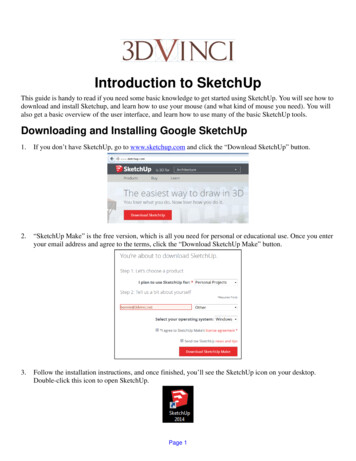
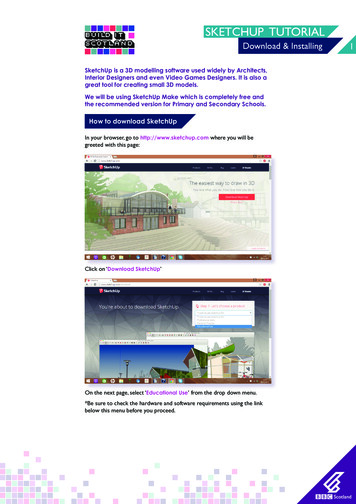
SKETCHUP TUTORIALDownload & InstallingSketchUp is a 3D modelling software used widely by Architects,Interior Designers and even Video Games Designers. It is also agreat tool for creating small 3D models.We will be using SketchUp Make which is completely free andthe recommended version for Primary and Secondary Schools.How to download SketchUpIn your browser, go to http://www.sketchup.com where you will begreeted with this page:Click on ‘Download SketchUp’On the next page, select ‘Educational Use’ from the drop down menu.*Be sure to check the hardware and software requirements using the linkbelow this menu before you proceed.1
SKETCHUP TUTORIALDownload & InstallingComplete the form on the next page, adding email, name, school name andyour role.Choose your operating system (Windows or Mac) and select ‘SketchUpMake’ as the product.Read the License agreement and check the box to agree. Then click‘Download SketchUp’.2
SKETCHUP TUTORIALDownload & InstallingWindowsFrom your Downloads folder, double click the ‘SketchUp Make’ Installer fileand follow the wizard instructions.Locate the ‘SketchUp 2016’ icon on your desktop and double click to open.3
SKETCHUP TUTORIALDownload & InstallingOn the pop up screen read the License agreement and click the box toagree then click ‘Continue’.MacFrom your Downloads folder, double click the ‘SketchUpMake-en.dmg’Installer file.4
SKETCHUP TUTORIALDownload & InstallingDrag the SketchUp 2016 icon into the Applications folder.On the pop up screen read the License agreement and click the box toagree then click ‘Continue’.Open your ‘Applications’ folder and locate ‘SketchUp 2016’ and doubleclick the icon to open it.5
SKETCHUP TUTORIALDownload & InstallingTemplate SelectionBefore you start using SketchUp you will need to select a template. This isvery important because it will allow you to select units for your model.Select the ‘Template’ menu from the bottom of the screen.Scroll down though the templates and select ‘3D Printing – Millimeters’, thenclick ‘Start using SketchUp’.6
SKETCHUP TUTORIALDownload & InstallingLet’s take a look at our blank work area. As part of the 3D Printer templatethere is a Makerbot Replicator model. This can be used as a guide area towork within to ensure your model stays at a printable scale.The Replicator is 160.02mm x 248.920mm x 149.86mm (H).NavigationBefore we start building, it’s a good idea to practice navigating the work area.From the top toolbar select the ‘orbit’ tool.7
SKETCHUP TUTORIALDownload & InstallingClick and drag the screen to rotate and orbit around the build area in alldirections.You can also click and drag with the scroll wheel to orbit.Now select the ‘Pan’ tool.8
SKETCHUP TUTORIALDownload & InstallingClick and drag to move the work area without rotating it.You can also click and drag with your scroll wheel on your mouse whilstholding down the shift key on your keyboard to Pan.Next select the ‘Zoom’ tool.Click and drag the mouse up to zoom in,9
SKETCHUP TUTORIALDownload & Installingand move it down to zoom out.You can also use the scroll wheel on yourmouse to zoom in and out.Click on the ‘Zoom extents’ tool to zoom in or out to fit the full model intothe screen.10
SKETCHUP TUTORIALMoving Objects and LinesLet’s take a look at the ‘Move’ tool. Still using the 3D shapes we createdpreviously, triple click on one to select the entire object.Or click and drag a box around it.Once all lines and faces are selected, find the ‘Move’ tool in the toolbarand click on it. Click on your shape and drag it to move its position onthe work plane.1
SKETCHUP TUTORIAL Download & Installing Drag the SketchUp 2016 icon into the Applications folder. On the pop up screen read the License agreement and click the box to agree then click 'Continue'. Open your ' Applications' folder and locate 'SketchUp 2016' and double click the icon to open it. 5