Transcription
REFERENCE GUIDE
MAKERBOT METHOD MANUALCHAPTER 1WELCOMEWelcome to the Reference Guide for the MakerBot Method Performance3D Printer.PAGE 2
PAGE 3LEGAL NOTICESLIMITED WARRANTYThe MakerBot Limited Warranty (available at makerbot.com/legal) applies to the MakerBotMethod 3D Printer.OVERALL PROVISIONSAll information in this user manual (“Manual”) is subject to change at any time without noticeand is provided for convenience purposes only. MakerBot Industries, LLC and our respectiveaffiliates and suppliers (“MakerBot”) reserves the right to modify or revise this Manual in its solediscretion and at any time and makes no commitment to provide any such changes, updates,enhancements, or other additions to this Manual in a timely manner or at all. Contact theMakerBot Support Team for up-to-date information. In order to protect MakerBot proprietaryand confidential information and/or trade secrets, this manual may describe some aspects ofMakerBot technology in generalized terms.DISCLAIMERSMakerBot does not warrant the accuracy or completeness of the information, products, orservices provided by or through this Manual and assumes no responsibility for any typographical,technical, or other inaccuracies in this Manual, which is provided “as is” and without anyexpress or implied warranties of any kind, including warranties of merchantability, fitness for aparticular purpose, or non-infringement of intellectual property. In connection with your use ofthis Manual, MakerBot shall not be liable to you for any damages whatsoever, be they direct,economic, commercial, special, consequential, incidental, exemplary, or indirect damages, even ifMakerBot has been advised of the possibility of such damages, including without limitation, lossof business revenue or earnings, lost data, or lost profits. MakerBot assumes no responsibility,nor will be liable, for any damages to, or any viruses or malware that may infect, your computer,telecommunication equipment, or other property caused by or arising from your downloadingof any information or materials related to this Manual. The foregoing exclusions do not apply tothe extent prohibited by law; please refer to your local laws for any such prohibitions. MakerBotmakes no warranties to those defined as “consumers” in the Magnuson-Moss Warranty-FederalTrade Commission Improvement Act.INTELLECTUAL PROPERTYCertain trademarks, trade names, service marks, and logos (the “Marks”) used in this Manualare registered and unregistered trademarks, trade names, and service marks of MakerBot andits affiliates. Nothing contained in this Manual grants or should be construed as granting, byimplication, estoppel, or otherwise, any license or right to use any Marks without the writtenpermission of MakerBot. Any unauthorized use of any information, materials, or Marks mayviolate copyright laws, trademark laws, laws of privacy and publicity, and/or other laws andregulations. Other company and/or product names mentioned herein may be trademarks of theirrespective companies.MAKERBOT METHOD MANUAL 2009-2019 MakerBot Industries, LLC. All rights reserved.
MAKERBOT METHOD MANUALSAFETY AND COMPLIANCEMANUFACTURER:MakerBot Industries, LLCOne MetroTech Center, 21st FloorBrooklyn, NY 11201347.334.6800PRODUCT: 3D Desktop PrinterMODEL: METHODMETHOD, Cat Nos. PACT56RATINGS: 100-240VAC 50/60 Hz, 3.9 - 1.6 AMakerBot declares that the radio equipment type 802.11a/b/g/n dual band complies with Directive 2014/53/EU.CMIIT ID: XXXXXXXXXXRegulatorycompliance@makerbot.comRADIO AND TELEVISION INTERFERENCEThis equipment has been tested and found to comply with the limits for a Class A digital device, pursuant to part 15of the FCC Rules. These limits are designed to provide reasonable protection against harmful interference when theequipment is operated in a commercial environment. This equipment generates, uses, and can radiate radio frequencyenergy and, if not installed and used in accordance with the instruction manual, may cause harmful interference toradio communications. Operation of this equipment in a residential area is likely to cause harmful interference in whichcase the user will be required to correct the interference at his own expense.Any changes or modifications made to this equipment voids your authority to operate this equipment under FCC Rules.WIRELESS SPECIFICATIONSFREQUENCY2.4 GHz / 5GHzWLAN RFFREQUENCY RANGE2.412 - 2.484 GHz /4.91 - 5.825 GHzThe module supports router channels 1-14.PROTOCOLANTENNA TYPEPulseLarsen Antennas,Part #W3006802.11 a/b/g/n2.5 dBi in the 2.4FX831.07.0100CGHz BandsANTENNASPECIFICATIONS2.2 dBi in the 2.4GHz Band / 4.5 dBi inthe 5 GHz BandPAGE 4
PAGE 5Safety alert symbols precede each safety message in thismanual. These symbols indicate potential safety hazards thatcould harm you or others or cause product or property damage.Warning: The MakerBot Method includes moving parts that may cause injury. Never reach inside theMakerBot Method while it is in operation.Warning: The MakerBot Method generates high temperatures. Always allow the MakerBot MethodPerformance Extruders to cool down before you reach inside.Warning: There is a risk of shock. The electronics of the MakerBot Method are not user serviceable.Caution: Do not print using materials that have not been approved by MakerBot for use with theMakerBot Method.Caution: The socket outlet must be located near the printer and must be easily accessible.Caution: In case of emergency, disconnect the MakerBot Method from the socket outlet.Caution: The MakerBot Method melts plastic during printing. Plastic odors and particles may beemitted during this operation. Make sure to set up the MakerBot Method in a well-ventilated area.Caution: Always allow the Performance Extruders to cool to 50 C before reaching inside theMakerBot Method or removing the Performance Extruders.Caution: Dust generation and accumulation should be minimized. Some dust and dry powders canbuild static electricity charges when subjected to friction and create an ignition hazard.Note: For users in Japan, the power cord is only for use with this printer model, the MakerBot MethodPerformance 3D Printer.MAKERBOT METHOD MANUALCaution: Children under 12 should be supervised by an adult.
MAKERBOT METHOD MANUALABOUT THE MAKERBOT METHODHOW THE MAKERBOT METHOD WORKSThe MakerBot Method makes three-dimensional objects out of different types of melted materials. First,download a model from the internet or design a part, then use MakerBot Print to translate 3D design files intoa .makerbot file, which creates instructions for the MakerBot printer. Then, transfer the .makerbot file to theMakerBot printer via your local network, USB drive, or USB cable.The MakerBot Method will melt materials and extrude it out onto the build plate in thin lines to build yourobject layer by layer. The heated build chamber allows the extruded material to cool slowly, minimizingwarping and curling. This 3D printing technology is called fused deposition modeling (FDM).SPECIFICATIONSPRINTINGPrint TechnologyFused deposition modeling (FDM)Build Volume19 L x 19 W x 19.6 H cm / 7.5 x 7.5 x 7.75 in single extrusion15.2 L x 19 W x 19.6 H cm / 6.0 x 7.5 x 7.75 in dual extrusionMaximum Layer Resolution20 – 400 micronsNozzle Diameter0.4 mmPrint File Type.makerbotSOFTWARESoftware BundleMakerBot Print, MakerBot MobileSupported File TypesMakerBot (.makerbot), STL (.stl), SolidWorks (.sldprt, .sldasm), InventorOBJ (.ipt,.iam), IGES (.iges, .igs), STEP AP203/214 (.step, .stp), CATIA (.CATPart, .CATProduct),Wavefront Object (.obj), Unigraphics/NX (.prt), Solid Edge (.par, .asm), ProE/Creo(.prt, .asm), VRML (.wrl), Parasolid (.x t, .x b)PHYSICAL DIMENSIONSPrinter64.9 H x 41.3 W x 43.7 D centimeters [25.6 H x 16.3 W x 17.2 D inches]Shipping Box76.5 H x 50.0 W x 55.5 D centimeters [30.1 H x 19.7 W x 21.9 D inches]Printer Weight PACT5665 lbsShipping Weight PACT5681.7 lbsTEMPERATUREAmbient Operating15 - 26º C / 59 - 78º F, 10 - 90% RH non-condensingTemperature PACT56Storage Temperature0 - 38º C / 32 - 100º FELECTRICALPower Requirements :PACT56100 - 240 VAC, 50/ 60 Hz, 400 W max 3.9A -1.6AConnectivityUSB 2.0, Unshielded Ethernet: 10/100Base -T, WiFi 802.11 a/b/g/n 2.5Ghz, 5GhzCAMERACamera Resolution640 by 480 pixelsPAGE 6
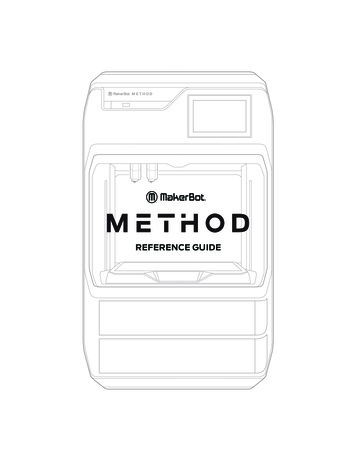
PAGE 7MAKERBOT METHOD DIAGRAMPRINTERPRINTER LIDPOWER BUTTONPOWERBUTTONTOUCHSCREENTOUCHSCREENUSB KEYKEYPORTPORTMODEL 1MODEL1PERFORMANCEEXTRUDERPERFORMANCE EXTRUDERSUPPORT 2SUPPORT2PERFORMANCEEXTRUDERPERFORMANCE STEELSTEELBUILDBUILD PLATEPLATESPRINGMATERIALMATERIALDRAWERDRAWER BAYBAY 1MAKERBOT METHOD MANUALMATERIALDRAWERDRAWER BAYBAY 2MATERIAL
MAKERBOT METHOD MANUALCHAPTER 2GETTING STARTEDWhen you set up your MakerBot Method Performance 3D Printer,remember that it was built and packaged very carefully. We hope you willtake your time and be just as careful unpacking it and getting it set up.PAGE 8
International: MakerBot.com/Service-PartnersCarefullyCarefully removeremove thethe foamfoam fromfromthe sidessides ofof thethe printer.printer.the4Remove thethe bag,bag, remainingremainingRemovepackagingpackaging tape,tape, andand openopen thethedoordoor toto removeremove thethe starterstarter kit.kit.7Use thethe correctcorrect powerpower cordcord toUseconnectthetheprinterto toanantoconnectprinteraccessible nearby.nearby.5OpenOpen thethe starterstarter kitkit onon aa flatflatsurface.surface.8PressPress thethe powerpower buttonbutton onon thethefrontfront ofof thethe printer.printer.3Withtwo peoplepeopleliftliftfromfromthetheWith twosidehandlesof theofprinterand putitsidehandlesthe printerandon aitstableflat surface.puton a stableflat surface.6LocateLocate thethe powerpower inputinput onon thethelower backback ofof thethe rprinterpowerspowerson,on,theon screento finishfollowthe oninstructionsscreen instructionssettingupsettingyour printer.to finishup your printer.MAKERBOT METHOD MANUAL1PAGE 9NEED HELP?NEED HELP?UNBOXINGUS/CAN Call: 1 925.529.8563 Mon - Fri 9am – 6pm ETUNPACKING THEMETHODOr Visit:Support.MakerBot.com
MAKERBOT METHOD MANUALSTARTER KITInside the box of your MakerBot Method, you will find all the necessary tools to get started, including both a Model PerformanceExtruder and Support Performance Extruder, a spring steel build plate, a leveling hex key, a nozzle cleaning brush, and two power cords(North America and EU). To order material, visit store.makerbot.com.SPRING STEELBUILD RUDERCLEANINGBRUSHLEVELINGHEX KEYNORTH AMERICA ANDEU POWER CORDSETTING UP THE METHODIn case of conflicting information between this Manual and the on-screen instructions, FOLLOW THE ON-SCREENinformation, since it is updated more frequently.INSTALL THE PERFORMANCE EXTRUDERS1. Remove the lid from the top of the printer.2. Open both latches on the carriage labeled “1” and “2”.3. Insert the Performance Extruder labeled “Model-1” into the slot labeled “1”.4. Insert the Performance Extruder labeled “Support-2” into the slot labeled “2”.5. Close both latches on the Performance Extruders, locking them in place.6. Insert the swivel clip labeled “1” into the ”Model-1” Performance Extruder.7. Insert the swivel clip labeled “2” into the ”Support-2” Performance Extruder.8. Replace the lid on top of the printer.Caution: Never remove a PerformanceExtruder from your MakerBot Method3D printer during or immediately afterprinting. Always allow a PerformanceExtruder to cool below 50 C.INSTALL THE SPOOLS OF MAKERBOT MATERIALOn the touchscreen tap [Material], then tap [LOAD ON MATERIAL BAY 1] and follow the on-screen instructions. Once complete, followthe same steps for [LOAD ON MATERIAL BAY 2].PAGE 10
PAGE 11CHAPTER 3GUIDED SETUPThe first time you turn on your MakerBot Method Performance 3DPrinter, you will be guided through the setup process via the onboardtouchscreen. From there, you will learn everything you need to know toMAKERBOT METHOD MANUALstart your first 3D print.
MAKERBOT METHOD MANUALTHE MAKERBOT METHOD TOUCHSCREENThe touchscreen located at the upper right of the machine operates the MakerBot Method. See Chapter 4 The User Interface for more related information.PRINTERLIDLIDPRINTER LIDPRINTERPOWER BUTTONPOWER BUTTONPOWER BUTTONTOUCHSCREENTOUCHSCREENTOUCHSCREENUSB KEY PORTUSB KEY PORTUSB KEY PORTMODEL 1 MODEL 1PERFORMANCEPERFORMANCEEXTRUDEREXTRUDERSUPPORT 2SUPPORT TUPThe first time you turn on your MakerBot Method, you will be guided through the initial setup process using theMakerBot Method user interface. This Guided Setup will walk you through connecting the printer to an internetconnection, authorizing your printer, attaching Performance extruders, running calibration, loading material, andHEATED BUILDHEATEDCHAMBERBUILD CHAMBERrunning your test print.RE-RUN THE GUIDED SETUPTo re-run the Guided Setup, select SETTINGS RESET TO FACTORY.Restoring factory settings will allow you to rerun the Guided Setup.SPRING STEELSPRINGBUILDSTEELPLATEBUILD PLATEMATERIAL MATERIALDRAWER BAYDRAWER1BAY 1MATERIAL MATERIALDRAWER BAYDRAWER2BAY 2PAGE 12
PAGE 13CHAPTER 4TOUCHSCREEN USERINTERFACEThe touchscreen interface gives you options for managing your printerand the printing process. You can use these options to print objects froma USB flash drive on your MakerBot Method Performance 3D Printeror start prints initiated via MakerBot Print software. You can alsoMAKERBOT METHOD MANUALchange printer settings and monitor a print’s progress.
MAKERBOT METHOD MANUALHOME SCREENThe touchscreen gives you six options for managing your printer and the printing process:› PRINT› INFO› EXTRUDERS› MATERIAL› SETTINGS› ADVANCEDPAGE 14
1PAGE 15START A PRINTSELECT A FILESelect [PRINT] on the touchscreen to initiate a print stored on aUSB flash drive.Use the touchscreen to scroll through the list of available filesand press it again to select the file you would like to print.Push the icon to select the location of the file you want to print.Select [USB STORAGE] to print a file stored on a USB driveinserted into the USB port.START PRINTChoose a .MakerBot file that has been exported from MakerBotPrint to begin printing. Note that the file needs to be formattedfrom within MakerBot Print for MakerBot Method before beingexported.Select [START PRINT] to begin printing the file.3 PRINTINGDuring the printing process you will be able to view print progressinformation and other printer details.1.Percentage of the print completed.2.Time elapsed and estimated time remaining in the print. While theHeated Chamber and Performance Extruders are heating, the screenwill display the current and target temperatures.3.While actively printing, swipe the touch screen between the followingscreens:4. Print progress Rendering of your model or layout File information Print options information Extruder temperaturesThe Print menu contains the following options: PAUSE - Press the pause button on the screen to temporarilypause your print. CHANGE MATERIAL - Select this option to load or unload material. CANCEL - Select this option to cancel your print.MAKERBOT METHOD MANUAL2
MAKERBOT METHOD MANUAL4PRINT COMPLETEAfter the print is complete, the screen will indicate its completion. Push the screen to continue to the next menu. Youwill then be asked if you would like to print the object again, or return to the storage menu screen. Select your choiceby touching the screen accordingly.If you wish to print the object again, make sure to clear the build plate.MATERIALSelect the [Material] icon to load or unload material.TO LOAD MATERIAL1.2.3.Cut the end of your material to create a clean edgeUse the touch screen to select [LOAD FOR MATERIAL BAY 1] or [LOAD FOR MATERIAL BAY 2]Follow the instructions on the screenTO UNLOAD MATERIAL1.2.3.Use the touch screen to select [UNLOAD MATERIAL] for either Material Bay 1 or 2Follow the instructions on the screenWhen the Performance Extruder has stopped pushing the material out and the screen states that the material isready to be removed, gently pull the material and rewind it onto the spoolIf you are changing material spools, make sure to keep the spool tightly wound as you pull the material free of theguide tube. If you do not, the material could unravel or tangle on the spool.NOTE: When you are not using a material spool, make sure the free end of the material is inserted into one of thestorage slots of the spool. This allows you to find the insertion end of the material much faster and will prevent thespool from tangling. Spools not in use should be stored in the original bag they came in. This prevents moistureuptake, which is important for maintaining print quality.SETTINGSSelect the [SETTINGS] icon to personalize your MakerBot Method, edit network or sharing settings, updatefirmware, access automated XYZ calibration, and other tools.FIRMWARE UPDATESelect [FIRMWARE UPDATE] to see if you have the most up-to-date firmware. If the MakerBot Method is alreadyconnected to a network, then it will automatically check for an update. If there is an update, push the screen tobegin the download. If the MakerBot Method already has the most current firmware, a message will display on thetouchscreen stating that your firmware is already up-to-date. If the printer can not be connected to the internet,firmware can be updated via MakerBot Print.CONFIGURE WIFISelect [CONNECT TO WIFI] to begin the setup process of connecting your MakerBot Method to a WiFi connection.When you select [CONNECT TO WIFI], the MakerBot Method will show the available WiFi networks. Select the WiFinetwork that you would like to connect to and enter a password if required.CALIBRATIONSelect [CALIBRATE TOOLHEADS] to run an automated XYZ calibration after inserting the performance extruders tothe extruder assembly. For more information on calibrating toolheads, see Chapter 6 Maintenance.DIAGNOSTICS AND LOGSSelect [DIAGNOSTICS AND LOGS] to run a system diagnostic scan of the MakerBot Method and save the resultinglogs. These logs can be sent to MakerBot should you ever need support.PAGE 16Copy System Logs to USBAllows you to copy system logs of the MakerBot Method to a USB drive.
Select [RESET TO FACTORY SETTINGS] to restore the MakerBot Method to its original factory settings and wipeany information stored on the internal storage drive.PAGE 17RESET TO FACTORY SETTINGSPOWER OFFSelect [POWER OFF] on the touchscreen to turn off the MakerBot Method.EXTRUDERSelect the [EXTRUDER] icon for assistance in attaching a Performance Extruder. If the Performance Extruder isattached, the screen will show the Performance Extruder information such as temperature and print statistics.If the Performance Extruder is not attached, the Extruder icon will not be highlighted or display the MakerBot logo.When attaching the Performance Extruder, position the extruder so that the connectors lock into place with theExtruder Assembly and close the latch onto the extruder. If the Performance Extruder is successfully attached, youwill see the extruder icon highlighted.NOTE: Only the Performance Extruder is supported for the MakerBot Method. Both extruders are required to start a print.INFOMAKERBOT METHOD MANUALSelect the [INFO] icon to view firmware information, network information, and print statistics from yourMakerBot Method.
MAKERBOT METHOD MANUALCHAPTER 5MAKERBOT PRINT TMThe MakerBot Method Performance 3D Printer streamlines 3D printpreparation and file management using MakerBot Print software.MakerBot Print is a free desktop application that allows you to discover,prepare, manage, and share 3D prints.PAGE 18
1.2.3.PAGE 19DOWNLOADING AND INSTALLINGMAKERBOT PRINT (WEBSITE)Go to MAKERBOT.COM/PRINT. Click the Download button.Select your operating system from the drop-down menu on the download pack and click Download.Double-click the MakerBot Print installer to run the installation wizard. Follow the installation instructions.HOW IT WORKSMakerBot Print streamlines 3D print preparation and file management. PC users can also import and manipulateNative CAD files. MakerBot Print allows you to Arrange, Orient, Scale, and View your 3D models and prepare them forprint. You can also access print settings to modify your print.USING MAKERBOT PRINTPlease visit our MakerBot Print Learning Page to get our most up-to-date instructions and guides on how to use theMakerBot Print application.STARTING A PRINT WITH THEMAKERBOT METHODThere are two ways to begin printing an object. You can use the touchscreen on the MakerBot Method or MakerBot Print.When you are ready to print your model, click PRINT in MakerBot Print to slice the model using the current settingsand send a .makerbot print file to your MakerBot Method. You will be reminded to clear the build plate and asked toinitiate the print on the touchscreen. You can also select [BEGIN PRINTING] on the touch screen after starting thefile transfer.If MakerBot Print is connected to your MakerBot Method, the print file will be sent directly to your 3D printer. IfMakerBot Print is not connected to your MakerBot Method, this button will open a dialog allowing you to export andsave a .makerbot print file. You can transfer the print file to your MakerBot Method using a USB drive.HOW TO PAUSE OR CANCEL A PRINTTo pause a print, push the pause icon on the print progress screen. You can also select the printer in MakerBot Printand select PAUSE.To cancel a print, tap the top of the screen that says printing or paused. A drop down will appear with the option tocancel the print.TO ADD AN OFFLINE PRINTEROpen the printer panel and click [ADD A PRINTER]Select [ADD AN UNCONNECTED PRINTER]Select a printer, and the build plate will update to the appropriate sizeAFTER YOU PRINTREMOVING THE PRINT FROM THE BUILD PLATEWhen your print finishes, remove the flexible build plate from the MakerBot Method. Remove the print from the buildplate by simply bending the flexible build plate. The print will peel off the smooth grip surface. After the model hasbeen removed, soaking it in warm water will cause the PVA to dissolve. Warm water with agitation will increase thespeed at which the support material dissolves. Do not heat the water higher than 40º Celsius as this may cause thepart(s) to deform.NOTE: When you bend the flexible build plate, some pieces of the raft may remain on the plate. Simply bend theflex build plate again or use a flat, non-sharp tool such as a putty knife to remove the raft pieces. Never use a knife toremove pieces of the raft—doing so can damage the build plate.MAKERBOT METHOD MANUAL1.2.3.
MAKERBOT METHOD MANUALCHAPTER 6PRINTER MAINTENANCEAs soon as you take your MakerBot Method Performance 3D Printerout of the box, it is ready to print high-quality models. However, like anyprecision machine, routine maintenance is needed. Here are some waysyou can keep your MakerBot Method printing smoothly.PAGE 20
Each time you attach a Performance Extruder or a new build plate, you will need to run the Automated XYZCalibration routine. This process will make sure that the Performance Extruders are positioned properly with respectto the build plate when you begin a print.PAGE 21AUTOMATED XYZ CALIBRATIONBefore inserting a Performance Extruder into the printer, use the nozzle cleaning brush to clean the extrudernozzle tip of any debris or material. This is critical for attempting to run Automated XYZ Calibration. IMPORTANTNOTE: Please make sure the extruder nozzles are 100% clean and there is absolutely no filament residue left. Yourcalibration will otherwise be inaccurate and your print performance will suffer from it.Follow the instructions on the screen and remove the build plate. The MakerBot Method will then check andrecord the X and Y locations of the extruders. When the screen prompts you, insert the build plate to continue. TheMakerBot Method will now check and record the Z locations of the extruders.Once this process has completed, you will be ready to start a print.MAINTAINING THE BUILD PLATEThe surface of the MakerBot Method build plate, known as the Grip Surface, allows for better print adhesion andprint quality compared to other types of build surfaces. However, over time the grip surface can become cracked anddamaged. If these cracks or tears begin to affect print quality, it is time to replace the grip surface. Visit HTTPS://SUPPORT.MAKERBOT.COM to learn how to replace the grip surface.Go to HTTPS://STORE.MAKERBOT.COM/ to order more Grip Surfaces and build plates.OTHER ISSUESMAKERBOT METHOD MANUALFor help with issues not covered in this chapter, please go to HTTPS://SUPPORT.MAKERBOT.COM.
MAKERBOT METHOD MANUALCHAPTER 7REFERENCEGLOSSARYBUILD PLATFORM: The support for the build plate. The buildMATERIAL DRAWER BAYS: The two drawers located at theplatform’s underside contains adjustable hex bolts for usebase of the MakerBot Method, where both the model andduring assisted-leveling.support material spools are stored during the printing process.ETHERNET CABLE: The cable used to connect your MakerBotMATERIAL GUIDE TUBE: The plastic tube that guides theMethod to a local area network.MakerBot material from the material spool to the PerformanceExtruders.EXTRUDER ASSEMBLY: The swappable PerformanceExtruders which contain the sensors, drive gears, hot end, and.OBJ: A file format used for 3D models.nozzle.PERFORMANCE EXTRUDER: The Performance Extruder drawsEXTRUDER CARRIAGE: Holds the extruders firmly in placethe material from the spool, melts it, and pushes it through aon the rail of the x-y gantry while allowing for quick and easynozzle onto the Spring Steel Build Plate.extruder swapping.PROFILE: The settings used to slice your 3D model and create aEXTRUDER NOZZLE: The opening on the end of theprint file. MakerBot Print Software comes with preset profiles forPerformance Extruder from which heated MakerBot materialBalanced and High-resolution prints.emerges to be spread onto the build plate.RAFT: A plastic base printed on the build plate and used as aFIRMWARE: The software that runs on your MakerBot Method.printing surface for your printed object.GANTRY: The apparatus that allows the carriage and extruderSLICING: The process of turning a 3D model into a printassemblies to move along the x and y axis.file containing instructions for your MakerBot Method. TheMakerBot Method uses print files with the extension .makerbot.GRIP SURFACE: The surface on which the extruder prints on.Prints adhere better to the Grip Surface resulting in reducedSPRING STEEL BUILD PLATE: The flat plate on which thewarping and curling.MakerBot Method 3D Printer builds an object. This plate isremovable and bending the plate allows you to remove objects.GUIDED SETUP: The set of tasks that runs when you turn onthe MakerBot Method for the first time. The setup assistant.STL: A widely used file format for 3D models.helps you level the build plate, load material and start a testprint.SUPPORTS: Automatically generated support structures usedto prop up any sections of a print that will not stand alone.INTERNAL STORAGE: The part of the MakerBot Methodonboard storage that you can use to store print files.THING: A file format used by MakerBot Print that storesadditional information about your 3D model files.LAYOUT: An arrangement of 3D models on the build plate.Multiple layouts can be saved as part of any .Thing in yourTHING: A file or group of files saved to Thingiverse or to yourLibrary.MakerBot Cloud Library.LEVELING SCREWS: The two screws underneath the buildTHINGIVERSE: An online community for sharing 3D design files.platform that allow you to pivot the build plate around its centerpoint during the leveling process.TOUCHSCREEN: The touchscreen at the upper right cornerof the MakerBot Method. The touchscreen allows you to start.MAKERBOT: The format of print files for your MakerBotprints, change settings and view status information.Method Print files contain instructions for your MakerBotMethod.USB CABLE: A cable that allows your computer tocommunicate with the MakerBot Method.MAKERBOT ACCOUNT: The username and password you willPAGE 22use to sign in to MakerBot Print, and log on to Thingiverse andUSB DRIVE: A USB flash drive. You can use a USB drive toother MakerBot sites.transfer print files to and from the MakerBot Method. Make surethat the USB drive is formatted to FAT32. USB drives that areMAKERBOT PRINT SOFTWARE: Free software for use withyour MakerBot Method. MakerBot Print will help you discover,manage, share and print 3D models.formatted to NTFS will not be visible.
SUPPORTPAGE 23CONTACTsupport.makerbot.comOur website has extensive documentation and troubleshooting information about your MakerBot Method. It’s a greatresource when you want to try to solve issues quickly on your own.my.makerbot.com/supportAt MakerBot, we take pride in offering expert, responsive, friendly customer support to our customers around theworld. If you need help resolving an issue with your MakerBot Method, open a case with the MakerBot Support Teamat the web address above.SALESMAKERBOT METHOD MANUALsales@makerbot.comTo learn about other MakerBot products, including MakerBot material, please email the address above, or call ourSales Team at 1 347.334.6800
0 - 38º C / 32 - 100º F 100 - 240 VAC, 50/ 60 Hz, 400 W max 3.9A -1.6A USB 2.0, Unshielded Ethernet: 10/100Base -T, WiFi 802.11 a/b/g/n 2.5Ghz, 5Ghz 640 by 480 pixels 81.7 lbs 15 - 26º C / 59 - 78º F, 10 - 90% RH non-condensing.makerbot 20 - 400 microns 0.4 mm Print Technology Build Volume Software Bundle Supported File Types Shipping Box