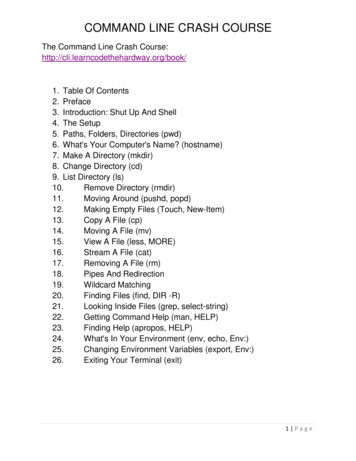
Transcription
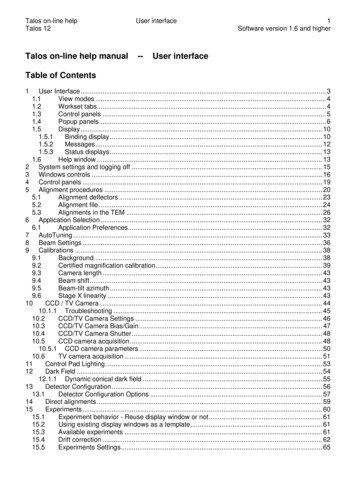
Talos on-line helpTalos 12User interfaceTalos on-line help manual--1Software version 1.6 and higherUser interfaceTable of Contents1User Interface . 31.1View modes . 41.2Workset tabs . 41.3Control panels . 51.4Popup panels . 61.5Display . 101.5.1Binding display . 101.5.2Messages . 121.5.3Status displays . 131.6Help window . 132 System settings and logging off . 153 Windows controls . 164 Control panels . 195 Alignment procedures . 205.1Alignment deflectors . 235.2Alignment file . 245.3Alignments in the TEM . 266 Application Selection . 326.1Application Preferences . 327 AutoTuning . 338 Beam Settings . 369 Calibrations . 389.1Background . 389.2Certified magnification calibration . 399.3Camera length . 439.4Beam shift . 439.5Beam-tilt azimuth . 439.6Stage X linearity . 4310CCD / TV Camera . 4410.1.1 Troubleshooting . 4510.2CCD/TV Camera Settings . 4610.3CCD/TV Camera Bias/Gain . 4710.4CCD/TV Camera Shutter . 4810.5CCD camera acquisition . 4810.5.1 CCD camera parameters . 5010.6TV camera acquisition . 5111Control Pad Lighting . 5312Dark Field . 5412.1.1 Dynamic conical dark field . 5513Detector Configuration . 5613.1Detector Configuration Options . 5714Direct alignments . 5915Experiments . 6015.1Experiment behavior - Reuse display window or not . 6115.2Using existing display windows as a template . 6115.3Available experiments . 6115.4Drift correction . 6215.5Experiments Settings . 65
Talos on-line helpTalos 12User interface2Software version 1.6 and higher15.5.1 Acquisition settings . 6615.5.2 Configuration settings . 6815.5.3 Correction settings . 6916Filament (User) . 7117High Tension (Expert/Supervisor) . 7218Image Settings . 7418.1.1 Image settings . 7418.1.2 Image shift . 7518.1.3 The image shift . 7718.2Image Settings Focus . 7819Measuring . 7919.1.1 Measuring in imaging . 8019.1.2 Measuring in diffraction . 8220Normalizations . 8420.1.1 Introduction to normalizations . 8421Stage² . 8821.1.1 Positions . 8821.1.2 Tracks . 8921.1.3 Confirmation . 8921.1.4 Files . 8921.1.5 Fine stage control . 9221.2Stage² Control . 9321.3Stage² File . 9521.4Stage² Set . 9621.5Stage² Settings . 9822STEM Imaging (User) . 10122.1STEM Imaging Focus (User) . 10422.2STEM Imaging Scan (User) . 10423STEM Imaging (Expert) . 10623.1STEM Imaging Focus (Expert) . 10923.2STEM Imaging Scan (Expert) . 11024STEM Detector (User) . 11324.1STEM Detector Selection (User) . 11424.2STEM Detector Auto CB . 11525Stigmator . 11725.1Stigmator Popup . 11926System status . 12027Vacuum (User) . 12227.1Vacuum Cryo (User) . 12327.2Vacuum Settings (User) . 12427.3Vacuum Control (User) . 12528Vacuum (Supervisor) . 12628.1Vacuum Cryo (Supervisor) . 12728.2Vacuum Settings (Supervispr) . 12828.3Vacuum Control (Supervisor) . 12929Vacuum Overview . 13030Workspace layout . 13331Control Pads . 13731.1Left-hand Control Pad . 13731.2Right-hand Control Pad . 139
Talos on-line helpTalos 12User interface3Software version 1.6 and higher1 User InterfaceThe user interface consists of a number of separate elements. We can divide these into differentcategories: The Main program. This consists of the program title, menu bar and toolbar. It basically is a shellthat allows the user to define the where, what and how of the other user interface elements. The userinterface provides a number of fixed layouts (view modes) with rapid switching between them.The Control panels. These are sets of controls that belong together and that are displayed in a fixedwindow (normally one of three displayed on the left-hand side of the screen). Control panels aregrouped in worksets which can be selected via a tab at the top of the area with the Control panels.The Information panels. These consist of a set of windows displayed near the bottom of the screen.They contain binding, microscope status information and messages or questions from themicroscope to the operator.The empty area to the right is reserved for data like images, spectra, etc. Currently it shows the flap-outof the topmost Control panel as well as the minimum-size help window.MenuThere is one special menu item, Mode. This will switch between "Normal" and "Grayscale". Normal willuse the normal coloring scheme, with yellow buttons being yellow, etc. When the Mode is switched toGrayscale, colored buttons are shown with a different coloring scheme that is used for Rapid or TAROremote connections with grayscale colors. This special scheme is used there because normally yellow,white or orange are virtually indistinguishable from gray when seen in gray scale mode.
Talos on-line helpTalos 121.1User interface4Software version 1.6 and higherView modesThe microscope user interfaces supports a number of different viewing modes: Standard open-frame view (data area left open). Taskbar only (user interface hidden except for a small band at the bottom).These different views make it possible to switch quickly between normal operation (standard openframe) and maximum space available for data display (minimum-size info or taskbar only). The viewscan be selected through the Show item of the menu or by clicking with the right-hand mouse button on apart of the information area that does not have any other right-hand mouse button menu (the messagearea is a good one, the binding display or status panels not). The following menu will popup on the righthand click:A rapid way of switching between Full size open frame en Task bar only is provided by a button next tothe list of popup panels.The button with the square blue block (far left) brings up the ApplicationSelection Control Panel, while button with the L shape switches to Full sizeopen frame mode.The button with the square blue block (far left) brings up the ApplicationSelection Control Panel, while button with the shape switches to Task baronly mode.1.2Workset tabsAt the top left of the user interface is a small window containing a (user-defined) number of tabs. Each ofthese tabs controls access to a number of Control panels (typically a set of three). Click on any of the oftabs to access it workset. Workset configuration (contents, name, order, color selection) can be defaultor as defined by the user.Worksets are intended to be arranged in sets that reflect a certain stage of operation of the microscope(but of course you are free to arrange them in any manner that you find suitable for the work you do).Thus the Setup workset could contain those controls needed when starting a microscope session(vacuum, high tension and filament control). The Search workset provides controls that are useful whensearching around the specimen for areas suitable for further investigation (the Stage control panel, forexample, allows storing and recall of specimen-stage positions). The Camera workset provides accessto plate camera functions that allow recording of data like images and diffraction pattern during the moredetailed investigations.Control-panel access is also possible through the popup-panel selection (in that case the currentselection remains on the left-hand side and the selected Control panel appears at the bottom right). Mostcontrol panels can only be selected for popup when they are already somewhere located in a tab.Modifying the worksetsThe worksets are defined using the Workspace Control Panel (because of its size accessible only in thepopup selection).
Talos on-line helpTalos 121.3User interface5Software version 1.6 and higherControl panelsControl panels are small windows, typically arranged in sets of three above one another on the left-handside of the screen (some Control panels are double-height and can therefore only be combined with oneadditional panel). Each Control panel contains a coherent set of microscope controls (like vacuumsystem, electron gun or stigmators). The combination of up to three Control panels forms a workset,defined by name and accessible through a tab in the workset selection window above the Control panelsthemselves.The Beam settings Control panel.The rationale behind the Control panels is very simple. They are meant to give rapid access toelementary (often-used) microscope functionality. Selection of microscope settings (used much lessoften) is not accessible through the Control panels themselves but is 'hidden' away conveniently in flapouts.Panel flap-outSome Control panels (like the Beam Settings Control panel) are simple and have no 'hidden' settings.Other panels are equipped with so-called flap-outs: additional panels that appear to the right of the mainpanel. Panels with flap-outs are recognizable by the flap-out arrow button at their top right.The Image Settings Control panel with the flap-out button (arrowpointing to the right at top right).When the flap-out button is pressed, the flap-out panel appears. This panel has one or more panelsitself, combined through the use of tabs. Click on a tab to access that particular panel. If the total seriesof tabs doesn't fit in the panel, l
the Plate camera control panel to have rapid access to the plate-camera settings, without changing from the current workset tab. As soon as the workset tab is changed to one containing the panel visible as a popup, the popup panel will disappear. The popup is hidden again when: the small