Transcription
EEL 3923CJD/ Module 6 PCB Design Using Altium SuiteJason Reeder and Michael Stapleton Fall 2011
I. Assignment (PCB Design)A. Design PCB using Altium Suite1. Obtain your specific circuit to design the corresponding printed circuit board(PCB) from the TAs2. Design the PCB using the same parts and follow the PCB design rules togenerate an error-free net list that is properly laid-out and routed. Designsshould be single-sided if possible, and no bigger than 6”x6”. Finally, thestudent is expected to create plots and miscellaneous design files (Gerberfiles) that could be used to have the circuit boards milled locally or sent out tobe fabricated professionally.B. Upload your PCB design to the PCB milling queue1. Detailed for the upload procedure will be provided by the staff2. Full credit will received fora.b.Correct error-free PCB net list and Gerber file ANDOn-time submissionC. Upload report using template1. Sample circuit original diagram that you were given in class. ( one page )2. Altium schematic drawing. ( one page )3. PCB layout drawing in 1:1 format. ( one page )EEL 3923C, Fall 2011, T. Nishida2
II. Altium Designer Introduction The purpose of this document is to illustrate how to create a newproject in the Altium Designer. Setup Procedure 0. Install Altium Software– m#trial 1. Start the Altium Designer Software.– DXP - My account - Set up private license server– See TA for IP and server port 2. Ensure that the ‘Files’ and ‘Projects’ tabs are locatedsomewhere on the screen. Most likely they will be minimized onthe left side of the window. If they are not then add them to thescreen– View Workspace Panels System Files– View Workspace Panels System ProjectsEEL 3923C, Fall 2011, T. Nishida3
II. Altium Designer– Alternatively you may Click on the ‘System’ box in the lower right hand corner of the designerand then click ‘Files’ and ‘Projects’ to make the tabs appear.– These will both accomplish the same goal of making the ‘Files’ tab and the‘Projects’ tabs visible. All tabs can be dragged and dropped nearlyanywhere on the designer to suit your personal preferences. 3. Create a new PCB Project. File New Project PCBProject – or – You may click on the ‘Files’ tab and then underthe ‘New’ heading you can click ‘Blank Project (PCB)’ This will cause the ‘Projects’ tab to open and display‘PCB Project1.PrjPCB’ with no documents added to it.EEL 3923C, Fall 2011, T. Nishida4
II. Altium Designer 4. We will now add a schematic and a PCB to the current project.– Right click on the project Add New to Project Schematic– Right click on the project Add New to Project PCB 5. It is now time to save the new project– a. Right click on the project Save Project As – b. This will open the familiar windows save dialog box EEL 3923C, Fall 2011, T. Nishida5
II. Altium DesignerEEL 3923C, Fall 2011, T. Nishida6
II. Altium Designer – c. The designer will allow you to choose a name and where to saveeach individual file (the schematic file, the PCB file, and the Projectfile). It is recommended that you give each file the same name andsave them all in the same location for simplicity’s sake. Having allof your files in the same folder will also make your life easier if youneed to keep your project on a thumb drive and use a differentcomputer. You are not guaranteed the same computer each timeyou enter the lab.EEL 3923C, Fall 2011, T. Nishida7
II. Altium Designer 6. Now we need to change the paper size from the default size of ‘A’to ‘Letter’ size and also set up some automatic backups– a. DXP Preferences Schematic General Default BlankSheet Size - Letter– b. DXP Preferences System Backup - Check the ‘Autosave every:’ box Change the number of minutes to whatever you feel comfortable withknowing that it is your work that will be lost if something happens.This is not a replacement for you periodically saving your projectas you work on it.EEL 3923C, Fall 2011, T. Nishida8
II. Altium Designer Adding Parts and Modifying the Schematic 1. Libraries are a very important part of working with yourschematic. Libraries are where all of your parts will be found andselected from. If you do not have the ‘Libraries’ tab anywhere onyour screen you should – a. Click the ‘System’ box in the bottom right portion of the designer and thenclick the ‘Libraries’ button. 2. The libraries that are listed are dependent on how the librarieswere left the last time the designer was used. Since the computers inthe lab are shared there is a possibility that the libraries that youwould like to use are not listed. 3. The libraries that we will be using for this tutorial are:– Miscellaneous Devices– Miscellaneous Connectors– NSC AmplifierEEL 3923C, Fall 2011, T. Nishida9
II. Altium Designer If these libraries are not listed at startup then you will have toadd them. Their probable locations are: i. C:\PROGRAM FILES\ALTIUM DESIGNER SUMMER 09\Library\Miscellaneous Devices.IntLib ii. C:\PROGRAM FILES\ALTIUM DESIGNER SUMMER 09\Library\Miscellaneous Connectors.IntLib iii. C:\Program Files\Altium Designer Summer 09\Library\NationalSemiconductor\NSC Amplifier.IntLibEEL 3923C, Fall 2011, T. Nishida10
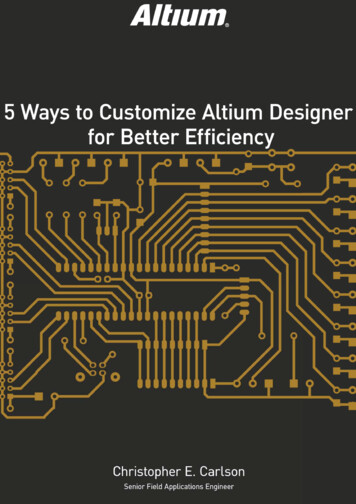
II. Altium Designer 4. Add a resistor to your schematic page by following these steps(below image has red letters corresponding to the stepsillustrated):– a. Make sure you have your schematics page opened– b. Open the ‘Libraries’ tab– c. Select the ‘Miscellaneous Devices’ library from the upper dropdown (if this library is not in the drop down refer to step 3 above)– d. Type ‘Res3’ into the dropdown textbox below the library listing– e. Click the ‘Place Res3’ button at the top of the libraries tab– f. Your cursor will then have a resistor attached to it and you canplace it anywhere on the schematic– g. Once you have placed the resistor you can either hit the ‘Esc’key –OR- right click your mouse to stop placing resistorsEEL 3923C, Fall 2011, T. Nishida11
II. Altium DesignerEEL 3923C, Fall 2011, T. Nishida12
II. Altium Designer 5. Follow the above steps and place the following parts– a. From the ‘Miscellaneous Devices’ library: i. (4) res3 ii. (2) Cap Pol1 iii. (4) Cap– b. From the ‘Miscellaneous Connectors’ library: i. (1) Header 3 ii. (1) Header 2Hiii. (1) Header 2– c. From the ‘NSC Amplifier’ library (1) LM741JEEL 3923C, Fall 2011, T. Nishida13
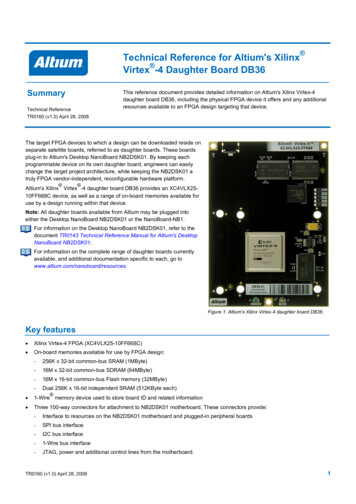
II. Altium Designer Notice 1: The difference between the ‘Header 2’ and the ‘Header2H’ parts are only in the footprint created on the PCB later. Someparts will need to be rotated and this can be accomplished bypressing the spacebar while you are placing the part or when thepart is selected. Try to place the parts more or less like thefollowing screenshot. Notice 2: The ‘Header 2H’ part has been rotated as well asmirrored in order to get the 1 pin on top when the part is in thisorientation. Rotation is accomplished with the spacebar key whilethe mirror is added by right-clicking the part and checking the‘mirrored’ checkbox. This does not make any difference on thePCB file it just makes your schematic easier to view andunderstand.EEL 3923C, Fall 2011, T. Nishida14
II. Altium DesignerEEL 3923C, Fall 2011, T. Nishida15
II. Altium DesignerThe image cannot be displayed. Your computer may not have enough memory to open the image, or the image may have been corrupted. Restart your computer, and then open the file again. If the red x still appears, you may have to delete the image and theninsert it again.6. It is now time to wire these parts together.a. You can either click the ‘Place Wire’ icon from the uppertoolbar or select Place Wire. Both are illustrated below.EEL 3923C, Fall 2011, T. Nishida16
II. Altium Designerb. Once you click this icon your cursor will turn into a crosshairwith a black X on it. Once you hover over a valid place to connecta wire the X will turn red. If the X does not turn red when youplace the wire a proper connection was not made and this willlead to errors later in the process. The red X is illustrated closeup below.The image cannot be displayed. Your computer may not have enough memory to open the image, or the image may have been corrupted. Restart your computer, and then open the file again. If the red x still appears, you may have to delete the image and theninsert it again.The image to the right is connected properly. The X in thecrosshair has turned red showing that a connection is being made.EEL 3923C, Fall 2011, T. Nishida17
II. Altium Designerc. Using the ‘Place Wire’ tool add wires between thecomponents just like the image shown belowThe image cannot be displayed. Your computer may not have enough memory to open the image, or the image may have been corrupted. Restart your computer, and then open the file again. If the red x still appears, you may have to delete the image and theninsert it again.EEL 3923C, Fall 2011, T. Nishida18
II. Altium DesignerThe image cannot be displayed. Your computer may not have enough memory to open the image, or the image may have been corrupted. Restart your computer, and then open the file again. If the red x still appears, you may have to delete the image and theninsert it again.d. Once a connection between two points is made the ‘PlaceWire’ cursor will be ready to select the next beginning point.e. When you are finished placing wire either press the Esckey or right-click the mouse to return the cursor to normaland stop adding wires.EEL 3923C, Fall 2011, T. Nishida19
II. Altium Designer7. Now it’s time to add the Power and Ground nets to theschematica. Click the ‘VCC Power Port’ button that is next to the ‘PlaceWire’ button and place (4) of them in the places shown in theimage on the next pagei. Two of the ports will be renamed from ‘VCC’ to ‘ 12V’and the other two will be renamed to ‘-12V’. Naming twoports the same thing is the same thing as connecting themwith a wire but it is a more elegant solution for keeping theschematic less congested.1. To rename a port just double click on the port and itsproperties dialog box will pop up. You can then changethe text in the ‘Net’ textbox in order to change the nameof the net. Shown below.The image cannot be displayed. Your computer may not have enough memory to open the image, or the image may have been corrupted. Restart your computer, and then open the file again. If the red x still appears, you may have to delete the image and theninsert it again.EEL 3923C, Fall 2011, T. Nishida20
II. Altium DesignerThe image cannot be displayed. Your computer may not have enough memory to open the image, or the image may have been corrupted. Restart your computer, and then open the file again. If the red x still appears, you may have to delete the image and theninsert it again.b. Click the ‘GND Power Port’ button next to the ‘PlaceWire’ button and place (6) of them in the schematic in theplaces shown in the image on the next pageEEL 3923C, Fall 2011, T. Nishida21
II. Altium DesignerThe image cannot be displayed. Your computer may not have enough memory to open the image, or the image may have been corrupted. Restart your computer, and then open the file again. If the red x still appears, you may have to delete the image and theninsert it again.This image shows the Power ( 12V and -12V) and Ground (GND)nets added to the schematic with red arrowsEEL 3923C, Fall 2011, T. Nishida22
II. Altium DesignerThe image cannot be displayed. Your computer may not have enough memory to open the image, or the image may have been corrupted. Restart your computer, and then open the file again. If the red x still appears, you may have to delete the image and theninsert it again.8. Now we will use named nets to add connections to our schematicwithout wires.a. Click on the ‘Place Net Label’ icon next to the place wire icon–OR- click Place Net Label.b. Use spacebar to rotate the net label to make it easier to place.c. Place nets in the places shown in the image below.d. In order to rename the net Double click it –OR- Right clickand select Properties then change the value in the textbox forNeti. In our case the net name will be either Input or OutputEEL 3923C, Fall 2011, T. Nishida23
II. Altium DesignerThe image cannot be displayed. Your computer may not have enough memory to open the image, or the image may have been corrupted. Restart your computer, and then open the file again. If the red x still appears, you may have to delete the image and theninsert it again.Input and output nets are shown by the red arrowsEEL 3923C, Fall 2011, T. Nishida24
II. Altium Designer9. It is now time to annotate all of the unnamedcomponentsa. Add more descriptive comments to the ports, thiswill make them easier to find on the PCB laterThe image cannot be displayed. Your computer may not have enough memory to open the image, or the image may have been corrupted. Restart your computer, and then open the file again. If the red x still appears, you may have to delete the image and theninsert it again.i. Change the comment on the input port that reads ‘Header 2H’ andmake it say ‘Input’ii. Change the comment on the output port that reads ‘Header 2’ andmake is say ‘Output’iii. Change the comment on the power port that reads ‘Header 3’ andmake is say ‘Power’b. No two components are allowed to have the samedesignator we must rename them; this can beaccomplished one-by-one or this can be doneautomaticallyi. You can do this for each component by hand1. Go to the properties of each component and change the text in theEEL 3923C, Fall 2011, T. Nishida25Designator field
II. Altium Designerii. –OR- You can do them all at once automatically usingtools in Altium (much easier)The image cannot be displayed. Your computer may not have enough memory to open the image, or the image may have been corrupted. Restart your computer, and then open the file again. If the red x still appears, you may have to delete the image and theninsert it again.1. Tools Annotate Schematics Quietly2. Click OK when the dialog box pops up to tell you how manychanges will be made3. This will automatically add unique designators to eachcomponent depending on the annotation rules that are currentlyin place4. You may optionally change the annotation rules using Tools Annotate Schematics if you want more control over the way theprogram decides to rename you designators for you. That is outof the scope of this tutorialEEL 3923C, Fall 2011, T. Nishida26
II. Altium DesignerYour schematic should look something like the one belowwithout any question marks on itThe image cannot be displayed. Your computer may not have enough memory to open the image, or the image may have been corrupted. Restart your computer, and then open the file again. If the red x still appears, you may have to delete the image and theninsert it again.EEL 3923C, Fall 2011, T. Nishida27
II. Altium Designer10. We are now ready to update the PCB fileThe image cannot be displayed. Your computer may not have enough memory to open the image, or the image may have been corrupted. Restart your computer, and then open the file again. If the red x still appears, you may have to delete the image and theninsert it again.a. Design Update PCB Document ‘nameOfProject.PcbDoc’b. Scroll to the bottom of the window that pops up and uncheck the boxnext to the room that the program is trying to addc. Click Validate Changes, make sure all of the changes get validatedd. Click Execute Changes, this will add all of the components and netsto your PCB documente. Close the update window11. The PCB file should have automatically opened for you; ifnot, open it nowa. Click View Fit Sheet to see the board as well as all of yourcomponentsb. You will notice that the components are added outside of the boardarea (black area)c. The components can be dragged onto the board as you place themEEL 3923C, Fall 2011, T. Nishida28
II. Altium Designer12. Notice how big the circular footprints are for the capacitorswe added; We will change the footprint used in order to savespace on our board.a. Return to the schematic file and open theThe image cannot be displayed. Your computer may not have enough memory to open the image, or the image may have been corrupted. Restart your computer, and then open the file again. If the red x still appears, you may have to delete the image and theninsert it again.properties dialog on one of the two polarizedcapacitorsb. Find the ‘Footprint’ drop down in thelower right and change it from‘RB7.6-15’ to ‘CAPPR1.27-1.7x2.8’.Shown on the next pagec.Repeat step b for the other polarizedcapacitord. Continue to change the footprints of the other four capacitors as well from‘RAD-0.3’ to ‘CAPPR2.54-5.1x3.2’e. Update the PCB using Design Update PCB Document‘nameOfProject.PcbDoc’; be sure to uncheck the addition of the rooms inthe update dialog each time. Validate and execute the changes then goback to the PCB document and notice how the footprints have changedEEL 3923C, Fall2011,theT. Nishidaforcapacitors29
II. Altium DesignerThe image cannot be displayed. Your computer may not have enough memory to open the image, or the image may have been corrupted. Restart your computer, and then open the file again. If the red x still appears, you may have to delete the image and theninsert it again.EEL 3923C, Fall 2011, T. Nishida30
II. Altium Designer13. We will now arrange the components on the boardThe image cannot be displayed. Your computer may not have enough memory to open the image, or the image may have been corrupted. Restart your computer, and then open the file again. If the red x still appears, you may have to delete the image and theninsert it again.a. Go to the PCB documentBegin dragging the footprints of the components over to the boardi. The footprints and the designators can once again be rotated using Spacebarwhile draggedii. To get a better view at any time you can use View Fit Document or you canuse Page Up and Page Down to zoom in and out at any timeiii. The designators of the components can be dragged independently of thecomponent in order to make the PCB document easier to read at timesiv. The comments or the designators from the schematic file can be added to orremoved from the PCB by opening the properties of the component on the PCBdocument and checking or unchecking the hide box under the ‘Designator’ and‘Comments’ sections.v. As you drag a component around the board you will notice thin lines connectingthe nodes of the component to other nodes around the board. These lines will jumpto the closest connection that can be made on the board. Take notice of these linesand attempt to keep them short and if they are crossed try rotating the componentuntil the lines are straight.EEL 3923C, Fall 2011, T. Nishida31
II. Altium Designervi. Try to arrange your components in a compact design as many manufacturinghouses will charge you depending on the size of the board. You will get better atthis the more you use the software. For an example of the layout look at the imagebelowThe image cannot be displayed. Your computer may not have enough memory to open the image, or the image may have been corrupted. Restart your computer, and then open the file again. If the red x still appears, you may have to delete the image and theninsert it again.EEL 3923C, Fall 2011, T. Nishida32
II. Altium Designer14. Redefine the board shape (The black background on the screenis the board)a. Design Board Shape Redefine Board Shapeb. The cursor will turn into a crosshairc. Zoom in to get a closer view of the grid and click the firstcorner of the new board shape that you want; continue to thenext corner and click again; once you return to the first cornerthat you clicked on there will be a circle around the crosshairletting you know that you are back where you started; Once youare finished either Right-click or press Esc in order to stopredefining the board. The board should look something like theimage belowEEL 3923C, Fall 2011, T. Nishida33
II. Altium DesignerEEL 3923C, Fall 2011, T. Nishida34
II. Altium Designer 15. Add a design rule to the board to make the GND net have a largerwidth than the other nets– a. Open the rule wizard using Design Rule Wizard– b. When the wizard opens click next– c. On the next page type ‘GND net width’ for the name of the rule and select‘Width Constraint’ under the ‘Routing’ header and click next– d. Select the radio button for ‘1 Net’ since we only want this rule to apply to theGND net then click next– e. Change the condition value in the dropdown box to ‘GND’ then click next– f. Leave it as the highest priority and click next again– g. Click ‘Finish’ and the main design rules dialog window will open– h. Once the rule open in the window change the ‘Preferred Width’ to ‘30mil’ andthe ‘Max Width’ to ’30 mil’– i. Click Apply and then OKEEL 3923C, Fall 2011, T. Nishida35
II. Altium Designer 16. We are finally ready to route the board– a. Auto Route All.– b. Click the ‘Auto Route’ button Notice the width of the GND net is wider than the other nets because ofthe rule we created. Your PCB should look like the one below– c. If you need to add a new component or add a new rule you willneed to un-route the board using Tools Un-Route All and thenuse the auto route to route the board again. You will most likely dothis several times before your finalize your designEEL 3923C, Fall 2011, T. Nishida36
II. Altium Designer 17. To strengthen your board add teardrops to the pads and the vias– a. Tools Teardrops– b. Make sure the ‘All Pads’ and ‘All Vias’ checkboxes are checkedthen click OK You will notice the teardrops get added immediately without having tore-route the board 18. Add your initials and a revision number to the board– Use Place String to add the string to an empty space on yourboard– Double click the string to open its properties i. Change the text field to your initials and then a revision number for thecurrent design of the board i.e. ‘JDR REV1.0’ ii. Change the Height of the text to ‘30mil’ and the Width to ‘6mil’ iii. Change the Font Name from ‘Default’ to ‘Serif’EEL 3923C, Fall 2011, T. Nishida37
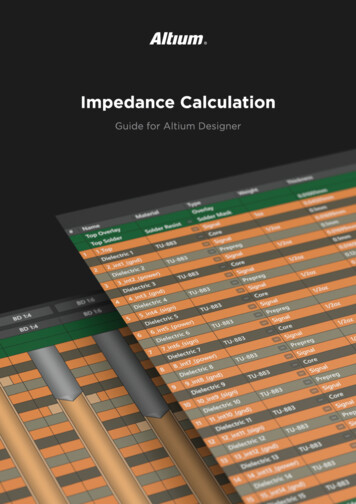
II. Altium Designer19. Add a keepout layer to the perimeter of your board, somemanufactures will use this to cut your boarda. Select ‘Keep-Out Layer’ from the tabs at the bottom of thedesigner window; up to this point we have been working from the‘Top Layer’b. Add a track using Place Line. This will be similar toredefining the shape of the board where you can zoom in at thecorners to make sure you are clicking the right spot and thenzoom back out to get to the next corner more quickly.c. Add the Line to the perimeter of the board and then press Escto stop adding the Line. The keepout Line should be pinkbecause it is on the keepout layer like in the image belowAfter routing, adding teardrops, your initials, and keepout Line theboard should look something like this:EEL 3923C, Fall 2011, T. Nishida38
II. Altium DesignerEEL 3923C, Fall 2011, T. Nishida39
II. Altium Designer 20. You now need to set up the correct print settings– a. File Default Prints– b. Check the boxes next to ‘PCB Prints’ and ‘Schematic Prints’under the ‘Default Print’ column header– c. Highlight the ‘PCB Prints’ row and click the ‘Page Setup’ buttonon the bottom left of the dialog box– d. Change the ‘Scale Mode’ dropdown from the default to ‘ScaledPrint’ then make sure that the scale is ‘1.00’ and the X and Y valuesare also ‘1.00’. This is so you can print this page and place yourphysical components on top of the layout to ensure the footprints arecorrect and there are no issues– e. Highlight the ‘Schematic Prints’ row and click the ‘Page Setup’button and make sure that its ‘Scale Mode’ is left as ‘Fit DocumentOn Page’EEL 3923C, Fall 2011, T. Nishida40
II. Altium Designer 21. It is time to create the Gerber fabrication files that can be sent tothe board manufacturer– a. File Fabrication Outputs Gerber Files– b. Go to the ‘Layers’ tab on the Gerber Setup window and click the‘Plot Layers’ button on the bottom left– c. Select ‘Used On’ and the list of layers should then auto-populatethe checkboxes for only the layers that you used– d. Click ‘OK’ to create the Gerber files 22. Now you can create the drill holes fabrication output files– a. File Fabrication Outputs NC Drill Files– b. Keep the default settings on the NC Drill Setup window andclick ‘OK’.EEL 3923C, Fall 2011, T. Nishida41
II. Altium Designer Both the Gerber files and the drill files will be added to the folderwhere you are saving the project and the drill file will just be a ‘.txt’file. 23. If you choose to you can make an integrated library that willcontain only the components that were used in your design. This couldbe useful if you are going to transfer your project to a new computerand you aren’t sure that all of the libraries you used will be available.– a. Design Make Integrated Library The library will be added to the listing of all the libraries in the librariestab and it will be named ‘ProjectName.IntLib’EEL 3923C, Fall 2011, T. Nishida42
II. Altium Designer Useful Tips 0. Check Altium www site for many training enter/en/trainingmanuals.cfm 1. If there is a red icon next to a file in the Project tab that means thatthe file has unsaved changes. A quick way to save all of your unsavedchanges across files at once is – a. File Save All 2. If at any time you would like the schematic or the PCB document tofill the entire screen you can use – a. View Fit Document to make the components fill the screen ina PCB document– b. View Fit All Objects to do the same thing in a schematicdocumentEEL 3923C, Fall 2011, T. Nishida43
II. Altium Designer Useful Tips (cont.) 3. Page Up and Page Down can be used to zoom in and out on eitherthe PCB or the schematic 4. To rotate a part– a. highlight it and press Spacebar while on the schematicdocument– b. while dragging the part press Spacebar while on the PCBdocumentEEL 3923C, Fall 2011, T. Nishida44
II. Altium Designer Useful Tips (cont.) 5. To select several similar things at once on the PCB document thePCB Filter is useful– a. Click on the ‘PCB Filter’ tab that is either on the left side of youscreen or down at the bottom right– b. Click in the large textbox where it says ‘Find items matchingthese criteria’– c. Type ‘isDesignator’ into the textbox. It should begin toautocomplete for you as you type enough letters– d. Click the ‘Apply’ button at the bottom of the tab– e. This will select all of the designators on the PCB document. Thiscan be used if you want to change the font size of all of them atonce. EEL 3923C, Fall 2011, T. Nishida45
Summary Assignment 6 (PCB design using AltiumSuite) See detailed schedule in syllabus forassignment check-off process Also check for lab/TA hours at NEB 246and E-learningEEL 3923C, Fall 2011, T. Nishida46
of your files in the same folder will also make your life easier if you need to keep your project on a thumb drive and use a different computer. You are not guaranteed the same computer each time you enter the lab.! II. Altium Designer!File Size: 1MB