Transcription
Programming a PICMicrocontrollerA Short Tutorialby Yesu ThommandruIowa State University – ECpENovember 2006
Programming a PIC MicrocontrollerPage ii of 24Table of ContentsTable of Contents . iiRevision Record . iii1. Introduction.11.11.21.31.4Purpose.1Document Conventions.1Intended Audience and Reading Suggestions.1References.22.12.2Introduction.3Types of PICs.32. Choosing a PIC Microcontroller .33. Integrated Development Environment.44. Programming Language.45. Compiler, Assembler, and Linker .66. Using MPLab IDE.77. Writing Software.118. The “Burning” Process.129. Breadboarding a PIC Microcontroller .1810. Other Considerations.21
Programming a PIC MicrocontrollerPage iii of 24Revision RecordNameDateReason For ChangesVersionYesu ThommandruYesu ThommandruYesu Thommandru11/17/0611/18/0611/19/06Started tutorialFinished majority of tutorialAdded breadboard images, finished and postedtutorial on Dec06-04 website.1.01.11.2
Programming a PIC MicrocontrollerPage 1 of 241. Introduction1.1 PurposeThe purpose of this document is to provide a simple, easy to use tutorial on programming PICmicrocontrollers. The tutorial begins with instructions on selecting a specific PIC and ends withdirections for breadboarding the microcontroller.1.2 Document ConventionsIn this document different styles of text and visuals are used to help the reader separate differenttypes of information. General description text will be in this format, size 11 italicized Arial.Pseudo-code or source code will be written in multi-color, size 10 Courier New font as in thefollowing example:#include stdio.h void main(int argc, char *argv[]){printf("Star Wars!\n”);return;}Buttons and menu items will be in standard Arial text such as Button with the first letter underlined.Important notes and pieces of information will appear in normal text in shaded boxes as in thefollowing example:NOTE: I think Darth Vader would win in a fight against Boba Fett!1.3 Intended Audience and Reading SuggestionsThe intended audience of this document is students in the Department of Electrical and ComputerEngineering enrolled in EE/CprE 491 or 492 Senior Design. This document can also be used byany student or individual who wishes to learn the basics of how to program a PIC microcontroller.There are a number of suggested readings for any users of this document. The following booksare suggested for specific PIC programming tasks:Introduction to microelectronic systems: the PIC 16F84 microcontroller by Martin Bates.PIC microcontroller: an intro to software and hardware interfacing by Han-Way Huang.The PIC microcontroller: your personal introductory course by John Morton.PIC microcontroller project book by John Lovine.Programming and customizing the PIC microcontroller by Myke Predko.The quintessential PIC microcontroller by Sid Katzen.NOTE: In my experience most of software in these books is written in Assembly and are thus notuseful to students wishing to program in a high-level programming language.
Programming a PIC MicrocontrollerPage 2 of 241.4 ReferencesSchildt, Herbert. C/C Programmer’s Reference 2nd Edition. McGraw-Hill Publishing. NewYork, 2000.Morton, John. PIC Your Personal Introductory Course. Newnes. Boston, 1998.Bergquist, Carl. Guide to PICMICRO Microcontrollers. Sams Technical Publications. Indianapolis,2001.Predko, Myke. Handbook of Microcontrollers. McGraw-Hill Publishing. New York, 1999.Predko, Myke. PICMicro Microcontroller Pocket Reference. McGraw-Hill. New York. 2000.Smith, D.W. PIC in Practice. Newnes. Oxford. 2002.Microchip.com. PIC16F877A. 2006. http://www.microchip.com/ MicrochipC.com PICMicros and C http://www.microchipc.com/ Best Microcontroller Projects .html
Programming a PIC MicrocontrollerPage 3 of 242. Choosing a PIC Microcontroller2.1 IntroductionPIC microcontrollers are popular processors developed by Microchip Technology with built-inRAM, memory, internal bus, and peripherals that can be used for many applications. PIC originallystood for “Programmable Intelligent Computer” but is now generally regarded as a “PeripheralInterface Controller”.2.2 Types of PICsPIC microcontrollers are broken up into two major categories: 8-bit microcontrollers and 16-bitmicrocontrollers. Each category is further subdivided into product families as shown in thefollowing table:8-bit MCU Product Family16-bit MCU Product dsPIC33The microcontrollers in the PIC10 through PIC14 families are considered low-end microcontrollers.PIC microcontrollers in the PIC16 and PIC18 families are considered mid-level microcontrollerswhile 16-bit PICs are considered high-end microcontrollers.NOTE: The majority of students and projects will require mid-level microcontrollers. The mostpopular PIC used in senior design is the PIC16F877/A.Each PIC has unique features and subtle differences. The correct choice for your project dependson many factors:Does the project require analog input or output?Does the project require digital input or output?How many I/O pins are required?Does the project require precise timing?How much memory does the project require?Is serial I/O required?Etc.PICs also come in several types of packages:Plastic Dual Inline Package (PDIP)Small-Outline Transistor (SOT)Dual Flat No-lead (DFN)Mini Small Outline Package (MSOP)Thin Quad Flat Pack (TQFP)Plastic Leaded Chip Carrier (PLCC)CERamic QUADpack (CERQUAD)
Programming a PIC MicrocontrollerPage 4 of 24The reason for the number of packages is that there are some PICs with 100 I/O pins! Themicrocontrollers are basically rectangular or square shaped. The easiest package to work with isDIP or PDIP because it is easily breadboardable and can easily be soldered.NOTE: Use a mid-level dual inline package PIC microcontroller. You will not be able to burnsoftware into a QUAD chip and SOP chips will require Schmartboards.3. Integrated Development EnvironmentIn order to develop your software and organize your files you will have to use an integrateddevelopment environment. The number one IDE used with PIC microcontrollers is MPLab IDE byMicrochip Technology. MPLab IDE is free and easy to use. Just go to http://www.microchip.com/to download the latest version.NOTE: The latest version of MPLab IDE ends in zero. e.g. v7.50. Files not ending in zero areinterim versions of MPLab IDE.You can also download the MPLab IDE User’s Guide, Quick Chart, and Quick Start Guide. Afteryou have downloaded the latest version of MPLab IDE install the software on your local drive.4. Programming LanguagePIC microcontrollers can be programmed in Assembly, C or a combination of the two. Other highlevel programming languages can be used but embedded systems software is primarily written inC. The following three examples demonstrate the programming styles.Example 1 – AssemblyMAINclrfbsfmovlwmovwfbcfPORTB;Clear PORTB output latchesSTATUS,RP0;Switch to bank 1b'11110000' ;Load value to make lower 4 bits outputsTRISB;Move value to TRISBSTATUS,RP0;Switch to bank P;Turn on LED on RB0;Call delay routine;Turn off LED on RB0;Call delay routine;Repeat main loopDELAYdecfszCOUNTERL;Decrement COUNTERLgoto DELAY;If not zero, keep decrementing COUNTERLdecfszCOUNTERH;Decrement COUNTERHgoto DELAY;If not zero, decrement COUNTERL againreturnEND
Programming a PIC MicrocontrollerPage 5 of 24Example 2 – Assembly and Cmain(){short first pass TRUE;//----- Set up port direction reg's ----#asmmovlw 0// Set port b to outputstris port bclrf port bmovlw 0xff // Set port a to inputstris port a#endasm//----- Wait for powerup, Initilize LCD ----delay ms(200);init lcd();//----- Write a startup message ----msg 1();//----- Write status message ----msg 2(); Example 3 – Cvoid main() {U8 i 0;U16 num;U8 row 0;U16 blinkc 0;U16 blink onoff 1;U8 bcd h,bcd m,bcd s;////////////General purpose loop var.General purpose number var.Current display row.LED blinker counter.LED state.BCD numbers.init ports();init();enable interrupts();ROW RESET;/////////////////////////////for (;;) { // infinite loop// FLASH LED @ RA3if ( blinkc 500) {blinkc 0; // time to change state ?I suggest writing your code completely in C because it is much faster and easier than writing yourcode in Assembly or a combination of languages.NOTE: The version of C that you use to write you software will depend on the C compiler youchoose to use in your project.
Programming a PIC MicrocontrollerPage 6 of 245. Compiler, Assembler, and LinkerOnce you have downloaded and installed MPLab IDE and chosen a programming language youwill have to select a compiler. The compiler, assembler, and linker are usually combined in asingle package. In MPLab IDE you can choose you compiler by using the Project Wizard orselecting the menu option ProjectSelect Language Toolsuite. The following image showssome of the available toolsuites in MPLab IDE:Most of the toolsuites are NOT preinstalled and are quite expensive. As a student you will mostlikely be interested in the free toolsuites that come with MPLab IDE which are Microchip MPASMToolsuite and CCS C Compiler for PIC12/24/26/18. Other free compilers that can be integratedinto MPLab IDE are available on the web.NOTE: The CCS C Compiler is free but incompatible with many PIC microcontrollers. Check thesupported device list at http://www.ccsinfo.com/devices.php?page devicesBecause of the previous note I searched in the Internet for a free C compiler. I came across theHI-TECH PICC-Lite compiler available at http://htsoft.com/products/PICClite comparison.php.The compiler can be easily installed and integrated into MPLab IDE.
Programming a PIC MicrocontrollerPage 7 of 246. Using MPLab IDELet’s start writing software in MPLab IDE in the C programming language by creating a newproject.Open MPLab IDE and observe the Workspace and Output windows. The Workspace windoworganizes the files in your project in an easy to see hierarchy.Select ProjectProject Wizard to create a new project as shown in the following image:
Programming a PIC MicrocontrollerPage 8 of 24You should see the following welcome message in a dialog window:Hit Next and you will see enter Step One: Select a device. There will be a single pull downmenu with a huge amount of PIC microcontrollers to choose from.
Programming a PIC MicrocontrollerPage 9 of 24After selecting your device hit Next and you will enter Step Two: Select a language toolsuite (seesection 5). Choose your compiler and hit Next .You should be at a window called Step Three: Name your project. Enter your project name,choose a directory, and hit Next . In this example we will create a project called MyProject andcreate a folder on the desktop.Step Four: Add existing files to your project allows you to add any required files into your projectdirectory. Examples of required files are pic.h , stdlib.h , and string.h . Add any necessaryfiles to your project and hit Next . (In this example we’ll skip this step)TIP: If you’re using the HI-TECH PICC-Lite compiler there are several helpful files such as lcd.h,lcd.c, delay.h, delay.c and many others in the folder /HI-TECH Software\PICC-Lite\9.50\samplesthat can help you in your project.
Programming a PIC MicrocontrollerPage 10 of 24The last window in the Project Wizard is a summary of the options you have selected. Ifeverything looks ok hit Finish to create the project.After hitting Finish you will be presented with a dialog window asking you to save your workspace.A workspace is a file that allows a user to gather and organize various sources and resources.Rename and save your workspace in the project directory.Your workspace window now contains a hierarchy of folders for your project.
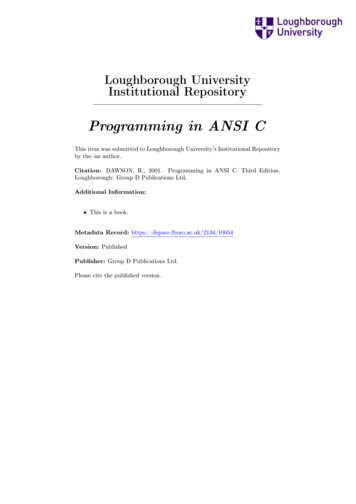
Programming a PIC MicrocontrollerPage 11 of 247. Writing SoftwareWe will now write basic software in C using MPLab IDE. The following program flashes an LED onone of the PORTA pins of the PIC microcontroller (look at the PIC’s datasheet).main.c//LED example program written for//PIC programming tutorial.//standard include files#include stdlib.h #include pic.h #include “delay.h”//main functionvoid main(){PORTA 0x00;TRISA 0x00;//set RA0-RA5 low//set PORTA to output//superloopwhile(1){PORTA !PORTA;DelayMs(250);}}For basic C operations and delays the files stdlib.h and delay.h are needed. The file pic.h isrequired for access to the PIC microcontrollers I/O pins, memory locations, and other components.The following diagram shows how I/O pins on a PIC16f877A correspond to software variables:PORTA in the file main.c refers to the 6-bit I/O port on the PIC microcontroller. Each pin can beset high or low using simple masking commands: PORTA 0x01 sets RA0 high. Multiple pins canbe set: PORTB 0xFF. Check the datasheet for the number and size of ports on your PIC.
Programming a PIC MicrocontrollerPage 12 of 24TRISA is a direction control register corresponding to PORTA. The corresponding TRIS registershave the same bit width as the ports they control. Setting a tris bit to 1 signals that an I/O pin onthat port will be used as an input pin. Setting a tris bit to 0 signals that an I/O pin will be used asan output pin.TIP: Usually the first function called when entering the main function is an initialization function thatsets all ports and their directions.The program then enters a superloop and flips PORTA on and off with a delay of 250 milliseconds.The structure, purpose, and complexity of your software depend on the application of use of yourPIC microcontroller. For a good source on programming microcontrollers in C programming-microcontrollers-in-c.html.NOTE: Standard C functions such as printf() or scanf() are meaningless in embeddedprogramming. In order to test I/O functionality the PIC will have to be breadboarded.8. The “Burning” ProcessOnce you have you software written you can compile your code to check for syntactical errors.The first important step in the “Burning” processing is building your project. Before building yourproject make sure your configuration bits are set appropriately by selecting ConfigureConfiguration Bits. Then select ProjectBuild All or hit Ctrl F10 to build your project.The output window will print the results of each step in the build process. You will probablyreceive some warning or advisory messages. If the build process was successful the outputwindow should print a Memory Usage Map that looks like the following:
Programming a PIC MicrocontrollerPage 13 of 24Memory Usage Map:Program space:CODECONSTENTRYSTRINGused 21h (used 0h (used 0h (used 0h (Data space:BANK0BANK1COMBANKused 3h ( 3) of 60h bytes ( 3.1%)used 0h ( 0) of 50h bytes ( 0.0%)used 0h ( 0) of 10h bytes ( 0.0%)EEPROM space:EEDATAusedID Location space:IDLOCusedConfiguration bits:CONFIGused0h (0h (0h (33) of0) of0) of0) of800h words800h words800h words800h words( 1.6%)( 0.0%)( 0.0%)( 0.0%)0) of 100h bytes ( 0.0%)0) of0) of4h bytes ( 0.0%)1h word( 0.0%)Summary:Program spaceused 21h ( 33) of 800h words ( 1.6%)Data spaceused 3h ( 3) of B0h bytes ( 1.7%)EEPROM spaceused 0h ( 0) of 100h bytes ( 0.0%)ID Location space used 0h ( 0) of 4h bytes ( 0.0%)Configuration bits used 0h ( 0) of 1h word ( 0.0%)Loaded C:\MyProject\MyProject.cof.BUILD SUCCEEDED: Sat Nov 18 01:34:23 2006When you build your project a large amount of files are created and stored in your projectdirectory. The most important file created is the hexadecimal file as shown in the following image:This is the file that will be “burned” into your PIC microcontroller. Copy this HEX file and take it tothe computer connected to your available programmer.
Programming a PIC MicrocontrollerPage 14 of 24NOTE: The senior design lab (Town Engineering room 316) has an easy to use DatamanUniversal Programmer used to program PIC microcontrollers.Place your PIC microcontroller in the black ZIF socket and place the silver lever in the downposition to clamp onto the I/O pins.Start the Dataman Programmer software by going to StartAll ProgramsDatamanProgrammersDataman-48XP. There are basically three steps in the Dataman Programmer“burning” process:1. Select device2. Load HEX file3. Program PIC
Programming a PIC MicrocontrollerPage 15 of 24Select the DeviceSelect Device from the menu or press Alt C in order to choose your PICmicrocontroller. A large list of devices will be displayed in a window. Find you PIC and press OK.Select FileLoad File or click the Load button or press Alt L in order to load the HEX file fromyour project. The Dataman software should automatically detect the file as an Intel HEX file.Make sure one of the Clear Buffer radio buttons is selected and press OK.
Programming a PIC MicrocontrollerPage 16 of 24Right now you have loaded your HEX file from your project into the Dataman buffer. The PICmicrocontroller isn’t programmed yet! The Dataman software allows you to view and edit thebuffer as shown in the following image but this step should be unnecessary.Before programming the PIC microcontroller you can set certain device options in the Datamansoftware by pressing the Config button in the menu bar. A window with several sections ofcheckboxes and radio buttons will appear for your specific device. Read your PIC’s datasheet tofully understand these configuration bits. Make your appropriate choices and click OK.
Programming a PIC MicrocontrollerPage 17 of 24Now it is time to program your PIC microcontroller. The correct device has been selected, theHEX file has been loaded and configuration bits have been set. Select DeviceProgramAutoor press Alt P to program your PIC microcontroller. You should see a progress bar at the centerof your screen:If the “burn” process has been successful a Programming Complete message will be printed to thescreen. There are many other functions provided by the software. For more details read thedatasheet on the Dataman 48UXP Universal Programmer available 8UXPInformation.aspx.NOTE: When reprogramming a PIC you may receive the error messages: “Poor contact at pin 13”or “Over current detected”. These messages most likely mean you have destroyed your PIC.
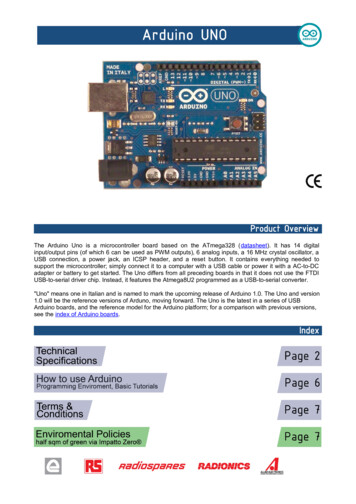
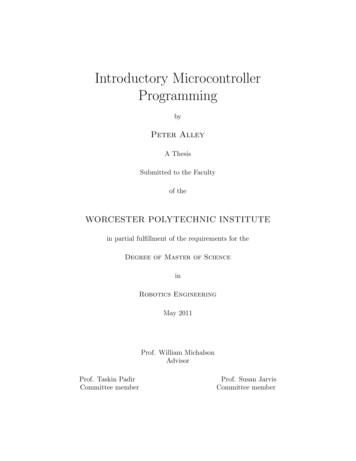
Programming a PIC MicrocontrollerPage 18 of 249. Breadboarding a PIC MicrocontrollerWhen breadboarding a PIC microcontroller the most important thing to remember (besides howeasily they can be destroyed) is the mandatory pin connections required to make your programrun. These connections will differ from device to device so please read your datasheet for morespecific information.Using the PIC16F877A as an example we will outline the basic step required to run the flashingLED program written in MyProject previously described. The following is a pin diagram of thePIC16F877A:With regards to voltage supply, pins 1, 11, 12, 32, and 33 must always be connected. VDD is thepositive voltage supply while VSS is ground. The MCLR/VPP pin is a special pin that keeps the PICis reset mode until a proper voltage supply is detected. This pin must be connected in a specialway in line with two resistors and a capacitor:
Programming a PIC MicrocontrollerPage 19 of 24A representative from Microchip claimed the following values for components in the circuit:ComponentValueR133 KR210 KC10.1 FFor more accurate values please read chapter 14.0 Special Features of the CPU in your PICmicrocontroller’s datasheet.The next important step in breadboarding a PIC microcontroller is the clock oscillation required tostep through your program. Because most PIC’s do not have internal oscillators and externalclocking method is required. Pin 13 OSC1 must be connected in order for your program to run.During the testing phase a square wave signal from an Arbitrary Waveform Generator may beused as the source of oscillation. The correct frequency will depend on the PIC you are using aswell as your software requirements.When your components are ready to be soldered onto a PCB a timer IC will be required. A cheap555 timer can be purchased from Digikey or Mouser. Radio Shack also sells them for 1.49.
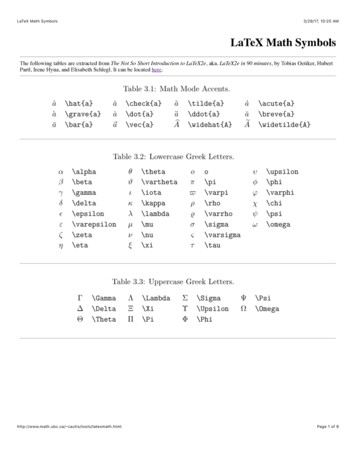
Programming a PIC MicrocontrollerPage 20 of 24The following diagram is the basic circuit schematic for wiring up a PIC microcontroller to run theLED flash program. You can ignore the 7805 chip and supply the PIC with 5V. As you can seethe red LED is connected to one of the pin in PORTA. The LED should flash on and off at a speeddepending upon your chosen frequency.You circuit should end up looking something like this:For more information of breadboarding a PIC microcontroller please read the appropriate PICdatasheet and visit First Project Tutorial with the 16F877 .html.
Programming a PIC MicrocontrollerPage 21 of 2410. Other ConsiderationsThe software you will develop for your project will obviously be much more complex that the LEDflash program written for this document. Microchip’s website has a section dedicated to softwaredevelopment along with web seminars and tutorials.This tutorial is not all inclusive and should only be used as a starting point for a general overviewof programming a PIC microcontroller. The most information you can acquire on PICmicrocontrollers is the individual datasheets and specs. They provide a wealth of information in aneatly organized document. Also take advantage of Microchip’s very helpful technical supportteam at http://support.microchip.com/.The following names are contacts at Iowa State University capable of helping with programmingPIC microcontrollers:Prof. Ralph PattersonCSG 2101 Coovero Steve Kavoriko Jason Boydo Jason JirakDr. Doug JacobsonSSOL Howe Hallo Mike CookDiane Rover – Associate Dean of EngineeringDr. Akilesh TyagiProf. Zhao ZhangI would also appreciate any feedback on this tutorial. Please feel free to email me with questionsand/or suggestions at yesu@iastate.edu. Thank you for taking the time read this short introductionto programming PIC microcontrollers.
Yesu Thommandru 11/17/06 Started tutorial 1.0 Yesu Thommandru 11/18/06 Finished majority of tutorial 1.1 Yesu Thommandru 11/19/06 Added breadboard images, finished and