Transcription
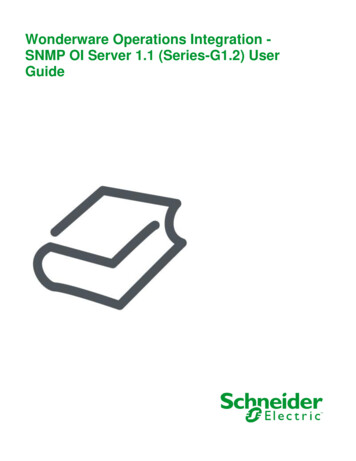
INSTALLING, CONFIGURING, AND DEVELOPING WITH XAMPPby Dalibor D. Dvorski, March 2007Skills Canada – OntarioDISCLAIMER: A lot of care has been taken in the accuracy of information provided in this article,however, it cannot be guaranteed that inaccuracies will not occur. The author and Skills Canada will notbe held responsible for any claims or damages caused as a result of any information from this article.This article explains the installation and configuration process of the XAMPP Apache distribution, andthen provides a step-by-step tutorial on developing a simple address book program using the PHPprogramming language and MySQL database package.In order to comply with the Ontario Skills Competition, this article will use the following codingstandards and tools: XHTML 1.0 Transitional, PHP 5.0, MySQL 5.0, and phpMyAdmin 2.9.About XAMPP and Installation RequirementsXAMPP is a small and light Apache distribution containing the most common web developmenttechnologies in a single package. Its contents, small size, and portability make it the ideal tool forstudents developing and testing applications in PHP and MySQL. XAMPP is available as a freedownload in two specific packages: full and lite. While the full package download provides a widearray of development tools, this article will focus on using XAMPP Lite which contains the necessarytechnologies that meet the Ontario Skills Competition standards. As the name implies, the light versionis a small package containing Apache HTTP Server, PHP, MySQL, phpMyAdmin, Openssl, andSQLite. For more details on the packaging and versions, refer to TABLE 1.In order to be able to successfully run XAMPP Lite, you will require 17 MB for the self-extracting ZIPinstallation archive and at least 118 MB after it has been extracted on a local hard disk or USB drive.TABLE 1: XAMPP and XAMPP Lite featurecomparison chart.1
Obtaining and Installing XAMPPAs previously mentioned, XAMPP is a free package available for download and use for various webdevelopment tasks. All XAMPP packages and add-ons are distributed through the Apache Friendswebsite at the address: http://www.apachefriends.org/. Once on the website, navigate and find theWindows version of XAMPP Lite and download the self-extracting ZIP archive. After downloadingthe archive, run and extract its contents into the root path of a hard disk or USB drive. For example,the extract path for a local Windows installation would simply be C:\.If extracted properly you will notice a new xampplite directory in the root of your installation disk. Inorder to test that everything has been installed correctly, first start the Apache HTTP Server bynavigating to the xampplite directory and run the apache start.bat batch file.NOTE: Depending on your local Windows configuration, you may be asked to provide network access tothe Apache HTTP Server. It is important that you allow network access to the server through yourfirewall in order to have a functioning server.Next we will test if the server is running correctly by opening an internet browser and typinghttp://localhost/ into the address bar. If configured correctly, you will be presented with a screensimilar to that of the one in FIGURE 1.FIGURE 1: XAMPP splash screen.In order to stop all Apache processes do not close the running terminal application, but instead runanother batch file in the xampplite directory called apache stop.bat.2
PHP Hello WorldIn the previous pages we installed and ran the Apache HTTP Server with success. The next step is towrite a simple “Hello World” program in PHP that will test the configuration of PHP under XAMPP.In a text editor, such as TextPad, write the following lines of code:The above code example starts a new XHTML document with the page title set as “Hello World” andthen prints a single line of text, Hello World, using the echo PHP language construct.In order to run and test this PHP program, save it into your xampplite\htdocs directory with the filename of helloWorld.php. Then, to view it in your browser, simply type inhttp://localhost/helloWorld.php into the address bar. If done correctly, you will see your HelloWorld line of text in the web browser as shown in FIGURE 2.FIGURE 2: Resulting output for helloWorld.php.3
Creating a Database and Table, and Inserting DataNow that we have run and tested Apache and PHP, the next step is running MySQL and creating adatabase and table which will hold information for our address book program. In order to startMySQL, navigate to the xampplite directory and run the mysql start.bat batch file.NOTE: Similarly to the Apache HTTP Server, MySQL will also need network access; therefore in orderto have a functioning database it is important to allow this access through your local Windows firewallconfiguration.The XAMPP Lite package contains an application called phpMyAdmin which allows developers toadminister and maintain MySQL databases. For the remainder of this article we will be usingphpMyAdmin to create a database and table, and enter test data used in the address book program. Inorder to start phpMyAdmin, you must first copy the phpMyAdmin folder from the xampplite directoryand place it into the xampplite\htdocs directory. Before testing phpMyAdmin, make sure that bothApache and MySQL are running by opening their respective batch files: apache start.bat andmysql start.bat. Along with Apache and MySQL running in the background, typehttp://localhost/phpMyAdmin/ into your internet browser. If successful you will be presented with aphpMyAdmin start page similar to the one in FIGURE 3.FIGURE 3: phpMyAdmin start page.4
The first step with phpMyAdmin running is creating a new database. To do this, point to the textboxlabelled Create new database and type addressBook as the name of a new database. Upon doing so,you will be forwarded to a screen similar to the one in FIGURE 4. Next, insert a new table in theaddressBook database by typing colleague into the table name textbox and clicking the Go button toproceed with creating the table.FIGURE 4: Creating a new table in the addressBook database.Following the creation of the colleague table, you will be required to insert the columns that make upyour table. By using TABLE 2 as a reference, insert the necessary columns that will make up yourcolleague table for the address book.TABLE 2: Table summary for the colleague table.Lastly, with the database and table created, we next need to input some data into the table. Using thefictional information from TABLE 3 on the next page, input the contact data into your own table.NOTE: When inputting data into the table, leave the id field blank because it is set to auto increment to anautomatic number on every record entry.5
TABLE 3: Fictional table data for the colleague table.We are now ready to write the PHP program that will connect to the database and display our data in aninternet browser. The procedure that we will write this program is to first establish a connection withthe database using PHP, then start our XHTML deceleration and meta data, and finally in the body ofour page, write a loop that will iterate through each record in the colleague table and display that datain the browser.The PHP block above will connect to our database using localhost as the address, root as theusername, and a blank password field. This configuration of root as the username and a blankpassword is the default that is set when phpMyAdmin is configured and is what we will be using forour examples.NOTE: Although it is perfectly fine to use the default username and password for learning purposes, it isstrongly suggested to change the password to something more secure if developing full web applications.Following the mysql connect("localhost", "root", ""); line of code is another line stating that wewill be connecting to and using the addressBook database. Lastly, we will create a variable calledresult which will contain a SQL query that will select all records from the colleague table.6
In the above code example you will notice that the PHP code block, contained within ?php and ? , isstarted and then ended before declaring the XHTML document. Remember that in the “Hello World”example earlier in this article we also had a PHP code block within a XHTML paragraph tag. This isimportant to note because XHTML and PHP can interchangeably be used within one another. Thisconcept will also be shown when we write a PHP loop to retrieve all the records from the database anddisplay it in a XHTML table.Insert a couple new lines after the closing /head tag and then type in the following code:This new addition to your code will simply start the body of your document and then place a newXHTML table, along with a new table row followed by five table headings: ID, First Name, LastName, Telephone, and Email Address.7
Next we will create a new PHP code block in which we write a while loop that goes through eachdatabase table record and outputs each piece of data in a new XHTML table cell:This loop will write a new table row for each record by printing the tr tag and then also write the id,firstName, lastName, telephone, and email into its own respective table cells using the td tags.Finally, before ending the loop, the table row is closed by printing out /tr . The PHP code block isconcluded by freeing the memory with mysql free result( result); and closing the databaseconnection with mysql close();.The majority of the code has now been written, however, to properly end this XHTML document wewill need to insert a few more closing tags:You may refer to the next page for complete code of the address book program.8
9
Now that you have created a database and table, inserted some data into that table, and written aprogram that reads the data using PHP, all that is left to do is test, and if required debug.Making sure that the Apache HTTP Server, along with MySQL are running, open up an instance ofyour internet browser and type in the location of your address book PHP file. For example, if youcreated an addressBook folder inside the htdocs folder, then the path to run the address book programwould be: http://localhost/addressBook/index.php. If done correctly, you will be presented with apage similar to that of the one in FIGURE 5. This figure shows the address book program running with aXHTML table showing the data from the colleague table. If you encounter an error, please reviewand compare your code with the complete code provided on the previous page. Lastly, to stop andclose all processes run the apache stop.bat and mysql stop.bat batch files for the server and databaserespectively.FIGURE 5: The address book program displaying contact information from the database.ConclusionThroughout this article you have been shown the beginning concepts that will allow you to set up adevelopment environment, create and administer a database, and write a program that connects to adatabase and retrieves data.Although these concepts are important ones, they are in no means the end of an application. By usingthe address book program as an example, there is still a lot of features that can be implemented in suchan application. Features such as editing contact information, deleting contacts, adding new contacts,and being able to email contacts through a form are all additions that can be implemented to theexample used in this article. Challenge yourself, use this article and other resources as a jump-start andtry adding other capabilities to your own address book program!10
then provides a step-by-step tutorial on developing a simple address book program using the PHP programming language and MySQL database package. In order to comply with the Ontario Skills Competition, this article will use the following coding standards and tools: XHTML 1.0 Transitional, PHP