Transcription
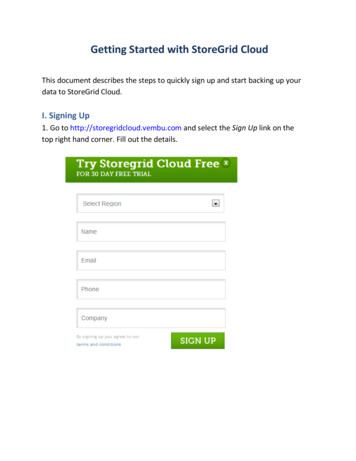
Getting Started with StoreGrid CloudThis document describes the steps to quickly sign up and start backing up yourdata to StoreGrid Cloud.I. Signing Up1. Go to http://storegridcloud.vembu.com and select the Sign Up link on thetop right hand corner. Fill out the details.
2. An email will be sent to you with the Account ID and verification link. Select theverification link.3. You will be redirected to login page. You have to enter a new password for yourreseller account.
4. Once you finish setting up your own password, you will be redirected to e-mailID verification page.5. Select "Login” and get started, enter your account ID RXXXXXX which youreceived in your confirmation e-mail and password to login your Reselleraccount.
II. Downloading Generic build or custom build1. Once your reseller account is verified, your generic client builds will beautomatically generated in your reseller portal. Select the Download Menu toaccess the build.You can install the above generic build on client machine and start backing up toStoreGrid Cloud server. If you want a customized build follow step 2 andgenerate the new build again. Your new build will be replaced in the same link.NOTE: You can simply skip step 2 if you are using generic build.2. You can also create a branded Client (agent) build with your company name,product name, your own logos and colors by clicking on create branded buildoption given in the quick links.
3. Fill out the customization details. Then select the Generate Custom Build linkat the bottom to start the build generation process.
4. Once the build is ready, select the Download link to download the builds. Notethat your web console also will change to the customized settings that youchoose. Go ahead and download the customized StoreGrid Cloud agent builds.
III. Setting up your account to send out emails1. Log into your account and click on Email Settings in the Quick Links to configureemail settings. You can fill out the Email Settings details as like belowconfigurations.
2. To make sure the email settings that you entered is right, select the link TestMail Server in the email settings page. If the email is sent successfully, you willsee a success message at the bottom of the page.
IV. Adding New Companies [customer] to your AccountBefore you start installing StoreGrid cloud agent in the machines that need to bebacked up, it is recommended that you should create the customer accounts inyour StoreGrid Cloud account. These customer accounts are useful to group theStoreGrid Cloud agent under the respective customers, to create invoice plans forcustomers and to manage their backups better.Please note: You can skip this step. All the backups will then be grouped underthe default Company Name [Customer] that is created in your account whenyou sign up.1. Log into your account in StoreGrid Cloud. Select Add Company from the quicklinks available on the left side.
2. Fill out the details of the new customer. The email address that you enter forthe customer will be used to send the reports and invoices to the customer.
V. Installing StoreGrid Cloud Agent and Configuring BackupsOnce your generic StoreGrid Cloud agent build is ready and downloaded fromthe 'Download page', then you can start installing them in the machines thatyou want to be backed up.1. Choose Typical, if the client machine is a desktop OS, then the client will beinstalled as Adobe Flex based client and will run as ‘Windows Application’. Ifthe client machine is a Server OS, then the client will be installed as a webconsole based client and will run as ‘Windows Service‘. When you chooseTypical, StoreGrid Cloud agent will be installed in "C:\Program Files\Vembuagent" by default.
2. Choose Custom, if the client machine is a Desktop OS then the client will askfor an option to be installed as Flex or webconsole. If the client machine is aServer OS then the client will be installed as webconsole UI.3. Once you have chosen the UI type, using “Browse” option you can selectthe location where you want to install StoreGrid Cloud agent .
4. Select “Next” to complete the installation. Once the installation iscompleted, it will take you to a client registration form.For Flex based Cloud agent, the client registration will be as follows:For webconsole based Cloud agents, the client registration will be as follows:
4. Please select “go to login page” to login to your StoreGrid Cloud agent:5. After completing the registration form, login to your account using theusername and passwordFor Flex based Cloud agent:
For webconsole based Cloud agent:6. Login and Start configuring backups with StoreGrid Cloud 4.4.For Flex based Cloud agent:
For webconsole based Cloud agent:
V. Installing StoreGrid Cloud Agent and Configuring Backups Once your generic StoreGrid Cloud agent build is ready and downloaded from the 'Download page', then you can start installing them in the machines t