Transcription
Honeywell WiFi ThermostatIntegration Release NotesContentIntroduction.1Installing the Honeywell thermostat.2Registering the thermostat.3Enabling auto mode.3Configuring in Fusion.4Configuring rules with TCC thermostats.6Contact information.8Last modified: 05/03/18IntroductionThe Honeywell WiFi thermostats are a series of WiFi thermostats that have beentested and certified for integration with the ClareHome system.When integrating a Honeywell WiFi thermostat into your ClareHome project, noextra connections are necessary. Install the thermostat according to theHoneywell documentation, register the thermostat on the Honeywell portal,enable auto mode in the thermostat, and then connect it to the network using IP.All HVAC integrations share a common UI, so that the user experience isconsistent. Temperature settings can be controlled via events. Use Fusion’sScenes and Rules to automate the actions your customers want.Supported RTH6580WFDoc ID - 1188 Rev 04TH6320WF1005/B1/8
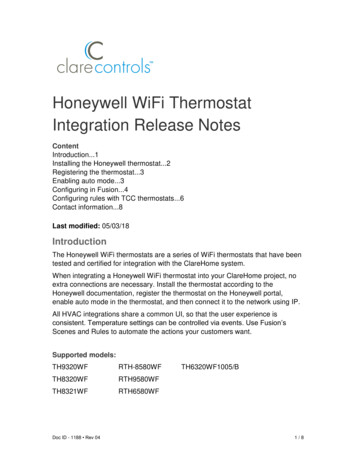
The Following figure shows the Honeywell controls on the ClareHome UI.Figure 1: User interface of the Honeywell WiFi thermostat.(1)(2)(3)(4)(5)Change the Heat set point by sliding the indicator around the dial.Change the Cool set point by sliding the indicator around the dial.Temperature setting displays on the ClareHome UI in Fahrenheit.Change the Operation mode using the slider control.Change the Fan mode using the slider control.Installing the Honeywell thermostatA qualified HVAC installation technician should install the Honeywell thermostat.Refer to the documentation that came with the thermostat for detailed installationinstructions. Clare Controls does not assume any responsibility for damagescaused by improper installation or connection to the data network.Doc ID - 1188 Rev 042/8
Registering the thermostatAfter installation, you must register the thermostat on the Honeywell portal. Thisallows the thermostat to be accessed remotely and updated with information fromthe Honeywell portalTo register the Honeywell thermostat:Note: To register your Honeywell WiFi devices, you must have each device’sMAC ID and Device CRC.1. Access the Honeywell WiFi portal athttps://mytotalconnectcomfort.com/portal.2. Log into the website.– or –Create an account, and then log in.3. Add a location.Adding the location launches a registration wizard.4. Complete the wizard to register your devices.Note: You will need the thermostats name for Fusion. The name is casesensitive and must match the name in Honeywell.Enabling auto modeFor auto mode to function in the Clare Controls App, auto mode must be enabledon the thermostat. This process varies by thermostat. Below are some examples.Note: It is necessary to enable auto mode when its used with the Clare ControlsApp.To enable auto mode in the Honeywell 8321:1. Disconnect the thermostat from the wall mount to view the back.2. Note the pin code, and then connect the thermostat to the mount.3. Press Menu, and then press the down arrow until the Installer Optionsdisplays.4. Tap Select and enter the pin code as prompted.5. Press Done to view the Installer Menu, and then press the down arrow untilthe Installer Setup displays.6. Press Select, and then press Next until the System Changeover displays.7. Toggle the System Changeover to automatic, and then press Done.8. Tap Yes to exit the menu.Doc ID - 1188 Rev 043/8
To enable auto mode in other Honeywell 8000 models:1. Access the thermostat, and then press System.2. Press and hold the blank center button.3. Press the up arrow until 0300 is displayed.4. Change the value to 1, and then exit the menu.To enable auto mode in the Honeywell 9000:1. Access the thermostat, and then press MENU.2. Browse to Advanced Preferences.Preferences Advanced Preferences3. Press the Next button until the Heating and Cooling System Changeoverscreen displays.4. Press Automatic, and then press Done.5. The Exit screen displays, press Yes to save your changes.Configuring in FusionOnce the thermostat has been installed, registered, and set to auto mode,configure the Honeywell thermostat in Fusion.To add the Honeywell WiFi device in Fusion:1. Click the Devices tab, and then click the New Device buttonSelect Template dialog.to display the2. Expand the Climate folder, and browse to the Honeywell WiFi Thermostats.Climate IP Thermostats Honeywell WiFi ThermostatsDoc ID - 1188 Rev 044/8
3. Click OK.The Details tab displays.4. Enter a name and notes for the thermostat.5. Click the Configure tab.6. Enter values in the following fields: Thermostat ID: Enter the thermostat number associated with thatthermostat.Note: Fusion sets the Thermostat ID to 1 by default. This number onlyneeds to be changed if there is more than one thermostat in use. Werecommend assigning the thermostats IDs in order. The first thermostatadded is 1, the second thermostat is 2, and so on. Device Name: The thermostats name in the Honeywell WiFi portal.Note: The names in the Honeywell portal and Fusion must be identical orthe thermostat will not connect. The names are case sensitive. Username: The username used for the Honeywell WiFi portal. Password: The password used for the Honeywell WiFi portal.Doc ID - 1188 Rev 045/8
7. Click the Save button.8. The Create Service dialog displays. Click OK, and the service is automaticallycreated for you.Note: You can select Open Wizard to check or change the controls points asneeded.9. Configure rules to work with your thermostat.Configuring rules with TCC thermostatsConfigure a rule for your thermostat. The example below shows how to set a rulefor alerting the customer of the home’s temperature. If the thermostat reachesabove 72 F, an email notification is sent.To create a rule for the TCC thermostat in Fusion:1. Access your project, and then click the Rules tab.2. Click the New Rule button.3. Enter a name for the rule, and then select the Enable Rule checkbox.Doc ID - 1188 Rev 046/8
4. Configure the Event Part as below. Event Type: Device Property Change EventNote: This event type is replacing the Device Property Value Event. Device: Honeywell WiFi thermostat Function: Heat Cool Temperature Actuator Property: Unit Constraint: Value: 725. Configure the Action part as below. Action Type: Send Email Recipients: The homeowner’s Email addressNote: To add an Email address, you must click the green plus iconthis for each desired Email recipient. Subject: The purpose of the alarm Text: The information included in the email6. Click the Save buttonDoc ID - 1188 Rev 04. Do, and then deploy the project.7/8
Contact informationClare Controls, LLC.7519 Pennsylvania Ave, Suite 104Sarasota, FL 34243General: 941.328.3991Fax: 941.870.9646www.clarecontrols.comIntegrator/Dealer Support: r Support (ClareCare): 941.315.2273 (CARE)help@clarecontrols.comDoc ID - 1188 Rev 048/8
TH8320WF TH8321WF RTH-8580WF RTH9580WF RTH6580WF TH6320WF1005/B . . To register your Honeywell WiFi devices, you must have each device’s MAC ID and Device CRC. 1. Access the Honeywell WiFi portal at . the Installer Setup displays. 6. Press Select,