Transcription
Installation step-by-stepNest Learning ThermostatInstallation Guide
ContentsCompatibility. . . . . . . . . . . . . . . . . . . . . . . . . . . . . . . . . . . . . . . . . . . . . . . . . . . . . . . . . . . . . . . . . . . . . . . . . . . . . . . . . . . . . . . . . . . . . . . . . . . . 3In the box . . . . . . . . . . . . . . . . . . . . . . . . . . . . . . . . . . . . . . . . . . . . . . . . . . . . . . . . . . . . . . . . . . . . . . . . . . . . . . . . . . . . . . . . . . . . . . . . . . . . . . . . . 4Before you start. . . . . . . . . . . . . . . . . . . . . . . . . . . . . . . . . . . . . . . . . . . . . . . . . . . . . . . . . . . . . . . . . . . . . . . . . . . . . . . . . . . . . . . . . . . . . . . . 5Choose an installation method. . . . . . . . . . . . . . . . . . . . . . . . . . . . . . . . . . . . . . . . . . . . . . . . . . . . . . . . . . . . . . . . . . . . . . . . . . . . 6Replacing an existing wired thermostat. . . . . . . . . . . . . . . . . . . . . . . . . . . . . . . . . . . . . . . . . . . . . . . . . . . . . . . . . . . . 8Installing the Nest Thermostat in a new spot. . . . . . . . . . . . . . . . . . . . . . . . . . . . . . . . . . . . . . . . . . . . . . . . . . . 20Cable diagrams. . . . . . . . . . . . . . . . . . . . . . . . . . . . . . . . . . . . . . . . . . . . . . . . . . . . . . . . . . . . . . . . . . . . . . . . . . . . . . . . . . . . . . . . . . . . . . . 32Nest Labs (Europe) Ltd. Limited Warranty Nest Learning Thermostat . . . . . . . . . . . . . . . . . . . . . 38WARNING: High voltage. Nest should be installed by a professional.WE TAKE YOUR PRIVACY SERIOUSLYWe’re committed to being open and honest about how we use data. We will always askfor permission before sharing your personally identifiable information such as youremail address. We also keep your data safe with industry-standard security tools. Tolearn more about our Privacy Policy, please go to nest.com/eu/privacy.2
CompatibilityThe Nest Learning Thermostat iscompatible with almost all centralheating systems, including: Combi and condensing boilers System and heat-only boilersYou don’t need Wi-Fi to use theNest Thermostat, but Wi-Fi isrequired to control Nest fromthe Nest app. Hydronic underfloor systems Air source and ground source heatpumps (heating only) Zoned systems (one Nest Thermostatper zone) Switched live systemsInstallation step-by-step Low-voltage (dry contact) systems3
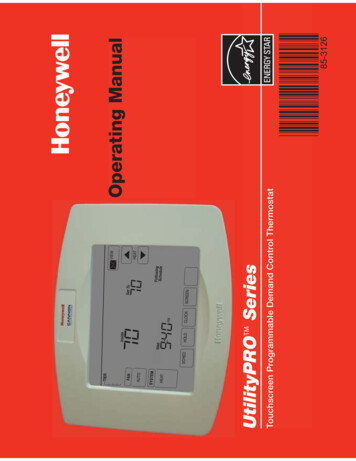
In the boxN L123DisplayBaseHeat LinkTrim plateScrewsWelcome Guide, InstallationGuide and WarrantyPower cordClipsFor installations in a new spot onlyPower plug4T1 T2
Before you startDo I need to install the NestThermostat somewhere new?The Nest Thermostatshould be:Many existing wired thermostatsare in rooms that are rarely used.The temperature they sense is warmeror cooler than homeowners feel. Installed so that it can communicatewirelessly with Heat Link (up to amaximum distance of 30m). The home’sconstruction and arrangement willaffect the communication rangeSo if the old thermostat isn’t in a goodspot, install Nest somewhere newusing the included power plug and cord,or using the Stand for Nest LearningThermostat (sold separately). In a room that’s used often, so Nestcan read the right temperature andthe homeowner can easily reach it On an interior wall Away from drafts 1.2 – 1.5m from the floor Not behind doors, bookcasesor other objectsInstallation step-by-step If in a zoned system, near the radiatorthat it’s controlling On the next page, you’ll see options for switching out anexisting thermostat or installing in a new spot.5
Replacing an existing wired thermostatChoose this installation method if the current thermostatconnects to heating cables in the wall and it doesn’t need tomove to a better spot. Jump to page 8ExistingthermostatcablestoHeatLink6
Installing the Nest Thermostat in a new spotChoose this installation if there’s a wireless thermostat,no thermostat at all or a thermostat that needs to be movedto a better spot. Jump to page 20Connect to the Standfor the Nest LearningThermostat and placeon a desk, shelf orother flat surface.NOTE:The stand is soldseparately andcomes with itsown InstallationGuide. More info atnest.com/eu.Installation step-by-stepInstall over asocket and powerwith the providedcord and plug.7
Replacing an existing wired thermostatTo replace an existing wired thermostat, you’ll need to:1. Install the Heat Link first2. Remove or configure theprogrammer3. Install the Nest ThermostattoHeatLink8
REPLACE A THERMOSTATInstall Heat Link1. Switch off mains powerYou’ll be working with high voltagecables, so protect yourself and thethermostat by turning off the powerbefore you start.CAUTION: High voltage cablesFuse boxInstallation step-by-steporSwitch9
Install Heat Link2. Understand the cablesFind the call-for-heat circuit in theheating system.The circuit may run directly fromthe thermostat to the boiler or passthrough a junction box.If there’s a combi boiler with nojunction box, the Heat Link will beconnected directly to the boiler’scontrol circuit.You may need to test each cableto understand its function.Make sure you connect thecorrect cables to the Heat Linkto avoid blowing a fuse.10
REPLACE A THERMOSTATInstall Heat Link3. Choose where you’ll installthe Heat LinkThe Heat Link and Nest Thermostatcommunicate wirelessly, even ifthey are also connected by cables.Position the Heat Link such that largemetal objects—like the boiler or hotwater tank—don’t come between it andthe thermostat. Metal objects can blockthe wireless signal.Boiler30cmmin.ThermostatInstallation step-by-stepHeat Link30mmax.11
Install Heat Link4. Run power to the Heat LinkUse a cable to connect the L (live) andN (neutral) connectors on the Heat Linkto the L and N connectors on the boileror junction box. This will power theHeat Link.WARNING:DO NOT SKIPIt’s important to install the HeatLink before the Nest Thermostat.Otherwise, high voltage currentwill irreparably damage theNest Thermostat.If existing controls operate at mainsvoltage, you can add a jumper cablebetween live and common. The jumpercable should be 0.75mm2 and 55mmlong (with 8mm of exposed cable ateach end).BoilerHeat LinkJunction box12
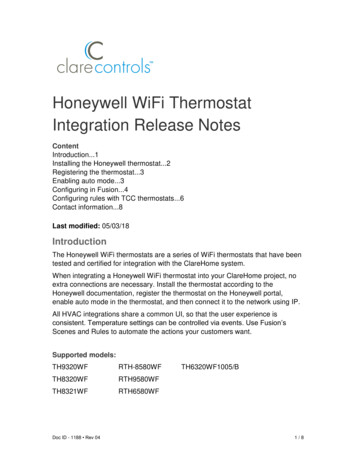
5. Connect the control circuitto the Heat Link6. Connect the thermostatcables to the Heat LinkConnect the common and call-for-heatconnectors on the boiler or junction boxto the 2 (common) and 3 (call-for-heat)connectors on the Heat Link. Thesecables will control the heating system.Take two cables from the cable bundlethat goes to the thermostat and attachthem to the T1 and T2 connectors onthe Heat Link.REPLACE A THERMOSTATInstall Heat LinkSee installation diagramson page 32.ThermostatInstallation step-by-step12V power to thermostatCall-for-heatCommonSatisfied (optional)230V AC live and neutral input power13
For zoned homes onlyInstall Heat Link with azoned systemIf this home has multiple heatingzones, each zone valve will needits own Nest Thermostat andHeat Link.First, disconnect the thermostatcables from the zone valve.Use a cable to connect the L (live)and N (neutral) connectors onthe Heat Link to the L and Nconnectors on the zone valve.Connect the common and call-forheat cables to the 2 (common) and3 (call-for-heat) connectors on theHeat Link. If necessary, connectthe 1 (satisfied) cable from thezone valve to the Heat Link.Zone valveJunction boxHeat LinkSatisfied cable optional14Thermostat
REPLACE A THERMOSTATInstall Heat Link7. Attach the Heat Link8. Configure the programmerUse the included screws to attach theHeat Link to a wall near the boiler orjunction box, making sure to leave30cm of space on all sides. When you’redone, put the Heat Link cover back on.If there’s a programmer that controlshot water and heating, set theheating controls to ALWAYS ON. If theprogrammer only controls heating,then remove it. The Heat Link willcontrol heating in its place.Check page 11 for placement info.Installation step-by-stepTIP: Put this sticker on theprogrammer to remindhomeowners not to adjust it.attach sticker15
Install thermostat9. Install the baseRemove the old thermostat and attachthe base. You can either attach thebase directly to the wall or use theincluded trim plate to cover up marksor route cables that are outside thewall. The trim plate and base snaptogether and should be screwed tothe wall as one piece.16Remember, if the old thermostatisn’t in a good place, you shouldinstall the Nest Thermostat in anew spot. Check the placementguidelines on page 5.
10. Connect cables11. Attach the displayConnect the existing cables to Nest’sT1 and T2 connectors. It doesn’t matterwhich cable goes into which connector.Press the display onto the base until itclicks into place.Installation step-by-stepSwitch on mains power and the NestThermostat will begin setup.REPLACE A THERMOSTATInstall thermostat17
Install thermostat12. Set up the Nest ThermostatJust turn the ring and press to select.During setup, you will: Choose a language Connect to the home’s Wi-Fi network Confirm that Heat Link is connected If the homeowner used to havea programmer, enter that schedule Enter the post code Choose an Away temperatureTIP: Double check that theprogrammer has been removedor that its heating channelhas been set to ALWAYS ON.18
REPLACE A THERMOSTATInstall thermostat13. Create a Nest AccountBefore the homeowner can control theNest Thermostat from their mobile,tablet or laptop, they need aNest Account. Tell them to create oneat nest.com/eu/account or justdownload the Nest app.Once the thermostat is connected toWi-Fi, the Nest app will automaticallyadd it to a Nest Account.Installation step-by-stepQuestions about connecting to a NestAccount? Visit nest.com/eu/pairing.19
Installing the Nest Thermostat in a new spotIf you’re installing the Nest Thermostat and aren’t connectingit to any cables within the wall, then you’ll need to:1. Install the Heat Link first2. Remove or configure theprogrammer3. Attach the Nest Thermostatto the wall4. Plug the thermostat in withthe power plug and cordNOTE: The Stand for theNest Learning Thermostat issold separately.20
Install Heat Link1. Switch off mains powerCAUTION: High voltage cablesINSTALL IN A NEW SPOTYou’ll be working with high voltagecables, so protect yourself and thethermostat by turning off the powerbefore you start.Fuse boxInstallation step-by-steporSwitch21
Install Heat Link2. Understand the cablesFind the call-for-heat circuit in theheating system.The circuit may run directly fromthe thermostat to the boiler or passthrough a junction box.If there’s a combi boiler with nojunction box, the Heat Link will beconnected directly to the boiler’scontrol circuit.You may need to test each cableto understand its function.Make sure you connect thecorrect cables to the Heat Linkto avoid blowing a fuse.22
Install Heat Link3. Choose where you’ll installthe Heat LinkINSTALL IN A NEW SPOTThe Heat Link and Nest Thermostatcommunicate wirelessly. Positionthe Heat Link such that large metalobjects—like the boiler or hot watertank—don’t come between it andthe thermostat. This can block thewireless signal.Boiler30cmmin.Installation step-by-stepThermostatHeat Link30mmax.23
Install Heat Link4. Run power to the Heat LinkUse a cable to connect the L (live) andN (neutral) connectors on the Heat Linkto the L and N connectors on the boileror junction box. This will power theHeat Link.BoilerHeat LinkJunction box24
Install Heat Link5. Connect the control circuitto the Heat LinkINSTALL IN A NEW SPOTConnect the common and call-for-heatconnectors on the boiler or junction boxto the 2 (common) and 3 (call-for-heat)connectors on the Heat Link. Thesecables will control the heating system.See installation diagramson page 32.ThermostatInstallation step-by-step12V power to thermostatCall-for-heatCommonSatisfied (optional)230V AC live and neutral input power25
For zoned homes onlyInstall Heat Link with azoned systemIf this home has multiple heatingzones, each zone valve will needits own Nest Thermostat andHeat Link.First, disconnect the thermostatcables from the zone valve.Use a cable to connect the L (live)and N (neutral) connectors onthe Heat Link to the L and Nconnectors on the zone valve.Connect the common and call-forheat cables to the 2 (common) and3 (call-for-heat) connectors on theHeat Link. If necessary, connectthe 1 (satisfied) cable from thezone valve to the Heat Link.Zone valveJunction boxHeat LinkSatisfied cable optional26Thermostat
6. Attach the Heat Link7. Configure the programmerUse the included screws to attach theHeat Link to a wall near the boiler orjunction box, making sure to leave30cm space on all sides. When you’redone, put the Heat Link cover back on.If there’s a programmer that controlshot water and heating, set theheating controls to ALWAYS ON. If theprogrammer only controls heating,then remove it. The Heat Link willcontrol heating in its place.Lastly, turn the power to the heat back on.TIP: Put this sticker on theprogrammer to remindhomeowners not to adjust it.Installation step-by-stepCheck page 23 for placement info.INSTALL IN A NEW SPOTInstall Heat LinkSee page 15 for sticker.27
Install thermostat8. Install the Nest ThermostatInstall it on a wall using the includedpower cord, plug and clips. Instructionsfor installing the Stand for NestLearning Thermostat (sold separately)come with the stand.Before attaching the base to the wall,check to make sure the thermostat iswithin range of the Heat Link.28If you’re getting rid of an oldthermostat, cap its cables afteryou remove it, then cover up thehole in the wall.
Install thermostat9. Install the base10. Attach the displayMake sure you install the base above asocket. You can either attach the basedirectly to the wall or use the trim plateto cover up marks or holes.Press the display onto the base until itclicks into place.INSTALL IN A NEW SPOTThe trim plate and base snap togetherand should be screwed to the wall inone piece.Installation step-by-stepCheck the placement guidelineson page 5 before you install.29
Install thermostat11. Set up the Nest ThermostatJust turn the ring and press to select.During setup, you will: Choose a language Connect to the home’s Wi-Fi network Confirm that Heat Link is connected If the homeowner used to havea programmer, enter that schedule Enter the post code Choose an Away temperatureTIP: Double check that theprogrammer has been removedor that its heating channelhas been set to ALWAYS ON.30
Install thermostat12. Create a Nest AccountBefore the homeowner can controlNest from their mobile, tablet or laptop,they need a Nest Account. Tell them tocreate one at nest.com/eu/account orjust download the Nest app.INSTALL IN A NEW SPOTOnce the thermostat is connected toWi-Fi, the Nest app will automaticallyadd it to a Nest Account.Installation step-by-stepQuestions about connecting to a NestAccount? Visit nest.com/eu/pairing.31
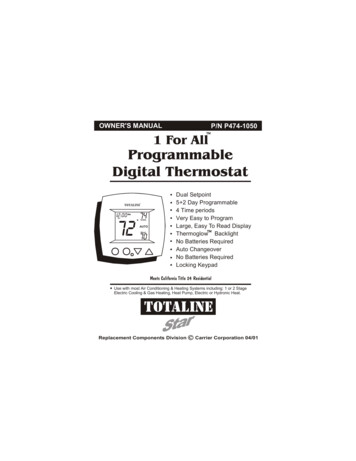
Cable diagramsThe following diagrams show you how to install theNest Thermostat on: Switched live systems Low voltage (dry contact) systems Zone valve systems MOMO zone valve systemsPower supplyfor Heat LinkNeutralLiveSPDT relaySatisfied Common Call-for(optional)heatTIP: If the call-for-heat circuit is at mainsvoltage, you can jumper the L (live) and2 (common) connectors with a 0.75mm2,55mm long jumper cable.32Power supplyfor thermostat12V power to Nest Thermostat(only required if you haveexisting thermostat cables)
General specsConnectionSpecificationNotesL230V AC / 50Hz mains voltageRequiredN230V AC / 50Hz mains voltageRequired1Relay normally closed3A max.2Relay common3A max.3Relay normally open3A max.T112V DC power output to NestGroundT212V DC power output to NestPositiveNote: T1 and T2 have no polarity at the thermostat.Wiring specsMaximum cable thickness 2mm²33
Switched LivePower supplyfor Heat LinkOnly required if you haveexisting thermostat cables230V / 50Hzmains3A fuse12V powerto NestThermostatLNBoiler with “switched live” activation34
Low voltage (dry contact)Power supplyfor Heat LinkOnly required if you haveexisting thermostat cables230V / 50Hzmains3A fuse12V powerto NestThermostatLNWiring specsBoiler with low voltage / dry contact activation35
Boiler with zone valvesPower supplyfor Heat LinkOnly required if you haveexisting thermostat cables230V / 50Hzmains3A fuse12V powerto NestThermostatLNBoiler36Zone valve(Zone valve cable colours may vary)
Boiler with MOMO zone valvesPower supplyfor Heat LinkOnly required if you haveexisting thermostat cables230V / 50Hzmains3A fuse12V powerto NestThermostatLNZone valve (MOMO)Wiring specsBoiler37
Nest Labs (Europe) Ltd.Limited WarrantyNest Learning Thermostat For online or phone support, visit nest.com/eu/support.You can also find answers in the Nest Community atnest.com/community.Recycling and disposal: visit nest.com/eu/recycle.Dispose in accordance with applicable legislation.The WEEE symbol means that your Nest Thermostatmust be disposed of separately from generalhousehold waste. When Nest Thermostat reachesits end of life, take it to a designated waste collectionpoint in your area for safe disposal or recycling.By doing this, you’ll conserve natural resources,protect human health and help the environment.EU Declaration of ConformityNest Labs (Europe) Limited hereby declares that thisNest Learning Thermostat is in compliance with theessential requirements and other relevant provisionsof Directives 1999/5/EC, 2006/95/EC, 2004/108/EC.A copy of the EU Declaration of Conformity is availableat: nest.com/eu/legal/eudoc.38THIS LIMITED WARRANTY CONTAINS IMPORTANT INFORMATIONABOUT YOUR RIGHTS AND OBLIGATIONS, AS WELL AS LIMITATIONSAND EXCLUSIONS THAT MAY APPLY TO YOU AS PART OF THE TERMSAND CONDITIONS OF SALE IN EFFECT AT THE TIME YOU PURCHASEA NEST PRODUCT.YOUR RIGHTS AND THIS LIMITED WARRANTYThis Limited Warranty gives you specific legal rights. You may alsohave other legal rights that vary by state, province or jurisdiction. Forexample, these rights may include your rights under the EC (CertainAspects of Sale of Consumer Goods and Associated Guarantees)Regulations 2003 and other enactments governing the sale of goods.The disclaimers, exclusions, and limitations of liability under thisLimited Warranty will not apply to the extent prohibited by applicablelaw. For a full description of your legal rights you should refer tothe laws applicable in your jurisdiction and you may wish to contacta relevant consumer advisory service. This Limited Warranty is inaddition to your legal rights in relation to the Products. This LimitedWarranty only applies to Products purchased and used in theEuropean Union.1. WHAT THIS LIMITED WARRANTY COVERS; PERIOD OF COVERAGENest Labs (Europe) Ltd. (“Nest Labs”) warrants to the owner of theenclosed product that the product contained in this box (“Product”)will be free from defects in materials and workmanship for a periodof two (2) years (or one (1) year for Factory Refurbished Products)from the date of delivery following the original retail purchase(the “Warranty Period”). If the Product fails to conform to thisLimited Warranty during the Warranty Period, Nest Labs will, at itssole discretion, either (a) repair or replace any defective Productor component; or (b) accept the return of the Product and refundthe money actually
Call-for-heat Common Satisfied (optional) 230V AC live and neutral input power Thermostat Install Heat Link 5. Connect the control circuit to the Heat Link Connect the common and call-for-heat connectors on the boiler or junction box to the 2 (common) and 3 (call-for-heat) connectors on the Heat