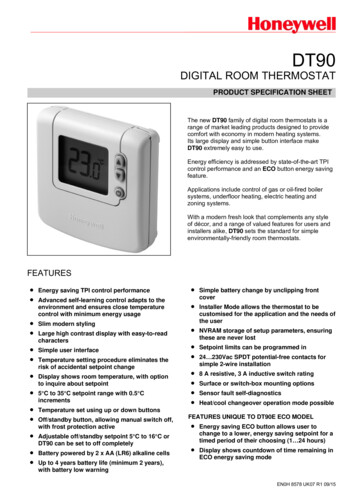
Transcription
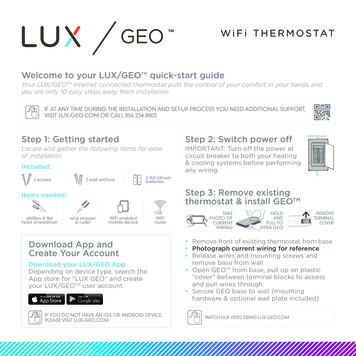
GE OGEOW i F i T H E R M O S TATW i F i T E R M O S TAT OWelcome to your LUX/GEO quick-start guideYour LUX/GEOTM internet connected thermostat puts the control of your comfort in your hands andyou are only 10 easy steps away from installation.IF AT ANY TIME DURING THE INSTALLATION AND SET-UP PROCESS YOU NEED ADDITIONAL SUPPORT,VISIT LUX-GEO.COM OR CALL 856.234.8803Step 1: Getting startedLocate and gather the following items for easeof installationIncluded:2 screws2 wall anchorsIMPORTANT: Turn off the power atcircuit breaker to both your heating& cooling systems before performingany wiring.2-AA LithiumbatteriesStep 3: Remove existingthermostat & install GEOTMItems needed:phillips & flathead screwdriverStep 2: Switch power offwire stripper& cutterWiFi enabledmobile deviceWiFirouterTAKEPHOTO LAVAILABLEREBATESGEOandOPENVideoDemos at Lux-Geo.comEncuentre los reembolsos y videos deDownload App andCreate Your AccountDownload your LUX/GEO AppDepending on device type, search theApp store for “LUX GEO” and createyour LUX/GEOTM user accountIF YOU DO NOT HAVE AN iOS OR ANDROID DEVICE,PLEASE VISIT LUX-GEO.COM.demostracióndisponibleslux-geo.com Remove front of existingthermostatfromenbase Photograph current wiring for reference Release wires and mounting screws andremove base from GEOFENCINGwallBILOCATIONpullDETECTIONMO Open GEO from base,up on plasticDETECCIÓNDEUBICACIÓNMO“cover” between terminal blocks to accessDE LA CERCA GEOBIDand pull wires through. Secure GEO base to wall (mountinghardware & optional wall plate included)WATCH OUR VIDEO DEMO LUX-GEO.COM
Step 4: Powering & wiringLUX/GEOTMGEOTM needs only 1 of 3 power source options: C-terminal (Recommended & for optimal performance.Reference photo from step 3 to confirm C-wire.) Battery* (2-AA Lithium included) USB micro-port available on GEOTM(adapter & cord not included; recommend 1A adapter)Step 5 provides detail on battery & USB connectionAS AN ADDED RESOURCE, A GLOSSARY OF TERMS ISAVAILABLE ON LUX-GEO.COM*Notice for battery installations: Batteries should be replaced at least once per year, butdepending on your settings may need to be replaced sooner. Battery failure could leave property without controlledheating or cooling. Reliance on battery power is notrecommended with prolonged absence from property. After installation you can choose to set the“energy profile” for your GEOTM This energy profile willdetermine the delay in GEOTM responding to changes fromthe App. GEOTM should only be used with lithium batteries.NOTE: System compatibilityFor Use On: Most 24-volt heating and cooling systems 1 or 2 stage heat / 1 or 2 stage cool: gas, oil, or electricfurnace and a/c systems 1 or 2 stage heat / 1 stage cool: heat-pump style systems 2-wire hydronic (hot water) zone valves Gas Millivolt wall/floor heatersNot For Use On: 120/240 VAC linevoltage systems(without a transformer) Heat pumps thathave (Y2) twoWIRES INSERT INTO SIDE OFTERMINAL, UNDER SCREWS.compressor stages4.1 Wiring Terminal Reference: ConventionalFurnace – gas/oil/electric & air-conditioning*FOR A DETAILED WIRING GUIDEVISIT LUX-GEO.COM.*for heat pump systems - see section 4.2Referencing your wiring photo & terminal guide below, wire to GEO.GAS / OIL / ELECTRIC FURNACE and/or AIR CONDITIONING(typical)RH (or R) 24( ) VAC Power, HeatW1 1st Stage HeatG Blower FanC 24(-) VAC CommonY1 1st Stage Cool(other)RCBOW2Y2 [typical wire color used][RED][WHITE][GREEN][BLUE][YELLOW]24( ) VAC Power, CoolHeat Mode DamperCool Mode Damper2nd Stage Heat2nd Stage CoolIMPORTANT: If you have both an RC and RH wire present thenremove the RED RC-RH shorting cap found on inside front of GEOTM. Wiring is complete - you may return “cover” between terminal blocks.Y1W1RC RHRESETRETURNTERMINALCOVER
4.2 Wiring Terminal Reference: Heat Pump SystemsReferencing your wiring photo, attach your thermostat wires to the LUX/GEOTM using your originalwiring letters and the following terminal reference as a guide based upon your system type.HEAT-PUMP (COMPRESSOR) STYLE HEAT/COOL SYSTEMR (or RC/RH) 24( ) VAC Power, CoolO Reversing ValveY1 Heat Pump Outdoor UnitG Blower FanW2 Auxiliary/Emergency HeatC 24(-) VAC CommonB** Reversing Valve (only if no “O” wireie: Rheem/Ruud/Bard systems)[typical wire color used][RED][ORANGE][YELLOW][GREEN][WHITE][BLUE][can vary per eachinstallation]Y1W1RESETNote: There should NOT be a wire used on the W1 wire connection at terminal.** IMPORTANT: If you have both an O wire and B wire (ie: Trane system),please install B to the “C” terminalHeat Pump systems (Y1/W1) - YELLOW cap MUST BE MOVED to sit on both pins. Wiring is complete – you may return “cover” between terminal blocks.Step 5: Power on For C-terminal: secure GEOTM front onto base For battery power: insert 2-AA lithiumbatteries & secure GEOTM front onto base For USB power: place aflathead screwdriver againstport cover from inside GEOTMalong bottom side – twist &INSERTpush out. Plug in Micro USBSCREWDRIVER &and insert into base.TWISTTO POP OUT Once GEOTM front has beenUSB COVERsecured to base (line up andfirmly push), return powerto system.WITH GEO SECURE & POWERON – THE DISPLAY SHOULDILLUMINATE, IF NOT, CHECKPOWER IS BACK ON.---RETURNTERMINALCOVERRC RHStep 6: Configure system settingsGEOTM will guide you through setupRotate the control wheel to navigatethrough options and values. To make aselection, press ; to go back, press .GEOTM will prompt you to select:1. Whether heating and/or cooling areconnected.2. System type (only applies if you have heat).Note if you wired per section 4.1 youhave a furnace. If you wired per section4.2 you have a heat pump.If furnace fan is not operating properly afterinstallation, change from furnace:gas tofurnace:electric in the settings menu.3. The number of stages for heat/cool you have.Most common is 1 heat/1 cool. Not sure? referto our online glossary to learn more.4. If you have set more than 1 stage of heat or cool,the OFFSET setting adjusts the stage-2 cut in.Step 7: If you have not yet downloaded your LUX/GEOTM App–do so now
Step 8: Connecting LUX/GEOTMThe recommended set-up of GEOTM requires an iOS or Android device.using another?. VisitLUX-GEO.com. Set-up follows a series of screen prompts – have your GEOTM and mobile device ready.8a. Getting ready to connectYou’ve downloaded theLUX/GEO App, created auser account and now,from your GEO, select “yes”for WiFi setupGEO will begin scanning but you can move on to 8b.8b. Connecting GEOTM to your mobile deviceYour GEO will show:“DISCONNECTED”.iOSiOSAndroidAndroidOpen App and click icon to add device.When prompted, leaveApp & go to your mobiledevice’s WiFi settings menu.Select the WiFinetwork that looks likeLUXGEO-xx-xxAfter connecting toLUXGEO return back to App
Step 8: Connecting LUX/GEOTM8c. Select your home WiFi network & enter passwordiOS8d. When room temp appearson GEOTM display, continue byfollowing prompts on AppOnce you see on app and on GEO - your system is nowsuccessfully connected.Troubleshoot:You may need to manuallyreconnect your phone to your wifinetwork.If this is unsuccessful – restartGEO by going to menu/settings/network and pick up App fromstep 8b.Android
Step 9: Custom settings & RadiusTM set-upRadiusTM is a geofence that allows you to set a geographic “fenced” zone via your mobile device. UsingGPS, RadiusTM (geofencing software) will recognize your approach into or out of the “fenced” area andtrigger your thermostat to adjust to either your “at home” comfort settings or “Away” settings whichprovide more efficient energy use. With RadiusTM, geofencing can be set on multiple devices/users andto your custom needs and can work with or without a thermostat schedule to still save energy whenaway from home.Please note and be assured that your GPS location is NEVER reported or known by LUX Products.Setting your “fence”The RadiusTM iconcan be found inupper right of screen Ready to set yourfenceConfirm startinglocationCustomize yourdistanceCompleteTIP: IF YOU SET YOUR FENCE FURTHER FROM YOUR HOME THEN YOUR SYSTEM WILL HAVE MORE TIME TO MAKE YOUR HOMECOMFORTABLE BEFORE YOU GET HOME. IF YOU SET THE FENCE CLOSER TO HOME THEN YOU WILL SAVE MORE ENERGY BUTSOMETIMES YOUR SYSTEM WILL NOT HAVE TIME TO RECOVER BEFORE YOU GET HOME.IF YOU ARE USING BATTERY POWER, WE RECOMMEND SETTING A LARGER DISTANCE.Step 10:Enjoy the comfort, peace of mind and flexibility of your LUX/GEOTM thermostat.VISIT OUR ONLINE COMMUNITY FOR INTERESTING ARTICLES AND TIPS FOR SAVING ENERGY AT LUXPRODUCTS.COM. THANK YOU.LUX/GEO is a trademark of LUX Products Corporation. RadiusTM is a trademark of EnergyHub, Inc.LUX Products Corporation, Philadelphia, PA 19112 LuxProducts.com 201553599
8c. Select your home WiFi network & enter password 8d. When room temp appears on GEOTM display, continue by following prompts on App iOS Android Once you see on app and on GEO - your system is now successfully connected. Troubleshoot: You may need to manually reconnect your phone to your wifi network. If this is unsuccessful – restart