Transcription
VIDEO VIEWERUSER MANUALPlease read instructions thoroughly before operation and retain it for future reference.Video viewer V1.0
LEGAL INFORMATIONReproduction, transfer, distribution or storage of part or all of the contents in this document in any formwithout the prior written permission of the company is prohibited.Microsoft, Windows and the Windows logo are either registered trademarks or trademarks of MicrosoftCorporation registered in the United States and/or other countries.Product and company names appearing in this document are trademarks of each respective company ororganization.Under no circumstances shall we be responsible for any loss of data or income or any special, incidental,consequential or indirect damages howsoever caused.The contents of this document are provided “as is”. Except as required by the applicable law, nowarranties of any kind, either express or implied, including, but not limited to, the implied warranties ofmerchantability and fitness for a particular purpose, are made in relation to the accuracy, reliability orcontents of this document. All the pictures in this manual may vary from the actual ones you see becausedifferent device may have its own setting pages. We reserve the right to revise this document or remove itat any time without prior notice.MPEG4 LicensingTHIS PRODUCT IS LICENSED UNDER THE MPEG-4 VISUAL PATENT PORTFOLIO LICENSE FOR THEPERSONAL AND NON-COMMERCIAL USE OF A CONSUMER FOR (i) ENCODING VIDEO IN COMPLIANCEWITH THE MPEG-4 VISUAL STANDARD (“MPEG-4 VIDEO”) AND/OR (ii) DECODING MPEG-4 VIDEO THATWAS ENCODED BY A CONSUMER ENGAGED IN A PERSONAL AND NON-COMMERCIAL ACTIVITY AND/ORWAS OBTAINED FROM A VIDEO PROVIDER LICENSED BY MPEG LA TO PROVIDE MPEG-4 VIDEO. NOLICENSE IS GRANTED OR SHALL BE IMPLIED FOR ANY OTHER USE. ADDITIONAL INFORMATIONINCLUDING THAT RELATING TO PROMOTIONAL INTERNAL AND COMMERCIAL USES AND LICENSING MAYBE OBTAINED FROM MPEG LA, LLC. SEE HTTP://WWW.MPEGLA.COM.Version: 0206
TABLE OF CONTENTS1. OVERVIEW . 11.1 Product Features .11.2 Prerequisites .12. CONTROL PANEL OVERVIEW. 22.1 Accessing the device .22.2 Control panel overview .22.2.1 Simplified Version (Default) . 22.2.2 Full Function Version . 32.2.3 Main Button Overview . 33 FREQUENTLY-USED FUNCTIONS . 53.1 Record .53.2 Playback .63.2.1 Playback Panel. 63.3 Full Screen Display.73.4 Live Audio Volume Adjustment .73.5 Network Backup.83.6 Firmware / OSD / Logo Upgrade .93.7 E-Map .104. ADDRESS BOOK . 154.1 Overview .154.2 Configuration Page for Device Access .165. RECORD . 175.1 Overview .175.2 Record Time Range.185.2.1 Weekly. 185.2.2 Custom . 185.3 Record Path .196. CUSTOM SETTING. 206.1 Overview .206.1.1 General. 206.1.2 Connection . 206.1.3 Live. 217. STATUS LIST . 227.1 Overview .227.2 Log Searching.227.2.1 Time Range . 227.2.2 Record Type . 237.2.3 Log List . 238. DVR / PTZ CONTROL. 248.1 DVR Control Panel .248.2 PTZ Control.26APPENDIX 1 SPECIFICATIONS . 27
1. OVERVIEWVideo Viewer, the free Central Management System (CMS) software, offers a powerful and integratedsolution for centrally managing and monitoring. Compatible with Windows 8, Windows 7, Windows Vista andWindows XP, each CMS server can manage up to 16 devices simultaneously.The friendly graphical interface with full functions for the advanced management, intelligent motiondetection, flexible scheduled recording and quick event search makes Video Viewer excellent for everysecurity demand. Furthermore, EMAP is also supported for quick and convenient multi-site surveillance.1.1 Product Features Multi-site surveillance and full central management software running on Windows 8, Windows 7, Windows Vistaand Windows XP Allows multiplex operations (live view, record, playback, backup and network) equipped with intelligent motiondetection function Google map connection for EMAP application Pre- and post-event recording to capture full evidence Full record log and graphical design for quick event search PTZ camera control1.2 PrerequisitesBefore using Video Viewer, make sure:1) You have installed the software from the supplied CD, or it could be downloaded from here.Note: If you’re unable to install this software, please log into Windows with anadministrator account, and try again.2) The computer on which Video Viewer is installed is connected to Internet.3) The device (DVR, NVR and / or IP camera) you’re intended to connect is configured well to connect toInternet, and you know the IP address, port number, user name and password to access it. To know how to configure your DVR and NVR to the Internet, please see here; to know how to configure your IPcamera to the Internet, please see here. To know how to use this software, please refer to “2. CONTROL PANEL OVERVIEW” at page 2.1
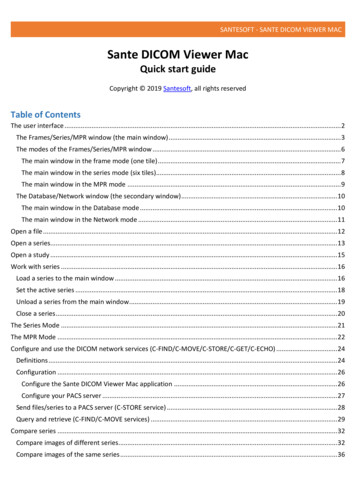
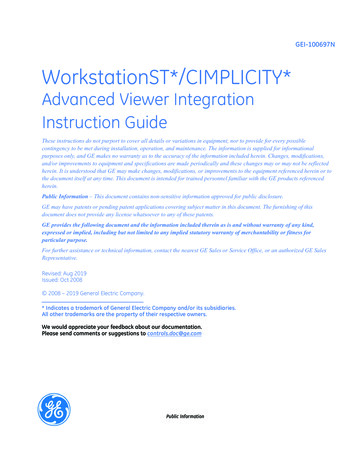
2. CONTROL PANEL OVERVIEW2.1 Accessing the deviceStep1: Double-click “ ” on your PC desktop to open Video Viewer. By defaults, the “Address Book”panel will be displayed on the right side of the control panel.Step2: Click “” to select the IP address of the device you intend to connect, and double-click it.Step3: The live view is displayed in the Video Viewer.2.2 Control panel overviewTwo control panels are available and can be switched depending on your using habit.2.2.1 Simplified Version (Default)2
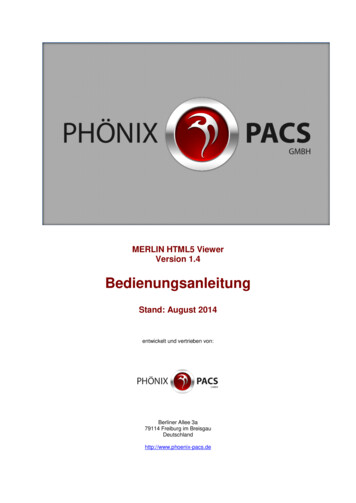
2.2.2 Full Function Version2.2.3 Main Button OverviewButtonSimplifiedFull FunctionFunctionAddress BookDescriptionClick to show the predefined IP address(es). You can add, remove orsearch the IP address to log in the DVR remotely. For details, pleaserefer to “4. ADDRESS BOOK” at page 15.MiscellaneousControlLogRemoteConfigClick to go to the detailed system configuration.RecordSettingClick to go to the record setting page for allconnected devices. For details, please refer to“3.1 Record” at page 5.CustomSettingClick to choose the language of this program.The language change will take effect when thisprogram is closed and executed again.Click to view all event and recording logs, search the desired log(s) bydate, or playback the recording of the selected log. For details, pleaserefer to “7. STATUS LIST” at page 22.Click to start / stop manual recording for all connected devices.//Record / RecordStopSnapshotInformationTo enable / disable the manual recording function for a single device,please refer to “4. ADDRESS BOOK” at page 15.The record button will be disabled when the reserved disk capacity set in“Record Setting” is larger than the current disk capacity. For details,please refer to “3.1 Record” at page 5.Click to take a snapshot for the current view. The snapshot pictures willbe saved in the path you specified in “Record Setting”. For details,please refer to “3.1 Record” at page 5.Click to show the current network connection details.3
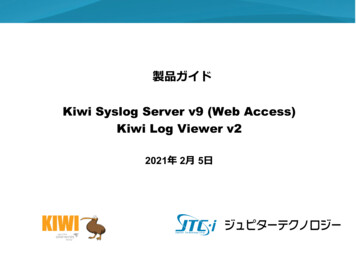
ButtonSimplifiedFull FunctionFunctionDescriptionDVR ControlClick to open the DVR control panel for remote control. For details,please refer to “8.1 DVR Control Panel” at page 24.PTZ ControlClick to open the PTZ control panel to control the PTZ camera. Fordetails, please refer to “8.2 PTZ Control" at page 26.BackupClick to download and backup event footage saved in the DVR / NVRhard disk(s).4
3 FREQUENTLY-USED FUNCTIONS3.1 RecordTo record remotely, click “” (simplified version) or “” (full function version) “” to go to the“Record Setting” page. For details, please refer to “5. RECORD” at page 17.In the “Record Setting” page, you can set the following items:‧Record type‧Pre- / post-event record‧Record time setting‧Record pathNote: The record function will be disabled when the reserved disk capacity in“Reserved(MB)” is larger than the current disk capacity in “Free(MB)”.When “Manual” is checked, click “” (simplified version) or “” (full function version) on the maincontrol panel to start manual recording immediately, and all recordings will be saved in the locationspecified in “Record Path”.When “Motion” and / or “Alarm” are checked, the recording function will be enabled for a motion oralarm event, and all recordings will be saved in the location specified in “Record Path”.5
3.2 PlaybackTo play a recording, click “” (simplified version) or “” (full function version), and select the“Record” tab. A list of all recordings will be shown by defaults, and you can also sort out the logs youwant to speed up the search time. For details, please refer to “7. STATUS LIST” at page 22.3.2.1 Playback Panel Simplified Version Full Function VersionButtonSimplified--Full Function--FunctionDescriptionPlayClick to play the selected video clip.PauseClick to pause the video playback.StopClick to stop the video playback.RewindClick once to get 2X fast rewind, twice to get 4X, three times to get 8X, and fourtimes to get 16X the highest.ForwardClick once to get 2X fast forward, twice to get 4X, three times to get 8X, andfour times to get 16X the highest.De-InterlaceSelect to reduce the vibration of the paused picture.6
3.3 Full Screen DisplayClick(simplified version) or(traditional version) to display images in the full screen mode.To quickly control each device without returning to the original mode, right-click to display thetranslucent quick menu bar similar as follows:Button////FunctionDescriptionReturn to normal displayClick to return to the simplified version display or full function versiondisplay.Device Display ModeClick to select the device display mode depending on how many devicesyou’re connected.DVR Control(When the selected device is a DVR)Click to show the DVR control panel. For details about each button, pleaserefer to “8.1 DVR Control Panel” at page 24.PTZ Camera Control(When the selected device is a PTZ camera)Click to show the PTZ camera control panel. For details about each button,please refer to “8.2 PTZ Control” at page 26./3.4 Live Audio Volume AdjustmentClick and drag the sliderlive audio volume.(simplified version) or(full function version) to adjust the To mute the audio, click the speaker icon once to disable audio transmission; to restore the audio, click theicon again. To hear the live audio from other audio channel(s) of the selected device when the selected device connectsto more than one audio camera, please refer to “8.1 DVR Control Panel” at page 24.This function is available only when: The selected device supports the audio function. For details, please refer to the user manual of the selecteddevice. “Video/Audio” is selected in the configuration page. For details, please refer to “4.2 Configuration Page forDevice Access” at page 16.7
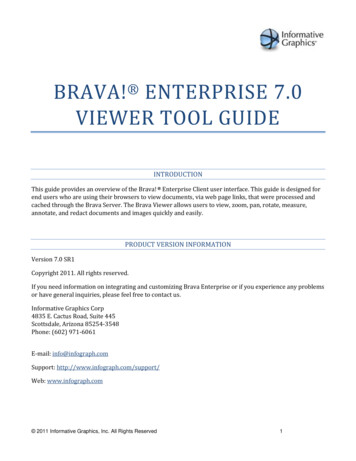
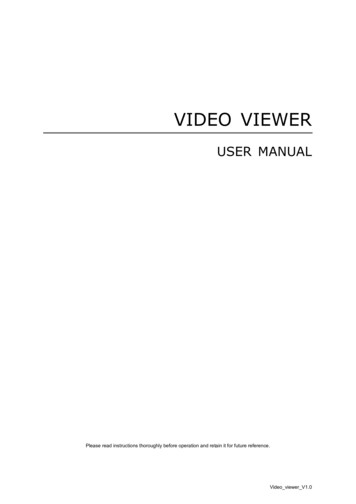
3.5 Network BackupClick “” (simplified version) or “ ” (full function version), and select IP address of the DVR you wantto make video backup in the address book. Then, click “” (simplified version) or “” (fullfunction version) to go into the “Backup” page, and you can select a specific time range or event tomake a video backup remotely.Note: You need to be a supervisor to operate this function.FunctionDescriptionHDD Number / ChannelSpecify the hard disk (HDD Number) and channel number (Channel) within which have the video data you need.List Search by TimeSpecify the time range within which has the video data you want in the “Start Time” and “End Time” columns. Search by EventSelect an event log from the event list. This list shows all logs in the specified DVR from the latest to the earliest.‧To quickly find the events you need, check or uncheck the event type(s), and select the log you want.‧To view the earlier or later logs that are not shown in the current page, click “Prev. Page” or “Next Page”.‧To refresh the event list, click “Reload”.Calendar Search by CalendarDirectly choose the date and time from the calendar, and download. The date and time with recorded data will beespecially marked.File PathAssign the location where the backup files are saved.File SizeLimit the maximum file size downloaded. If the footage selected is larger than the specified file size, a second filewill be generated, and so on.Simultaneous PlaybackTo view the backup images simultaneously when the download process is in progress, select “SimultaneousPlayback”.You will see the backup images while the images are being downloaded to the PC or notebook.To simply backup images without previewing, deselect “Simultaneous Playback”. You will only see a message boxindicating the total time needed, the current status and the saving location.Download / CancelClick “Download” to start or “Cancel” to discard the video backup.8
3.6 Firmware / OSD / Logo UpgradeThis function is used when users need to upgrade the selected device for function scalability. Theavailable upgrade items may vary based on the device connected.Note: Before using this function, make sure you have the correct upgrade files provided byyour installer or distributor.Step1: Click “” (simplified version) or “ ” (full function version), and select the IP address of yourdevice in the address book.Step2: Click “” (simplified version) or “” (full function version) to show the upgrade page,“Update Server”.Step3: Select the items you want to upgrade, and click “Add” to browse to the upgrade files.Step4: Click “Upgrade Firmware” / “Upgrade OSD / “Upgrade Logo” to start upgrading.Note: It takes a few minutes to finish the upgrade process. Do
Video Viewer, the free Central Management System (CMS) software, offers a powerful and integrated solution for centrally managing and monitoring. Compatible with Windows 8, Windows 7, Windows Vista and Windows XP, ea