Transcription
Abbey Road TG Mastering Chain User Guide
CONTENTSIntroduction. 3About the Abbey Road TG Mastering Chain Plugin. 3Quick Start. 5Components. 6The WaveSystem Toolbar. 6Interface. 7Modules and Controls. 8Controls Available in All Modules. 8TG12411 Input Module . 10TG12412 Tone Module. 13TG12413 Limiter Module. 15TG12414 Filter Module. 19TG12416 Output Module. 21Abbey Road TG Meter Bridge. 23Abbey Road TG Mastering Chain User Guide
INTRODUCTIONThanks for choosing Waves. To get the most out of your Abbey Road TG Mastering Chain plugin, please take a fewminutes to read this user guide.To register and activate your new products, check for upgrades, and manage your account, log in to your Wavesaccount. If you don’t already have a Waves account, click Create Account in the top right corner of the Waves.comhomepage.Download and install your new Waves software with the Waves Central application, which you can also use todownload the latest version of plugins, move licenses from your Waves Cloud to any computer, and make offlineinstallers so you can install current software on computers not connected to the internet.Finally, we suggest that you visit Waves Support, where you’ll find an extensive answer base, system and hostrequirements, troubleshooting guides, and much more.About the Abbey Road TG Mastering Chain PluginAbbey Road TG Mastering Chain is a modular plugin for mastering and mixing, modeled after the original EMITG12410 Transfer Console used in all Abbey Road Studios’ mastering suites from the early ‘70s to this day.The plugin can be used for both mastering and mixing – on the master bus, on groups or on individual tracks – tolend them the distinct sound of the original console, as heard on albums from Pink Floyd’s Dark Side of the Moon toRadiohead’s OK Computer and beyond.Like the original EMI TG12410 console, the Abbey Road TG Mastering Chain plugin consists of the following modules:1. TG12411 Input Module – handles all input tasks (phase, L/R balance, etc.)2. TG12412 Tone Module – a musical, versatile 4-band EQ with 5 filter types per band3Abbey Road TG Mastering Chain User Guide
3. TG12413 Limiter Module – includes three compressor/limiter types:OriginalAggressive and ‘dirty’, precision-modeled after the unit’s original Zener diode limiterModernPristine-sounding, with higher levels of perceived loudness; an original Waves andAbbey Road design LimitBased on the limiter mode of the console’s original Zener diode. The knee is muchharder compared to the “Original” compressor [“Original”]4. TG12414 Filter Module – includes low-pass & high-pass filters and a presence bell5. TG12416 Output Module – complete with a spreader (stereo spread enhancer)The individual modules can be re-ordered (except for the Input and Output modules which remain at the start andend of the chain) and switched on/off, letting you create differently ordered chains and a modular, customizableprocessing flow.The Abbey Road TG Mastering Chain plugin also comes with the Abbey Road TG Meter Bridge component (aseparate plugin), which is based on the original set of PPM, VU and phase correlation meters used by Abbey Road’sengineers in conjunction with the EMI TG12410 Transfer Console.4Abbey Road TG Mastering Chain User Guide
QUICK STARTThis quick start guide suggests the basics of how to use the Abbey Road TG Mastering Chain plugin when masteringa track. To learn more about controlling the plugin and how to fine-tune its sound, in mixing as well as masteringsessions, read the “Interface and Controls” section later in this user guide.1. Insert the plugin on the master channel. (If you are using the plugin to mix rather than master, you can of courseinsert it on any individual channel or group.)2. Use the TG12411 Input module to adjust input gain or to handle phase and balance issues (for more on how to dothis, see the TG12411 Input Module section later in this user guide). You may also want to use the module’s TapeEqualizer control for its unique sonic color.3. Open the TG Meter Bridge on any channel.4. Set the Meter bridge to read the instance you are working on.5. Adjust the input level to get a good 0VU input reading on the meter bridge. This will assure enough headroom.6. Experiment with the TG12412 Tone module to get a good frequency balance.7. When mastering a track to meet modern mastering requirements, we recommend you use the Modern mode ofthe TG12413 Limiter module, which is best suited for today’s mastering requirements.8. In the TG12413 Limiter module, experiment with the Recovery control to get the best time-constant results forthe song you are working on. 3, 4 and 5 are the ones we’ve found most suitable for mastering: 3 for more upbeatsongs, 5 for slower ones.9. The key to getting a good compression sound is playing with the TG12413 Limiter module’s Ratio and Mix controls,in order to achieve the best compression balance. Try somewhere around Ratio 30–40 and Mix 40–50.10. In the Limiter’s expanded view, turn on the high-pass filter and find a good-sounding point anywhere between 120–200 Hz. This will make the compression better correlated to the music (as sub frequencies will tend to suffocate thecompression).5Abbey Road TG Mastering Chain User Guide
11. Use the TG12414 Filter module to clean unwanted frequency ranges and add some presence if needed.12. A/B between the unprocessed and processed signal, using the bypass control. Make sure you adjust the overalllevel of processed signal to match the unprocessed level, so the A/B comparison does not introduce gain changeswhich might easily throw you off.COMPONENTSThe Abbey Road TG Mastering Chain plugin has four components: Mono Stereo Live Mono Live StereoThe Live components are optimized for live use, where extremely low latency and minimal CPU usage are required.The non-Live components have up-sampling at lower sample rates; the Live components remove the up-samplingin order to reduce latency. The non-Live components use very sharp linear phase FIR sidechain filters that introducelatency; the Live components use non-linear phase IIR sidechain filters to minimize both latency and CPU usage.THE WAVESYSTEM TOOLBARThe WaveSystem toolbar, located at the top of the plugin, takes care of most of the administrative functions you willencounter while working with your Waves software, including Undo and Redo, loading and saving presets, and more.The features of the WaveSystem toolbar are the same on practically all Waves plugins. For more information on howto use it, see the WaveSystem User Guide.6Abbey Road TG Mastering Chain User Guide
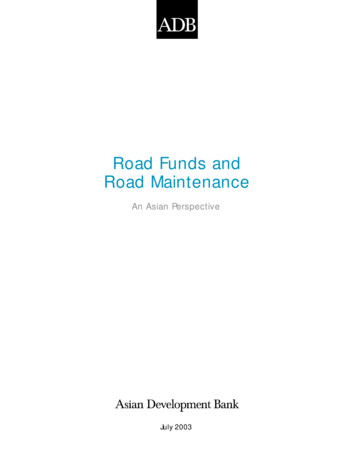
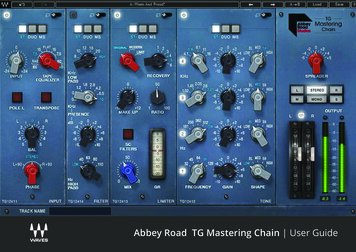
INTERFACEPlease note: This is the default order of the plugin’s five modules, from left to right: Input, Tone, Limiter,Filter, Output. To create your own customized chain, you can easily change the order of the Tone, Limiterand Filter modules by dragging each to the desired location within the chain.7Abbey Road TG Mastering Chain User Guide
MODULES AND CONTROLSControls Available in All ModulesThe following controls appear at the top of each module (except Output):On/OffEach of the plugin’s modules can be turned on or off by pressing this button. While off, the module does not consumeany CPU power. All modules are first turned off by default. To turn each on, click on the individual module’s on/offcontrol. (Please note that in the plugin’s Live components, turning a module off will not change CPU consumption.)Expand/CollapseExpands/collapses the module.ST/DUO/MS (Stereo component only)In the plugin’s stereo component, within each module, you can choose between three modes of processing a stereosignal: Stereo (ST), Duo, and Mid-Sides (MS).Regardless of a module’s stereo mode – ST, DUO, or MS – its output is always stereo. If needed, it will be converted intoMS at the input of the next module in the chain. This allows re-ordering of the modules on the fly with no impact on thestereo processing.8Abbey Road TG Mastering Chain User Guide
The collapsed view of each module shows just one control per function (e.g., frequency, gain), regardless of whether thesignal is mono or stereo.The expanded view of each stereo module shows each control twice. In Stereo and Duo modes, the left and right controlsections are labeled L and R. In MS mode, the labels will change to M and S, for mid and side.LinkIn the collapsed view, the left and right (or mid and side) channels are always linked: that is, both channels are controlledtogether, and by default, with the same values.The expanded view of each module includes a square Link button at the top. When Link is on, the controls for bothsides remain linked. Switches (such as EQ type, filter on/off, SC on/off) remain linked as well: clicking a left or right switchwill set both controls to the same value.To decouple the left and right (or mid and side) controls, simply turn the Link button off. This will allow you to adjusteach side separately. Once L and R are re-linked, any offset between them will be maintained.Expanded Module NavigationOnce a module is expanded, you can navigate directly to the expanded view of any other module in the plugin byclicking on any of the module navigation buttons at the top.Track NameEach instance of the plugin will show the track name it is instantiated on. You can use this information to move betweendifferent meter readings on the TG Meter Bridge.Please note that some DAWs do not support track naming. When working with such DAWs, you can fill in the TrackName manually.9Abbey Road TG Mastering Chain User Guide
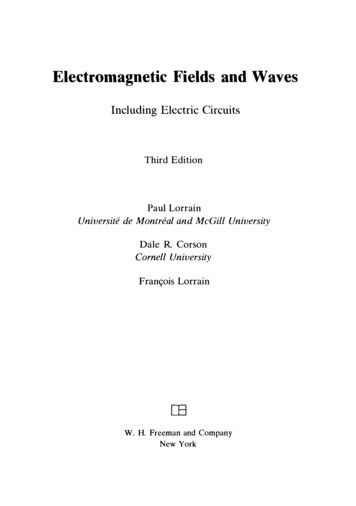
TG12411 Input ModuleCollapsed View10Expanded View (Stereo)Abbey Road TG Mastering Chain User Guide
InputControls the input level to the plugin.Range: -24 to 24 dB in 0.1-dB increments.Tape EqualizerApplies a filter to flatten out the frequency spectrum.Originally, in the hardware domain, this was done when playing back the track from NAB or IEC tape machines at either7.5 or 15 ips, in order to provide the equalization required for playing NAB-equalized tape on an IEC machine and viceversa.In your digital mixes, you will not need to use this control for that historic purpose. We have decided to keep this control,however, due to its great sonic character, and you may find that it gives your tracks interesting sonic characteristics.Options:NAB-to-IEC: 7.5 ips and 15 ipsIEC-to-NAB: 15 ips and 7.5 ipsDefault: FlatPoleFlips the input phase by 180 degrees.The Stereo component includes Pole L and Pole R. Clicking on Pole L will only flip the phase for the Left channel. To flipthe overall phase for both channels, you will have to expand the Input module and click on Pole R as well.Default: OffTransposeTransposes the Left and Right channels.Default: Off11Abbey Road TG Mastering Chain User Guide
Balance (BAL)Changes the level relations between Left and Right channels. Moving towards the right side will increase the level on theright and decrease the level on the left, and vice versa.Range: -5 to 5 dB in 0.05-dB increments.Default: 0PhaseShifts the phase of one channel relative to the other by 90 degrees. This is good for stereo tracks that have phasecorrelation problems between Left and Right.Options: Stereo, L 90, R 90Default: Stereo12Abbey Road TG Mastering Chain User Guide
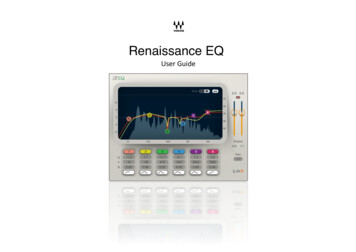
TG12412 Tone ModuleCollapsed View13Expanded View (Stereo)Abbey Road TG Mastering Chain User Guide
The Tone module is a highly musical and versatile 4-band EQ. Each band has 5 fixed cutoff points and 5 filter shapes.FrequencyDetermines the cutoff point for each band:Band 132, 45, 64, 91, 128 HzBand 2181, 256, 362, 512, 724 HzBand 31.02, 1.45, 2.05, 2.6, 3.25 kHzBand 44.1, 5.8, 8.1, 11, 16 kHzGainDetermines the level for each band.Range: -10 to 10 dB in 0.05-dB increments.ShapeDetermines the filter type for each band:LowA low-shelf filterBLBlunt – a very wide bell filterMEDMedium Blunt – a moderately wide bell filterSHSharp – a very narrow bell filterHighA high-shelf filterBand On/OffEach band has a dedicated on/off switc
This quick start guide suggests the basics of how to use the Abbey Road TG Mastering Chain plugin when mastering a track. To learn more about controlling the plugin and how to fine-tune its sound, in mixing as well as mastering sessions, read the “Interface and Controls” section later in this user guide. 1. Insert the plugin on the master .