Transcription
Yosemite Server BackupUser’s GuidePart number:First edition: October 2010
Legal and notice information Copyright 2004, 2012 Barracuda Networks, Inc.Under copyright laws, the contents of this document may not be copied, photocopied, reproduced, translated or reduced to any electronicmedium or machine-readable form, in whole or in part, without prior written consent of Barracuda Networks, Inc.NoticeInformation in this document is subject to change without notice. Barracuda Networks, Inc. makes no representations or warranties withrespect to the contents of this document and specifically disclaims any implied warranties of merchantability or fitness for any particularpurpose. Further, Barracuda Networks, Inc. reserves the right to revise this publication and to make changes without obligation to notify anyperson or organization of such revisions or changes.TrademarksYosemite Server Backup is a trademark of Barracuda Networks, Inc.Windows and Windows NT are registered trademarks of Microsoft Corporation.
ContentsBefore you begin . . . . . . . . . . . . . . . . . . . . . . . . . . .71 Overview . . . . . . . . . . . . . . . . . . . . . . . . . . . . .9Concepts . . . . . . . . . . . . . . . . . . . . . . . . . . . . . . . . . . . . . . . . . .A Simple, Immediate Backup . . . . . . . . . . . . . . . . . . . . . . . . . . . . . . . . . .Restore to a Different Location . . . . . . . . . . . . . . . . . . . . . . . . . . . . . . . . .2 Administering Backup . . . . . . . . . . . . . . . . . . . . . . . .15Using the Administrator . . . . . . . . . . . . . . . . . . . . . . . . . . . . . . . . . . . .Using Quick Access from Taskbar . . . . . . . . . . . . . . . . . . . . . . . . . . . . . . . .About the Yosemite Server Backup Service . . . . . . . . . . . . . . . . . . . . . . . . . . . .3 Configuring Backup Jobs . . . . . . . . . . . . . . . . . . . . . . .Selecting Files . .Selecting Devices .Encryption . . .Configuration . .Advanced Settings.User’s Guide.44444647498 Working with Third-Party Applications . . . . . . . . . . . . . . . . .353536394143.7 Encryption and Compression . . . . . . . . . . . . . . . . . . . . .Microsoft Exchange Server . . . . . . . . . . . .Configuring a Microsoft Exchange Server . . . .Backing up Microsoft Exchange Server . . . . .Restoring Microsoft Exchange Databases . . . .Disaster Recovery with Microsoft Exchange Server2931313135.6 Scheduling, Rotations, and Media Management . . . . . . . . . . . . . .Backup Schedule ConsiderationsScheduling Concepts . . . .Media Rotation Types . . . .Running Jobs with Rotations .212222222629.5 Working With Devices . . . . . . . . . . . . . . . . . . . . . . . .Selecting Devices for Jobs . . .Device Properties . . . . . . .Device Commands . . . . . .Working with Tape Libraries . .Sharing storage devices on a SAN15171921.4 Configuring Restore and Verify Jobs . . . . . . . . . . . . . . . . . .Selecting Files . .Selecting Devices .Configuration . .Advanced Settings9111253.53535455563
Mailbox Backup and Recovery . . . . . . . . . . . . . . . .Working with Microsoft SQL Server . . . . . . . . . . . . . . . .Microsoft SQL server concepts . . . . . . . . . . . . . . . .Configuring the Microsoft SQL Server . . . . . . . . . . . . .Backuping up Microsoft SQL Server . . . . . . . . . . . . . .Microsoft SQL Server Databases and the backup mode . . . . .Using Yosemite Server Backup with SQL Server’s Backup RoutineRestoring Microsoft SQL Server . . . . . . . . . . . . . . . .Restoring Microsoft SQL Server user databases . . . . . . . . . .Restoring Microsoft SQL Server master databases . . . . . . . . .Restoring Microsoft SQL Server 2000 master databases . . . . . .Restoring Microsoft SQL Server 7 master databases . . . . . . . .Protecting Microsoft Windows SharePoint Services . . . . . . . . . .Windows SharePoint Services protection concepts . . . . . . . . .Protecting Windows SharePoint Services . . . . . . . . . . . .Restoring SharePoint Services . . . . . . . . . . . . . . . . .Using Disaster Recovery with Windows SharePoint Services . . . .Working with Certificate Services . . . . . . . . . . . . . . . . .9 Disaster Recovery. . . . . . . . . . . . . . . . . . . . . . . . .Preparing For a Disaster . . . . . . . . . . . . . . . . . . . . . . . . . . . . . . . . . . . .Recovering From a Disaster . . . . . . . . . . . . . . . . . . . . . . . . . . . . . . . . . . .Limitations . . . . . . . . . . . . . . . . . . . . . . . . . . . . . . . . . . . . . . . . .5860616162626363636565697272737474757778818410 Backup Domain Configuration . . . . . . . . . . . . . . . . . . . .8711 Advanced Job Options . . . . . . . . . . . . . . . . . . . . . . .89Index . . . . . . . . . . . . . . . . . . . . . . . . . . . . . . .934
Figures1 Basic Architecture . . . . . . . . . . . . . . . . . . . . . . . . . . . . . . . . .User’s Guide95
Tables1 Icon viewing status6. . . . . . . . . . . . . . . . . . . . . . . . . . . . . . . .172 Creating jobs . . . . . . . . . . . . . . . . . . . . . . . . . . . . . . . . . . .183 Element status . . . . . . . . . . . . . . . . . . . . . . . . . . . . . . . . . .4 Log file formats . . . . . . . . . . . . . . . . . . . . . . . . . . . . . . . . . .3689
Before you beginCustomer SupportPhone and Email Technical Support offered 24 x 7. Basic Support includes email and live chat support 24x7and phone support between the hours of 9am and 5pm Monday through Friday in the USA (Pacific time zone).Enhanced Support provides 24x7 phone support. You can get customer support for Yosemite Server Backupin one of the following ways: Visit our website at http://www.barracudaware.comPhone us at 1 408 342 5300.Email us at support@barracuda.com.Release NotesRelease notes are included with every release and service pack. Before using Yosemite Server Backup, pleaseread the release notes for additional information. The release notes are available in HTML format in the rootdirectory of the Yosemite Server Backup CD-ROM.Document Conventions and SymbolsConventionElementBlue text: Document Conventions and SymbolsCross-reference links and e-mail addressesBlue, underlined text: http://www.website.comWebsite addressesBold text Keys that are pressedText typed into a GUI element, such as a boxGUI elements that are clicked or selected, such as menuand list items, buttons, tabs, and check boxesItalic textText emphasisMonospace text File and directory namesSystem outputCodeCommands, their arguments, and argument valuesMonospace, italic text Code variablesCommand variablesWARNING!Indicates that failure to follow directions could result in data loss.User’s Guide7
CAUTION:Indicates that failure to follow directions could result in damage to equipment or data.IMPORTANT:Provides clarifying information or specific instructions.NOTE:Provides additional information.TIP:Provides helpful hints and shortcuts.8Before you begin
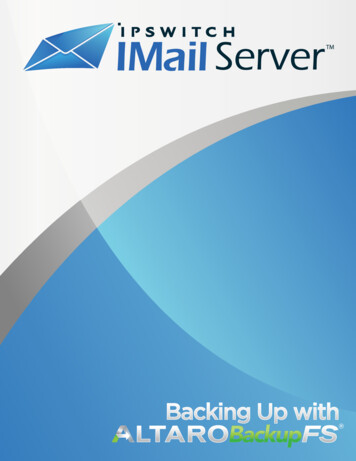
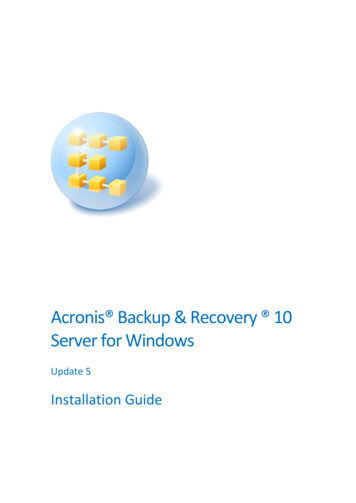
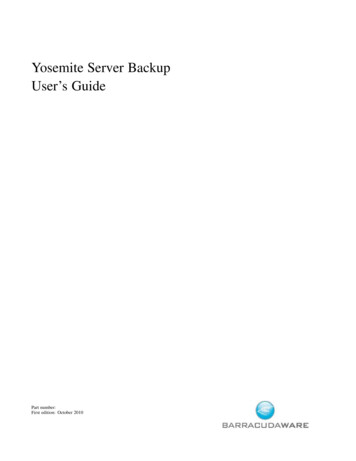
1 OverviewIn this chapter ConceptsA Simple, Immediate BackupRestore to a Different LocationWARNING!Yosemite Server Backup security is disabled at installation to simplify the evaluation process. Wheninstalling the product in a production environment we recommend, at a minimum, that you set a userpassword for the Admin user. Doing so will result in the Administrator prompting the user for a passwordbefore starting. See Setting a User Password for details.ConceptsYosemite Server Backup is designed to operate within your existing network to protect your vital data. Eachmachine that will be protected must have Yosemite Server Backup installed. One machine acts as the DomainServer which houses the catalog and establishes a Backup Domain. Other machines become clients of theBackup Domain by identifying themselves as clients of the Domain Server during installation.Yosemite Server Backup can back up data from clients over a network to a backup device attached to a remotemachine. A client with an attached device acts as a Media Server.When a machine is being backed up or restored it is operating the client role. When it is providing access to abackup device it is operating as a Media Server. And when a machine is hosting the catalog it is operating as theDomain Server. A single machine can operate in one or more roles at the same time.Data on client machines is read and written with agents such as the File System, Windows System State,Microsoft SQL, and Microsoft Exchange agents. The configuration of agents is done on a client by client basis.A typical installation of Yosemite Server Backup may look like Figure 1 below.User’s Guide9
Figure 1 Basic ArchitectureTerminologyThe following terminology is used throughout this document . Clients— A client is any computer (or Machine) in the Backup Domain other than the Domain Server.This includes file servers, application servers, and user PCs (desktops and laptops). All client computersmust have Yosemite Server Backup installed. For licensing purposes, clients are classified as beingserver or workstation class machines. All clients are considered to be server class clients unless theyare running Windows XP, Vista, or Windows 7.Backup Domain— A Backup Domain is a collection of computers and backup devices that is managedtogether as a group. A Backup Domain can encompass an entire company or each department could bea separate domain, even though they are all on the same network. All resources in a Backup Domaincan be accessed by all members of the Backup Domain and centrally managed from a single YosemiteServer Backup interface. Each file server, application server, user PC, and attached peripherals suchas backup devices can be the member of only one Backup Domain. Each Backup Domain has oneand only one Domain Server.NOTE:A Backup Domain is completely independent of any Windows Active Directory domain. 10The Yosemite Server Backup administrator can administer more than one Backup Domain from a singlecomputer. However, the Yosemite Server Backup interface cannot manage more than one BackupDomain at the same time. The administrator must log off of one Backup Domain and log into another.Domain Server— Each Backup Domain has one and only one Domain Server. The Domain Server isresponsible for coordinating the backup activities of all other machines in the Backup Domain. Alllicense information is also contained on the Domain Server.Catalog— A catalog is a special-purpose database that contains all the information about a BackupDomain. There is one and only one catalog for each Backup Domain. The catalog must reside onthe Domain Server machine.Job— A job is an object stored in the catalog that represents the settings for a task the user hasconfigured. Jobs come in one of four types: backup, restore, verify, and copy media.Backup devices— A backup device is any device to which files can be backed up. This includes tapedrives, tape libraries, hard disks (as virtual tape libraries), and Network Attached Storage (NAS)appliances. Backup devices are attached to media servers. Each Backup Domain must have at least onebackup device, such as a tape device, tape library, virtual library, or CD device. This backup devicecan belong to only one Backup Domain; it cannot be shared among multiple domains. However, aBackup Domain could have multiple backup devices.Media Server— A media server is any machine in the Backup Domain to which a backup device isattached. Any machine in the Backup Domain can act as a media server. There can be multiple mediaservers in a Backup Domain. The media server allows its attached backup devices to be shared by all themachines in the same Backup DomainMedia— Backed up files are written to media. Media can be a physical tape or a virtual “tape” in avirtual tape library on a disk drive. Media cannot be used in another Backup Domain without importingthe media into the other Backup Domain.Media Rotation — Rotations are a means of efficiently using you available media to maintain datahistory. When using a rotation your backups alternate among a set of multiple media, reusing oldermedia when necessary. The type of media rotation you select is based on how often you want to back upyour data, how long you want to retain the data, and the number of media you want to use.Disaster Recovery (DR) — Disaster Recovery is the process of restoring a machine that has suffered acatastrophic failure such as hardware failure or critical system data loss. The recovery process entailsreformatting the affected system’s hard drive and restoring the operating system, system settings,applications, and data from a backup. This feature replaces the traditional tedious task of findinginstallation disks, installing operating systems and applications, patching them and restoring data witha simple restore process directly from backups.Overview
Full System Recovery — Full system recovery is the process of recovering all of the data on a machine.It differs from DR in that a full system recovery does not reformat the disks prior to restoring the data.A Simple, Immediate BackupWe will do a simple backup of selected files to a local backup device. This will illustrate many of the backupfeatures available in Yosemite Server Backup. For many organizations, a simple backup such as this may beall that is needed. Organizations with more complex needs can use this simple backup as a starting point forexploring the other capabilities of Yosemite Server Backup.1.Make sure the device is powered up and insert a blank piece of media. You do not need to format the media.Yosemite Server Backup will do that, if necessary, when it runs the job.2.Start the Administrator. The initial view will show a list of tasks to choose from. Double-click the Backupicon to start creating a backup job.3.Enter a job name, such as “My First Backup” and click OK. The job name is simply a friendly nameused to identify each job.4.Now you are ready to select folders and files for backup. Navigate down the network, machine and filesystem to locate the files that you wish to back up. Check the box to select the files/folders to be backed up.By checking the box next to a folder we are selecting all its subfolders and the files in them.TIP:The top left section of the property page is called the Task bar. It shows the different configurationtasks available to fully configure a job. Default values are supplied for many of the configurationvalues so you don’t have to visit all of them. Your current position is highlighted by a bold label.5.Now you need to select your device for backup. Click on the Devices link in the Task bar.You can click on the to the left of a device type (e.g., Tape Devices) to display all available devices of thattype. If not already selected, select the device you want to use for this backup by clicking the associatedcheckbox. The Device View allows you to locate and select devices by type, regardless of where they are inthe network. The Network view allows you to locate select devices on specific machines. Select a class ofdecide, like Tape Devices, will configure the job to use all tape devices available when the job runs even inthe drive was not available when the job was created.6.Click on the Encryption link in the Task bar if you want to change the default encryption or compressionsettings. By default, encryption is off and compression is on. For more information, see Chapter 7.NOTE:This option should be used with care. It requires an encryption passphrase. If you lose the passphrase, youwill not be able to recover your data.7.Click on the Configuration link to see the job settings, the media that the job will use and how themedia will be formatted. For this example, accept the default settings. For more information on backupjob options, see Configuration.8.You may ignore the Advanced options for this example.9.Click OK to complete the backup job configuration. Click Yes at the prompt to see the new job (command)in your Home folder.10. Select the new job object and click the Run button on the Command bar to start the job. Hold the cursorover the Yosemite Server Backup icon (the Quick Access program) in the Windows System tray, normallyin the bottom right corner of your screen. You can see that the job is running.User’s Guide11
NOTE:During execution of the job you may notice a flashing red button in the lower right portion of the screen.This indicates an that requires your intervention. Click the button to open the alert details and resolve theissue.NOTE:The Quick Access program is installed and available on all clients but it only runs automatically on theDomain Server.11. The status of the job is visible in the lower left hand pane, the Info bar, of the Administrator. Alternately,click on the Status and Logs link in the top left hand area — the Navigation bar. For more detailedinformation click on Status in the Command bar. The job’s property page will open and show the status ofthe running job.12. It is a good practice to check the logs after a job runs to ensure that there were no problems. Click Statusand Logs in the Navigation bar. Locate your job in the list, click on the sign to expand the job andselect the most recent run. The property pane will show the firs page of the job log. To see the entire log,click the View Log button in the Command bar.13. Select the log entry for the backup job and double-click to open it. Scroll through the log to check thateverything is OK. If the Next button is bold, there are additional pages to check. Click Close when youhave finished reading the log.14. You have now created and run your first tape backup job.Once you have created your backup (or any) job, it can be quickly and easily located again in your Home folder.NOTE:With the settings in this tutorial, this job will overwrite the media when you run it again. If you do notwish this to happen, you need to select a Write Mode of Append to all media in the Modes section ofthe Configuration page.Restore to a Different LocationWe will do a simple restore of selected files from the backup media we created in the previous step. This willillustrate many of the restore features available in Yosemite Server Backup.1.Make sure the device is powered up and insert the backup media into it.2.Select Tasks in the Navigation bar and double click the Restore icon.3.Enter a name for the restore job, such as “My First Restore” and click OK.4.Now you are ready to select folders and files for restore.Navigate down the network, machine and file system to locate the files that you included in your firstbackup. In this view, only files and folders that have been backed up will appear. Check the box to selectthe files/folders to be restored. By checking the box next to a folder, we are selecting all its subfoldersand the files in them.5.For this first restore job, we want to restore the files to a different location. This will allow you to comparethe original files with the restored files.To do this task, we need the move functionality. Click on th
Yosemite Server Backup is designed to operate within your existing network to protect your vital data. Each machine that will be protected must have Yosemite ServerBackup installed. One machine acts as the Domain Server which houses the