Transcription
AIRaider EZ95Installation & Instruction ManualRadonAway3 Saber Way Ward Hill, MA 01835radonaway.comIN052 Rev. K 0613
TABLE OF CONTENTS & FIGURES1. PRE-INSTALLATION.334555562. INSTALLATION INSTRUCTIONS.2.1. System Location.2.2. Preparing the System For Installation.2.3. Plumbing Hook-up .2.4. Electrical Hook-up.2.5. Vent Line Installation .2.6. Remote Air Intake.2.7. System Start-up.2.8. System Check.7881012131414153. RETESTING.164. MAINTENANCE.165. TROUBLE SHOOTING.186. ALARM SCHEMATIC.197. BLOWER BRUSH REPLACEMENT .208. EQUIPMENT SPECIFICATION.21LIMITED WARRANTY.22Figure 1 – Pump Curve.Figure 2 – Typical System.Figure 3 – System Preparation.Figure 4 – Pump Installation.Figure 5 – Plumbing Arrangement.Figure 6 – Rear View, Unit Only.Figure 7 & 7a – Water Connections.Figure 8 – Electrical Schematic.Figure 9 – Vent Line Connection.Figure 10 – Vent Line Installation.Table 1 – AIRaider Output vs. Well Pump Output .Figure 11 – Blower Enclosure, Front.Figure 12 – Blower & Enclosure Cover .41.1. Safety Matters.1.2. Water Flow Requirements .1.3. Full Water Test .1.4. Unpacking and Locating System Components .1.4.1 Unpack All System Components.1.4.2 Locate All Components.1.5 Use Qualified Technicians.4.1. Six Month Service (recommended). 164.2. Annual Service (required). 17IN052 Rev. K 061378991010111313152020Page 2 of 22
PRE-INSTALLATION11. PRE-INSTALLATIONThe AIRaider EZ95 System is a diffused bubble aeration system for the removal of radon and other VOC’s fromresidential water supplies. This installation and operation manual is designed to guide professionals throughthe safe and proper installation of the AIRaider EZ95 System.Before beginning the installation of the AIRaider EZ95 System, there are 5 items to be considered. They are:1. Safety2. Installation site requirements3. Inspection of System components4. Qualified Technicians are necessary5. Knowledge of all contaminants in the water1.1. Safety MattersSafety is the most important step in the installation process. Never perform any step of the installation that youare not qualified to perform (i.e. Electrical or plumbing hook up). It is important that you read through theentire manual prior to beginning the installation.When performing the installation, work slowly and deliberately. Follow all instructions carefully and never takeshortcuts. Our team of technicians is available to answer your questions at 800-355-0901.WORK SAFELY!IN052 Rev. K 0613Page 3 of 22
PRE-INSTALLATION11.2. Water Flow RequirementsThe AIRaider EZ95 System is designed for use with water flows up to 7 gallons per minute (GPM)* foroptimum Radon Reduction. Higher outflow can be accommodated although higher flows will result in reducedwater pressure (see Figure 1) and a degradation of radon reduction efficacy.Figure 1 - Pump CurveIf higher or lower system outflow is needed, a flow control valve may be placed in the outlet piping downstream of the bladder tank and may be opened or closed by the amount necessary to balance the system.To avoid interruptions in the outflow from the AIRaider EZ95 System the well pump output must exceed the systemoutflow by at least 1 GPM at design flow (i.e. well output 8 GPM ; AIRaider EZ95 outflow setting 7 GPM).If the well pump output is less than the system output the AIRaider EZ95 may run dry which will cause thepump, installed integrally within the AIRaider EZ95 System, to automatically shutdown. To prevent outflowinterruptions it is strongly recommended that well pump water flow rate be determined before the AIRaider EZ95 System is installed and that the system is balanced accordingly.*The AIRaider EZ95 System is not recommended for high flow residential properties. Other AIRaider Systemsare designed specifically for high flow residential properties. Separate repressurization systems are not requiredwith the AIRaider EZ95 System but are available for other AIRaider Systems. Proper repressurization systemsizing is required to meet water flow needs. Consult the manufacturer if assistance is needed for system selection.In order to determine available water flow rate the following is needed: Garden Hose Five Gallon Bucket A Stop Watch or Watch with a Second HandOr A Water Flow Meter.IN052 Rev. K 0613Page 4 of 22
PRE-INSTALLATION1Household water use must be discontinued during the following flow rate test.Mid-Range Flow Rate Test:1. Attach garden hose to the drain connection on the base of the Well Pressure Tank.2. Open the drain valve and run water for 15 minutes.3. After 15 minutes, check the pressure gauge on the well system. Adjust the drain valve (open orclose) as needed to maintain the required running system pressure (constant pressure on gauge)with the well pump running continuously.4. Run for 5 minutes while ensuring that the pressure is not fluctuating.5. Run water from the hose into a five gallon bucket. Using a stop watch, time how many seconds ittakes to fill the bucket (Z sec.).6. Determine the GPM by dividing 60 seconds by the number of seconds it took to fill the bucket (Zsec.). Multiply the answer by 5 gallons. This gives you the GPM.GPM ( 60 / Z ) x 57. Repeat steps 5 and 6 and average the 2 numbers. The answer is the well pump output in gallons perminute. It is recommended that this number be indelibly recorded in an obvious location, togetherwith the date of test, as it will be required when setting the AIRaider EZ95 System and may be required for future troubleshooting of the well pump system or the AIRaider EZ95 System.1.3. Full Water TestA full Water Sample Analysis must be performed to determine the quality of the water that requires treatment. In many water supplies, contaminants other than radon are present. The AIRaider EZ95 Systemis only effective for the removal of radon and some other VOCs. The Aeration Process employed by theAIRaider EZ95 System and other radon removal systems can worsen problems due to iron or manganesecontaminants in the water supply. For optimal removal of radon or other VOCs, other contaminants such assediment, iron, or manganese must be removed before the water supply enters the AIRaider EZ95.Failure to remove other contaminants can reduce the effectiveness of the system and may result in system damage!1.4. Unpacking and Locating System Components1.4.1. Unpack All System ComponentsRemove all packing material and discard appropriately away from the work area.1.4.2. Locate All ComponentsCheck to ensure all components are intact and included in shipment.Included Component List (may vary with order) Tank Assembly Pump (Installed Inside Tank Assembly) Diffuser Assembly (Installed Inside Tank Assembly) Bypass Valve (Sold Separately) Bladder Tank (Minimum 5 gallon. Sold Separately) ManualIN052 Rev. K 0613Page 5 of 22
PRE-INSTALLATION11.5. Use Qualified TechniciansA Licensed Plumber, Electrician, Radon Contractor or Certified Water Treatment Specialist may be required toinstall the AIRaider EZ95 System in accordance with the installation instructions. Check your Local and StateCode and Licensing requirements.Failure to follow the instructions may lead to poor system performance and/or possible system damage.The installation must comply with the National Electrical Code, NEC NFPA 70 and all applicable Local and StateCodes! Electrical Wiring must be completed by a Qualified and Licensed Electrician.IN052 Rev. K 0613Page 6 of 22
1INSTALLATION INSTRUCTIONS22. INSTALLATION INSTRUCTIONSOVERVIEWNow you are ready to begin the installation process. The eight steps to properly install the AIRaider EZ95System are listed below. Read all components of each step prior to beginning the actual installation.1.2.3.4.5.6.7.8.System LocationReadying the System for InstallationPlumbing Hook UpElectrical Hook UpVent Line InstallationRemote Air Intake InstallationSystem Start UpSystem CheckSAFETY TIP: Do Not undertake anystep for which you are Not QualifiedFigure 2 - AIRaider EZ95IN052 Rev. K 0613Page 7 of 22
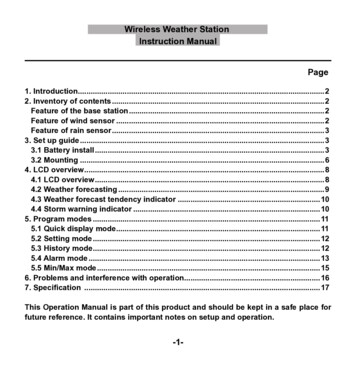
1INSTALLATION INSTRUCTIONS22.1. System LocationWhen selecting the location for the AIRaider EZ95 System, six factors should be among those considered:1. System Plumbing Hook-up. Find a location that will minimize the amount of plumbing necessary, thisis typically in proximity to the well tank.2. Electrical Hook-up. Keep in mind the need for accessibility to a 20 Amp dedicated 120VAC powersupply.3. Exhaust Line Venting. The location of the system must allow for outside venting of the system exhaustabove the eave of the structure. The Manufacturer requires that the exhaust pipe pitch-back toward thesystem (see Section 2.5).4. Remote Air Intake. If the system must be installed in an area with questionable air quality (i.e. furnaceroom, garage, crawlspace) then ducting from the air intake to a remote location having good air quality may be required.5. System must be Level. The system should not be located on a significant slope as this may impedesystem performance and may cause system damage.6. Drain Location. The system is equipped with an overflow connection, it is recommended that thisconnection be directed to a drain or sump.Place the system in the location acceptable to customer that maximizes the ease of installation. All Local andState codes as well as any applicable AARST, EPA and/or State Radon standards must be adhered to whenlocating the AIRaider (i.e. away from electrical panel, furnace, exits, etc.).2.2. Preparing the System for Installation1. Remove fasteners securing cover to tank andremove cover assembly. (See Figure 3)2. Remove lid3. Remove any packing materials, manuals, baggedCover assemblyLidparts etc., from inside the system.4. Check that the diffuser assembly is mounted inthe elbow at the bottom of the front most pipeon the right of the tank and is secured via themounting screw locatedvertically thru elbowand horizontal diffuser pipe.5. Ensure that pump float, is free to float over thediffuser bar.6. Check that all liquid tight connectors on cablesabove the mounting plate are secure.Mounting plateSpray nozzlePressure regulatorPump bracketPumpAirguardDiffuser assembly7. Check that all hose clamps on all floats and ventpipe are tight.8. Verify float distances from mounting plate andcable lengths from tether to float are correct.Figure 3 - System Preparation9. Mount the lid and lid gasket, do not secure with the fasteners provided at this time.10. Replace the cover assembly, do not secure with the fasteners provided at this time.IN052 Rev. K 0613Page 8 of 22
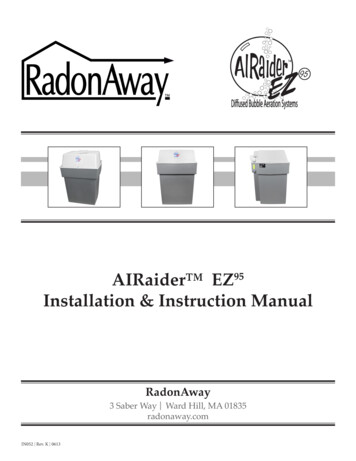
1INSTALLATION INSTRUCTIONS2Over temperature warning lightBlower housingPush button, thermostat overridecutout. Permits pump operationto refill tank with cold water.Solenoid valvesHammer arresterVentVent pipe hose clampsOn/off float switchhousing. Aerator controlfloat, blower and solenoidcontrol (normally closed)Fail safe float3” Cable length tether to float(Normally closed) shuts off unit andsounds alarm on high water levelFloat switch hose clampCheck valve (behindpressure regulator)On/off floatPump float3” Cable length tether to float(normally open) prevents pump dryrunningThermostat switch (for overtemperature protection,installed inside pipe cap)Figure 4 - Overview of Pump InstallationFigure 5 - Plumbing ArrangementIN052 Rev. K 0613Page 9 of 22
12INSTALLATION INSTRUCTIONS2.3. Plumbing Hook-upAll plumbing should be performed in accordancewith Local and State Codes by a Qualified Plumber.Vent hole, breakssiphon if unit overflows.To bladder tankWater in1. Shut off water main valve located after the pressure tank.2. Drain water line.3. Plumb system into water line after the pressuretank and all other water treatment equipment.(Exception: Install before activated carbon filter/tank.)Water outOverflow, to beconnected to drainor sump4. Plumb appropriately to “Water In” and “WaterOut”. (Figure 6)For ease of installation and servicing a ¾” sharkbitefitting is provided on the inlet. This is compatiblewith 3/4” pex or copper tubing.5. From the open leg of the inlet tee run pipe/tubingthru a bypass valve to a second tee.6. Plumb unit as shown in Figures 6, 7 and 7a. TheBladder Tank must be connected to the Rise Legof the Tee provided on the System Outlet, withoutany elbows between the Tee and Tank.Warning: An undersized bladder tank will result inpremature pump failure.Figure 6 - Rear View, Unit OnlyBladder tankMinimum capacity5 Gal. (Required)Water out, to houseOutlet valveFlow control valve(Recommended)Pressure gauge(Optional)Inlet valve(Recommended)(Recommended)Bypass valve(Recommended)Existing housepressure tank(Tank tee, pressure switch,pressure gauge and reliefvalve not shown.)Note: Pipe supports are required, particularly tosupport the bladder tank. These are not shown, asinstallation details vary by property.7. Plumb the water line to the house into the openleg of the second tee. (Figure 7) It is recommendedthat a flow control valve be installed in this line.8. The built-in pump pressure switch and pressureregulator provided are designed for use with apressure tank. The pressure tank bladder pressureshould be set per the tank manufacturers recommendations for a pressure switch setting of 37 psi.9. An outlet pipe must be installed in the overflowconnection (figure 6) and connected to drain orsump in accordance to Local and State Codes.Warning: Overflow may occur due to a blocked ventpipe, debris in or wear of the solenoid valves, or incorrectconnection to the electrical supply. Failure to connectthe overflow to a drain or sump (with sump pump orother means of external discharge) may flood the areaaround the unit in the event of overflow occurring.10. With the system in bypass mode, slowly open theWater in,From well pumpFigure 7 - Water ConnectionsOutlet Tee provided with Unit.Bladder Tank to be connected toTee Rise Leg. Do not install bendsbetween Tank and Tee.Overflow, connect todrain or sump per localand state codesmain water valve and check for leaks.11. Remove tank cover and slowly change bypassvalve to service configuration and check for leaks.IN052 Rev. K 0613Figure 7a - Water ConnectionsPage 10 of 22
Figure 8 - Electrical SchematicIN052 Rev. K 0413Page 11 of 22WGPower In115VAC50/60HZ ONLYBGOFFBBRGAuxiliaryFan(Optional)WWRAuto ResetThermostatSwitch N.C.Switch BoxOn/OffFloatSwitch N.C.TOPPumpwithoutIntegralFloatBGWGPump ControlPressureSwitchB B1B W2W B B BCR R BBRElectrical EnclosureDR W W W REG G G G GBWBWBBBABR Red WireG Green WireW White WireBlack WireTerminal blockSolenoid 1Solenoid 2Wiring NEZ SRTRRGRRGWire NutWBBBWBBBWWRBNeonLampPush ButtonThermostatOver RideWWWBlowerBBBWWWtrs040913PressureSwitch N.C.BuzzerFuse10ARBlower EnclosureWPumpFloatSwitch N.O.Fail SafeFloatSwitch N.C.
1INSTALLATION INSTRUCTIONS22.4. Electrical Hook-upThe Installation must comply with the National Electrical Code, NEC NFPA 70 and all applicable Local andState Codes! Electrical Wiring must be completed by a qualified and licensed electrician.WARNING: Never perform electrical work while standing in water. Do not attemptwiring on a live circuit.WARNING: Power Supply Voltage must match that marked on the System Name Plate.Improper wiring may result in system and/or property damage.1. Turn main power switch, located on electrical box at rear left of unit, to the “Off” position.2. Bring power into the electrical box via the hole provided.3. Connect power line to the connections provided within the electrical box per the Electrical Schematic(Figure 8).Warning: Line L1 must be connected to the switch connection. Do Not connect L1 to the white Neutral wire.This will cause the Aeration System to malfunction.4.
IN052 Rev. K 0613 Page 3 of 22 1 PRE-INSTALLATION 1. PRE-INSTALLATION The AIRaider EZ95 System is a diffused bubble aeration system for the removal of radon and other VOC’s from residential water supplies. This installation and op