Transcription
v1.023-Apr-20Crestron SoftwareCrestron file types [filename].umco A SimplWindows file. User Module created in SimplWindows. Can be opened inSimplWindows and modified[filename].usp , Simpl source codeo Simpl fileso The .usp file is the Simpl source file and can be opened and modified in Simpl .[filename].smw ß SimplWindows fileo SimplWindows demo program file detailing the use of the module.[filename].lpzo 3 Series SimplWindows program fileo Should be located in the same folder as the same filename .smw file. This is the compiled file forthe same name .smw file.o Note: The .lpz file CAN NOT be opened in SimplWindows or modified.[filename].sigo Crestron Test Manager Signal Fileo Should be located in the same folder as the same filename .smw file. This is the test file for thesame name .smw file.o Note: The .sig file CAN NOT be opened in SimplWindows or modified.[filename].vtpo VTPro demo Touchpanel project file to use with the SimplWindows programo Wherever you want to locate this main VTPro Touchpanel project file. The .vtp file can beopened in VTPro and modified as desired.[filename].vtzo VTPro Touchpanel project fileo Should be located in the same folder as the same filename .vtp file. This is the compiled file forthe same name .vtp file.o Note: The .vtz file CAN NOT be opened in VTPro or modified.[filename].cedo Smart Graphic Configuration Fileo Should be located in the same folder as the same filename .vtp file. This is the information filefor the independent smart object. This file needs to be added to the simpl windows to allow thesmart object to function.o Note: The .ced file CAN NOT be opened in VTPro or modified.[filename].c3po Core 3 Xpanel Project1 of 18
o This file is isolated in a separate folder. The folder is named Project Name .c3prj. The .c3pfile in the folder is the project that is utilized by the Xpanel. This file utilizes the Adobe AIRapplication installed on the computer to produce a working user interface.[filename].clzo SIMPL# compiled codeo Place in your USERPLUS folder[filename].pdfo SimplWindows User Macro Help fileo Should be placed in the same folder as the User macro, *.umc as mentioned in Step 1 above. Toview the Help file, select the User Module and then press [F1].o Note: Opening the User Module and selecting [Project], [Edit Program header], refer to the [PDFHelp File] field for the target filename that will be opened when [F1] is pressed.[filename].audioarchitecto Audio Architect design file.o Can be opened using version 1.95.5 or later.Installing Crestron Software Create an account at http://www.crestron.com using the Harman company ID 1002710Select the Pro Panel and navigate to the Resources folder to download the Crestron Master Installer.Note: The Master Installer MUST be run as administrator and will not work properly on the HarmanDomain; you have to use the TCS network or McDonald's network. After running Crestron Master Installer as admin, open it up to show all the software packages availableto download.2 of 18
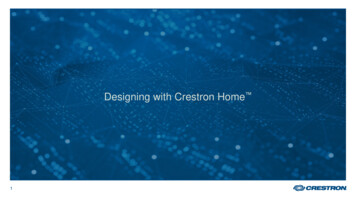
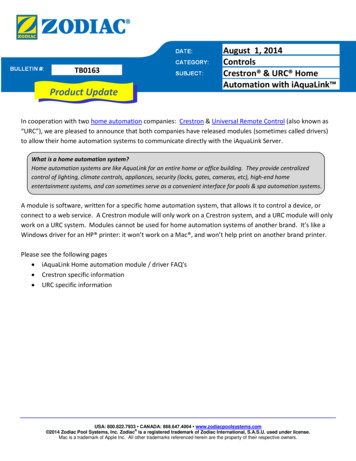
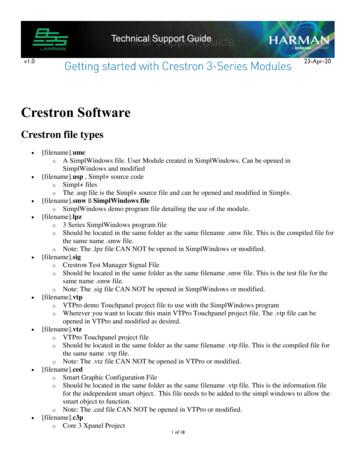
o Software needed for this tutorial Crestron Database Device Database SIMPL Windows SIMPL Cross Compiler Smart Graphics Toolbox Vision Tools Pro-eOnce selected, hit next and leave download and install to the default directories.It is a good idea to Remove downloaded files after installation, these are large downloads.Then select Download and Install using the email and password you used to setup your CrestronAccount.Finding the IP Address of a Crestron Processor Open Toolbox from your Crestron folder in your programs.In Toolbox select from the menu Tools – Device Discovery.o Note: make sure you are connected to the same network as the Crestron processor.3 of 18
Once Toolbox finds a Crestron processor on the network you can select it for more info, however youshould be able to see the processor's IP now.Right click on the Control System that was found and add IP address to address book. This way we cansend it the code later.Opening the Archived Touch Panel File with VTPro In the ZIP file containing the archived demo programs is a file named BSS BLU v1.0 DemoXPANEL.vta. This is the touch panel file that can be executed and controlled from a PC. Double clickon this file to open in Crestron's VTPro.This will start the un-archive process.4 of 18
With VTPro open and the file un-archived select the project form the Project View on the left side.In the properties on the right hand side of VTPro expand Connection Settings and change the Hostaddress to the IP address of the Crestron processor we found earlier. (see Finding the IP of your CrestronBrain using Toolbox if you need the IP address)Then press F12 on your keyboard to recompile the Xpanel project.To use the Xpanel you need to have Adobe AIR installed on your computer, luckily after compiling theVTPro panel Crestron provides an install package for us in the same folder.After installing CrestronXpanel installer.air you can now run the Xpanel by clicking this file:5 of 18
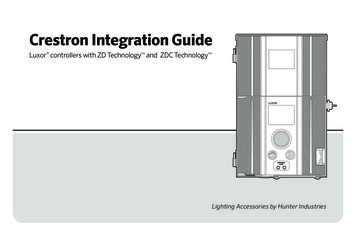
Opening the Archived Example Program in SIMPLWindows Open the SIMPL Windows program located in your program directory under Crestron.Go to File – Import Archived ProgramSelect the .zip file to import (IP or RS232) and the destination for the imported file.o Make a new folder to import the files to and selected the option to import the module to yourdatabase for future use. You could keep the modules in the local project directory if you justwant to test.o To import ALL the modules to your computer directory for later use you will need to un-archiveand import both the IP and RS232 .zip. After importing you will get a prompt to manage smart graphics extensions. If you followed thedirections above and un-archived the VTPro file and recompiled it, then you can manage the smartgraphics extenders by browsing to the VTPro file and selecting it.Compiling and Uploading SIMPL Windows to aProcessor Before we upload the Crestron code we need to modify the IP settings for the processor to point to theproper BSS DSP. To do this, expand the Control Logic folder in the demo file and locate the CommandProcessors included in this file.6 of 18
After you double click on the command processor you can then edit the properties for that module. TheCommand Processor (either IP or RS232) is the communication node between the BSS and Crestron.This includes the IP address, port, and the Node address of the DSP in hex. For more information youcan hit F1 while the module is selected to open the help file.In this demo file there are two command processors, one for the BLU160 which has all the ProcessingObjects being controlled from the Crestron in it, except the VoIP card which is managed fromCommand Processor 2.After matching the IP address and node from your Audio Architect file for the 2 command processorswe are ready to compile.Press F12 on your keyboard to compile the program.After compiling it will prompt for a transfer, select YES.It should pull up your address book where we should have a processor already there. Just select theprocessor from the list and press OK.A popup window will then show the current status of the Crestron processor.Note: It is important to note the Program slot found at the top of the popup. Make sure you are in thecorrect slot and don't override another program on accident. (3-series processors can load 10 differentprograms at a time)7 of 18
Finish sending the compiled Crestron program to the processor. Once finished and rebooted (on its own)your Xpanel should sync up and have green lights on Communicating and Initialized.8 of 18
Setting Up Modules for a New SystemLet's build a system that controls a mono gain with an Xpanel.Adding Crestron Processor from scratchThe demo provides a good example file on proper setup of each module using two different CommandProcessors. Most of the time you will need to start from scratch and add these modules into a new or existingfile. Here is an example to Control a Mono Gain Vol/Mute from a CP3. Open SIMPL Windows and start a new program. Give it a System Name and select a program slotunder Program ID. ß That's important.Double click on this folder to add a processor:Go down to CP3 and select Add.Then select the BUG mode:o BUG and BBQ mode because the icon looks like it!9 of 18
Adding BSS Modules and Configuring From the Module Library (left side window) Expand User Modules – Audio DSP and drag the BSSBLU Command Processor v1.0, BSS BLU State Control Module v1.0, and the BSS BLU LevelControl Module v1.0 into the Logic folder under the Program View. If you don't have the modules under your User Modules folder then see the section on importingmodules to your database found here: Import Archived FilesNext open your Command Processor by double clicking on the module. Fill out the Node Address andIP address of the BSS box. The IPPort should always be 1023 when talking to a BSS unit.The blue lines on the Command Processor are digital lines, i.e. High or Low. If we put a 1 on a digitalline then when the program starts it will initialize high and stay that way. So we will put a 1 on theConnect line.Next put a 0 on the Debug line. In our case we won't need this one so we are going to disable it.Now select the Is Communicating line and give it a name like “BSS Communicating" and hit enter.Drag “BSS Communicating" to the Initialize line to connect these signals. Now whenIs Communicating goes high Initialize will start.In Crestron everything needs to be either configured or commented out. Because we aren't using theDisconnect and Is Initialized, we need to comment these out with a double forward slash “//". 10 of 18
The Command module is now setup. Open the State Control Module.Proceed to setup the module with the proper Node address and control type. Next give names to theDigital and Analog (red lines) signals. These will be tied to our touch panel later.If LevelType is set to Percent make sure the input is an analog value from 0-100.Putting a 1 on the SetValue makes the Value pass to the module. In some cases you may not want it topass on every change. For example when setting to an exact value like -15dB. This would be a onetimetrigger event and pulsing the SetValue would then proceed to set it.For further help on the module support see the help file by selecting the module and pressing F1. Here isan example of a finished module:Creating an Xpanel Open Crestron VisionTools ProGo to File – New – ProjectIn the Dialog give it a filename and location and under Panel Type change it to XPANEL 2.0 SmartGraphics.Select a default theme for the GUI.In your Properties window you can set the size of your project.Set your Connection Settings in the Properties window to connect to your Crestron processor with anIP ID of 03 or higher. SimplWindows will need to know this number.Right click on your project name in the Project View to add a page.11 of 18
If you don't see the Smart Graphics Control Browser, select this button in your toolbar to expand it.Drag in a Vertical Slider and a Button to your panel. Resize and give your button some text from theproperties. In the properties window give your button a Press Digital Join of 1. This is how we assign the digitalcontrols in SimplWindows. Also enable Show Control Feedback to show feedback from the processor.From the properties window give your slider a Touch Feedback Analog Join of 1. And a value of 0100, because we are doing a LevelType of percent in our module. 12 of 18
Do a File Save and then press F12 to compile.Adding the Xpanel to SimplWindowsWe started creating a SimplWindows file and now we need to add our Xpanel to it. With your SimplWindows file open (the one we added the Command processor, State, and LevelControl already) select the BBQ from the toolbar. Expand your processor (CP3), expand your ENET slot and double click on the IP-ID: 03. If youremember this is the IP ID we gave our Xpanel in VTPro. Once you added the Xpanel to your IP ID, navigate back to your BUG.In the Program View expand your Ethernet Slot and double click on your Xpanel IP ID.Then double click on your State Control Module so we can see both of these modules side by side.Drag and Drop the line names from the State Module to the Xpanel like the picture below.o Note the Xpanel left side is for feedback, the right side comes from the action or press in thiscase from the Xpanel.o This will connect our button press function and feedback to our module.13 of 18
When finished close the State module. Open the Level Control Module and navigate the Xpanel tab tothe Analog side. Drag the VOLUME and VOLUME FB just like we did before to their appropriate signal numbers. Press F12 to recompile and send to our processor.Open your Xpanel and see if it controls!14 of 18
TroubleshootingFrequent IssuesWhen having issues controlling a device you can start your troubleshooting with these tips: Check your connectivityo If using IP communication check your IP addresses and Subnet maskso The Communicating indication on the Xpanel shows if you have opened an IP socket or RS-232connection to the BSS device.o If using serial you can always send a \x02\x03 and should receive a \x06 back. Send this straightout the command port on the processor to the BSS, bypassing any modules. If no reply check cabling, TX, RX, GND. When using serial also check to make sure the TX and RX go from the CommandProcessor to the Serial Port properly.Check your HiQnet address fieldso Make sure the node address on the module has a little h next to it. In the Crestron environmentthis is a hex value parameter. For example 761h would be 0x761 in HiQnet software.o Make sure the object ID is correct on the module. This format is a little different but it is still inHex. \x00\x01\x00 is the last three bytes of the full HiQnet address of an object. [e.g.0x76103000100]o Make sure the object module has the correct command processor assigned to it.If you aren't receiving feedback, make sure the Initialize is green, or held high. This means the subscribestrings were successfully sent out, received, and all replies have come back. If this is not green then itcould either still be subscribing (wait a few seconds) or it has an issue. Restart the Crestron processor.Verify your Control Types are setup correctly. The [A] and [B] correspond to Inputs and Outputsdepending on which module you are using. Make sure these signals line up.15 of 18
Verifying ModulesMake sure they are using the SIMPL Windows modules and not just the SIMPL modules. You can tell by theway the icon looks next to the Module:Using ToolboxThese modules are new and could potentially have bugs we haven't found yet. For help in troubleshooting thereis a verbose debug mode on the Command Processors. By putting a 1 on the debug line and recompiling we cannow see more info in Debugger. To open Simpl Debugger we need to first open up our Toolbox program. Once Toolbox is up navigate tothe Tools – SIMPL Debugger.16 of 18
In the drop down menu Debugger, select the processor from your address book. Then sync with thecurrent compiled file.Debugger will show you everything happening on the processor. With debug enabled on our commandprocessor we can see exactly what commands that are being sent to and from Crestron, as well as anyerrors.Debugger reference symbols:oDigital HighoDigital LowooAnalog Value, example is a value 0d-100d. This is a decimal value and could be passedinto a module set as percent.Serial String, example is the VoIP Dialer Phone Number.17 of 18
If still having issues checking the Crestron event log is a good idea. In Toolbox select the Tools System Info.o From here you can select your Processor from the drop down menu and select the Open ErrorLog arrow button.About HARMAN Professional SolutionsHARMAN Professional Solutions is the world’s largest professional audio, video, lighting, and control products and systems company. Our brands comprise AKG Acoustics , AMX , BSSAudio , Crown International , dbx Professional , DigiTech , JBL Professional , Lexicon Pro , Martin , Soundcraft and Studer . These best-in-class products are designed, manufactured anddelivered to a variety of customers in markets including tour, cinema and retail as well as corporate, government, education, large venue and hospitality. For scalable, high-impactcommunication and entertainment systems, HARMAN Professional Solutions is your single point of contact. www.harmanpro.com
3 of 18 o Software needed for this tutorial Crestron Database Device Database SIMPL Windows SIMPL Cross Compiler Smart Graphics Toolbox Vision Tools Pro-e Once selected, hit next and leave download and install to the default directories. It is a good idea to Remove downlo