Transcription
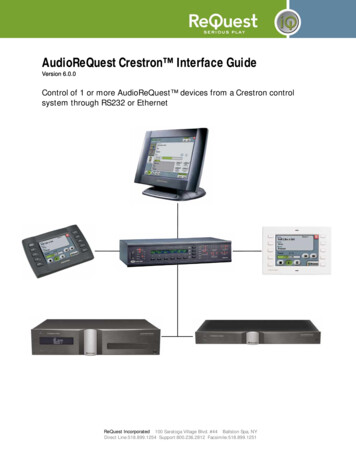
AudioReQuest Crestron Interface GuideVersion 6.0.0Control of 1 or more AudioReQuest devices from a Crestron controlsystem through RS232 or EthernetReQuest Incorporated 100 Saratoga Village Blvd. #44 Ballston Spa, NYDirect Line:518.899.1254 Support:800.236.2812 Facsimile:518.899.1251
Table of ContentsRevision History . IICrestron Install Checklist. IIIIntroduction: . 1Rear Serial Port Pinout (Male RS-232 Port) . 1Serial Cable Pinout (Female ÆFemale RS232 cable) . 1COM Settings . 1Design Changes and New Features . 3Multiple Product Model Support . 3Single START-COMMUNICATIONS Signal . 3Dual Module Design . 3Ethernet Control . 4Cover Art on Supported Panels . 4Customizing the Program . 5Adding Touch Panels . 5Adding AudioReQuests . 7Serial Control . 9Ethernet Control . 9Complete List of Module Inputs and Outputs. 10Basic Module – Inputs . 10Basic Module – Outputs . 12Basic Module – Parameters . 13Advanced Module – Inputs . 14Advanced Module – Outputs . 15Advanced Module – Parameters . 15Touchpanel Controller Module – Inputs . 16Touchpanel Controller Module – Outputs . 16Keyboard Handler Module – Inputs . 16Keyboard Handler Module – Outputs . 17Keyboard Handler Module – Parameters. 17Appendix A: Troubleshooting . 18A) Can’t establish 1-way serial communication: . 18B) I have one-way control but I can’t get any feedback: . 18C) Getting garbage text or lines not refreshing on Crestron Touch panels: . 19D) The text is being drawn slowly on the touch screens: . 19E) When I go into the ARQ pages on my touch panel nothing happens: . 19Appendix B: Using Hyper Terminal: . 20Phone (518) 899-1254 Fax (518) 899-1251 www.request.com- I-
Revision HistoryRevision 06.0.0ChangesUpdated for 1.7.11, updated graphicsUpdated for 1.7.5 (genre commands)Updated for 1.8.1Updated version number to match program version number. No changesto documentComplete redesignAdded new 1.9.0 commandsAdded POWER-ON and POWER-OFF to Basic ModuleAdded info about single Start Comm signalMinor formatting changesInitial F-Series VersionAdded support for cover art using Dynamic GraphicsRedesigned moduleAdded Keyboard Handler and Touchpanel modulesAdded support for new 4.6.0 featuresAdded support for classical modePhone (518) 899-1254 Fax (518) 899-1251 www.request.com- II -
Crestron Install ChecklistClient Name:Date Installed:Module Version: Processor Type:Number of ReQuests: Connection to ARQ:EthernetSerialHardware Requirements1)2-Series Crestron Processor and AudioReQuest Digital Music Server2)FemaleÆFemale NULL Modem serial cable if connecting serially (one ships with the ARQ). Itis HIGHLY recommended to use a cable that is no longer than 10ft to prevent groundproblems.Hardware Configuration1)2)Install ARQ unit and Crestron processor in rackConnect cables for control (NULL Modem Serial or Ethernet)Software Requirements/Setup1)Ensure that you have the all the latest SIMPL Windows and VTPro programs and componentsinstalled. Don’t forget the SIMPL Windows Cross Compiler!Software Configuration1)2)3)4)Import the ReQuest demo program into SIMPL Windows using FileÆImport Archived Program(see page 2 below for more info)Select a control method (Ethernet or Serial). The demo is setup for Serial. If using Ethernet,comment out the COM port, uncomment the TCP/IP client, and configure it with yourAudioReQuest’s IP address.If integrating the AudioReQuest into an existing Crestron program, copy the logic from thedemo program to your program. Be sure to copy Digital, Analog, and Serial joins for the touchscreens. Modify the joins as necessary to fit into your system.If using the ReQuest demo touch screen interfaces, open those in VTPro and modify asnecessary. Copy our screens to yours if integrating with an existing systemPhone (518) 899-1254 Fax (518) 899-1251 www.request.com- III -
Introduction:This document explains how to interface all models of AudioReQuest Digital Music Servers with Crestroncontrol systems using the AudioReQuest Crestron Demo Program version 6.0.0. It will not give a detailedexplanation of the protocol used to communicate with the AudioReQuest via Ethernet, Serial, or IR. Forthis information, please download the Communication Protocol Guide from www.request.com.Rear Serial Port Pinout (Male RS-232 Port)Pin123456-9PurposeNot UsedReceiveTransmitNot UsedGroundNot UsedSerial Cable Pinout (Female ÆFemale RS232 cable)Pin (ARQ Side)2(Rx)3(Tx)5(GND)Pin (Control Side)3(Tx)2(Rx)5(GND)COM SettingsThe rear serial port is used for integrating the AudioReQuest with a control system. Connection to the rearserial port requires a FemaleÆFemale NULL MODEM serial cable. The front serial port(if equipped) isused ONLY for configuring certain settings on the AudioReQuest, such as the IP Address. You CANNOTuse the front serial port to control the ARQ.The default baud rate depends on the model of AudioReQuest unit. On newer AudioReQuest units, thebaud rate is configurable in the webserver (SettingsÆHardwareÆControl Port Baud Rate). The tablebelow shows the default baud rates by model.Rear Serial Port(Single Zone Units)ParameterValueBaud9600Data Bits8Stop Bits1ParityNoneFlow ControlNoneRear Serial Port(Multi Zone Units)ParameterValueBaud57600Data Bits8Stop Bits1ParityNoneFlow ControlNonePhone (518) 899-1254 Fax (518) 899-1251 www.request.com- 1-
W HAT T O D O F I R S T :Do Not Unzip The Demo Program You Download!!!1.2.3.4.5.Download ARQConnect Crestron Demo v6 0 0.zip from www.request.com.Open SIMPL Windows.Select Import Archived Program from the File pull-down menuClick Browse and find the zipped file you downloaded in step 1 above.Click Start to import the file.Following the above steps is CRITICAL to the success of your project. Although it is typically sufficient tosimply copy the files to the appropriate place on your hard drive, SIMPL Windows performs better whenthe file is imported.Importing the file will unzip the project, placing the .smw, .umc and .usp files in the appropriate places,and open our demo program in SIMPL Windows. This program works as a complete solution with ourtouch panel designs, which are also available on our website. If you choose to use our module in anotherprogram, but you plan to use our panel designs, you MUST copy over the Subpage Logic subsystem inorder for the panels to work correctly. If you have any questions or problems, call (800) 236-2812 forfurther assistance.Phone (518) 899-1254 Fax (518) 899-1251 www.request.com- 2-
Design Changes and New FeaturesIn an effort to simplify integration between Crestron and AudioReQuest, ReQuest has made a number ofchanges to the demo program, the ARQConnect module, and the demo touch screens. This sectiondescribes the changes that have been made.Multiple Product Model SupportReQuest now has 3 main types of AudioReQuest unit: Single Zone (N.Series), 2 Output Multizone(F2.Series), and 4 Output Multizone (F4.Series and S.Series). Using the ARQConnect Demo Program, youcan interface to any number of units of any type simply by changing the zone number on the module/Single START-COMMUNICATIONS SignalPrevious versions of the demo program and touch screen interfaces contained 2 separate StartCommunications signals: One for Ethernet (join 771) and one for Serial (join 772). These 2 signals havebeen combined into 1 signal named ARQ-CONNECT (join 771). This allows you to switch betweenEthernet and Serial communications by simply moving the ARQ-CONNECT signal from the [STARTSERIAL-COMMUNICATIONS] input to the [START-ETHERNET-COMMUNICATIONS] input on the module.For more information on using Ethernet, see the Ethernet Control section on the next page.Multi-Module DesignThe demo program version 5.0.0 introduced the simplified Basic module and added the Advanced module.This concept has been expanded in version 6.0.0. The Basic module has been simplified even more andwe have added 2 new modules: Keyboard Handler and Touchpanel Controller.The Keyboard Handler ModuleThis is a stand-alone module that handles all the necessary work for displaying an onscreen keyboard andbuilding a string based on input from the touch panel. This is used mainly for creating playlists.The Touchpanel Controller ModuleThis module handles all the logic for displaying subpages on the touch panel. Previously, this logic lived inthe demo program. This made it more difficult to integrate a ReQuest into an existing project.The Advanced ModuleThis module “piggy-backs” on the basic module and utilizes it to communicate with the AudioReQuest.The advanced module cannot be used stand-alone without the Basic Module. The picture below showshow the modules connect together.Input/Output on Basic Module[ADVANCED-CMD-IN ][ADVANCED-CMD-OUT ]Input/Output on Advanced Module[REQUEST-ADVANCED-TX ][REQUEST-ADVANCED-RX ]Phone (518) 899-1254 Fax (518) 899-1251 www.request.com- 3-
Ethernet ControlThe demo program provided by ReQuest includes a commented out TCP/IP client that is ready to use.In order to control AudioReQuest with Ethernet:1. Uncomment the TCP/IP client that is already in our demo program(Slot-08, IP-ID-04).2. Verify that the TCP/IP client is configured as shown in the figure below.3. Switch to Configure view and set the IP address of the TCP/IP client to the IP address of yourAudioReQuest. You can find the IP by going to MenuÆSystem Information on the AudioReQuest.4. Switch back to Program View and delete the AUDIO-REQUEST-RX and AUDIO-REQUEST-TX signals going to the COMM Port (Slot-04, Port-A).Figure 2Cover Art on Supported PanelsWith the addition of Dynamic Graphics on newer Crestron panels, you can now get cover art images onyour touch panel without the need for a video input. The Advanced module contains a number of serialoutputs you can use (see Advanced Module Outputs on page 15 for details on the different outputs).For the Player image as well as the single Browse image, you have the option of choosing a large image(170 x 170px) or a small image (75 x 75px). The Browse images per line are hard-coded to use the smallerimage size to increase performance.To use cover art and set the browse image sizes you desire:1. Open the Advanced Module into detail view2. At the bottom of the module, set the IP ADDRESS and WEB-PORT parameters to the ip addressand web port of your AudioReQuest3. Set the cover art modes for the size of image you wish to receive1d: Large Image (170 x 170 pixels) default2d: Small Image (75 x 75 pixels)4. Connect the serial outputs from the module to the appropriate serial joins on the panels that willdisplay the images (see image below for more info)Phone (518) 899-1254 Fax (518) 899-1251 www.request.com- 4-
Customizing the ProgramAdding Touch PanelsTo simplify customization of the program, we have added templates for the Touch Screens and PanelSpecific Logic folders. The demo program has nine 2-way panels already in it. If you wish to add morepanels, you can use the templates to make it easier.NOTE: You may find it easier to delete all but one AudioReQuest Zone subsystem, add the new panellogic, then add back in the ARQ Zone logic folders.To add another touch screen:1.Add your new touch screen to the system in ConfigureView.2.Under Program View, locate ID-FE : TPS Touch panel. :{Panel TEMP} (Figure 3).3.Right-Click AND HOLD on the TEMPLATE.4.Move the mouse over top of the new touch panel5.Release the mouse button.6.Select Copy all signals and parameters from the menuthat pops up (Figure 4). This will copy all the Digital,Analog, and Serial signals from the template to yournew touch screen.All of the signals for the touch screens have a suffix thatdistinguishes that screen from the others. This is usedto isolate one panel from another. The template has thesuffix {Panel TEMP} on all signals. The next steps willwalk you through changing this. You will need to use aunique suffix for each new touch screen you add. In thedemo, we use {Panel A} through {Panel I}. If you addpanels, you could start with {Panel J} and continuealphabetically from there (Panel K, Panel L, etc.).7.8.Figure 3Figure 4Select the new touch screen in Program View and press F9 on yourkeyboard to begin a Search and Replace.Search for Panel TEMP and replace it with the suffix you decided touse above.Phone (518) 899-1254 Fax (518) 899-1251 www.request.com- 5-
The next step is to create the Panel Logic folder for the new panel.9.10.11.12.13.Select the S-1.4.10 : {Panel TEMP} subsystem and press Ctrl-C on your keyboard.Select the S-1.4 : Panel Logic subsystem and press Ctrl-V.Uncomment the newly copied subsystem.Select the newly copied subsystem and press F9 on your keyboard.Search for Panel TEMP and replace it with the same as in Step 8 on the previous page.Figure 5You must also create the Panel Specific Logic in each zone for the new panel.14.15.16.17.18.19.Select S-1.5.2.2.10 : {Panel TEMP} subsystem and press Ctrl-C on your keyboard.Select S-1.5.2.2 : Panel Specific Logic for This Zone subsystem and press Ctrl-V. This will createS-1.5.2.2.11 : {Panel TEMP}.Uncomment the newly copied subsystem.Select the newly copied subsystem and press F9 on your keyboard.Search for Panel TEMP and replace it with the same as in Step 8 on the previous page.Repeat steps 14-18 above for ALL remaining {ZONE XX} subsystems.Figure 6Phone (518) 899-1254 Fax (518) 899-1251 www.request.com- 6-
Adding AudioReQuestsThe Multi Zone program is designed in such a way that adding more AudioReQuests to the program is assimple as possible.1.Select the S-1.5 : {ARQ 01} subsystem and press Ctrl-C on your keyboard.2.Select the S-1 : AudioReQuest Logic folder and press Ctrl-V to paste.3.Select the newly copied subsystem and press F9 on your keyboard.4.In the Search and Replace dialog box, replace all instances of ARQ 01 with ARQ 02.a. If you already have an ARQ 02 folder, use the next available number.5.Click OK.If you are adding an F4.Series unit (4 Zone box), skip to step 10 below. Otherwise, continue.6.7.8.9.10.Open the S-1.6.1 : Ethernet OR Gates subsystemOpen all 3 gates into detail view by double clicking on each one.If the unit you are adding is a 2 zone box (F2.Series):a. Remove the last 2 input/output pairs on each gateb. Comment out the S-1.6.4 : {ZONE 03} and S-1.6.5 : {ZONE 04} subsystemsIf the unit you are adding is a 1 zone box (N.Series, Fusion, Nitro, etc):a. Remove the last 3 input/output pairs on each gateb. Comment out the S-1.6.3 : {ZONE 02} through S-1.6.5 : {ZONE 04} subsystemsc. If the unit you are adding is running firmware earlier than 2.1.0:i. Open the S-1.6.2.1.1 : ARQConnect module into detail viewii. Scroll to the bottom of the module and change the Zone number from 1 to 0If desired, open every ARQConnect module and modify the [ZONE NAME] parameter tosomething more descriptive for your install.The next step is to add the ARQ-CONNECT signal to the Connection Interlock:11. Open S-1.4.1.1 : Interlock into Detail View12. Select the last line on the input side and press Alt-‘plus’ once for each AudioReQuest Zone youhave added to the system (4 times for one F4, 2 times for one F2, etc)13. Select the last line with a signal name on it and press Ctrl-C14. Select the first empty line and press Ctrl-V. This will copy the ARQ-CONNECT signal to the newline.15. Change the ARQ XX and ZONE XX numbers appropriately.16. If the unit you are adding is a F2 or F4, select the remaining lines and press F4 on the keyboard.This will copy the signal name to the remaining lines and automatically increment the ZONE XXnumber.17. Do the same for the output side of the interlock18. Repeat the above steps for the interlock in each Panel X folderFigure 8aFigure 8bPhone (518) 899-1254 Fax (518) 899-1251 www.request.com- 7-
Next you want to add the ARQ-CONNECT signal to the touch panel:19. Double click on the first touch panel to open that panel in Detail View20. Select Join 774 and press Ctrl-C on your keyboard.21. Select the next open join and press Ctrl-V.22. Adjust the ARQ XX and ZONE XX numbers appropriately as in step 15 above.23. Repeat steps 20-22 for every AudioReQuest Zone you have added above24. Repeat steps 19-23 for every panel in the systemFigure 9aFigure 9bNOTE: For each ARQ you add to the program, you must also add corresponding buttons to the VTPro filesfor your touch screens.Phone (518) 899-1254 Fax (518) 899-1251 www.request.com- 8-
The final step is to determine how you will control the newly added ARQ devices and connect the signalsto/from the module.Serial Control1.2.3.4.Select an open COM port for each ARQ you have added to the system.Copy the signals from Port A to the new COM portModify the signal names, changing ARQ 01 to ARQ XX, where XX is the number of theAudioReQuest you are adding.Open the ARQConnect Basic v6 0 0 module into detail view and make sure the ARQCONNECT{ARQ XX} signal is connected to the [START-SERIAL-COMMUNICATIONS] i
Jan 07, 2011 · 1. Download ARQConnect_Crestron_Demo_v6_0_0.zip from www.request.com. 2. Open SIMPL Windows. 3. Select Import Archived Program from the File pull-down menu 4. Click Browse and find the zipped file you downloaded in step 1 above. 5. Click Start to import the file. Following th