Transcription
PORT-BASED VLAN SETUP GUIDEFOR ARAKNIS NETWORK PRODUCTSRelated Products: N-210/310 Managed SwitchesAAN-300-RT-4L2W RouterAll Wireless Access Point Models1 - Contents1 - Introduction22 - VLAN Basics23 - How Araknis Port-Based VLANs Work34 - Best Practices45 - Planning and Setup46 - Configuring the Router67 - Configuring Managed Switch Ports88 - Configuring WAP SSIDs109 - Reboot the LAN1010 - Troubleshooting1111 - Contacting Technical Support11Araknis Networks supports other VLAN setupmethods not covered in this document. See the fullmanuals on the product page support tabs or contactus for more information.
Configuring and Using OpenVPN2 - IntroductionThis guide will help you understand the basic operation and setup of Araknis port-based VLANfeatures using the following Araknis Networks equipment: AN-300-RT-4L2W Router 210 and 310 Managed Network Switches 100, 300, 500, and 700 Series Wireless Access PointsNote – We do not recommend implementing VLANs unless you have at least one managedswitch in the LAN to serve as the core switch.3 - VLAN BasicsVLANs, or Virtual Local Area Networks, segment a LAN into logical sub-networks with isolatedbroadcast domains over the same physical topology.In other words, different VLANs behave like isolated networks, even though data is moving throughthe same physical network. VLANs logically group together client devices that need to communicate,and restrict data from clients that shouldn’t be receiving it.Logical Topology Without VLANsLogical Topology With VLANsVLAN 40VLAN 20VLAN 1Exec Team192.168.1.11192.168.1.20Guest Wi-Fi192.168.1.100192.168.1.150RouterWAPExec Team192.168.20.11192.168.20.20WAPVLAN 50VLAN 30SwitchDesign Dept192.168.1.21192.168.1.30Sales Dept192.168.1.31192.168.1.40Design Dept192.168.30.21192.168.30.30All devices can freely communicateGuest chSales Dept192.168.50.31192.168.50.40Traffic is restricted to the specified VLANPort-based setup assigns physical LAN ports to a specific VLAN. You must know which ports clientdevices are connected to and which ports link between network switches and the router. This methodis easy to set up and maintain as long as the physical network doesn’t change often. Modifying oradding connections later will also require appropriate VLAN settings.Why Set Up VLANs? Added Security – Clients sharing sensitive data can be placed in a separate VLAN to restrictother users from listening in on traffic. This is often the most useful application for VLANs in smallhome and office networks. Reducing Traffic – Broadcasts, or data sent to all LAN devices, makes up a large part networktraffic. Small LANs can handle this with no problems, but larger networks can begin to slowdown. Using VLANs, broadcasts can be limited to reaching only relevant devices. 2016 Araknis Networks Page 2/11
Configuring and Using OpenVPN4 - How Araknis Port-Based VLANs WorkAraknis equipment utilizes the IEEE 802.1Q VLAN tagging protocol to manage port-based VLANs.Ports being actively used in a VLAN are assigned to one of two roles: Access ports are assigned to only one VLAN and are generally used to connect clients. Alsoknown as untagged ports because all traffic moving through is assumed to belong to the specifiedVLAN. Multiple clients can connect to a single access port by using a switch as long as they areall in the same VLAN. Trunk ports carry traffic for more than one VLAN to other network devices such as a router,managed switch, or access point. Also known as tagged ports, because they need to keep trackof each VLAN’s data simultaneously.Ports may also be excluded from a VLAN (or disabled altogether) to prevent any connected devicefrom gaining access.Trunk PortAccess PortRouter192.168.1.1LAN12WAN3412Employee Wi-Fi192.168.20.XXXWAP192.168.1.4Trunk PortsIT Admin PC192.168.1.10135Customer Wi-Fi192.168.30.XXX7SFPManaged Switch192.168.1.2246812Access PortsCustomer PC Lab192.168.30.XXXAN-110-SW-F-8Unmanaged SwitchAN-110-SW-F-24Unmanaged SwitchEmployee Offices192.168.20.XXX 2016 Araknis Networks AN-110-SW-F-24Unmanaged SwitchSurv. NVR192.168.1.3Page 3/11VLANs1 : Admin (Default)20: Employees30: Customers
Configuring and Using OpenVPN5 - Best Practices Planning is the key to success with port-based VLANs. Identify your needs, plan the networktopology accordingly, then complete equipment setup. Use the fewest number of VLANs possible to accomplish your goals, especially in small networks.You might use one VLAN for guests, and leave everything else on the default, untagged VLAN.Or, place all users in a separate VLAN and leave the default for admin use and equipment accessonly. Consider shared resources such as printers and file servers. Ensure that clients have access to allthe resources they need. If clients need access to other VLANs, you may need to complete someadvanced setup (contact us for help) or provide additional equipment for each VLAN. Minimize cost and setup time by using fewer managed switches. Instead of configuring an accessport for each client in a VLAN, connect a managed switch access port to an unmanaged switch,then connect more clients to that VLAN as needed. Designate one VLAN ID for IT device management and configure one or more LAN ports specificallyfor IT management, then remain connected to these ports during setup to avoid losing access.We recommend using the default VLAN ID 1. In the following example, we use a router port, butit can be any LAN port configured as an access port on the default or management VLAN.6 - Planning and SetupThis section uses a real-world example to demonstrate proper port-based VLAN planning and setup.In the example, we are reconfiguring a flat LAN in a growing small business and implementingVLANs to separate client and employee traffic.Step 1 – Identify your needs.Why are you planning to use VLANs? Clearly defined solutions to problems will make it much easierto implement VLANs successfully. Discuss past issues and current and future needs with your clientto avoid unexpected surprises.Example Goals: Separate customer and employee traffic to improve security. Limit access to network and surveillance equipment to IT staff only. Dedicate one Internet connection for employees and one for customers. Configure one router port for IT device management. Disable unused router ports to avoid security issues. Create one secured Wi-Fi SSID for employees. Create one secured Wi-Fi SSID for customers. 2016 Araknis Networks Page 4/11
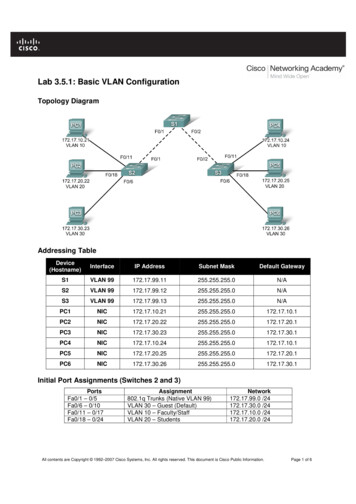
Configuring and Using OpenVPNStep 2 – Plan the topology.Your topology should detail which VLAN each client is a part of, which access ports connect thoseclients, and which trunk ports connect between equipment. You may also want to configure unusedports for future expansion, or disable them to prevent unwanted access. Example:VLAN 01 Admin (Default)VLAN 20 EmployeesVLAN 30 ClientsIT Admin PCSales Team (20 workstations) Client Wi-FiSurveillance System NVRAccounting (12 workstations)Router Web GUIEmployee Wi-FiClient Work Area (5-10 clients)Managed Switch Web GUIWAP Web GUILANRouter192.168.1.112WAN3412Employee Wi-Fi192.168.20.XXXWAP192.168.1.4IT Admin PC192.168.1.10135Customer Wi-Fi192.168.30.XXX7SFPManaged Switch192.168.1.2246812Customer PC Lab192.168.30.XXXAN-110-SW-F-8Unmanaged SwitchAN-110-SW-F-24Unmanaged SwitchEmployee Offices192.168.20.XXXAN-110-SW-F-24Unmanaged SwitchVLANs1 : Admin (Default)20: Employees30: CustomersSurv. NVR192.168.1.3Step 3 – Build a setup checklist.List the VLAN IDs to be configured on each port and make note of custom settings that are required.RouterSwitchPortVLAN IDsPortTypeVLAN IDsPortTypeVLAN IDsLAN 1 (Access)11Trunk1, 20, 305None—LAN 2—2Access206Access1LAN 3—3Access207Trunk1, 20, 30LAN 4 (Trunk)1, 20, 304Access208Access30*Configure route binding: VLAN 1, 20 on WAN1; VLAN 30 on WAN2 (see router setup).*Configure WAP SSIDs with correct VLAN ID (see WAP setup). 2016 Araknis Networks Page 5/11
Configuring and Using OpenVPNStep 4 – Connect and configure equipment.The last step is setting up the equipment. First, you need to make the right connections, then youcan configure the ports using the setup menus. We recommend setting up the router first.Each of the following sections details correct setup for the example we have been using. Refer to theprevious page to better understand the settings being configured.7 - Configuring the RouterAdding new VLANs in the router is fairly easy, but the port settings can be confusing. We recommendcreating all the new VLAN IDs, saving the settings, then configuring settings for each port.Step 1 – Create New VLANsA. Connect your computer to the designated IT management port. In our example, this is routerLAN port 1.B. Log into the router as an administrator and navigate to Advanced, VLANs.C. Click the Add button to create the desired number of new VLAN IDs, then change the IDs anddescriptions for each one. For our example, we added two new entries, VLAN IDs 20 and 30.D. You may also configure other general setting for each VLAN at this time: Inter-VLAN Routing – Enable this feature for any VLANs that need to communicate. Disabledby default. Do not use if security between VLANs is a concern. Device Management – When enabled, the router setup menu may be accessed from thatVLAN. Important: Disabling this Device Management on all VLANs will cause you to loseaccess to the router! A factory default will be required to regain access. We recommendenabling this setting on one “management” VLAN only. Enabled on VLAN 1 by default. Route Binding – Tie all Internet traffic for a VLAN to WAN 1 or WAN 2 port. Disabled by default.In our example, WAN 1 is used for all employee traffic and WAN 2 is for all client traffic.E. Click Apply to save the settings once you have all VLANs configured to this point.This screenshot illustrates the settings used for our example. The default VLAN 1 is used for managing IT devices.We added VLAN 20 for employees and 30 for guests, with route binding configured as specified for each one. 2016 Araknis Networks Page 6/11
Configuring and Using OpenVPNStep 2 – Configure LAN Ports for VLANsA. Each router LAN port’s role in each VLAN must be configured separately. Click the dropdowns tochange each setting for your application. Access ports should be set to Untagged for that VLAN, and set to Excluded for the remainingVLANs. (Access all connected devices belong to a single VLAN ID.) Trunk ports should be set to Untagged for the default VLAN ID, Tagged for other includedVLANs, and Excluded for VLANs not connected. (Trunk connected devices belong tomultiple VLAN IDs.)B. Click Apply to save the new settings.RouterPortTypeVLAN IDsLAN 1Access1LAN 2——LAN 3——LAN 4Trunk1, 20, 30As you can see in the screenshot, the settings for each LAN port can get confusing as the numberof VLANs increases. Use the notes from the planning phase to easily determine the settings requiredfor each port, and remember that each LAN port must be set to Untagged on exactly one VLAN ID. LAN 1 – In our application, LAN Port 1 will only be used by IT for access to the default VLAN ID 1.The default settings are already correct. If data tagged with VLAN ID 20 or 30 reaches the portit will be dropped. LAN 4 – LAN Port 4 is the trunk between the router and the managed switch for all VLAN IDs.We set VLAN 1 to Untagged and VLANs 20 and 30 to Tagged. If untagged data reaches the portit will be tagged with the default VLAN ID. LAN 2 & 3 – These ports will not be used, but they can’t be totally disabled in this menu. Wewill leave the default VLAN settings and disable the ports in the Settings LAN Port Settingsmenu, shown below, by changing the Speed dropdowns for LAN Ports 2 and 3 to Disabled asshown below:Remember to click Apply before leaving a page to save all of the new settings. Once you have thesesettings configured, router setup for VLANs is complete. 2016 Araknis Networks Page 7/11
Configuring and Using OpenVPN8 - Configuring Managed Switch PortsVLAN setup in the Araknis managed switch is similar to the router, but instead of using the settings,tagged, untagged, and excluded, ports are configured as either, trunk, access, or none for eachVLAN ID.When configuring port-based VLANs in the Araknis switch, we recommend creating all the newVLAN IDs first, saving the settings, then configuring the port settings for each VLAN ID.Step 1 – Create New VLANsNote – Leave your computer connected to the specified IT management port used for routersetup to avoid losing access to the switch during setup. See section “5 - Best Practices” onpage 4 for more information about setting up IT management ports.A. Log into the switch as an administrator and navigate to Settings VLANs.B. Click the Add button to create the desired number of new VLAN IDs, then change the IDs anddescriptions for each one. For our example, we added two new entries, VLAN IDs 20 and 30.C. Click Apply to save the settings once you have all VLANs configured to this point.This screenshot illustrates the settings used for our example. The default VLAN 1 is used for managing IT devices.We added VLAN 20 for employees and 30 for guests. 2016 Araknis Networks Page 8/11
Configuring and Using OpenVPNStep 2 – Configure LAN Ports for VLANsA. Click the Access or Trunk Port field for default VLAN ID 1 to open the port settings menu, thenconfigure each LAN port’s role for that VLAN. Refer to the notes you made during the planningphase to make it easier. Set the Access and Trunk ports accordingly. Set any ports that are not included in the VLAN to none.The VLAN ID 1 settings for our example are shown in the screenshot below. We set all unusedports for the VLAN to none to avoid any possibility of traffic reaching the wrong destination.SwitchVLAN ID AccessTrunk161,7202,41,73081,7B. Click Confirm to save the settings. You will see the new settings appear in the VLAN menu:C. Complete the setting changes for the remaining VLAN IDs, then click Apply to save the newsettings. Completed settings for our example are shown below. 2016 Araknis Networks Page 9/11
Configuring and Using OpenVPN9 - Configuring WAP SSIDsConfiguring VLANs in Araknis Wireless Access Points is the easiest part of setup. Each SSID can beset to tag traffic for one VLAN ID.Note – These instructions assume that you have already configured the desired SSIDs andknow which SSIDs will carry traffic for a specific VLAN ID. One SSID can only be set to tagtraffic for one VLAN ID.A. Log into the WAP as an administrator and navigate to the Advanced VLANS menu.B. Select the check boxes to enable all VLAN-tagged SSIDs.C. Enter the VLAN ID for each tagged SSID. Do not set up tagging for the default untagged VLANID. VLAN 1 is used in our example.D. Click Save, then Apply Changes to save the new settings.10 - Reboot the LANAfter configuring port-based VLANs, you should always reboot all of the network equipment, andreset the LAN connection on any connected client devices.After you restore the network: If you are using DHCP, check the IP address assigned to each client device and ensure that it hasa working LAN connection. All DHCP clients should receive an IP address within the assignedDHCP range set up in the router. If you are using static IP addresses, configure each client’s NIC card settings, then ensure theclient has a working LAN connection. See the next section, “Troubleshooting” if you experience problems after setup. 2016 Araknis Networks Page 10/11
Configuring and Using OpenVPN11 - TroubleshootingProblemsSolutionsI can’t access a network deviceafter changing settings.If using Inter-VLAN Routing, check to ensure that the featureis enabled for both devices’ VLAN IDs.If not using inter-VLAN Routing, Check the IP address ofyour computer versus the inaccessible network device. Theymust be in the same subnet to allow communication. (Ex.192.168.010.106; bold must match)If attempting to access network device interfaces, check tobe sure that your computer is on the device’s configuredmanagement VLAN.I can’t access the Internet froma client device.Confirm that the router settings for the VLAN ID are correct.My devices are not beingissued an IP address.Ensure that the VLAN is configured correctly in the router.Check that the DHCP server is configured to issue enoughaddresses for all connected devices (Default range will issueup to 50 addresses.)Turn off route binding to determine if the WAN connection isthe issue.Reset the client device’s NIC card and ensure that it is set toDHCP.WithInter-VLANRoutingcorrectly enabled, one or moredevices are not communicatingcorrectly between VLANs.Certain protocols may not be supported with the Inter-VLANcommunication feature in the Araknis AN-300-RT4L2Wrouter, such as Bonjour, mDNS, TCP forwarding (redirects arealllowed), and others. Contact us for more information if yoususpect a device is encountering these issues.12 - Contacting Technical SupportPhone:(866) 838-5052Email: support@araknisnetworks.com 2016 Araknis Networks Page 11/11161208-1707
Port-based setup assigns physical LAN ports to a specific VLAN. You must know which ports client devices are connected to and which ports link between network switches and the router. This method is easy to set up and maintain as long a