Transcription
Setup Instructions for Email Setup andAuthenticationUser ManualVersion: 2.0Wctel.netExamples: mail.wctel.netsmtp.wctel.net1
EMAIL AUTHENTICATION. 3What is Authentication? . 3What is it used for? . 3EMAIL SETUP INSTRUCTIONS:. 4Outlook 2013 .4Thunderbird .7Mac Mail . 10Mail for iPhone . 15Mail for Android . 202
Email AuthenticationWhat is Authentication?SMTP Authentication is a transparent mechanism for our mail server to verify who youare. The server asks for your user name and password, which your mail program passeson. If you are verified as being a “real” WCTEL.NET user, then you’ll be able to sendand receive your email messages.What is it used for?In the fight to stop Spam (junkmail, Unsolicited Commercial email, etc.), the rules thatapply to mail servers acceptance of mail are getting ever stronger.In order to set up mail clients to use SMTP Authentication, the following instructionsshould be used. Basically, SMTP Authentication needs to be enabled and set up to use theemail address and password of the user in question.Below are instructions and screen shots for the most common mail software currently inuse. Simply select the email client that you currently use from the list below. There youwill find step by step instructions on how to change your email settings.3
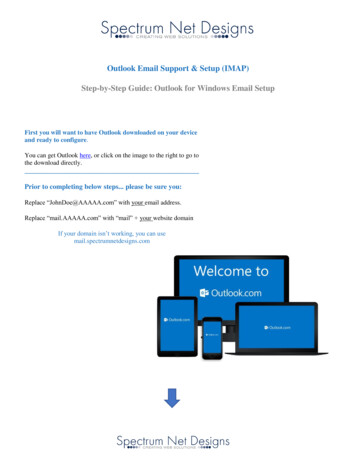
Email Setup Instructions:Outlook 2013Step 1:Open Outlook, you may be prompted immediately to add an account, if so proceed to step 2.If you are not immediately prompted to add an account, go to File ‘Add Account’ as shown inFig 1.Fig 14
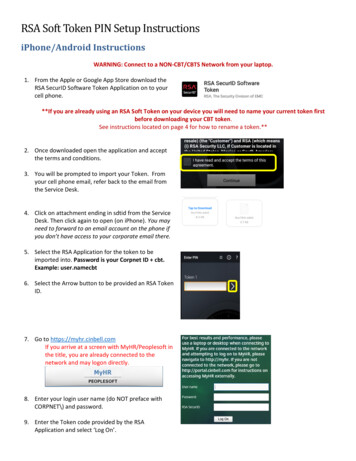
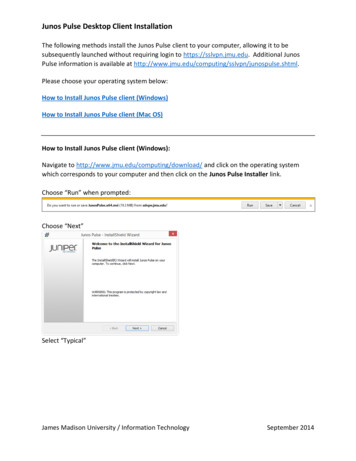
Step 2:When the Add Account dialog box appears, select ‘Email Account’ as shown in Fig2. Enter your name, your full email address and your password. Then click ‘Next ’Fig 25
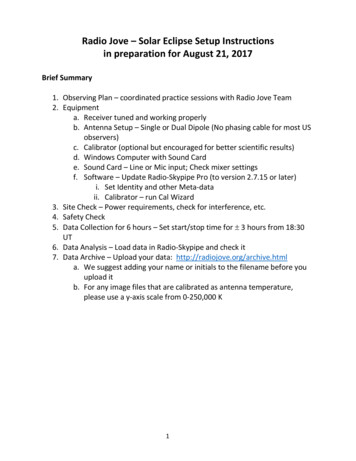
Step 3Outlook should automatically setup the account as shown below in Fig 3. Click‘Finish’.Fig 36
Mozilla ThunderbirdStep 1:Open the Mozilla Thunderbird mail client, then click ‘Email’ ‘Skip this and use myexisting email’ as shown below in Fig 4-A.AFig 47
Step 2:When the dialog box appears, enter your name, email address, and passwordthen select ‘Continue’. See below in Fig 5.Fig 5Step 3:Click on ‘Manual config’ as shown in Fig 6-A.AFig 68
Step 4:Change SSL for both Incoming and Outgoing servers to ‘SSL/TLS’, Fig 7-A.Change ‘Username’ for both Incoming and Outgoing servers to your full email address, Fig 7B.Click ‘Done’ to complete setup. (You may have to click ‘Re-test’ if ‘Done’ is not an option).ABFig 79
Mail for Mac ComputerStep 1:Open ‘Mail’You should be prompted to enter account information, if so please continue to step 2.If you are not prompted, go to ‘Mail’ ‘Add Account’ as shown in Fig 8.Fig 810
Step 2:Choose a mail account to add, select ‘Add Other Mail Account’ as shown in Fig 9. Click‘Continue’Fig 9Step 3:Enter your name, email address and password. (Fig 10) Click ‘Create’Fig 1011
(Continued)You will see a message appear as shown in Fig 11. Click ‘Next’Fig 1112
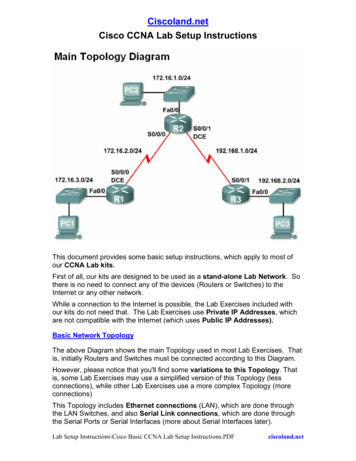
Step 4:Enter incoming server as: mail.wctel.netEnter your full email address beside ‘User Name’ and enter password. Click‘Next’Example shown below in Fig 12.Fig 1213
Step 5:Enter outgoing server as: smtp.wctel.netEnter your full email address beside ‘User Name’ and enter password. Click‘Next’Example shown below in Fig 13.Fig 1314
Mail for iPhoneStep 1:Go to ‘Settings’ ‘Mail, Contacts, Calendars’Click on ‘Add Account’ as shown in Fig 14.Fig 1415
Step 2:Select ‘Other’ as shown in Fig 15.Fig 1516
Step 3:Select ‘Add Mail Account’ as shown in Fig 17.Fig 1717
Step 4:Enter your full name, full email address, and password as shown in Fig 18.Note: The ‘Description’ is how the email address will be listed on your phone.Your ‘Name’ is how your name will appear in the sender line of an email.Fig 1818
Step 5:Enter incoming and outgoing mail servers as shown in Fig 19.‘User Name’ Full email addressAlways enter ‘User Name’ and ‘Password’ even where optional.Click ‘Next’ to complete email setup.Fig 1919
Mail for AndroidStep 1:Go to ‘Settings’ ‘Add Account’ as shown in Fig 20.Fig 2020
Step 2:Select ‘IMAP’ as shown in Fig 21.Fig 2121
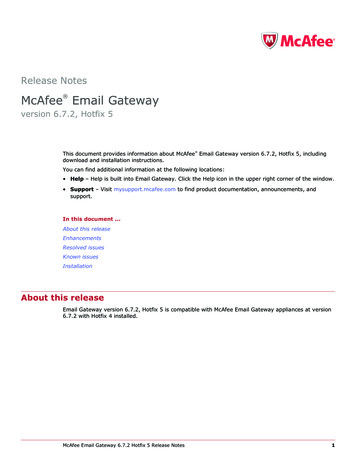
Step 3:Enter your full email address and password, then select ‘Manual Setup’Step 4:Enter your information as shown in Fig 22. Click ‘Next’‘Username’ Full email address‘Server’ wctel.net‘Port’ 993‘Security Type’ SSL/TLSFig 2222
Step 5:Check all boxes as shown in Fig 23. Click ‘Next’ to complete setup.Fig 23If you have any questions about making these changes, please contact WCTEL's Internet TechnicalSupport at 1-888-446-4638.23
If you are verified as being a “real” WCTEL.NET user, then you’ll be able to send and receive your email messages. What is it used for? In the fight to stop Spam File Size: 818KBPage Count: 23