Transcription
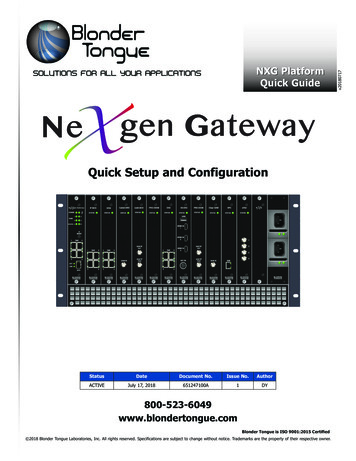
Quick Setup and ConfigurationStatusDateDocument No.Issue No.AuthorACTIVEJuly 17, Blonder Tongue is ISO 9001:2015 Certified 2018 Blonder Tongue Laboratories, Inc. All rights reserved. Specifications are subject to change without notice. Trademarks are the property of their respective owner.v20180717NXG PlatformQuick Guide
2 NeXgen Platform BaseQuick GuideProduct IntroductionThe NeXgen Gateway (NXG) is a powerful, two-way, future-proof platform that is ideal for delivering next generation videoservices to enterprise locations including hospitality, educational, multifamily residential, healthcare, business parks, orstadiums.NXG Platform Base - Master Controller Module, Mainframe, and Power Supplies provides: IP routing and traffic management System configuration and management via a powerful Linux-based monitoring and control system Module interconnection via a 30 Gb high-speed backplane Distributes DC power to the various sections and modules via (2) fully-redundant, hot-swappable power suppliesThe NeXgen Platform is designed to be installed in a standard 19" rack. Up to 12 Modules, along with the required MasterController and Power Supply Modules, can be installed into a single NXG Platform Mainframe.ModelNXG-MFRNXG-CNTRLNXG-PSStock #678067816782DescriptionMainframe - 5RU Chassis; 12 Module Slots; 30 Gb Backplane with Fans and Air FilterMaster Controller Module - Controls Entire PlatformPower Supply - (2) Required for RedundancyBefore You BeginUnpacking the PlatformIncluded with the Chassis: NeXgen Chassis (QTY 1) 10 blank panels (QTY 2 bags of 5 each)CAUTION! PLEASE READBlank panels MUST be installed in all the unused slots in the chassis to ensure propercooling and airflow. Anti-static wrist strap (QTY 1)CAUTION! PLEASE READThe modules are user-installed and are circuit boards with exposed parts and contacts.In order to prevent possible damage, first install the chassis into a grounded equipmentrack and attach the provided wrist strap to the chassis and your wrist. Once grounding iscomplete, you will be able to safely remove the modules from their anti-static bags.
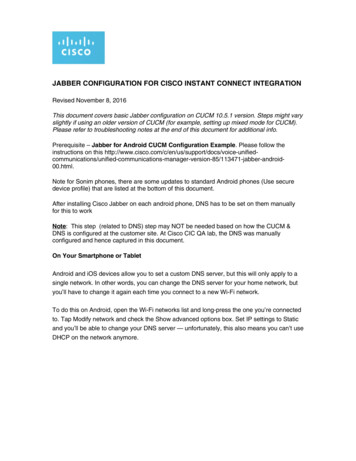
NeXgen Platform Base 3Quick GuideStep 1: Setting up the MainframeAdequate ventilation is very important in NeXgen chassis installations. The NeXgen chassis Airflow is from front to back.Some air movement is advisable in enclosed rack cabinets. Excessive heat will shorten the life of components and individualmodule(s). Power supply performance will also be degraded without proper ventilation.1 Mount the 5 RU NeXgen chassis into the 19 inch rack using rack screws (not provided).2 Install the Air Filter in the bottom of the chassis, if not installed already, and tighten the screws.MC123lellererastontrCouodM4Mo5du6le S7lot8s910MAir1112PS 2FilterrainfMaespliuprSwePoCmesssihaPS 1Step 2: Installing the Controller and Power Supplies1 Locate the Power Supplies (sold separately). Slide the power supplies in the power supply slots on the far right with theLED facing down one at a time. The power supplies should snap into place. Connect the AC power cord to each powersupply and to an appropriate 120-240V, 50/60Hz AC power source.2 Install the Master Controller (sold separately) by sliding the module into the card slot on the far left within the chassis.3 Install the appropriate input and output modules for your NeXgen application in any of the 12 slots. When possiblespace the input and output modules apart to maximize airflow.REMINDERBefore NXG-CCQD-24 module installation, don't forget to insert the CableCARDs into themodule. Please see the NXG-CCQD-24 Manual for more information on installation.
4 NeXgen Platform BaseQuick GuideStep 3: Connecting to a PC/LaptopETHERNET ACCESS:Local or remote communication with the unit is only possible through a GUI-based menu via any standard web browser.Before you can communicate with the unit, you must configure your computer's IP address to be in the same subnet as theunits default IP address. To do so, follow these steps:1 Plug one end of the Ethernet cable into Port 1 on the NeXgen Gateway Master Controller front-panel interface. Plugthe other end of the Ethernet cable to your computer.2 The factory default IP address of the NeXgen Master Controller management port is 172.16.70.1. To be able tocommunicate with the NeXgen Master Controller management port, you must first change your computer's IP address.The following steps explain how to do this for a computer with Windows 7, Windows 8.x or Windows 10 operating software:(a) On your computer, navigate to the “Network and Sharing Center”.(Note: Can be found using the search box in the Start Menu or for Windows 8.x, the Start Screen)(b) Once open, click on “Change Adapter Settings” on left hand side of the window.(c) Right-click on the “Local Area Connection”, and then click on the “Properties”.(d) A dialog box entitled “Local Area Connection Properties” will appear. In this box, double-click on the “InternetProtocol Version 4 (TCP/IPv4)”.(e) A dialog box entitled ”Internet Protocol Version 4 (TCP/IPv4) Properties” will appear. Select the “Use the followingIP address” option and enter the following addresses:IP address: 172.16.70.2Subnet mask: 255.255.255.0No need to enter a value for the Default Gateway.Click OK to close the dialog box. Your computer is now ready to communicate with the unit.- OR The following steps explain how to do this for a computer with Windows XP operating software:(a) On your computer, open the “Control Panel”(b) Double-click on “Network Connections”(c) Right-click on the “Local Area Connection”, and then click on the “Properties”.(d) A dialog box entitled “Local Area Connection Properties” will appear. In this box, double-click on the “InternetProtocol (TCP/IP)”.(e) A dialog box entitled “Internet Protocol (TCP/IP) Properties” will appear. Select the “Use the following IP address”option and enter the following addresses:IP address: 172.16.70.2Subnet mask: 255.255.255.0No need to enter a value for the Default Gateway.Click OK to close the dialog box. Your computer is now ready to communicate with the unit.
NeXgen Platform Base 5Quick GuideStep 4: Login to the ControllerAn Ethernet Cable should be connected between your PC and “Port 1” on the Master Controller. Open a Web browser(Chrome or Firefox recommended) and type http://172.16.70.1 in to your web browser to view and configure your NeXgenplatform. Enter the username “Admin” and “pass” as the password and click [LOG IN].Step 5: Basic ConfigurationOnce you are logged into the NeXgen, you will be presented with the “System Status” page (“Status” tab):
6 NeXgen Platform BaseQuick GuideStep 5: Basic Configuration (continued)Go to the “System” tab to change the System Settings, including: Unit Name and Unit Location. The following EthernetSettings can also be changed: IP address, Subnet Mask, Default Gateway, and the Primary and Secondary DNS.Click “Apply” in order to save the new settings.REMINDERIf the IP Address is changed, the procedure in Step 4 must be repeated using the new IPaddress in place of the default IP address in order to reaccess the control panel.Step 6: Module ConfigurationAfter the hardware installation of any additional modules, go through the control panel and set up each module slot toconfigure your NeXgen application. Please refer to the user manuals of each module for in-depth configuration.Module Slot Tabsare accessed here.TroubleshootingFor technical support please contact us at 1-800-523-6049 ext. 4217 between the hours of 8am and 5pm EST.Please refer to the operation manuals of each module for additional information.
NeXgen Platform Base 7Quick GuideNOTES
Product and Documentation UpdatesDownload the latest User Manual (PDF) by visiting our website. Navigate to the product page by entering the fullModel Name or Stock Number in the search field. Upon reaching the product page, the “User Manual” downloadlink will be located beneath the product image. Firmware Updates are available under “Tech Support” in the“Resources” section of the website. General instructions for the FTP site, as well as updating your firmware, areprovided on this page.Returning Product for Repair (or Credit)A Return Material Authorization (RMA) Number is required on all products returned to Blonder Tongue, regardlessif the product is being returned for repair or credit. Before returning product, please contact the Blonder TongueService Department at 1-800-523-6049, Ext. 4256 or visit our website: www.blondertongue.com for furtherinformation.One Jake Brown RoadOld Bridge, NJ 08857-1000 USA732-679-4000 Fax 732-679-4353www.blondertongue.com
Controller and Power Supply Modules, can be installed into a single NXG Platform Mainframe. Unpacking the Platform Included with the Chassis: NeXgen Chassis (QTY 1) 10 blank panels (QTY 2 bags of 5 each) Anti-static wrist strap (QTY 1) Model St