Transcription
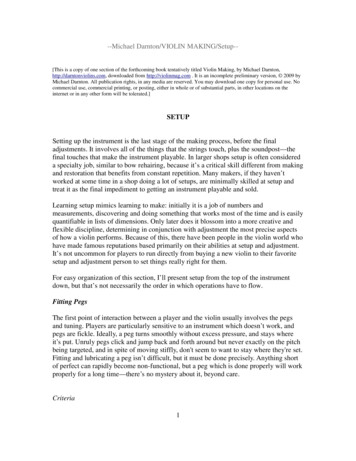
Install Oracle RAC 12c R1 on Oracle Linux6.4 using VirtualBox 4.2.16The following documents are a step by step guide to install Oracle Real Application Clusters12c on Oracle Linux 6 using VirtualBox. The installation sequence below will get your 2Node RAC running on your Laptop in a day or two.1)2)3)4)5)6)7)Install Oracle RAC 12c R1 on Linux 6.4 using VirtualBox 4.2.16 checklistInstall VirtualBox 4.2.16 on Windows 7 64bitInstall Dual DHCP/DNS Server 7.10 on Windows 7VirtualBox 4.2.16 setup and Linux 6.4 Installation for Oracle RAC 12c R1Install Grid Infrastructure 12c R1 on Oracle Linux 6.4Install Oracle RAC Database 12c R1 on Oracle Linux 6.4Create Oracle RAC Database 12c R1 on Oracle Linux 6.4VirtualBox 4.2.16 setup and Linux 6.4Installation for Oracle RAC 12c R1Download Oracle Linux ndrydba.com1
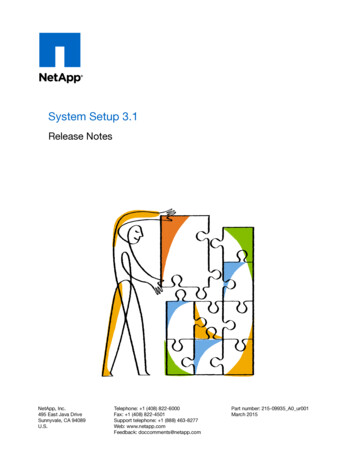
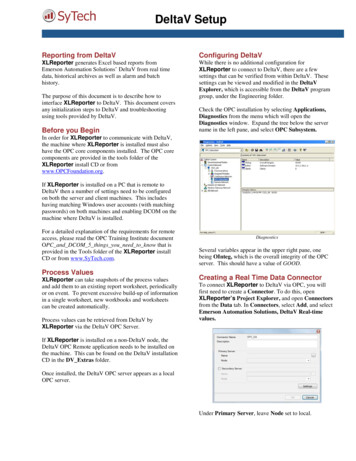
VirtualBox Network setupOpen Oracle VM VirtualBoxselect File from Menu Network Enter the Default Machine Folder. Click OK.Click VirtualBox - settings Network VirtualBox Host-Only Ethernet Adapterhttp://www.hendrydba.com2
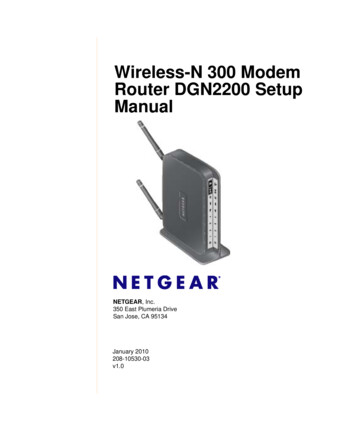
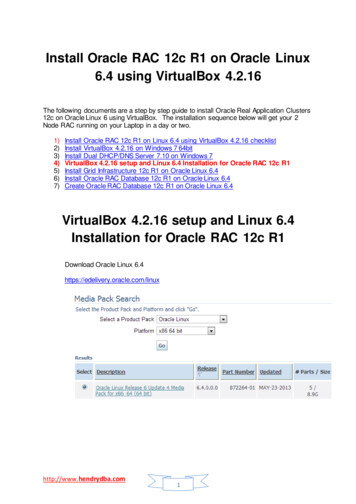
Enter the IPv4 Address and Network Mask, Click OK.Virtual Machine setupOracle Linux Node1 Configurationhostname: ol6-121-rac1.workgroupeth0: DHCP (Connect Automatically)eth1: IP 192.168.56.101, Subnet 255.255.255.0, Gateway 192.168.56.1, DNS 192.168.56.1,Search workgroup (Connect Automatically)eth2:IP 192.168.1.101,Subnet 255.255.255.0,Gateway blank ,DNS blank ,Search blank (Connect Automatically)Under Create Virtual Machine, provide the Node1 name and choose the type and version.Click Nexthttp://www.hendrydba.com3
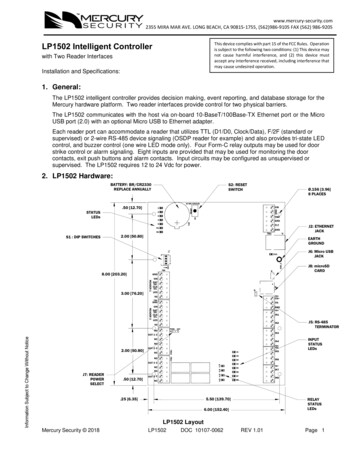
Allocate the memory for Node1 3072 MB. Click NextChoose Create a Virtual hard drive nowhttp://www.hendrydba.com4
Choose VDI (VirtualBox Disk Image)http://www.hendrydba.com5
Choose Dynamically allocatedProvide the name of new virtual hard drive file and size of the virtual hard drive inmegabytes.http://www.hendrydba.com6
The new VM Node1 is created. Click Network to configure the Network interfaces for OracleRAC.Choose NAT for Adapter 1http://www.hendrydba.com7
Choose Host-only Adapter – VirtualBox Host-Only Ethernet Adapter for Adapter 2Choose Internet Network for Adapter 3http://www.hendrydba.com8
Click Settings system. Choose Hard Disk and click the move up button.Click Start to Install Oracle Linux 6.4http://www.hendrydba.com9
Choose the V37084-01.iso downloaded image file. Click StartPress Enterhttp://www.hendrydba.com10
Choose “Skip” and proceedClick Nexthttp://www.hendrydba.com11
Choose “English” and Click NextChoose “U.S. English” and click Nexthttp://www.hendrydba.com12
Choose “Basic Storage Device” and Click NextClick “yes discard anydata”http://www.hendrydba.com13
Enter the name of Linux Node 1 ol6-121-rac1.workgroup. It doesn’t accept underscore forhostname. click Configure NetworkClick Configure Network to configure the system etho, eth1 and eth2Eth0 connect automaticallyhttp://www.hendrydba.com14
Eth1 IPv4 settings click add Address: 192.168.56.101Netmask: 255.255.255.0Gateway: 192.168.56.1DNS Servers: 192.168.56.1Search Domains: workgroup. Click ApplyEth2 IPv4 settings click add http://www.hendrydba.com15
Address: 192.168.1.101Netmask: 255.255.255.0Click ApplyClick closeClick nexthttp://www.hendrydba.com16
Choose the “country/City”Type the root passwordhttp://www.hendrydba.com17
Choose the “Use All Space”Choose “Write changes to disk”http://www.hendrydba.com18
Choose “Basic Server”http://www.hendrydba.com19
Select “Base System” choose Base, Compatibility Libraries, Console Internet tools,Debugging tools, Directory Client, Hardware Monitoring utilities, Java Platform, LargeSystems Performance, Network file system client, Performance tools, perl supportSelect “Servers” choose server platform, system administration toolshttp://www.hendrydba.com20
Select “Desktops” choose Desktop, Desktop Platform, Fonts, General Purpose Desktop,Graphical Administration Tools, Input methods, X Windows SystemSelect “Applications” choose Internet Browserhttp://www.hendrydba.com21
Select “Development” choose additional development, development toolsClick nexthttp://www.hendrydba.com22
RebootClick Forwardhttp://www.hendrydba.com23
Click “yes to accept the License Agreement” and forwardChoose “No, I prefer to register at a later time”http://www.hendrydba.com24
No thanksForwardhttp://www.hendrydba.com25
Provide the username, password and click forwardhttp://www.hendrydba.com26
Check the Date and Time, click ForwardClick Finishhttp://www.hendrydba.com27
Login as root user.Oracle Installation Prerequisites on LinuxAutomatic setupAs root user perform the prerequisite setup. Issue the commandyum install oracle-rdbms-server-12c R1-preinstall -yhttp://www.hendrydba.com28
http://www.hendrydba.com29
http://www.hendrydba.com30
http://www.hendrydba.com31
Configure /etc/resolv.conf fileSearch workgroupNameserver 192.168.56.1Write protecting /etc/resolv.conf fileThe changes to /etc/resolv.conf can be overwritten by the network manager due to NATinterface. To avoid this you can write protect this file.you can make the file readonly as below# chattr i /etc/resolv.conf i attribute write protect etc/resolv.conf file under Linux so that no one can modify it. But root canConfigure /etc/security/limits.d/90-nproc.conf# Change this*soft nproc1024# To this* - nproc 16384Change the setting of SELinux to disabled by editing /etc/selinux/config fileSELINUX disabledAdd the local addressed on /etc/hosts and also other addresses for reference.# Public192.168.56.101 ol6-121-rac1.localdomainol6-121-rac1192.168.56.102 ol6-121-rac2.localdomainol6-121-rac2# Private192.168.1.101 ol6-121-rac1-priv.localdomain ol6-121-rac1-priv192.168.1.102 ol6-121-rac2-priv.localdomain ol6-121-rac2-priv# Virtual192.168.56.103 8.56.104 ol6-121-rac2-vip.localdomainol6-121-rac2-vip# SCAN#192.168.56.105 ol6-121-scan.localdomain ol6-121-scan#192.168.56.106 ol6-121-scan.localdomain ol6-121-scan#192.168.56.107 ol6-121-scan.localdomain ol6-121-scanDisable Linux firewall# service iptables stop# chkconfig iptablesOr from the VM Node1, you can choose system Administration Firewall disableStop / deconfigure NTPhttp://www.hendrydba.com32
# service ntpd stopShutting down ntpd:# chkconfig ntpd off# mv /etc/ntp.conf /etc/ntp.conf.orig# rm /var/run/ntpd.pid[ OK ]Set the password for Oracle userpasswd oracleCreate Oracle software directoriesmkdir -p /u01/app/12.1.0.1/gridmkdir -p /u01/app/oracle/product/12.1.0.1/db 1chown -R oracle:oinstall /u01chmod -R 775 /u01/add the lines to oracle user /home/oracle/.bash profile# Oracle Settingsexport TMP /tmpexport TMPDIR texportexportORACLE HOSTNAME ol6-121-rac1.loc aldomainORACLE UNQNAME CDB RACORACLE BASE /u01/app/oracleGRID HOME /u01/app/12.1.0.1/gridDB HOME ORACLE BASE/product/12.1.0.1/db 1ORACLE HOME DB HOMEORACLE SID cdbrac1ORACLE TERM xtermBASE PATH /usr/sbin: PATHPATH ORACLE HOME/bin: BASE PATHexport LD LIBRARY PATH ORACLE HOME/lib:/lib:/usr/libexport CLASSPATH ORACLE HOME/JRE: ORACLE HOME/jlib: ORA CLE HOME/ rdbms/jlibalias grid env '. /home/oracle/grid env'alias db env '. /home/oracle/db env'add the lines to oracle user /home/oracle/grid envexport ORACLE SID ASM1export ORACLE HOME GRID HOMEexport PATH ORACLE HOME/bin: BASE PATHexport LD LIBRARY PATH ORACLE HOME/lib:/lib:/usr/libexport CLASSPATH ORACLE HOME/JRE: ORACLE HOME/jlib: ORA CLE HOME/ rdbms/jlibadd the lines to oracle user /home/oracle/db envexport ORACLE SID cdbrac1http://www.hendrydba.com33
export ORACLE HOME DB HOMEexport PATH ORACLE HOME/bin: BASE PATHexport LD LIBRARY PATH ORACLE HOME/lib:/lib:/usr/libexport CLASSPATH ORACLE HOME/JRE: ORACLE HOME/jlib: ORA CLE HOME/ rdbms/jlibTest the DNS Configuration from Linux Node1[root@ol6-121-rac1 etc]# nslookup 1#53Non-authoritative answer:Name:ol6-121-scan.workgroupAddress: 192.168.56.105Name:ol6-121-scan.workgroupAddress: 192.168.56.106Name:ol6-121-scan.workgroupAddress: 192.168.56.107Test the DNS Configuration from Windows 7C:\Users\Hendry nslookupDefault Server:Address: 192.168.2.1 server 192.168.56.1Default Server: [192.168.56.1]Address: 192.168.56.1 ol6-121-scan.workgroupServer: [192.168.56.1]Address: 192.168.56.1Non-authoritative answer:Name: ol6-121-scan.workgroupAddresses: 192.168.56.105192.168.56.106192.168.56.107 ol6-121-rac1.workgroupServer: [192.168.56.1]Address: 192.168.56.1Non-authoritative answer:Name: ol6-121-rac1.workgroupAddress: 192.168.56.101 hendrypc.workgroupServer: [192.168.56.1]Address: 192.168.56.1Non-authoritative answer:Name: hendrypc.workgroupAddress: 192.168.56.1http://www.hendrydba.com34
Reboot the Node1 VMShutdown –r nowInstall Guest AdditionsSelect Devices Install Guest AdditionsClick OKClick Runhttp://www.hendrydba.com35
Add the oracle user to the vboxsf group to have access to shared drives.[root@ol6-121-rac1 ]# usermod -G vboxsf,dba oracle[root@ol6-121-rac1 ]# su - oracle[oracle@ol6-121-rac1 ] iduid 54321(oracle) gid 54321(oinstall) groups 54321(oinstall), 54322 (dba), 54323(vboxsf)Unzip the Oracle Grid and Database Software in the Host Windows 7 Laptophttp://www.hendrydba.com36
Create shared folders for the softwareDevices Shared Foldershttp://www.hendrydba.com37
Provide the folder Path, name and check Auto-mount and make PermanentConfigure Shared StorageShutdown Node1 Ol6-121-rac1Init 0Oracle VM VirtualBox Manager ole-121-rac1 settings storage Controller: SATA Add Hard Diskhttp://www.hendrydba.com38
Create New diskChoose VDI (VirtualBox Disk Image)http://www.hendrydba.com39
Choose Fixed SizeProvide the name of virtual hard drive and make the size to 10 GB. click Createhttp://www.hendrydba.com40
asm1.vdi is created. Click Add hard disk againhttp://www.hendrydba.com41
Create 3 more disks. asm2.vdihttp://www.hendrydba.com42
asm3.vdiasm4.vdihttp://www.hendrydba.com43
Click OKhttp://www.hendrydba.com44
Make the HDDs shareableOracle VM VirtualBox Manager File Virtual Media ManagerSelect the asm1.vdi disk and click modifyChoose shareable and click OKhttp://www.hendrydba.com45
asm2.vdi shareable and click OKasm3.vdi shareable and click OKhttp://www.hendrydba.com46
asm4.vdi shareable and click OKClick close .Start the Node1 – ol6-121-rac1 virtual machineConfigure persistence device naming[root@ol6-121-rac1 dev]# ls -l /dev/sd*brw-rw---- 1 root disk 8, 0 Jul 21 01:32 kdiskdiskdiskdisk8,8,8,8,8,8,1 Jul 21 01:32 /dev/sda12 Jul 21 01:32 /dev/sda216 Jul 21 01:32 /dev/sdb32 Jul 21 01:32 /dev/sdc48 Jul 21 01:32 /dev/sdd64 Jul 21 01:32 /dev/sdehttp://www.hendrydba.com47
Use the fdisk command to partition the disks sdb to sde.In each case, the sequence of answers is “n”,Repeat for the other disks.fdisk /dev/sdcfdisk /dev/sddfdisk /dev/sde“p”, “1”, “Return”,[root@ol6-121-rac1 dev]# ls -l /dev/sd*brw-rw---- 1 root disk 8, 0 Jul 21 01:32 /dev/sdabrw-rw---- 1 root disk 8, 1 Jul 21 01:32 /dev/sda1brw-rw---- 1 root disk 8, 2 Jul 21 01:32 /dev/sda2brw-rw---- 1 root disk 8, 16 Jul 21 01:51 /dev/sdbbrw-rw---- 1 root disk 8, 17 Jul 21 01:51 /dev/sdb1brw-rw---- 1 root disk 8, 32 Jul 21 01:55 /dev/sdcbrw-rw---- 1 root disk 8, 33 Jul 21 01:55 /dev/sdc1brw-rw---- 1 root disk 8, 48 Jul 21 01:56 /dev/sddbrw-rw---- 1 root disk 8, 49 Jul 21 01:56 /dev/sdd1brw-rw---- 1 root disk 8, 64 Jul 21 01:57 /dev/sdebrw-rw---- 1 root disk 8, 65 Jul 21 01:57 /dev/sde1Configure UDEV rulesCreate the file if it doesn’t existVi /etc/scsc id.configoptions -ghttp://www.hendrydba.com48“Return”and “w”
[root@ol6-121-rac1 dev]# ls -l /etc/scsi id.configls: cannot access /etc/scsi id.config: No such file or directory[root@ol6-121-rac1 dev]# vi /etc/scsi id.config[root@ol6-121-rac1 dev]# cat /etc/scsi id.configoptions -gThe SCSI ID of the disks are displayed below[root@ol6-121-rac1 dev]# /sbin/scsi id -g -u -d /dev/sdb1ATA VBOX HARDDISK VB33850917-0415bbe1[root@ol6-121-rac1 dev]# /sbin/scsi id -g -u -d /dev/sdc1ATA VBOX HARDDISK VB228d8b13-c7f88af1[root@ol6-121-rac1 dev]# /sbin/scsi id -g -u -d /dev/sdd1ATA VBOX HARDDISK VB3a3c0581-6f50f9b2[root@ol6-121-rac1 dev]# /sbin/scsi id -g -u -d /dev/sde1ATA VBOX HARDDISK VB3c9da5e3-da59013eEdit the ”/etc/udev/rules.d/99-oracle-asmdevices.rules” file adding the 4 entries below on asingle line for each.KERNEL "sd?1",BUS "scsi", PROGRAM "/sbin/scsi id-gRESULT "1ATA VBOX HARDDISK VB4699805a-6f360fe5",NAME "asm-disk1", OWNER "oracle", GROUP "dba", MODE "0660"KERNEL "sd?1",BUS "scsi", PROGRAM "/sbin/scsi id-gRESULT "1ATA VBOX HARDDISK VBb890e566-b3b68670",NAME "asm-disk2", OWNER "oracle", GROUP "dba", MODE "0660"KERNEL "sd?1",BUS "scsi", PROGRAM "/sbin/scsi id-gRESULT "1ATA VBOX HARDDISK VBe55b3d34-42b2c897",NAME "asm-disk3", OWNER "oracle", GROUP "dba", MODE "0660"KERNEL "sd?1",BUS "scsi", PROGRAM "/sbin/scsi id -gRESULT "1ATA VBOX HARDDISK VB89f5c0fa-bda80deb",NAME "asm-disk4", OWNER "oracle", GROUP "dba", MODE "0660"Load updated block device parttion partprobe/dev/sdb1/dev/sdc1/dev/sdd1/dev/sde1Test the Rules[root@ol6-121-rac1 dev]# /sbin/udevadm test /block/sdb/sdb1run command: calling: testudevadm test: version 147This program is for debugging only, it does not run any program,specified by a RUN key. It may show incorrect results, becausesome values may be different, or not available at a simulation run.parse file:parse file:parse file:parse d/10-c onsole. rules ' as rules fil
12c on Oracle Linux 6 using VirtualBox. The installation sequence below will get your 2 Node RAC running on your Laptop in a day or two. 1) Install Oracle RAC