Transcription
Evolution PayrollUser Guide v 1.2
Evolution Payroll User GuideThis page was intentionally left blank2PayData Workforce Solutions8/4/2015
Evolution Payroll User GuideContentsEvolution Payroll User Guide . 5Getting Started . 5System Requirements. 5Security Settings . 6Logging into Evolution Payroll . 7The Dashboard . 10Menu Bar . 10Payroll Today . 10Task Queue . 11Published Reports. 12Analysis . 12Selection Pane . 14Navigating Evolution Payroll. 16Hot Keys. 19New Terminology . 20The Menu Bar . 21The Company Menu – Screens and Fields . 22The Employees Menu - Screens and Fields . 27The Employees Menu – Adding New Employees . 62The Payroll Menu – Screens and Fields . 73The Payroll Menu – Creating a Payroll . 93Creating a Batch . 94Pre-Processing and Submitting the Payroll . 100Editing / Completing a Payroll . 102Adding Additional Checks . 102Adding Check Lines . 103Creating Manual Checks . 103Creating Third Party Checks . 105Deleting Batches . 108The Reports Menu . 109Published Reports . 109Defined Reports . 111The Settings Menu . 114The Task Queue. 1158/4/2015PayData Workforce Solutions3
Evolution Payroll User GuideCopyright 2015 by PayData Workforce Solutions. All rights reserved. Printed in USA.This manual, and the software described in this manual, is copyrighted. No part of this manual or the describedsoftware may be copied, reproduced, translated, stored in a retrieval system, or transmitted in any form or by anymeans, electronic, mechanical, photocopying, recording, or otherwise without the prior written consent of PayDataWorkforce Solutions. Any other reproduction in any form without the permission of PayData Workforce Solutions isprohibited.4PayData Workforce Solutions8/4/2015
Evolution Payroll User GuideEvolution Payroll User GuideEvolution Payroll is a dynamic Payroll, HR, and Tax Management system developed by payroll and HR service bureauveterans for the Human Capital Management (HCM) industry.It is a Web-based application that facilitates remote client tasks such as adding new employees, existing employeemaintenance, managing and processing payrolls, running reports and more, via the Internet using a Web browser.Getting StartedSystem RequirementsScreen ResolutionThe Optimum Resolution for Evolution Payroll use is 1920 x 1080. Evolution Payroll is designed to fit most screensand screen resolutions by using a Responsive Web Design (RWD), which allows the components within theapplication to be moved and resized based on screen size and resolution. The minimum supported resolution is1360 x 768.Internet BrowserEvolution Payroll is designed to leverage the features of the most current browser versions. For the best possibleexperience, we recommend using one of the browsers listed below.BrowserSupported VersionInternet Explorer10.0 Firefox28.0 Chrome33.0 Safari7.0 It is necessary to turn off Autofill settings in the Internet browser when using Evolution Payroll.Note: For additional help turning off Autofill on your browser, please check your browser’s Help menu.8/4/2015PayData Workforce Solutions5
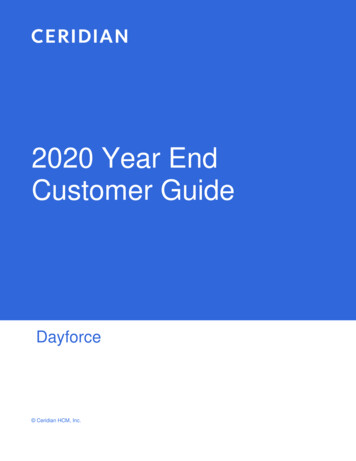
Evolution Payroll User GuideSecurity SettingsAccess to Evolution Payroll is granted in Evolution. Users may be granted access to as many or as few menus andfunctions in Evolution Payroll as the service bureau determines appropriate.User or Group Security RightsAdditional settings specify whether individual users have full access, read-only access, or no access.1.Go to the Admin - Security – Users (or Groups) screen, and select the user.2.Click the Details tab - User Rights button. Modify settings by right-clicking the green plus sign / red minus sign, and selecting Enabled orDisabled. Click the small plus signs (far left) to open a menu "tree". Everything can be selected individually to giveor remove permissions to users.3.Click the black plus sign next to Employee to open related topics4.Right-click the item to be changed from standard group rightsNote: each item must be selected individually.Enabled - the selected item is visible in the Edit Employee section of the Employees screens in Evolution Payroll. Theuser can Add/Edit and Delete Information.Read-Only - the selected item is visible in Employees screens in Evolution Payroll. The Add button is disabled, and Editand Delete are not functional for that item.Disabled - the selected item is not visible in the Employees screens in Evolution Payroll.6PayData Workforce Solutions8/4/2015
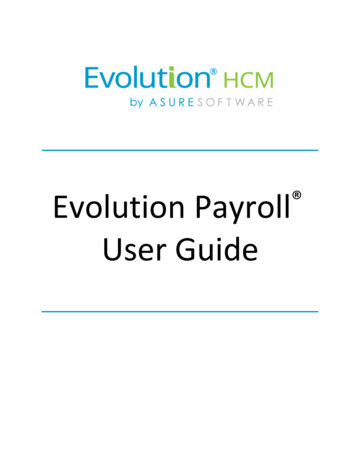
Evolution Payroll User GuideLogging into Evolution PayrollOnce security requirements have been established in Evolution,1.Open a Web browser and enter the URL provided by PayData Workforce Solutions.2.The first time a use logs in, enter the Username and Password given to them by the service bureau.3.Click Sign In.Result: the Dashboard opens.4.8/4/2015After logging in, click the Settings menu on the left-hand side of the Dashboard.PayData Workforce Solutions7
Evolution Payroll User Guide5.Select three General Security Questions and enter the answers.6.Click Save in the header.Forgotten PasswordIf the user forgets their password, click I forgot my password. A new screen opens requiring the user to enter their username and click Submit. Once submitted, three security questions displayed on the screen must be answered to continue. Thesesecurity questions were originally set up in Evolution when the user profile was created.Note: If a user answers any of the security questions incorrectly three times, s/he will get a message that theaccount is blocked, and instruct them to contact their service bureau.8PayData Workforce Solutions8/4/2015
Evolution Payroll User Guid After answering all three security questions, the user clicks the Submit button. A new screen opens, on which the user is to set up a new password. The user enters and confirms the new password, and clicks the Set Password button. The main Login screen opens, where the username and new password are entered.Result: The Evolution Payroll Dashboard opens.Note: If an account becomes blocked and is then unblocked by admin, user must redefine questions/answers uponnext login.Terms of UseService bureaus can define the Terms of Use for their internal and external users. These Terms of Use are presentedwhen users first log in, after the Terms of User are entered (or changed) on the SB Admin - Service Bureau - Terms ofUse tab.When users log in and see the Terms of Use, they must accept the terms to use Evolution Payroll. Once accepted,theTerms of Use are not presented again unless a change is made by the service bureau to the terms. To accept theTerms of Use, click the Accept button. New users are presented with the Terms of Use after the user has selected three security questions andanswers. Existing users will see the Terms of Use upon initial login or if the Terms of Use have changed.Note: If the service bureau has not entered anything in the Terms of Use tab, nothing needs to be accepted by theusers.When the user accepts, the Dashboard screen opens.8/4/2015PayData Workforce Solutions9
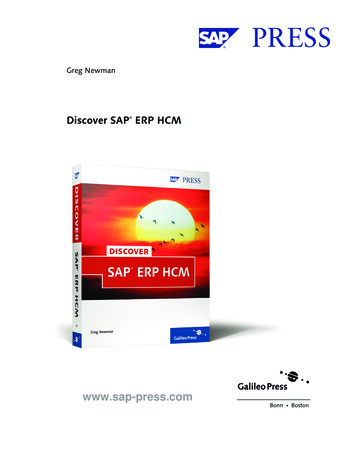
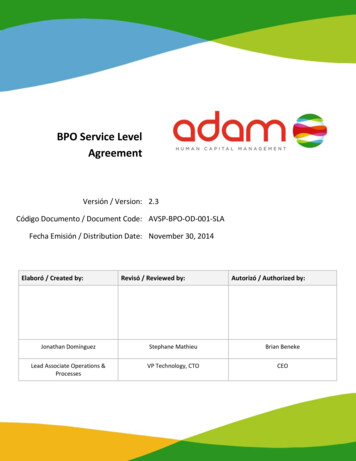
The DashboardThe DashboardInformation on the Evolution Payroll Dashboard is laid out in sections, or tiles, from which users can navigate to theinformation selected. Dashboard functionality is covered in more detail later in this guide.Menu BarUse the Menu Bar on the left-hand side of the screen to navigate within Evolution Payroll, similarly to the Menu Barin Evolution. Menu Items are selected from the main screens of each menu. Each menu is covered in more detaillater in this Guide.Payroll TodayThe Payroll Today tile offers a snapshot of payrolls scheduled around the time of the viewing. The payrolls listed arelinks that, when clicked, take you to the Batch Settings screen for the payroll selected. Normally the first payroll isthe most recently run prior to current day. The next are payrolls scheduled to go out on the current day or in thevery near future. The status for each payroll is shown to the right of the payrolls.10PayData Workforce Solutions8/4/2015
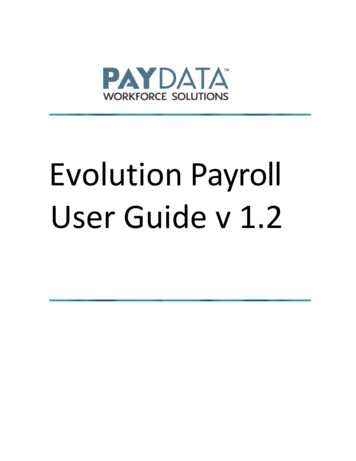
The DashboardThe icons across the center of the tile are described in the table below and indicate delivery status, currently afeature of VMR, of those payrolls listed below. To view this section, the company must be set up with VMR.IconDescriptionCheck date of the payrolls listed belowProcessed date of the payrolls listed belowPackaged date of the payrolls listed belowIn Transit date of the payrolls listed belowDate Delivered of the payrolls listed belowTask QueueThe Task Queue tile provides an at-a-glance view of everything that has been submitted for processing by the userthrough the queue on that day. The list shows the five most recent tasks, while the pie chart graphic represents all ofthe tasks processed that day by the user.8/4/2015PayData Workforce Solutions11
The DashboardEach task listed has an icon showing its status. Tasks are then represented by status in a piechart to the left of thelist. The table below describes the status icons.IconDescriptionTask waiting statusProcessing statusSuccessfully processed statusExceptions status preventing completion of the taskWarnings status NOT preventing completion of the taskPublished ReportsThe Published Reports tile lists the 10 most recently run reports published to the company through VMR inEvolution. Each report link when clicked, brings the user to the “Defined Reports” screen in the application, showinga preview of the report results.AnalysisThe tile on the bottom right of the Dashboard screen displays graphical representation of the Cover Letter Report(S193) and Tax Report for Payroll (S247) reports. Users can click the leftview.or rightarrow to scroll to the nextThe Analysis tile always shows data for the last processed payroll and is updated when next payroll is processed. Forthe graphs to be displayed, the reports must be properly configured to display on the dashboard.The Cover Letter (RW) (S193) displays as a Pie Graph showing the actual dollar amounts in the payroll. At the top ofthe chart is a breakdown of the payroll that the chart represents.12PayData Workforce Solutions8/4/2015
The DashboardThe Tax Report for Payroll (S247) displays as an inverted pyramid showing the amounts of the taxes as well as theNet Payroll amount for the payroll for which the report was generated.Setting company reports to show on the Dashboard1.In Evolution, go to Reports – Setup Reports.2.Select the company from the list on the left-hand side of the screen and click the Details tab.3.Click the Plus sign to add a new record.4.Select the report to be added.5.Update the Print Frequency, Priority to Print, and Number of Copies as needed6.Select the option to Display on Dashboard.8/4/2015PayData Workforce Solutions13
The DashboardNote: Print Frequency must be set to Every Pay to be updated on the Dashboard each time a payroll is processed.Number of copies must be set to 1 or more.Selection PaneThe Selection Pane along the right-hand side of the screen is where the Client and Company are selected from thedropdown list to view company-specific information. When the Dashboard first opens, the default client shown isthe one with the lowest Internal Client Number. The Selection Pane is accessible in every screen within EvolutionHCM.Note: When a different Client/Company is selected, the user is automatically returned to the Dashboard screen.14PayData Workforce Solutions8/4/2015
The Dashboard Client Contact information is displayed for the selected client directly beneath the Client Selection pick list.The Client Contact information is retrieved from the Client – Client – Details screen. Company Contact information is taken from the Company – Contacts screen. The Primary contact isdisplayed.8/4/2015PayData Workforce Solutions15
Navigating Evolution PayrollNavigating Evolution PayrollNavigate within Evolution Payroll using buttons, icons, or by clicking within the fields themselves. When addinginformation, press the TAB key to advance to each of the applicable fields in the order in which they should becompleted. When tabbing, the next screen will open when the TAB key is pressed in the last field on the screen.To navigate to the topic and screens desired from the Dashboard, users can1.Click the Menus2.Click the Tile titles, or3.Click the Ellipsis symbols within each tile.The Employee MenuAfter clicking the Employee menu, click the active button (the button that is not grayed-out) in the Header to accessthe additional menu items within the Employee menu.16PayData Workforce Solutions8/4/2015
Navigating Evolution PayrollExample: the following screen opens when the user clicks the Employees menu. Click the active button to access thenext screen, which offers a different view and lists the menu items within the Employee menu.8/4/2015PayData Workforce Solutions17
Navigating Evolution PayrollTablesSeveral screens in Evolution Payroll are formatted as tables, which come with their own unique navigatingfunctionality.The first screen to open in the Employees menu is displayed in table format:There are several additional tools that can be used when navigating with tables.Filtering – if a column header has a filtersymbol next to the name click to open a filter box. Entercriteria to filter the results displayed on the screen when searching for specific data.The filter symbol remains white to let the viewer see that the filter is being used.18PayData Workforce Solutions8/4/2015
Navigating Evolution PayrollColumn Re-ordering – click and drag the column heading to re-order the data – for example, click and dragthe Zip Code column to view in a different order:Sorting – similarly to Excel, data can be sorted from high to low or low-to-high by clicking the columnheader. This can be done with alpha as well as numerical data.Hot KeysA series of Hot Keys have been developed to enable quicker navigation. There are several key combinations thatperform the same function with different results, depending upon the menu the user is in. The table below identifiesthe Keyboard Hot Keys currently available.Keyboard Key/sDescriptionPress the ALT key NAdd new employee / Add new payrollPress the CTRL key SSave employee / Save payrollPress ALT InsertInsert record (row) into a tablePress ALT DeleteDelete record (row) from a tablePress the ALT key the Right Arrow keyScroll right to next employee record or checklinePress the ALT key the Left Arrow keyScroll left to previous employee record or checkline8/4/2015PayData Workforce Solutions19
Navigating Evolution PayrollNew TerminologyThere is new terminology used throughout Evolution Payroll that warrants introduction. The table below explains thenew terminology that you will see in this document as well as in the application.NameExampleDescriptionMenu BarColored blocks on the left-hand side of thescreens that correspond to a menu. Clickthe menus to be brought to the mainscreen of the menu selected.Menu ItemsWithin some of the menus (Company andEmployee) there is a sub-menu on the leftside of the screen with menu items thatpertain to the topics of those menu items.Our example is from the Employees menu.SectionsMany of the screens in the application aredivided into sections. These sections
Evolution Payroll User Guide 5. Select three General Security Questions and enter the answers. 6. Click Save in the header. Forgotten Password If the user forgets their password, click I forgot my password. A new screen opens requiring the user to enter their username and click Submit. Once submitted, three security questions displayed on the screen must be answered to continue.