Transcription
Quick GuideAudioCodes Mediant GatewayConnecting PBX to BroadSoft SIP Trunkusing AudioCodes Mediant PRI GatewayVersion 7.2
IntroductionSee Chapter 1Obtain Software FilesSee Chapter 2Cable Device for Initial AccessSee Chapter 3Upload Software to DeviceSee Chapter 4Configure & Reset DeviceSee Chapter 5Cable Device to DMZSee Chapter 6
Quick Guide11. IntroductionIntroductionThis document describes how to set up AudioCodes' PRI Gateway (hereafter, referred toas Gateway) for interworking between BroadSoft's SIP Trunk and PBX environment. Fordetailed information on each AudioCodes Gateway, refer to the corresponding User'sManual and Hardware Installation Manual.1.1Component InformationTable 1-1: Component InformationAudioCodes Gateway VersionGateway VendorAudioCodesModelsMediant 500; Mediant 800B; Mediant 1000BSoftware Version7.20A.104.001Protocol SIP/UDP (to the BroadSoft SIP Trunk)PRI (to the PBX)BroadSoft SIP Trunking VersionVendor/Service ProviderSSW Model/ServiceSoftware VersionProtocolVersion 7.2SIP/UDP3AudioCodes Mediant Gateway
BroadSoft SIP TrunkThis page is intentionally left blank.Quick Guide4Document #: LTRT-14020
Quick Guide22. Obtain Software FilesObtain Software FilesDownload the certified firmware file (firmware xxx.cmp), configuration file(configuration xxx.ini) and Call Progress Tones file (call progress uk.dat), of the specificAudioCodes PRI Gateway (referred as “xxx”), from Support Centre.Version 7.25AudioCodes Mediant Gateway
BroadSoft SIP TrunkThis page is intentionally left blank.Quick Guide6Document #: LTRT-14020
Quick Guide33. Cable Device for Initial AccessCable Device for Initial AccessThe device's factory default IP address for operations, administration, maintenance, andprovisioning (OAMP) is 192.168.0.2/24 (default gateway 192.168.0.1).1.Change your PC's IP address and subnet mask to correspond with the device'sdefault IP address.2.Cable as follows: Connect the PC to the device's Ethernet port labelled Port 1 (left-most port). Ground the device using the grounding lug. Using the supplied AC power cable, connect the device's AC port to a standardelectrical wall outlet.Figure 3-1: Mediant 500 – Front and Rear PanelsVersion 7.27AudioCodes Mediant Gateway
BroadSoft SIP TrunkFigure 3-2: Mediant 800 – Front and Rear PanelsQuick Guide8Document #: LTRT-14020
Quick Guide3. Cable Device for Initial AccessFigure 3-3: Mediant 1000B – Front and Rear Panels3.Access the device's Web-based management interface:a.On your PC, start your Web browser and then in the URL address field, enter thedevice's default IP address; the following appears:Figure 3-4: Web Loginb.Version 7.2In the 'Username' and 'Password' fields, enter the default login username("Admin") and password ("Admin"), and then click Login.9AudioCodes Mediant Gateway
BroadSoft SIP TrunkThis page is intentionally left blank.Quick Guide10Document #: LTRT-14020
Quick Guide44. Upload Software to DeviceUpload Software to DeviceUpload the certified software files, which you downloaded in Section Obtain Software Files,to the device:1.In the Web interface, open the Software Upgrade Wizard: Toolbar: From the Actions drop-down menu, choose Software Upgrade. Navigation tree: Setup menu Administration tab Maintenance folder Software Upgrade.Figure 4-1: Software Upgrade Page2.Click Start Software Upgrade; the wizard starts, prompting you to load a .cmp file:Figure 4-2: Loading CMP File in Software Upgrade WizardNote: At this stage, you can quit the Software Upgrade wizard without having to resetthe device, by clicking Cancel. However, if you continue with the wizard and startloading the CMP file, the upgrade process must be completed with a device reset.3.Version 7.2Click Browse, and then navigate to and select the .cmp file.11AudioCodes Mediant Gateway
BroadSoft SIP Trunk4.Click Load File; the device begins to install the .cmp file and a progress bar displaysthe status of the loading process:Figure 4-3: CMP File Loading Progress BarA message is displayed to inform you that the file has been loaded,.5.When successfully loaded, click Next to access the wizard page for loading the ini file.6.Clear the Use existing configuration option, click Browse to select the configurationfile (.ini) on your PC, and then click Load File to load the file:Figure 4-4: Load an INI File in the Software Upgrade Wizard7.Click Next to access the wizard page for loading the Call Progress Tones (CPT) file.8.Click Browse to select the CPT file on your PC, and then click Load File to load thefile:Quick Guide12Document #: LTRT-14020
Quick Guide4. Upload Software to DeviceFigure 4-5: Load an CPT File in the Software Upgrade Wizard9.Keep clicking Next until the last Wizard page appears (the FINISH button ishighlighted in the left pane) and the following message appears:Figure 4-6: Software Upgrade Wizard – Google ChromeVersion 7.213AudioCodes Mediant Gateway
BroadSoft SIP Trunk10. Click Reset to install the files by saving them on the device's flash memory with adevice. Once complete, the following is displayed:Figure 4-7: Current CMP Version ID11. Click End Process to close the wizard, and then log in again to the Web interface.12. Enter your login username and password (Admin, Admin respectively), and then clickLogin; a message box appears informing you of the new .cmp file version.13. Click OK; the Web interface becomes active, reflecting the upgraded device.Quick Guide14Document #: LTRT-14020
Quick Guide55. Configure DeviceConfigure DeviceThis section describes device configuration.5.1Change Default Management User Login PasswordsTo secure access to the device's Web management interface, follow these guidelines: The device is shipped with a default Security Administrator access-level useraccount – username 'Admin' and password 'Admin'. This user has full read-writeaccess privileges to the device. It is recommended to change the default password toa hard-to-hack string. The login username and password are configured in the WebInterface’s Local Users page (Setup menu Administration tab Web & CLI folder Local Users) using the 'Password' and 'Apply' fields:Figure 5-1: Changing Password of Default Security Administrator User Version 7.2The device is shipped with a default Monitor access-level user account - usernameand password: 'User' who has read access only and page viewing limitations but canview certain SIP settings such as proxy server addresses. Therefore, to prevent anattacker from obtaining sensitive SIP settings that could result in possible call theftetc., change its default login password to a hard-to-hack string.15AudioCodes Mediant Gateway
BroadSoft SIP Trunk5.2Configure a Network Interface for the DeviceYou can connect the device to the DMZ network using one of the following methods: Method A: (Preferred method) A global IP address is provided to the device (withoutNAT):Figure 5-2: Method AThe Enterprise firewall is configured with rules, for example:OriginalSourceDestinationPorts/Service any Global IP Address(public address)SIP service: 5060 / UDP(e.g. ITSP) RTP service: 6000-8500 / UDPMethod B: A local DMZ IP address behind NAT:Figure 5-3: Method BThe firewall is configured with rules, for erviceSourceDestinationPorts/Service any Global IP Address(public address)SIP service: 5060 / UDP any (e.g. ITSP)Local DMZ IPAddress as original RTP service: 6000-8500 /UDP(e.g. ITSP)NAT rules (port stinationPorts/Service any Global IP Address(public address)SIP service: 5060 / UDP any (e.g. ITSP)Local DMZ IPAddress as original RTP service: 6000-8500 /UDP any SIP service: 5060 / UDP as original RTP service: 6000-8500 /UDPGlobalIPAddress(publicaddress) any (e.g. ITSP)(e.g. ITSP)Local DMZ IPAddressQuick Guide16(e.g. ITSP)Document #: LTRT-14020
Quick Guide5.2.15. Configure DeviceConfigure Network InterfaceConfigure network interface, as described below:1.Open the IP Interfaces table (Setup menu IP Network tab Core Entities folder IP Interfaces).2.Modify the existing network interface ('Voice'):a.b.Select the 'Index' radio button of the OAMP Media Control table row, andthen click Edit.Configure the interface as follows:Parameter3.ValueNameVoice (arbitrary descriptive name, you may change it)Application TypeOAMP Media Control (leave as is)Ethernet Devicevlan 1IP AddressIf working in Method A: Global-IP-Address (publicaddress)If working in Method B: Local-DMZ-IP-AddressPrefix LengthSubnet mask in bits, e.g.28 (for 255.255.255.240)Default GatewayThe default gateway IP address(In Method B: router's IP address)Primary DNS Server IPAddressPrimary DNS IP addressSecondary DNS Server IPAddressSecondary DNS IP address (optional)Click Apply.The figure below shows an example of a configured IP network interface.Figure 5-4: Example of a Configured Network Interface in IP Interfaces TableVersion 7.217AudioCodes Mediant Gateway
BroadSoft SIP Trunk5.2.2Configure NATNote: NAT configuration is applicable only if you are behind a firewall NAT (see Method B). The NAT IP Address is the Global-IP-address used in front of the firewall facing theBroadSoft service. If the DMZ holds the global-IP-address (no NAT is performed bythe firewall) and the Gateway is already assigned the Global-IP-address as itsaddress, skip this NAT configuration.Configure the global IP address as follows:1.Open the NAT Translation table (Setup menu IP Network tab Core Entitiesfolder NAT Translation).2.Click New; the following dialog appears:Figure 5-5: NAT Translation Table - Dialog Box3.Use the table below as reference when configuring a NAT translation rule.Figure 5-6: NAT Translation Table Parameter DescriptionsParameter4.Quick GuideDescriptionIndex0Source InterfaceVoice (the interface to apply this rule to)Target IP AddressGlobal-IP-address. Defines the global (public) IPaddress.Source Start Port(leave empty)Source End Port(leave empty)Target Start Port(leave empty)Target End Port(leave empty)Click Apply.18Document #: LTRT-14020
Quick Guide5.35. Configure DeviceConfigure General SIP ParametersThis step identifies the device configuration needed to support the SIP General Parametersconfiguration.5.3.1Configure SIP General SettingsThis step shows how to configure the SIP General Settings. To configure the SIP General Settings parameters:1.Open the SIP Proxy & Registration Parameters page (Setup menu Signaling &Media tab SIP Definitions folder SIP Definitions General Settings).2.Configure following parameters:ParameterValueGateway SettingsUse To headerSource Header For Called NumberGateway Session ExpiresUpdateSession Expires MethodDisconnect SupervisionIgnoreBroken Connection ModeFigure 5-7: Configuring SIP General Settings Parameters3.Version 7.2Click Apply.19AudioCodes Mediant Gateway
BroadSoft SIP Trunk5.3.2Configure SIP Message Structure ParametersThis step shows how to add SIP P-Asserted Header. To configure the SIP Message Structure parameters:1.Open the SIP Proxy & Registration Parameters page (Setup menu Signaling &Media tab SIP Definitions folder Message Structure).2.From the 'Asserted Identity Mode' dropdown, select Add P-Asserted-Identity.Figure 5-8: Configuring SIP Message Structure Parameters3.Quick GuideClick Apply.20Document #: LTRT-14020
Quick Guide5.3.35. Configure DeviceConfigure Registration ParametersThis step shows how to configure the SIP Proxy and Registration parameters, includingconfiguring a Proxy Name, Registrar Name, Registration and Subscription modes. To configure the SIP Proxy & Registration parameters:1.Open the SIP Proxy & Registration Parameters page (Setup menu Signaling &Media tab SIP Definitions folder Proxy & Registration).2.Configure following parameters:ParameterValueGateway Nameuk.ic.sipconnect.hipcom.co.ukUse Gateway Name for OPTIONSYesUse Default ProxyUse ProxyProxy NamePer SIP Trunk requirementAlways Use ProxyEnableGateway AuthenticationUser NameTrunk Group Pilot UserPasswordTrunk Group Pilot User PasswordAuthentication ModePer GatewayGateway RegistrationVersion 7.2Enable RegistrationEnableRegistrar Nameuk.ic.sipconnect.hipcom.co.uk21AudioCodes Mediant Gateway
BroadSoft SIP TrunkFigure 5-9: Configuring Proxy & Registration ParametersQuick Guide22Document #: LTRT-14020
Quick Guide5.3.45. Configure DeviceConfigure the SIP Trunk IP AddressThis step shows how to configure the Proxy Set toward SIP Trunk. The Proxy Set definesthe destination address (IP address or FQDN) of the IP entity server. Proxy Sets can alsobe used to configure load balancing between multiple servers. To configure Proxy Set:1.Open the Proxy Sets table (Setup menu Signaling & Media tab Core Entitiesfolder Proxy Sets).2.Edit the Proxy Set 0 (you can identify it by the 'Proxy Name' field).ParameterValueIndex0Proxy Keep-AliveUsing Optionsa.b.Click the Proxy Address link located below the table; the Proxy Address tableopens.Click New; the following dialog box appears:Figure 5-10: Configuring Proxy Address for SIP Trunkc.Configure the address of the Proxy Set per the parameters described in the tablebelow.ParameterIndex0Proxy Addressuk.ic.sipconnect.hipcom.co.uk:5060 (SIP Trunk IPaddress / FQDN and destination port)Transport TypeUDP (Network transport type for the SIP Trunk)d.Version 7.2ValueClick Apply.23AudioCodes Mediant Gateway
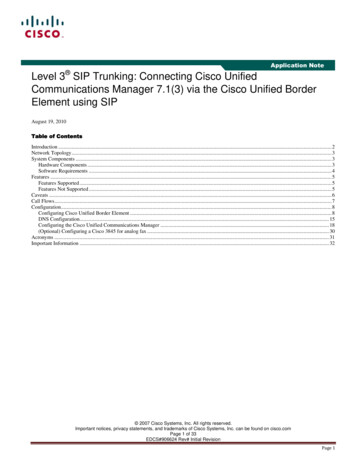
BroadSoft SIP Trunk5.3.5Configure Message Manipulation RulesThis step describes how to configure SIP message manipulation rules, which can includeinsertion, removal, and/or modification of SIP headers. Manipulation rules are grouped intoManipulation Sets, enabling you to apply multiple rules to the same SIP message (IPentity). Configured SIP message manipulation rules will be assigned as gateway outboundmessage manipulation set and will be applied to all outbound messages. To configure SIP message manipulation rule:1.Open the Message Manipulations page (Setup menu Signaling & Media tab Message Manipulation folder Message Manipulations).2.Configure a new manipulation rule (Manipulation Set 1) for BroadSoft SIP Trunk. Thisrule applies to response messages sent to the BroadSoft SIP Trunk for Rejected Callsinitiated by the PBX. This replaces the ‘503’ and ‘603’ method types with the value‘486’, because BroadSoft SIP Trunk not recognizes these method types.ParameterValueIndex0NameReject ResponsesManipulation Set ID1Message type '603' ORheader.request-uri.methodtype '503'Action Subjectheader.request-uri.methodtypeAction TypeModifyAction Value'486'Figure 5-11: Configuring SIP Message Manipulation Rule 0 (for BroadSoft SIP Trunk)Quick Guide24Document #: LTRT-14020
Quick Guide5. Configure Device3.Configure another manipulation rule (Manipulation Set 1) for BroadSoft SIP Trunk.This rule applies to messages sent to the BroadSoft SIP Trunk in a call forwardscenario. This add prefix to the user part of SIP Diversion Header to complete to thefull number.ParameterValueIndex1NameFull # in DiversionManipulation Set ID1Message Typeany.requestConditionheader.diversion.url.user len '4'Action Subjectheader.diversion.url.userAction TypeAdd PrefixAction Value'44203621'Figure 5-12: Configuring SIP Message Manipulation Rule 1 (for BroadSoft SIP Trunk)Version 7.225AudioCodes Mediant Gateway
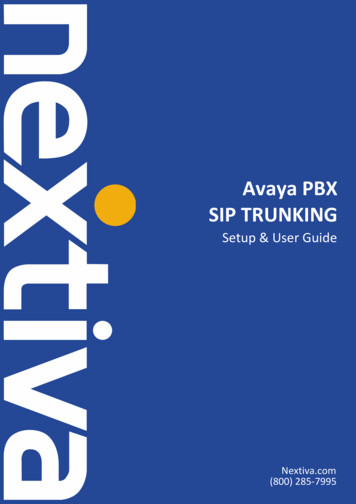
BroadSoft SIP Trunk4.Configure another manipulation rule (Manipulation Set 1) for BroadSoft SIP Trunk.This rule applies to messages sent to the BroadSoft SIP Trunk in a call transferscenario. This will add ‘ ’ prefix to the user part of SIP Refer-To Header to completethe BroadSoft SIP Trunk number conversion.ParameterValueIndex2NameCall TransferManipulation Set ID1Message Typerefer.requestConditionheader.refer-to regex ( sip:)(.*)(@)(.*)Action Subjectheader.refer-toAction TypeModifyAction Value 1 ' ' 2 3 4Figure 5-13: Configuring SIP Message Manipulation Rule 2 (for BroadSoft SIP Trunk)Quick Guide26Document #: LTRT-14020
Quick Guide5. Configure Device5.Configure another manipulation rule (Manipulation Set 1) for BroadSoft SIP Trunk.This rule applies to messages sent to the BroadSoft SIP Trunk in a call forwardscenario. This replaces the user part of the SIP From Header with the value from theSIP Diversion Header.ParameterValueIndex3NameCall ForwardManipulation Set ID1Message TypeinviteConditionheader.diversion existsAction Subjectheader.from.url.userAction TypeModifyAction Valueheader.diversion.url.userFigure 5-14: Configuring SIP Message Manipulation Rule 3 (for BroadSoft SIP Trunk)Version 7.227AudioCodes Mediant Gateway
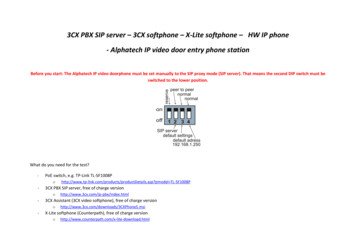
BroadSoft SIP TrunkFigure 5-15: Example of Configured SIP Message Manipulation RulesThe table displayed below includes SIP message manipulation rules which are grouped togetherunder Manipulation Set ID 1 and which are executed for messages sent to the BroadSoft SIP Trunk.These rules are specifically required to enable proper interworking between BroadSoft SIP Trunk andPBX. Refer to the User’s Manual for further details concerning the full capabilities of headermanipulation.RuleIndexRule DescriptionReason for Introducing Rule0This rule applies to response messages sent to theBroadSoft SIP Trunk for Rejected Calls initiated by thePBX. This replaces the ‘503’ and ‘603’ method typeswith the value ‘486’.1If the PBX is configured withendpoints in 4-digits format in theThis rule applies to messages sent to the BroadSoft SIPCall Forward scenario, SIPTrunk in a call forward scenario. This add prefix to theDiversion Header will present a 4user part of SIP Diversion Header to complete to the fulldigit number, that will cause anumber.problem in the Forward Callsetup.2This rule applies to messages sent to the BroadSoft SIPFor complete the BroadSoft SIPTrunk in a call transfer scenario. This will add ‘ ’ prefix toTrunk number conversion.the user part of SIP Refer-To Header.3For Call Forward scenarios,BroadSoft SIP Trunk needs thatThis rule applies to messages sent to the BroadSoft SIPUser part in SIP From Header willTrunk in a call forward scenario. This replaces the userbe defined number. In order to dopart of the SIP From Header with the value from the SIPthis, User part of the SIP FromDiversion Header.Header replaced with the valuefrom the SIP Diversion Header.Quick Guide28The BroadSoft SIP Trunk notrecognizes these method typesand continue to try to setup call tothe PBX.Document #: LTRT-14020
Quick Guide5.45. Configure DeviceConfigure CodersThis step describes how to configure coders (termed Coder Group) per BroadSoft SIPTrunk requirement. To configure coders:1.Open the Coder Groups table (Setup menu Signaling & Media tab Coders &Profiles folder Coder Groups).2.Configure a Default Coder Group:ParameterValueCoder Group NameAudioCodersGroups 0Coder NameG.729Coder NameG.711A-lawCoder NameG.711U-lawFigure 5-16: Configuring a Default Coder GroupVersion 7.229AudioCodes Mediant Gateway
BroadSoft SIP Trunk5.5Configure PSTN InterfaceThis section describes the configuration of the public switched telephone network (PSTN)related parameters.5.5.1Configure PRI Trunk SettingsThis step shows how to configure the PRI Trunk. To configure the PRI PSTN interface:1.Open the Trunk Settings page (Setup menu Signaling & Media tab Gatewayfolder Trunks & Groups Trunks).2.Configure following parameters per PSTN network:ParameterValueProtocol TypeE1 EURO ISDNClock MasterGenerated (The device is clock master)Recovered (The device slaves from the line clock)Framing MethodE1 Framing MFF CRC4 Ext (per remote side, PBX orPSTN, definitions)ISDN Termination SideNetwork side or User side (per remote side definitions)Local ISDN Ringback Tone SourceGatewayFigure 5-17: Configuring the PRI PSTN Interface3.Repeat for another PRI trunks if applicable (Mediant 800B and Mediant 1000B)4.Reset the device with a save-to-flash for your settings to take effect.Quick Guide30Document #: LTRT-14020
Quick Gui
view certain SIP settings such as proxy server addresses. Therefore, to prevent an attacker from obtaining sensitive SIP settings that could result in possible call theft etc., change its default login password to a hard-to-hack string.