Transcription
Creo UI EditorC User’s GuideDatecode M110
Copyright 2016 PTC Inc. and/or Its Subsidiary Companies. All Rights Reserved.User and training guides and related documentation from PTC Inc. and its subsidiary companies (collectively"PTC") are subject to the copyright laws of the United States and other countries and are provided under alicense agreement that restricts copying, disclosure, and use of such documentation. PTC hereby grants to thelicensed software user the right to make copies in printed form of this documentation if provided on softwaremedia, but only for internal/personal use and in accordance with the license agreement under which theapplicable software is licensed. Any copy made shall include the PTC copyright notice and any otherproprietary notice provided by PTC. Training materials may not be copied without the express written consentof PTC. This documentation may not be disclosed, transferred, modified, or reduced to any form, includingelectronic media, or transmitted or made publicly available by any means without the prior written consent ofPTC and no authorization is granted to make copies for such purposes. Information described herein isfurnished for general information only, is subject to change without notice, and should not be construed as awarranty or commitment by PTC. PTC assumes no responsibility or liability for any errors or inaccuraciesthat may appear in this document.The software described in this document is provided under written license agreement, contains valuable tradesecrets and proprietary information, and is protected by the copyright laws of the United States and othercountries. It may not be copied or distributed in any form or medium, disclosed to third parties, or used in anymanner not provided for in the software licenses agreement except with written prior approval from PTC.UNAUTHORIZED USE OF SOFTWARE OR ITS DOCUMENTATION CAN RESULT IN CIVILDAMAGES AND CRIMINAL PROSECUTION.PTC regards software piracy as the crime it is, and we view offenders accordingly. We do not tolerate thepiracy of PTC software products, and we pursue (both civilly and criminally) those who do so using all legalmeans available, including public and private surveillance resources. As part of these efforts, PTC uses datamonitoring and scouring technologies to obtain and transmit data on users of illegal copies of our software.This data collection is not performed on users of legally licensed software from PTC and its authorizeddistributors. If you are using an illegal copy of our software and do not consent to the collection andtransmission of such data (including to the United States), cease using the illegal version, and contact PTC toobtain a legally licensed copy.Important Copyright, Trademark, Patent, and Licensing Information: See the About Box, or copyrightnotice, of your PTC software.UNITED STATES GOVERNMENT RIGHTSPTC software products and software documentation are “commercial items” as that term is defined at 48 C.F.R. 2.101. Pursuant to Federal Acquisition Regulation (FAR) 12.212 (a)-(b) (Computer Software) (MAY 2014)for civilian agencies or the Defense Federal Acquisition Regulation Supplement (DFARS) at 227.7202-1(a)(Policy) and 227.7202-3 (a) (Rights in commercial computer software or commercial computer softwaredocumentation) (FEB 2014) for the Department of Defense, PTC software products and softwaredocumentation are provided to the U.S. Government under the PTC commercial license agreement. Use,duplication or disclosure by the U.S. Government is subject solely to the terms and conditions set forth in theapplicable PTC software license agreement.PTC Inc., 140 Kendrick Street, Needham, MA 02494 USA
ContentsCreo UI Foundation Classes Introduction .7Overview.8Basic Concepts .8User Interface Basics .17About the Creo UI Editor Main Window.18Menu Bar .18Creating a New Dialog Box.23Adding Components to the Dialog Box .23Opening and Closing the Dialog Box .23Saving the Dialog Box .24Saving a Copy of the Dialog Box .24Saving the Code File.25To Edit Properties of a Component or dialog box .25Grid.27Grid Positioning Scheme .28User Interface: Dialogs .33Label .34PushButton .36CheckButton .38RadioGroup .42InputPanel .45TextArea .49List .50OptionMenu .55Layout .58Tab .60CascadeButton.62SpinBox .64ScrollBar .67Slider .70ProgressBar .72DrawingArea .73Table .74NakedWindow .75Tree.76MenuBar .78MenuPane .79Dialogs .805
Basic Concepts of the Creo UI Editor Components .81Displaying Text Caption for Components .82Defining the Alignment of the Text Caption.82Defining a Mnemonic for Components.82Defining an Accelerator Hot Key .83Defining an Image for Components .83Defining the Alignment Between the Image and Text Caption .83Creating Name and Label Pairs .84Defining the Width of a Component .85Defining the Mouse Pointers.85Defining the Color .86Setting the Help Text .86Defining the Visibility of a Component .87Defining the Availability of a Component.87Defining the Type of Selection .876Creo UI Editor
1Creo UI Foundation ClassesIntroductionOverview .8Basic Concepts .8This chapter provides an introduction to the basic concepts of the Creo UIFoundation classes.7
OverviewThe User Interface Foundation Classes (UIFC) provides a framework for creating,displaying and managing additions to the Creo user interface. New dialogs can becreated using the Creo UI Editor, and then loaded into a Creo session. The UIFCis a platform and operating system independent toolkit, supporting trail files,mapkeys and a common appearance to the rest of the Creo user interface.Basic ConceptsThis sections provides more information on the basic concepts used in Creo UIEditor.DialogsA dialog is the term used for all top-level windows by the UIFC. This includesanything from a Creo main window to an exit confirmation dialog box.ModalityDialogs can be defined to be either modal, also referred to as blocking ormodeless. When the Activate function is called for a given dialog, modal dialogsprevent access to other individual dialogs or the whole application, whereasmodeless dialogs allow the user to interact with the rest of the application as wellas the modeless dialog itself.In the activated state, modal dialogs start an event loop and process events and thefunction uifcActivateDialog() will only return when the dialog is exitedfrom a callback function. Modeless dialogs on the other hand do not start an eventloop so the call to activate the dialog returns immediately. Event processing formodeless dialogs is handled by the currently active event loop.Dialog LifecycleThe dialog lifecycle has 4 or 5 stages depending on whether it is modeless ormodal. The steps to display a dialog are:1. CreateCall the function uifcCreateDialog() to create an instance of a dialog froma resource file. For example:uifcCreateDialog (“MyDialogInstance”,“my dialog resource file”);8Creo UI Editor
Creating the dialog only loads the definition into memory; it does not show thedialog on the screen, which happens later.2. InitializeOnce the dialog has been created, for example by loading a resource file, you canthen set up run time values for the dialog or components within the dialog. Forexample, if the dialog relates to editing a file, you might want to set the title of thedialog to the name of the file. We recommend that you set the title and modifyover components before the dialog is displayed on the screen as the values on thecomponents can affect the overall size of the dialog and relative placement ofcomponents in the dialog. This avoids causing the dialog to resize, or cause visualdisturbance, to the user due to the content in the dialog changing.Also at this point you will need to setup the action listeners for the components inthe dialog. For more information, see the section on Event processing on page 10.3. ActivateActivate the dialog, that is, show the dialog on the screen by calling the functionuifcActivateDialog():uifcActivateDialog (“MyDialogInstance”);If the dialog type is modal, this call will start a new event loop. The call will notreturn until the dialog exits from the event loop. Refer to the section 4. Exit onpage 9.For a modeless dialog, the activate call will display the dialog and returnimmediately.4. ExitA modal dialog stays in the uifcActivateDialog() call and has an eventloop running while it is displayed. You need to exit the event loop, to dismiss thedialog. This can be done from an action listener by calling:uifcExitDialog (“MyDialogInstance”, status);Specify the name of the dialog instance and an integer status value as thearguments to the call to uifcExitDialog(). The status value is used as thereturn status from the uifcActivateDialog() call. Note that you must exitthe event loop for a modal dialog before it can be destroyed.Creo UI Foundation Classes Introduction9
NoteExiting the event loop for a dialog does not remove the dialog from the screen.It will still be displayed, and it is possible to activate the dialog again and starta new event loop.For modeless dialogs, which do not have any associated event loop, there is noneed to call the exit function.5. DestroyTo finally remove the dialog from the screen after any event loop associated withthe dialog has been exited, call:uifcDestroyDialog (“my dialog instance”);For modal dialogs this will normally be called immediately after the call touifcActivateDialog().At this point the dialog will need to be created again before it can be reused.Event processingOnce you have your dialog displayed on the screen, you need to be able torespond to the user interacting with it. This is done by the use of action listenerson the dialog and on the components within it.Create an action listener by deriving a new class from the appropriate ObjectTOOLKIT Listener base class for the given component type. The followingexample shows you how to define an action listener for a PushButton component:class MyButtonListener : public uifcDefaultPushButtonListener{MyButtonListener() {}; MyButtonListener() {};OnActivate (uifcPushButton ptr component);};uifcPushButton ptr ok button uifcPushButtonFind("MyDialogInstance","ok button");MyButtonListner* ok listner new MyButtonListner();Ok button- AddActionListener (ok listner);10Creo UI Editor
In this example, the OnActivate() method is overridden, which informs youwhen the user has activated the PushButton, that is, when the user has clicked onthe component, or pressed the spacebar when the keyboard focus was on thecomponent, or if the activate action was programmatically pushed from code. Asyou are defining your own class for the notification, you are free to include yourown methods and data in the class, which allow for more versatility in associatingyour own data with the component.NoteCertain action types are not recorded to trail files unless there is a method thathad been derived for them from the base class. If you were to override all thenotification methods in the Listener class, for example to have a generalpurpose class for all your components, then you may cause additionalunwanted actions to be recorded into the output trail file. It is recommendedthat you only override those notifications that you need for a given individualcomponent.Text DisplayText displayed to the user in components can be either simple Unicode strings or asubset of HTML tags to control text attributes like the use of bold, italics, fontsize, and so on.ImagesThe supported image formats are PNG, Jpeg, GIF, BMP, and ICO. If using animage to define a cursor it is recommended that you use an ICO file, to allow thedefinition of the cursor hotspot.Component PositioningThe primary way to position components is via a Grid structure. Grids allowautomatic relative placement of components and resizing of a component if thecomponent is a child of a Dialog or Layout. Alternatively, components can bepositioned and resized manually when the component is a child of a DrawingArea,NakedWindow or PGLWindow. Component classes such as the Sash, Tab, orTable component define their own placement schemes for their child components.Creo UI Foundation Classes Introduction11
GridThe Layout and Dialog components both use a grid based positioning scheme fortheir child components. This consists of a recursive rectangular grid of cellssimilar to an HTML table or a spreadsheet. Each cell in the grid can either beempty or can contain a component or a nested sub-grid.A grid cell has offset values in pixels for the top, bottom, left and right sides,which give the spacing between a component in the cell and the cell edges. Youcan also define attachments for the cell content, so that a component can have it’sleft, right, top or bottom edges fixed to the corresponding cell edge taking intoaccount any offset defined for the edge, in any combination.If you attach a component to only the left or right side, or the top or bottom of agrid cell, then the component will stick to that edge if the grid cell changes size orposition. Attaching a component to both the left and right sides or both the top andbottom edges will cause the component to stretch to be the size of the grid cell,less any offsets in that direction.A row or column in a grid can be defined as being either resizable or nonresizable. This controls the distribution of any size changes made to the Dialog orLayout component, so that the change in size in the horizontal or vertical directionis divided up between the row and columns that are marked as being resizable. Atleast one of the rows and one of the columns must be resizable in order to acceptany size changes.Button SizesBy default, a toggle style PushButton in a dialog that is not in a menu and has noattachments will have the same width, based on the widest toggle stylePushButton component in the dialog. You can explicitly control this behavior byusing the UseStandardWidth attribute. When set to TRUE, the componentwill have the standard width behavior regardless of any attachments.NoteWhen determining the widest component, the ‘natural’ size of the componentis used, that is the size of the component before it is potentially stretched byany attachments.You can also set CascadeButton and CheckButton components to have thestandard width behavior by setting the UseStandardWidth attribute to TRUE.12Creo UI Editor
InternationalizationWhere possible you should define your dialogs using resource files rather thancreating the dialogs and components in code. The strings defined in the resourcefile that are displayed on the user interface can be automatically extracted andused to create a translation file. Separate translation files can then be created foreach supported language so that at run time the appropriately localized text istaken from the translation file.NoteBy default, the resource files contain English text strings, if any translationsare missing, then displayed test will fallback to the English text in the resourcefile.Textual input component such as the TextArea, InputPanel, and so on supportinput methods and right to left input.Trail Files and MapkeysActions such as the user clicking on a PushButton or selecting an item in a Listcomponent are automatically written into the output trail file for the session. Forsimple actions such as activating a PushButton, only the action type and the dialogand component names are recorded in the trail files. For more complex actions,such as selecting an item in a List, Table, OptionMenu, or RadioGroup, along withthe action type and component name, the names of the items that were selected arealso recorded in the trail file.Having meaningful names for components and particularly in the case of thenames of items in the component, will be helpful while examining trail files, forexample, ok button rather than PushButton3.In the case of items in a List, where the content might change from session tosession, such as a list of file names, you should base the names on a scheme thatwill be as far as possible invariant between times that the dialog is displayed. Forexample, if you use a numeric index for the item names, then this reduces thereadability of the resulting trail file entries and will most likely prevent anymapkeys that use the component from working in another situation other thanwhen the set of items in the component are exactly identical. Further more, if atsome later point in time you add more items into the component, then a simpleindex will mean that the names written in an earlier trail file or mapkey will nolonger map to the correct items. If however you used an invariant name, themapping will be unaffected and trail files and mapkeys will still work.Creo UI Foundation Classes Introduction13
Accelerators and MnemonicsAccelerators and mnemonics are two different ways of controlling components viathe keyboard.MnemonicsMnemonics are shown as an underlined character in the label text of a component,using Alt the underlined character will activate the component. The mnemonicis defined by putting an ampersand character in the label text of the componentimmediately in front of the character to be used, for example &File. To display aliteral ampersand character you need to use two ampersands, for example This&& that.In the case of a PushButton or CheckButton component the mnemonic behaves asif the user clicked on the component. In the case of a Label or Layout componentthis will move the keyboard focus onto the component defined by the Focusattribute. In the case of a MenuBar component it will open the menu with thematching mnemonic and similarly for a CascadeButton it will open it’s menu.Mnemonics are only available to the user to use if they are shown in the currentlyactive dialog, that is the dialog with the keyboard focus. The component with themnemonic also needs to be visible. If duplicate mnemonics are used in the dialogfor PushButton or CheckButton, then rather than immediately activating thecomponent, the keyboard focus is cycled between the components with the samematching mnemonic, to allow the user to chose and activate using the spacebar.NoteA best practice is to avoid having duplicate mnemonics as far as possible.It is good practice to add mnemonics to all the components in a menu, as thisallows the user to directly active a button in the menu by typing the sequence ofkey presses, rather than having to navigate through the menu using the arrowkeys.NoteWhen a menu pane is open, pressing the mnemonic character key will activatethe mnemonic, the Alt key is not required. Also when the menu is open thescope of any mnemonics available to the user is limited to just those in themenu itself.14Creo UI Editor
AcceleratorsUnlike mnemonics, accelerators can be used on components that are notimmediately visible in the dialog, that is, an accelerator can activate componentsthat are in a menu such as a popup menu or a menu associated with aCascadeButton or MenuBar without having to open the menu.Define an accelerator for a component using the AcceleratorCode attribute inCreo UI Editor. The accelerator consists of a character key and one or moremodifier keys, such as, Ctrl, Alt, or Shift where one of them should be the Ctrlkey. When a component with an accelerator is shown in a menu, the acceleratordefinition is automatically shown in a column on the right-hand side.For component classes that support the AcceleratorCode attribute, theaccelerator will call the Activate action on the component. The Dialog class is anexception to this, where the accelerator will call the Close action on the dialog,that is, using the accelerator will be similar to clicking the Close button on thedialog. It is a good practice to define an accelerator using the ‘Escape’ key ondialogs that contain transient content or short tasks, for example, prompts, queriesor perhaps something like renaming an object. This allows the user to quickly getout of the dialog and should behave as though the task was cancelled.Creo UI Foundation Classes Introduction15
2User Interface BasicsAbout the Creo UI Editor Main Window .18Menu Bar.18Creating a New Dialog Box .23Adding Components to the Dialog Box .23Opening and Closing the Dialog Box.23Saving the Dialog Box.24Saving a Copy of the Dialog Box.24Saving the Code File .25To Edit Properties of a Component or dialog box.25This chapter describes the user interface for the Creo UI Editor in detail.17
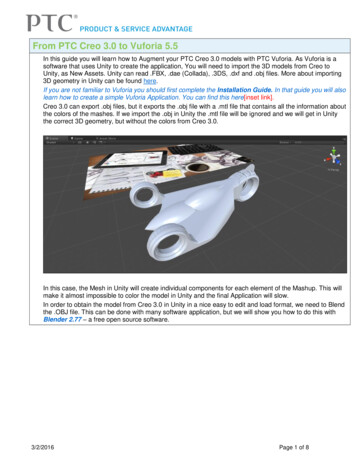
About the Creo UI Editor Main WindowYou can create dialog boxes using the Creo UI Editor. The dialog boxes are savedas resource files. Each dialog box that you create appears in the same Creo UIEditor window.The Creo UI Editor user interface consists of the following elements: Menu BarQuick Access toolbarTreeWork AreaStatus BarThe following figure shows the various elements of the Creo UI Editor:12345Menu barQuick Access toolbarTreeWork AreaStatus barMenu BarThe menu bar contains commands for creating, saving, and modifying dialogboxes and components, and for setting your Creo UI Editor environment. Itcontains the following menus: 18FileEditTreeCreo UI Editor
ViewHelpAbout the File MenuThe File menu allows you to create a new dialog box or work with an existingdialog box.It has the following commands:Command NameNewIcon on Quick Access DescriptionToolbarCreates a new dialog box.Opens an existing dialogbox.Closes the current dialogbox.Saves the dialog box.OpenCloseSaveSaves a copy of the dialogbox as a resource file(.res).Saves the source code tocontrol the dialog boxprogrammatically.Exits the Creo UI Editor.Save AsSave CodeExitAbout the Edit MenuThe Edit menu contains commands that allow you to cut, paste, delete and renamethe selected components in a dialog box. You can select and manipulate thecomponents in the dialog box using the Edit menu.It has the following commands:Command NameCutCopyUser Interface BasicsIcon on Quick Access DescriptionToolbarCopies the selectedcomponent to theclipboard and then deletesthe selected component.Copies the selectedcomponent to theclipboard withoutremoving it from itsoriginal location.19
Command NamePasteDeleteRenamePropertiesIcon on Quick Access DescriptionToolbarPastes the cut or copiedcomponent to the selectedcell in the grid.Removes the selectedcomponent or a layout ofcomponents.Changes the name of theselected component.Edits the properties of theselected component or thedialog box.About the Tools MenuAbout the View MenuThe View menu allows you to customize the display of the Creo UI Editor. Itprovides options to control the display of different types of grid in the work areaand display of user interface components in the Creo UI Editor.It has the following commands:Command NameNo GridGridResource GridBoth20Icon on Quick Access DescriptionToolbarNo grid is displayed inthe work area.Displays the placementgrid in the work areaaround the components.The placement grid helpsyou to position thecomponents in a dialogbox.Displays the resource gridin the work area aroundthe components. Theresource grid is the gridstructure present withinthe component.Displays both theplacement and resourcegrids in the work areaCreo UI Editor
Command NameRefreshPreviewToolbarIcon on Quick Access DescriptionToolbararound the components.Refreshes the work areain the Creo UI Editor.You can also use thefunction key F5 to refreshthe work area.Enables you to previewthe current dialog box.The preview isdynamically updated asyou modify the dialogbox.Displays the QuickAccess toolbar.Status BarThe Quick Access toolbaris located at the top of theCreo UI Editor. Itprovides quick access tofrequently usedcommands, such as Open,Close and Save files,copy and pastecomponents, and so on.Displays the status bar.ClipboardThe status bar is locatedat the bottom of the CreoUI Editor. It displays thename of the commandselected in the QuickAccess toolbar. It alsodisplays additionalinformation about thecommand selected fromthe menu bar.Displays the Clipboard.The Clipboard stores thecopied component.User Interface Basics21
About the Tree MenuThe Tree menu allows you to expand and collapse the tree structure of the dialogbox. Each branch of the tree corresponds to either individual components orparent container components that hold the child components. You can expand orcollapse the tree on a branch level or on a
created using the Creo UI Editor, and then loaded into a Creo session. The UIFC is a platform and operating system independent toolkit, supporting trail files, mapkeys and a common appearance to the rest of the Creo user interface. Basic Concepts This sections provides more information on the basic concepts used in Creo UI Editor. Dialogs