Transcription
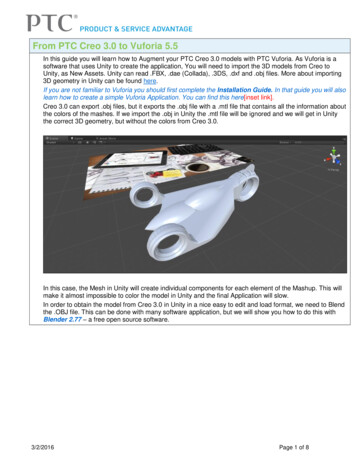
From PTC Creo 3.0 to Vuforia 5.5In this guide you will learn how to Augment your PTC Creo 3.0 models with PTC Vuforia. As Vuforia is asoftware that uses Unity to create the application, You will need to import the 3D models from Creo toUnity, as New Assets. Unity can read .FBX, .dae (Collada), .3DS, .dxf and .obj files. More about importing3D geometry in Unity can be found here.If you are not familiar to Vuforia you should first complete the Installation Guide. In that guide you will alsolearn how to create a simple Vuforia Application. You can find this here[inset link].Creo 3.0 can export .obj files, but it exports the .obj file with a .mtl file that contains all the information aboutthe colors of the mashes. If we import the .obj in Unity the .mtl file will be ignored and we will get in Unitythe correct 3D geometry, but without the colors from Creo 3.0.In this case, the Mesh in Unity will create individual components for each element of the Mashup. This willmake it almost impossible to color the model in Unity and the final Application will slow.In order to obtain the model from Creo 3.0 in Unity in a nice easy to edit and load format, we need to Blendthe .OBJ file. This can be done with many software application, but we will show you how to do this withBlender 2.77 – a free open source software.3/2/2016Page 1 of 8
1. Download and Install Blender 2.77a (or latrer). You can download it free from here. Open the Blender and click on the working area, so the start screen will disappear. On the top right of the screen you will find the model tree. Right click on Cube and Delete it. Now Blender is ready for your model.2. Open the 3D model you wish to use in Creo 3.0 and save it in Wavefront (*.obj). We will use for this example the Cool Car from PTC free curriculum How to Model AlmostAnything. Feel free to download How to Model Almost Anything from here, if you don’t have it onyour computer. Set your Working Directory in Cool Car folder and open the Cool Car Top Level.asm file. From File Save As click on Save a Copy and in the window that pops out, under Type, selectWavefront (*.obj), then click OK.6/24/2016Page 2 of 8
In the next window you need to set the parameters of the mesh. Also you need to add the geometrythat will be converted and the reference (a datum). Set the Chord to 0.02 mm [0.0011’]. Then click Alland select the ASM TOP. Click OK. Now you can see the Mash that has been created. If you don’t like it you can change the settings.6/24/2016Page 3 of 8
3. Open the Blender Window and from File Import select Wavefront (.obj).4. In the lower left corner of your screen, you can find the Import OBJ options. Uncheck Group andImage Search, then browse for the COOL CAR TOP LEVEL.OBJ select it and click Import OBJ.Check for the model colors and note that they are similar to the ones in Creo 3.0. Blender reads the.mtl file when importing an .obj, if it is in the same location.6/24/2016Page 4 of 8
5. Now you need to Export the model in .FBX. File Export FBX (.fbx).6/24/2016Page 5 of 8
6. Now all you need to do is to import the new asset in the Unity project. From Assets menu click onImport New Asset, than browse for the FBX file and click Import.7. Now you have the Cool Car in your Assets folder. Drag it on the target and scale it using Scale on X,Y and Z. If you used the same target as in Installation guide instruction, you should use the scalefactor 0.005 on each axel. You will also need to rotate it 90 on Y and position it 0.45 on X.8. If you wish to change some of the colors, you can do that by selecting the area of mesh that containsthe surface you wish to recolor. Expand the Cool Car in the Hierarchy and click the cool car .001.This should highlight the area that we want to change.In case of a model that has more mesh areas, you can find the needed area by selecting them eachof a time or by simply clicking on that surface.6/24/2016Page 6 of 8
Note that the colors of the areas contained in this mash are shown in the Inspector9. Expand the orange color and change it by clicking on the Albedo color.10. If you want to add effects on some surfaces (Transparent, Fade or Cutout), you will first need tochange the Shader to Standard (Specular setup), then the Render Mode.11. After you finished editing the colors, you may consider adding animations. Please note that using thisimport method, if you wish to add movement between components, the components should be addedindividually. Then you may make them move by creating empty game objects with C sharp code to dothe change of position. As a note the easy way to do that is to manipulate the position of the mesh.You can learn more from Unity Documentation: Page 7 of 8
6/24/2016Page 8 of 8
From PTC Creo 3.0 to Vuforia 5.5 In this guide you will learn how to Augment your PTC Creo 3.0 models with PTC Vuforia. As Vuforia is a software that uses Unity to create the application, You will need to import the 3D models from Creo to Unity, as New Assets. Unity can read .FBX, .dae (Collada), .3DS, .dxf and .obj files. More about importing