Transcription
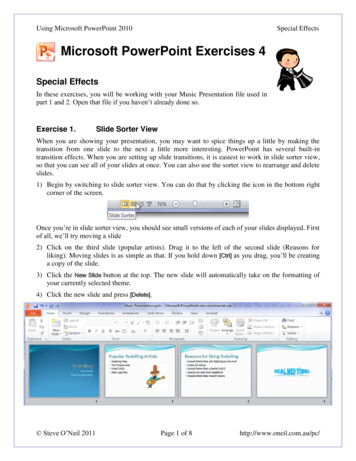
Using Microsoft PowerPoint 2010Special EffectsMicrosoft PowerPoint Exercises 4Special EffectsIn these exercises, you will be working with your Music Presentation file used inpart 1 and 2. Open that file if you haven’t already done so.Exercise 1.Slide Sorter ViewWhen you are showing your presentation, you may want to spice things up a little by making thetransition from one slide to the next a little more interesting. PowerPoint has several built-intransition effects. When you are setting up slide transitions, it is easiest to work in slide sorter view,so that you can see all of your slides at once. You can also use the sorter view to rearrange and deleteslides.1) Begin by switching to slide sorter view. You can do that by clicking the icon in the bottom rightcorner of the screen.Once you’re in slide sorter view, you should see small versions of each of your slides displayed. Firstof all, we’ll try moving a slide2) Click on the third slide (popular artists). Drag it to the left of the second slide (Reasons forliking). Moving slides is as simple as that. If you hold down [Ctrl] as you drag, you’ll be creatinga copy of the slide.3) Click the New Slide button at the top. The new slide will automatically take on the formatting ofyour currently selected theme.4) Click the new slide and press [Delete]. Steve O’Neil 2011Page 1 of 8http://www.oneil.com.au/pc/
Using Microsoft PowerPoint 2010Exercise 2.Special EffectsSlide TransitionsThe slide sorter view is the best place for setting up slide transitions since you can give a transitionstyle to several slides at once, and consistency is a good thing in a presentation. First of all, you willneed to display the Transitions options.1) Click the Transitions tab on the Ribbon Bar.Before you can apply a transition, you will need to select the slides to apply the transition to. Whenyou are doing this, remember that you can select more than one slide at a time. The following stepswill show you several ways of doing this.2) Selecting slides in a group - Click on the first slide. Hold down [Shift] and click on the thirdslide. Those slides and any in between will be selected. Click in the blank space between theslides to de-select them all.3) Selecting separate slides – Click on the second slide. Hold down [Ctrl] and click on the fourthslide. Each time you click on a slide while holding [Ctrl] you will select the slide if it’s not alreadyselected, and deselect it if it is already selected. Deselect all slides.4) Selecting all slides – Press [Ctrl] [A]. All slides will now be selected.5) With all of the slides still selected, click on some of the transition options listed in the Ribbon bar.Notice the slide sorter view giving you a preview of each transition style you choose. (if nothinghappens in the slide sorter view, click the Preview button to the left of the transition options).6) Return to the Normal View by clicking the iconin the bottom right corner of the screen.Note: PowerPoint includes several special effects including transitions and themes. Don’t over usethem. These effects can be impressive if used in moderation but they can also be annoying if usedtoo much. For instance, try to avoid using too many different transitions in the same presentation.You don’t need to have a different type of transition for each slide when consistency is often better. Steve O’Neil 2011Page 2 of 8http://www.oneil.com.au/pc/
Using Microsoft PowerPoint 2010Exercise 3.Special EffectsAnimation EffectsNot only can whole slides have transition effects, but the individual objects on a presentation canalso have animation effects. Many of these effects allow you to have certain objects hidden until yourequire them to be displayed. This can be especially useful for drawing attention to items in abulleted list one at a time.1) Move to the second slide in your presentation by clicking its preview on the left. We’ve got somebullet points on this page so we might want to discuss each one at a time while we are presenting.2) Click on the bulleted list to select it.3) Click the Animations tab on the Ribbon Bar.A range of animation types is available in the Ribbon.4) Move your mouse over one of the animations and leave it there for a moment. Your bullet pointswill animate – giving you a preview of what the chosen animation style will look like.5) Click the arrow button6) Click the More buttonto see more animations.to see a full list of animation styles.You will notice the animations are categorised under the headings, Entrance, Emphasis, Exit andMotion Paths. Entrance Emphasis Exit Motion Pathsanimations will make objects appear on your slide in various ways.animations will modify an object to draw attention to it (such as changing its size) andthen return it to the way it was.animations will make objects disappear from the slide.allow you to move objects around your slide in various ways.7) Click Fly In to set that as the animation type for the bullet points.Note: The note on the previous page about transitions applies double for animation effects. Toomany animation effects can make a very long and very tedious presentation. Use them for addingemphasis. Don’t use them just because you know how. They are meant to draw attention to yourslide’s information, not distract from it. Steve O’Neil 2011Page 3 of 8http://www.oneil.com.au/pc/
Using Microsoft PowerPoint 2010Exercise 4.Special EffectsAdding Sound to SlidesSound can be added to slides in a couple of different ways. One way is to have a button on a slidethat you can click on to make a sound play.1) Go to the Title (first) slide in your presentation.2) Click the Insert tab on the Ribbon Bar.3) Click on the bottom part of the Audio icon (clicking the top part will bring up a fileopen dialog for you to select a sound file. Clicking the bottom part lets you choosewhether you are getting your sound from a file or another source).4) From the list of options which appears, choose Clip Art Audio. The ClipArt task pane will appear onthe right side of the window and will display a list of sounds which can be used.5) Click on Claps Cheers to place the sound on your slide.The sound will be placed on your slide complete with play controls that can be used when you areviewing your slideshow.6) Move the sound and its controls to a suitable position on your slide where it isn’t overlappingyour text.NoteWhen you are viewing your presentation you will see the icon for the sound where youpositioned it on the slide. The controls for playing the sound will appear when you move your mouseover the icon. Steve O’Neil 2011Page 4 of 8http://www.oneil.com.au/pc/
Using Microsoft PowerPoint 2010Exercise 5.Special EffectsTransition SoundsAnother way you can add sound to a slide is by having a sound play as part of your slide’s transition,or as part of an animation effect.NoteIf you have a sound file you want to use, you may need to convert it to the WAV file formatfirst before it can be used for a slide transition.1) Move to your second slide.2) Click the Transitions tab on the Ribbon.The right section of the ribbon displays options that are used for sounds and transition timing.3) Click onto display a list of sounds that are included with PowerPoint.Instead of using one of the built-in sounds we’ll use an external sound.4) From the bottom of the list click Other Sound.5) Select one of the sample sounds included with these exercises1 and click Open.6) Display the list of sounds again and at the bottom of the list click Loop Until NextSound. When the slideshow is being viewed, this will cause the selected sound to keep repeatinguntil the slideshow ends or another sound plays.Note: You shouldn’t need to be told about how annoying sounds could be in a presentation ifthey’re used too much!1Some sample music files are available at the website for these exercises. Steve O’Neil 2011Page 5 of 8http://www.oneil.com.au/pc/
Using Microsoft PowerPoint 2010Exercise 6.Special EffectsViewing the PresentationOnce the presentation is all ready, you’ll want to show it off. Here’s how. First of all, you can set thepresentation to move from one slide to the next by itself, or you can change slides manually (whichis the standard setting). We’ll start with manual advance settings.1) Move to the first slide by pressing [Ctrl] [Home] (you didn’t forget that shortcut did you?)2) To get in to the slide show view, click the icon in the bottom left corner or press the [F5] key.If you want to end the presentation at any time, press [Esc]. You can then press [F5] again to return tothe presentation. Your presentation will also end once you have passed the final slide.3) Ensure you are on the first slide and in the slide show. Click your left mouse button or press thespacebar to advance. If you have a sound on the first page, you may need to click/press again toadvance to the second slide.4) If you want to move to the previous slide again, you can right-click on the screen and choosePrevious. An even easier way to go backwards and forwards through the slides is to press the[Page up] or key (for next slide) and the [Page down] or key (for previous slide).Note: When you reach a slide with animations like your second slide, clicking or pressing a key willactivate the next animation on the slide. The show will advance to the next slide after each of theanimations has played.5) If you would like to quickly get to a particular slide number, you can simply press the number ofthe slide you want to go to and then press [Enter]. E.g. press [3] and [Enter] on your keyboard whilein slideshow view. You will be taken straight to the 3rd slide. It doesn’t matter if you’ve alreadypassed the slide. If you have a lot of slides in a presentation it still works. E.g. if you want to goto the 32nd slide, you simply need to press [3] and [2] followed by [Enter] and you’ll be takenstraight there.6) Press B to turn Black Screen on and off. Press W to turn White Screen on and off.7) Press [Esc] to exit the slide show view if you are still in it.8) Click the slide sorter icon.9) Press [Ctrl] [A] to select all slides and make sure the Transitions tab is selected on the Ribbon.10) Change the advance slide options to the following.11) Press [F5] to preview your slideshow again. Each slide should automatically move to the next oneafter 5 seconds without you needing to click or press any buttons. Steve O’Neil 2011Page 6 of 8http://www.oneil.com.au/pc/
Using Microsoft PowerPoint 2010Exercise 7.Special EffectsNotes and Hand-outs1) Return to the normal slide view.Beneath the slide is an area for notes. These notes can help you, as a presenter. Your notes couldinclude additional information that you will say in your presentation, that doesn’t need to bedisplayed for the audience.2) Select the Second slide.3) Add a note about your chosen style of music.If you are doing a presentation using PowerPoint, your listeners may appreciate having some notes oftheir own to follow on with. It may even benefit you as a presenter to have a copy of yourpresentation printed out in front of you so you can remember what’s next in the presentation.4) Click the File tab on the Ribbon Bar and then click Print (or press [Ctrl] [P] on your keyboard). The Printer option allows you to select from the printers which are available to your computer.These could be network printers or printers that are directly connected to your computer. The Printer Properties option displays settings for the selected printer which will vary dependingon the printer selected. These will often include options to change the printing quality. The next setting allows you to choose how much of your presentation will be selected. Bydefault, all slides will be printed but you can choose specific slides to be printed if you don’tneed them all. Steve O’Neil 2011Page 7 of 8http://www.oneil.com.au/pc/
Using Microsoft PowerPoint 2010 Special EffectsThe next options allow you to choose how slides will be printed.5) Select the Notes Pages option under print layout. The preview in the right section will show youhow it will look when printed. This option will print each slide with any notes underneath.6) Use the page navigation buttons below the preview to move between the pages.7) Select the 6 Slides Horizontal layout option. This is a popular print layout for handouts.8) If you want to print your presentation with the current options, click the Print button. Otherwiseclick the Home tab or press [Esc] to return to your normal slide editing view. Steve O’Neil 2011Page 8 of 8http://www.oneil.com.au/pc/
Using Microsoft PowerPoint 2010 Special Effects Steve O'Neil 2011 Page 1 of 8 http://www.oneil.com.au/pc/ Microsoft PowerPoint Exercises 4