Transcription
CBCL LimitedSheet Set Manager TutorialCBCL Design Management & Best CAD Practices2013Our Vision“To be the most respected and successful Atlantic Canada based employeeowned firm, delivering multidiscipline engineering and technical services.”REV. 02
CBCL Limited AutoCAD TutorialUsing the Sheet Set ManagerContents1.What is The Sheet Set Manager2.What are the Benefits (Page 4)3.Sheet Set Manager Components (Page 5)(Page 3)4. Sheet Set Manager Field Category Definitions (Page 6)5. Sheet Set Manager Overall Procedure Reference (Page 8)a. Step 1 - create sheet set project (Page 9)b. Step 2 - add sheets to sheet set (Page 11)c.Step 3 - create viewports with named views for cross-referencing (Page 14)d. Step 4 - add a cover sheet complete with drawing list (Page 18)6. Tips and References (Page 21)a. Sheet Set Manager File Management Tips (Page 21)b. Sheet Set Manager Field Character Tips (Page 21)c.Sheet Set Manager View Tips (Page 22)d. Sheet Set Manager View Callout Tips (Page 22)e. Sheet Set Manager Drawing List Table Tips (Page 23)2 Page
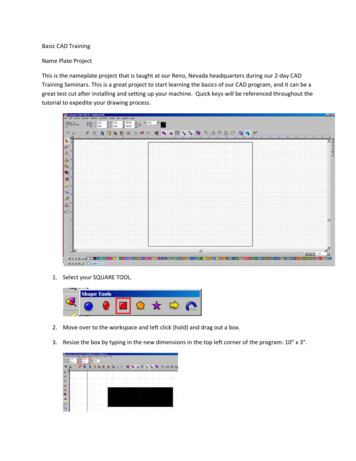
1.What is The Sheet Set ManagerThe Sheet Set Manager (SSM) is a Tool Palette introduced in AutoCAD 2005 that actsas a document control tool for project drawing sheets.A defined Sheet Set is an organized collection of sheets which can either be startedfrom scratch from a predefined template file or pre-existing sheet set, or as importedlayout tabs from existing drawing files.Each sheet defined in the Sheet Set Manager is essentially a hyperlink to a particularlayout tab in a drawing file designed to help automatically populate and control projectand drawing information from within the Sheet Set Manager.Managing sets of drawings manually can be complicated and time consuming, but withthe Sheet set manager, a lot of the upfront “leg work” greatly reduces potential errors,and makes global modifications easier.The image below show the Sheet Set Manager palette with discipline subsets definedfrom the CBCL template DST file before any sheets have been added.3 Page
2.What are the BenefitsUsing the Sheet Set Manager helps eliminate a lot of repetitive steps either at the initialsetup or throughout the entire course of the project. Below is a list of examples of howusing the SSM will save time and help eliminate mistakes.BArrange Quick Access To Drawing Files With Hyperlinks: Ensures that the correctdrawings are being opened, and eliminates time consuming searches through numeroussub-folders.BManages Project Data And Keeps It Consistent. Ensures that every sheet is using anddisplaying the same project information [e.g. “Yarmouth” vs. “YARMOUTH” vs. “Town ofYarmouth” across multiple drawings] and correct project information [e.g. some drawingssay “Phase 1” vs. other drawings saying “Phase 2”]BModify Project Data Globally Without Opening The Drawings: If a project name or projectnumber has to change, it only has to be done once through the Sheet Set Managerproperties, and the change will reflect globally on every drawing in the setBMaintains Accurate Cross-Referencing: All cross-references for Details, Sections,Elevations, etc. will be accurate, and if the source data has to change [e.g. changing adetail number] it only has to be done once via SSM properties, and all cross-referenceswill be globally updated.BEnsures All Users Are Using Same Format Of Callout And View Label Blocks:Eliminates any inconsistent looking callout blocks or section bubbles across multipledrawings and disciplines, and thus prevents operators from using symbols out of theirown “personal library” that does not adhere to company-wide standards.BEnsures all Users Are Using the Same Format Title-Sheet: Prevents users from merelydoing a “Save As” of a previous job using a potentially outdated title-sheet, which can beeasily replaced if that is the case.BCreates a List of all The Drawing Sheets in the Project: Inserts an automated linkedtable listing all the drawings in the set providing drawing the number and drawing title. Ifsheets are added or removed from the SSM, the drawing list table will updateBPrint or PDF Sheets Without Opening Drawings: Every drawing in the set, or justselected drawings, can be published in various formats en masse without having to openall the drawing filesBArchive Sheets, Drawing Files, and Associated Files in One Step: Collects and savesevery related file associated to the SSM and/or individual drawing files and archivesthem in a ZIP file.4 Page
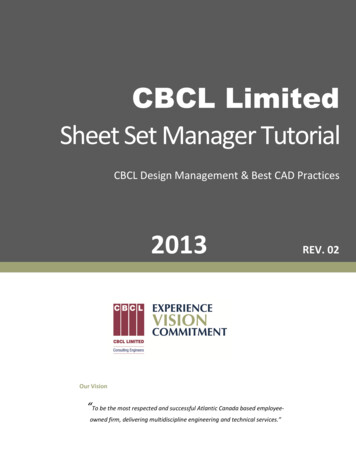
3.Sheet Set Manager ComponentsThe image below lists the various components of the Sheet Set Manager paletteRight-clicking on the Sheet Set Filename activates the pop-up menu which offers thevarious options to manage the Sheet Set5 Page
4.Sheet Set Manager Field Category DefinitionsAs previously mentioned, in order to automatically populate the title-block with projectand sheet data, the Sheet Set Manager uses FIELDS to extract information from theproject Sheet Set Manager.In the graphic below, it shows the FIELD command dialog box with the “SheetSet” FieldCategory active displaying the different fields available used to extract sheet set data6 Page
There are basically five root categories for Sheet Set fields:1. Current Sheet: These fields extract information from a drawing sheet that wouldonly pertain to that particular sheet, like: Drawing Number, Drawing Title, and anyother custom sheet properties like the design team2. Current Sheet Set: These fields extract information from the current sheet setthat would apply globally to every drawing in the package like: Project Name,Project Number, and any custom sheet set properties not available as a defaultlike the client name3. Sheet Set: These fields extract basic information from the Sheet Set of a differentproject (i.e. a different DST file) which can be useful if reference must be madebetween projects that have been broken up into different phases4. Sheet Set Placeholder: These fields are used in block attribute definitions forView Label details and Callout blocks in order to extract sheet and view relateddata like: Detail Numbers, Sheet Numbers, Detail Names, and Viewport scale.5. Sheet View: These fields are used to extract basic information about the attachedsheet View names from either the current sheet set or from a sheet set in adifferent project.7 Page
5.Sheet Set Manager Basic Procedure GuideWhat follows is a basic step-by-step procedure guide on the steps that it takes to createa full-functioning Sheet Set (note: this procedure guide does not go into a lot of detail onhow everything works, but enough to create a useable sheet set).The image below shows where the predefined Sheet Set DST template files arelocated:L:\CAD Standards\General\Sheet Set Manager Templates\As you can see in the image above, Sheet Set DST files have been created for bothMetric and Imperial units using either AutoCAD 2011 or 2013.8 Page
Step 1 (create sheet set project)The first step is to create a new Sheet Set using a predefined CBCL template and fill inthe appropriate project information.1. Enter the command SHEETSET to open the Sheet Set Manager (SSM)a. Click on the ”Open” pull-down menu and select “New Sheet Set”b. Select “An Example Sheet Set” [Next- ]c. Select “Browse to Another Sheet Set to Use As An Example, and navigate to appropriatetemplate DST file on the network [Next- ]2. In the Sheet Set Details, fill in the Name of “New Sheet Set” (i.e. project number and name),project “Description” (optional), and browse to the project folder on network to save the DST file.9 Page
3. Click on “Sheet Set Properties” button and fill in project information (When creating a Sheet Setfrom a template, the references to “Label Block for Views”, “Callout blocks” and “Page SetupOverrides File” defaults have been predefined within the DST template). [OK]4. When creating a new Sheet Set from one of the CBCL templates, the discipline subsets (whereeach discipline saves their drawing sheets) will automatically be created. (note: each disciplinereferences the same predefined title-sheet except for the cover sheet)10 P a g e
Step 2 (add sheets to sheet set)Once the Sheet Set project has been created, drawing sheets can now be added.Below the graphic example there are two methods describing how to add sheets to theSheet Set, the most common method is Method #2 (“Import Layout as Sheet”).1. Add new sheets to the Sheet Set by right-clicking on the appropriate discipline sub-set andselecting either “New Sheet” or “Import Layout as Sheet”Method #1The “New Sheet” option will create a new empty drawing and you will be given the option to SAVE thedrawing file complete with a Drawing Number and Description. The Description entered will be part of thefilename.Method #2The “Import Layout as Sheet” option is the most common method where existing Layout tabs are addedto the Sheet Set project. Ensure the proper Title-sheet definition is being used, and the attribute data willget filled in accordingly.11 P a g e
2. Once a sheet has been added in the Sheet Set Manager, simply right-click on the sheet andselect “Properties” to add custom data to appear in the Title-sheet including Drawing Number,Sheet Description, Sheet Number, and Design Team (as well as Revision or Issued informationaccordingly)TIP! If you have not been supplied with all the pertinent information, the field is blank by default and theinformation can be added at a later date.TIP! The Sheet Set Manager does NOT recognize blank spaces if you wish to leave a line totally empty.If a space is entered in the field, the title-block attribute will insert “---“as a default value.To prevent the “----“ from appearing, enter the Alt code “255” in the field (i.e. hold down the Ctrl key andenter 255 from the number pad on your keyboard)12 P a g e
The image below shows the result of what the title-block will look like once its Fields extracts globalinformation from the Sheet Set (i.e. Project Name & Project Number etc.) and specific information fromthe individual Sheet (i.e. Drawing Description & Drawing Number etc.)LEGEND[RIGHT-CLICK ON EITHER SHEET SET OR SHEET PROPERTIES]CATEGORY HEADER“Sheet Set or Sheet Data To Be Entered”13 P a g e
Step 3 (create viewports with named views for cross-referencing)Once the modelspace items have been created (i.e. plans, sections, elevations, details,etc.), they are ready to have Viewports created for them. To take advantage of theSheet Set Manager’s cross-referencing function, View names need to be saved for eachtype of viewport item.1. With the VIEW command, save View names for all model-space design components (i.e. Plans,Sections, Elevations, Details, etc.) that will be featured in individual viewports (View namesshould be saved as what best describes the view in question) and then save the drawing.NOTE: When defining the view, make sure the appropriate Annotation Scale (e.g. 1:20, 1:50, 1:500 etc.)is set first (this will be used to properly scale the viewport in Step 3)TIP! When creating a View, use the “Define Window” option and draw a window around the limits of themodelspace items as close as possible. This window will act as a reference for the size and shape of theViewport boundary (once the Viewport has been placed in the Layout, it can still be resized)TIP! After defining a View Name, it is good practice to also define a “View Category” for each type ofdetail to reside under which allows you to quickly access a particular detail via the Sheet Set Manger inthe same way it is quick to access a drawing sheet. For example, if there are a number of “road” typedetails (e.g. asphalt paving, curb & gutter, etc.), and then those details would reside under a ViewCategory called “ROAD”. At the time when a new View Name is being created, click on the “ViewCategory” pull-down to see if the particular View Category has already been created, and if not, it can becreated by enter the category name in the View Category field. To access the details quickly through theSheet Set Manager, click on the “Sheet Views” tab, click on the “View by Category” button (icon looks likea folder) in the title-bar, and then simply double-click on the desired detail view under its particular ViewCategory (the drawing sheet will open an automatically zoom in to that detail view)14 P a g e
2. With the Sheet Set Manager open, a reference link of the project folders containing the drawingswith the saved View names. Click on the Model Views tab, right-click on “Add New Location” andselect “Add New Location”, browse to the project folder accordingly and click “Open”.3. To add the saved Views as viewports on to their respective sheets, expand the drawing file in theModel Views tab, right-click on the desired View name and select “Place on Sheet”. A scaledviewport with a View label block definition will be placed on the sheet as seen in the image below.15 P a g e
The View Label uses the predefined block “DETAIL” which contains predefined attributes where thedefault values are FIELDS that extracts “Sheet View” information. Once inserted, do NOT explodethe block (or any block).The image below shows what the “DETAIL” block looks like by default when inserted. The word“DETAIL” is an attribute and can be manually overwritten to say “SECTION” or “ELEVATION” (etc.) ifrequired. If the block is not associated with a Sheet Set project, the default field attributes can alsobe overwritten if desired.4. To assign a number or letter to the detail view, click on the “Sheet Views” tab on the Sheet SetManager, right-click on the detail view and select “Rename & Renumber”, and enter a detailnumber in the Number field as required.Once a Detail View has been assigned a number, a callout block can been placed anywherethroughout the entire drawing package (regardless of the discipline) which will extract the DetailNumber and the Drawing Sheet the detail resides on (see step 5 below).16 P a g e
5. To place Callout Blocks for each Detail view, navigate to the drawing Layout tab, click on the“Sheet Views” tab on the Sheet Set Manager, right-click on the detail view in particular and selectthe “Place Callout Block” fly-out menu and select the type of callout (i.e. Detail, Section, orRectangle). The callout block will have the detail & sheet number automatically filled in.Like the View Label, the “Callout Blocks” uses block definitions which contain predefined attributeswhere the default values are FIELDS that extracts “Sheet View” information. If a Detail View isrenumbered, all of the Callout Blocks that make reference to that detail will be updated automaticallythe next time the drawing is Regenerated or Reopened.The image below shows what each callout block looks like by default when inserted. Both theRectangle and Section callout blocks have dynamic properties in which their appearance can bechanged to suit the situation. If any of these blocks are not associated with a Sheet Set project, thedefault field attributes can also be overwritten if desired.17 P a g e
Step 4 (add a cover sheet complete with drawing list)1. To add Cover Sheet, right-click on the Cover Sheet subset and select “New Sheet” and enter “00”for the drawing number, and “Cover Sheet” for the Sheet Title. The subset has been defined touse a cover sheet layout tab from the predefined CBCL title-sheet template.2. To create a Drawing List on the cover sheet, right-click on the Sheet Set Filename header andselect “Insert Sheet List Table” (as seen in the image below)18 P a g e
3. In the Sheet List Table dialog box, select the “CBCL Drawing List Table” as the table style, clickthe checkbox “Show Subheader” on, click on the “Subsets and Sheets” tab and ensure all thenecessary sheets to appear on the cover sheet are checked on, and click the OK button.Once the Drawing List table is inserted, it looks like image as seen below on the leftL.But when plotted , the table lookks like the image as seen above on the right.TIP! In the event that sheets are either added, removed, or modified, the Sheet List Table can beupdated. Simply click insideany one of the table cells, right-click and select “Sheet List Table” fly-outmenu , and then select “Update Sheet List Table”19 P a g e
Below is an image that shows which Sheet set fields are define in the cover sheetNOTE: Each time the drawing package is issued, the “Revision Description” and “Revision Date” will haveto be changed to reflect how the drawing package is being issued.NOTE: If possible, the cover sheet Layout tab should be created in a drawing file where a Key Plan canbe created using a Viewport of the model space contents (i.e. a Civil Site Plan or Architectural Floor Plan,etc.)NOTE: If a client logo is available (preferably in CAD format), then it needs to be inserted next to theCBCL logo matching the overall height or whatever has the better presentation.20 P a g e
6.Tips and ReferencesBelow is a collection of tips (some of which have already been mentioned in this tutorial)that will make using the Sheet Set Manager a little easier.a. Sheet Set Manager File Management Tips In the event that a user must work on two or more jobs at once, the Sheet Set Manager hasthe ability to have more than one Sheet Set open at a time. When done working in a SheetSet project, simply right-click on the Sheet Set file name and select “Close Sheet Set” In order to preserve a version of the drawing package after each submission and/or RecordDrawing stage, the Sheet Set project can either be Archived or eTransmitted (both of whichcollect the electronic files and save them in a compressed ZIP file). The difference betweenArchiving and eTransmitting is that the Archive function will include all the template files usedin addition to all the project files. More than one user can access the Sheet Set at any given time, but the users will see a“padlock” icon next to all the drawing sheets that are already being accessed. In order to make changes to the properties of either the Sheet Set project, or the individualsheets, a single or blank drawing must be open in order to make edits to the Sheet Set. The Sheet Set Manager has an “automatic refresh” which can slow AutoCAD down (especiallyis multiple users are simultaneously working within the same Sheet Set project). To turn thisautomatic refresh off, enter the command SSMSHEETSTATUS and set the value to 0 (i.e.“zero”). To refresh it manually, click the “Refresh Sheet Status” button which is located in the“Sheets” title-bar. If you are not currently working in a Sheet Set project, close the Sheet Set file by right-clickingon the Sheet Set file name and select “Close Sheet Set” (this will increase AutoCAD’s overallperformance) Another way to increase performance of the Sheet Set Manager is to minimize all the drawingsubsets that you do not work in. Having each discipline’s subset expanded showing its list ofdrawing sheets will slow AutoCAD down. Simply click the subset’s tree “ [-] “ button tominimize the drawing list (to expand it again, click it when it looks like “ [ ] “).b. Sheet Set Manager Field Character Tips The Sheet Set Manager does NOT recognize blank spaces if you wish to leave a line totallyempty. If a space is entered in the field, the title-block attribute will insert dashes like “---“ as adefault value. To prevent the “----“ from appearing, enter the Alt code “255” in the field (i.e.hold down the Alt key and enter 255 from the number pad on your keyboard) There are many characters which can’t be used in a Sheet Set field including: \ / ? “ ; : * , ‘ (because these characters are used in programming languages). But there is a trick usingAlt codes in order to sneak some of them in including:“ (left double quote) Alt 0145“ (right double quote) Alt 0148‘ (left single quote) Alt 0145‘ (right single quote) Alt 0146, (comma) Alt 0130; (semi colon) Alt 59o Ø (diameter) Alt 0248oooooo21 P a g e
If the default Sheet Set attribute values have been overwritten, they can be replaced againsimply by accessing attribute value through the attribute editor, and press “Ctrl F” in theattribute field to launch the FIELD command, access the Sheet Set values, and select thedesired value.c. Sheet Set Manager View Tips When creating a View, use the “Define Window” option and draw a window around the limits ofthe modelspace items as close as possible. This window will act as a reference for the sizeand shape of the Viewport boundary (once the Viewport has been placed in the Layout, it canstill be resized) After placing a Viewport in the Layout tab, the View Label (i.e. block definition “DETAIL”) isalso placed in the Layout tab. If you wish the View Label to be placed in Modelspace, simplyuse the CHSPACE command and send it through the Viewport accordingly. When placing a Detail View in the Layout tab, the Viewport boundary will be placed onwhatever layer is set current. After defining a View Name, it is good practice to also define a “View Category” for each typeof detail to reside under which allows you to quickly access a particular detail via the SheetSet Manger in the same way it is quick to access a drawing sheet.d. Sheet Set Manager View Callout Tips The callout block used for sections is defined as “SECTION CALLOUT” which has beendefined with Dynamic Properties. This means it contains features to change its appearanceincluding: rotating the section arrow while the text stays horizontal, includes different types ofsection lines that can be independently stretched and mirrored, and has a visibility state for anElevation Arrow which can also be independently rotated. The callout block containing a rectangle is defined as “RECTANGLE CALLOUT” which alsohas been defined with Dynamic Properties. The rectangle can be stretched to change its sizeand shape, and the callout bubble and leader can be mirrored around all four sides. References can be made to Sheet Set items without using callout blocks or view labels. If anote within a Text, MText, or an MLeader object must make reference to a Sheet Set item, aFIELD (press Ctrl F) can be used to access and insert the Sheet Set item. For example, if ageneral note says “For General Notes, See Drawing 2”, the number “2” can be a FIELD toaccess the Sheet Set drawing number. Inserting a Field works for Matchlines where if thedrawing number being matched to changes, the Matchline note referencing the drawingnumber will automatically update after a Regen. Detail callout blocks should not be placed too early during the design process in case DetailViews are removed or reshuffled to other drawings. Changing a detail number or renumberingthe sheet it’s on will not affect the callout reference link, but if a detail view is removed orrelocated to another sheet, then any callout blocks will lose their dynamic links will have to bereplaced or re-associated.22 P a g e
e. Sheet Set Manager Drawing List Table Tips In the event that sheets are either added, removed, or modified, the Sheet List Table can beupdated. Simply click inside any one of the table cells, right-click and select “Sheet ListTable” fly-out menu , and then select “Update Sheet List Table” A drawing can removed from the Drawing List Table simply clicking inside any one of thetable cells, right-click and select “Sheet List Table” fly-out menu , and then select “Edit SheetList Table Settings”, click on the “Subsets and Sheets” tab, and un-check the drawing that youdo want to appear in the Drawing List Table. Then follow the procedure listed above toupdate the table.This Tutorial was prepared by the CBCL Limited CAD Systems Analyst. Your comments are welcomed. Please direct anyresponses to Murray Clack (murrayc@cbcl.ca) or 902-421-7241, Ext. 2326.Rev 01 - This was initially prepared in January 2013.Rev 02 - Revision: September 20, 2013 (Revision attributes defaults removed from SSM)23 P a g e
CBCL Limited AutoCAD Tutorial Using the Sheet Set Manager Contents 1. What is The Sheet Set Manager (Page 3) 2. What are the Benefits (Page 4) 3. Sheet Set Manager Components (Page 5) 4. Sheet Set Manager Field Category Definitions (Page 6) 5. Sheet Set Manager Overall Procedure Reference (Page 8) a. Step 1 - create sheet set project (Page 9) b.