Transcription
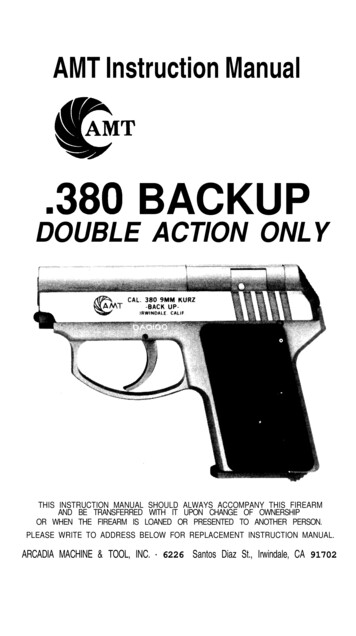
Instruction manualVWR PCR WorkstationEU cat. no 732-2541NA cat. no 10783-132UK cat. No 732-2542Version 02 Issue08/2021
Legal address of ManufacturerEuropeVWR International bv,Researchpark Haasrode 2020Geldenaaksebaan 464 B3001 Leuven 3216385011be.vwr.comUK Importer:VWR International LtdHunter Boulevard, Magna ParkLutterworth, Leicestershire, LE17 4XNuk.vwr.comUnited StatesVWR International LLC100 Matsonford RdRadnor, PA 19087 1 800-932-5000www.vwr.comCountry of Origin: GERMANY2vwr.com I Instruction manual VWR PCR Workstation
Table of ContentsIntroduction . 4Delivery contents . 4Safety INSTRUCTIONS . 5ASSEMBLING the PCR Workstation. 7Step 1 . 7Step 2 . 8Step 3 . 9Step 4 . 9Step 5 . 9Specifications . 10VWR PCR Workstation . 10Power supply . 10Connections . 11AC power inlet . 11AC power outlets . 12Operating the PCR Workstation . 13Use of PCR equipment inside the workstation .13Operating the overhead UV and white lights .13Operating the UV Air Recirculator.13Timer . 14Control panel description. 15Select day and time . 16Software menu . 16Set up UV Surface time . 16Set up Auto Decontamination routine. 17Checking and resetting the hours of duty . 19Settings . 20Measuring UV tube intensity . 22Bacterial destruction chart . 23Maintenance . 24Care and cleaning . 24Replacing the UV germicidal or white light tubes. 25Replacing the UV Air Recirculator UV tube . 25Replacing the fuse . 25Replacing the filter of the UV Air Recirculator . 25Ordering Information.26Technical service . 26Web resources . 26Warranty.26Compliance with local laws and regulations . 27Disposal Instruction . 27Our local offices in Europe, AMEA and North America .283vwr.com I Instruction manual VWR PCR Workstation
IntroductionThe VWR PCR Workstation is designed as an ideal environment for the manipulation of DNA andRNA, especially for the set-up of PCR assays. Contamination can lead to false or misleading resultswhich costs time and money. The VWR PCR Workstation minimises the risk of contamination. Itprovides a 'separate room', e.g. for the set-up of PCR reactions.The high intensity surface UV tubes inactivate DNA as a source of contamination betweenexperiments. In addition, a UV Air Recirculator is integrated into the workstation system whichreduces airborne contaminants during experiments. UV light is effectively blocked by solidpolycarbonate screens to ensure maximum protection for the user.The surface of the workstation is constructed of stainless steel, which is very robust and can easilybe cleaned plus has an antimicrobial effect.The VWR PCR Workstation offers a controlled environment for PCR and RNA applications thatprotects your samples and helps to achieve optimal results.Delivery contentsAfter receipt of the system, please check if the following items are included in the shipment: Base (1x) Rear panel (1x) Side panel (2x)4vwr.com I Instruction manual VWR PCR Workstation
Front panel (1x) Shelf (2x) Top assembly (1x) Ventilation cover (1x) Screw (31x) Screwdriver (1x) Main cable (1x)Safety INSTRUCTIONSThe PCR Workstation is designed with function, reliability, and safety in mind.Before using the PCR Workstation please read this entire manual and strictly follow the safetyinstructions!Caution: The unit includes shortwave UV, which is a powerful source of UV radiation that will cause5vwr.com I Instruction manual VWR PCR Workstation
damage to unprotected eyes and skin if directly exposed to the UV lamps. Before operating anyunit, ensure that the PCR Workstation is not damaged, and that instructions for use of thisequipment are followed. A safety shut-off switch automatically turns the UV light off when thefront panel is open, protecting users from UV exposure. The polycarbonate panels are UVblocking.Intended use of the PCR Workstation: Working environment for protection of PCR reactions /reaction set ups and genetic substances against pollution and contamination.Safety and protection of the user can not be ensured if the PCR Workstation is used in any mannerthat is not specified in these instructions. Special notice must be taken of the following:Caution: Dangerous voltageEnsure that the voltage requirements of the PCR Workstationexactly match your local AC power supply.Only use the original AC cable supplied with the PCR Workstation.Caution: LiquidsEnsure that no liquids can enter the device. Do not place liquids ontop of the PCR Workstation.Caution: Dangerous explosive materialDo not use reactive or explosive substances in the PCRWorkstation.Caution: DamageCheck for transport damage and completeness of the accessoriesupon arrival. If any damage is noticed, contact your distributor ormanufacturer immediately. If you detect any damage of the PCRWorkstation or one of its accessories, do not connect the PCRWorkstation to the AC wall outlet and do not use the device in anymanner!Caution: Optical radiationDo not switch on the PCR Workstation if not completelyassembled. See “ASSEMBLING THE PCR WORKSTATION”, page 6.Do not look directly into the UV lamps.6vwr.com I Instruction manual VWR PCR Workstation
ASSEMBLING the PCR WorkstationThe PCR Workstation should be assembled by two people, directly at the site of operation. Werecommend the wearing of safety gloves for hand protection.Step 1Put the base on an even surface with therubber feet facing down and the sensor cableoutlet facing to the front. Lay the back panel onto the base with the power outlets facingdown, and the power input and the type labelfacing to the right.Connect both sensor cables.Slide the connection assembly into the cavityof the back panel.7vwr.com I Instruction manual VWR PCR WorkstationBack panel Base
Slot the back panel onto the base . Theconnecting link of the base must fit in theback panel . Take care not to squeeze thesensor cable.Connect both parts by screwing 3 screws intothe back side. Use the screw driver to do this.Turn the parts around 90 on the site ofoperation and incline both screwed parts to theback part of the back panel . Screw bothpanels with 2 screws from underneath. Tiltback the panels in starting position with theback panel facing backwards.Step 2Back panel Remove the protective foil from the side panels.Insert the side panels into the guiding rails atthe base and push up against the back panel within the guiding rails at both sides. Carefullyscrew the side panels with 3 screws each inthe base and the back panel , respectively.Use the supplied screws and the screwdriver .Side panel Side panel Base 8vwr.com I Instruction manual VWR PCR Workstation
Step 3Side panel Put the shelves into the shelf brackets at theback panel .Shelves Remove the protective foil from the front panel.Put the front panel onto the side panels .Take care that the screw holes of the front panelmatch the threaded holes in the side panels .Hold the front panel in place. Screw the frontpanel to both side panels using 3 screws each. Use the screwdriver .Front panel Side panel Step 4Turn the assembled parts around 180 .Top assembly Remove the small UV tube at the back of the topassembly.Put the top assembly onto the panels. Takecare not to squeeze the cables protruding fromthe back panel. Screw the top assembly to theback panel at two positions. Use the screws and screwdriver supplied.Back panel Connect the sensor cables from the back panel and the top assembly . Put the power plugof the back panel into the power outlet of thetop assembly .Step 5Insert the UV tube back in place.Cover the service access of the top assembly with the ventilation cover . Screw both partstogether with 6 screws . Use the screw-driver .Turn the system around 180 and place it at thesite of operation as needed.Finally connect the system to the power supplyby plugging the power plug from the backpanel into the local power outlet.The system is now ready for use.9vwr.com I Instruction manual VWR PCR WorkstationTop assembly Ventilation cover
SpecificationsVWR PCR WorkstationLight sources integrated into the top assembly: 2x 25 W 254 nm UV light tubes– for effective surface decontamination 1x 8 W 254 nm UV light tube– for decontamination of air during work in UV AirRecirculator 1x 15 W white light tube– for a bright work surfaceFeatures: Four power outlets Two shelves made from stainless steel Electronic UV timer Working area and back panel made from stainless steel Front and side panels made from polycarbonate (Makrolon ) that blocks wavelengthsbelow 400 nmWxHxD:Weight:Pollution rate:Environmental temperature range:Maximum relative humidity:Maximum height above sea level:Noise level:750x780x620 mm48 kg2 10 to 30 C70%2000 m 51 dB (A)Circulation rate fan:56 m3/hPower supplyEU/UK version:220 - 240 V AC, 50/60 Hz, max. 1650 VAUS version:120 V, 60 Hz, max. 900 VAFuse:10 AT, 5 x 20 mmFor indoor use, only!10vwr.com I Instruction manual VWR PCR Workstation
ConnectionsAC power inletAC power switchAC power inletFuseBefore first use, ensure that the voltage requirements of the PCR Workstation exactly match yourlocal AC power supply. Connect the PCR Workstation to the AC power supply only by the ACpower cord delivered with your PCR Workstation. Only connect the PCR Workstation to electricpower systems with an earth conductor. The AC power inlet and the AC power switch are locatedat the rear of the workstation. The AC power switch serves as a disconnection of the AC powersupply from the device. The accessibility of the AC power switch must be not hindered or obscuredin any way.The electric fuse is placed at the back of the device between the power switch and the AC powerinlet. After pulling off the AC power cord and pushing upwards a safety catch, the fuse can bechanged. Use only a fuse with correct values (see "SPECIFICATIONS", page 10). Indications aboutthe fuse type are also located at the back of the device.If a service is required, contact your local distributor or the manufacturer (see "TECHNICALSERVICE AND ORDER INFORMATION", page 22).The serial number of the PCR Workstation is located at the rear of the instrument. Thereplacement of single components (except polycarbonate panels, UV tubes and the UV AirRecirculator fuse and filter) must not be done by the user but exclusively by authorised specialistsusing original replacement parts. Therefore, the device must be sent to the manufacturer.Unauthorised work on the device voids the warranty.The surface of the device should be decontaminated with a lint-free cloth soaked with 70%ethanol before sending. Please fill in and sign the decontamination certificate and send it tothe manufacturer together with the device.For safety reasons the device must be switched off and the mains plug pulled before cleaningis performed!11vwr.com I Instruction manual VWR PCR Workstation
AC power outlets4x AC power outletThe 4 AC power outlets serve as power supplies for devices used inside the PCR chamber.The sum of the maximum power ratings of devices connected to these power outletsmust not exceed the values specified for the PCR Workstation.See chapter "OPERATING THE PCR WORKSTATION ", page 13, for furtherinformation.12vwr.com I Instruction manual VWR PCR Workstation
Operating the PCR WorkstationUse of PCR equipment inside the workstationShelves are provided for the placing of small tools for storage and decontamination.Power outlets allow use of shakers, rockers and other equipment for PCR experiments inside thePCR chamber. The equipment can be decontaminated between experiments. To operateequipment within the chamber, plug the equipment into the power plug. Specific power plugs areinstalled as shown in the illustration "AC power outlets", page 12.Timing of UV decontamination can be programmed for time-controlled every daydecontamination.NOTE: When operating, equipment plugged into the outlets, combined amp total should notexceed 6 amps.NOTE: Crazing is a normal process for polycarbonate panels exposed to UV light. Crazing willoccur over a period of time. Reduce crazing by keeping exposure to UV to a minimum. Crazingmay occur within the warranty period and is regarded as normal wear and tear not covered by thewarranty. Polycarbonate panels are available as spare parts and can be replaced.Operating the overhead UV and white lightsThe PCR Workstation provides an automated process for eliminating contamination by using thedecontaminating properties of shortwave 254 nm ultraviolet light. The UV light is typicallyoperated when no samples are inside the chamber. The chamber is decontaminated and DNA as apossible contamination is inactivated.The overhead white light can remain lit at any time throughout an experiment or adecontamination process. The fluorescent white light provides a bright light within the PCRWorkstation.Operating the UV Air RecirculatorThe VWR PCR Workstation includes a built-in UV Air Recirculator for elimination of airbornemicrobes during experiments.NOTE: The UV Air Recirculator can operate while the front panel is open.The UV Air Recirculator circulates airflow into and out of the chamber. The air is sucked into theUV Air Recirculator in the top of the chamber, the air outlets are at the bottom of the back panel.The drawing indicates the location of the air vents.13vwr.com I Instruction manual VWR PCR Workstation
NOTE: Equipment in front of the air vents will block airflow.TimerThe default setting is 30 minutes adjustable at 5 minutes’ increments down to a minimum of 5minutes. For information on setting the timer please see page 16/17.Note: A magnetic sensor is built into the bottom of the front panel. When the front panel isopened, the ultraviolet light will automatically shut off!Note: Do not attempt to perform PCR procedures with the germicidal lamp on. The germicidallamp is used to decontaminate the chamber between experiments.14vwr.com I Instruction manual VWR PCR Workstation
Control panel descriptionTo scroll or increase selected valueTo scroll or decrease selected valueEnables to select and change the displayed program settings. Several clicks tojump from value to value.Enables to open and close the software menuSwitch white light on and offSwitch UV light on and offIt automatically activates the programme to decontaminate the workspace.The default time for the decontamination process is 30 minutes.The display will show the remaining time of the decontamination programme.Remaining time could be change with the arrow buttons.Switch Recirculator on and off15vwr.com I Instruction manual VWR PCR Workstation
Select day and timePressfrom the home screen to changeday and time. Pressing the or button willmodify the selected value.Pressto go to the next values: hours,minutes and safe.Software menuPressto open the software menu.Pressing the or button will go throughthe menu items. An arrow is displayed nearthe selected item.The items are: UV Surface Auto Decontamination Duty hours SettingsSet up UV Surface time16vwr.com I Instruction manual VWR PCR Workstation
Set up Auto Decontamination routineThe following parameters can be selectedStart timeWeekdaysFunctionsPressing the or button will modify fromOFF to ON. To activate or deactivate the dailydecontamination routine.17vwr.com I Instruction manual VWR PCR Workstation
(S Sunday)will store the settings.Pressto go back to thedecontamination routine parameters.Select “Functions” and press. To selectthe Functions for the auto decontamination,click on the function buttons on the rightpanel. A blue light will flash if a function isselected. To save the selection press.Note: During Auto-Decontamination allselected functions will be activatedautomatically, after reaching the selected timeonly the UV Light will be deactivated all otherfunctions (Recirculator) are still running toprotect the device from re-contamination.Pressto go back to thedecontamination routine parameters.To stop a running Auto Decontaminationselect Abort? Yes and press.After finalizing an Auto Decontamination runthe final Time will be shown in the display,pressto go back to the main screen.Note: During Auto-Decontamination allselected functions will be activatedautomatically, after reaching the selected timeonly the UV Light will be deactivated. All otherselected functions (e.g. Recirculator) are stillactive to protect the device from recontamination.18vwr.com I Instruction manual VWR PCR Workstation
Checking and resetting the hours of dutyUV SurfaceUV Recirculatorrogress bar will indicatewhen the device needs to be replaced.We recommend to change the UV tubes after1000 – 1500 operating hours as the UV intensitydecreases significantly after that time.togo back to the Duty hours selection parameters.After replacing UV tubes it is necessary toreset the hours of duty in the softwaremanually!19vwr.com I Instruction manual VWR PCR Workstation
SettingsBrightnessContrastLanguageTime FormatFactory Resetrogress bar starts flashing and indicates thebrightness of the display. Press the or buttons to change the value. Presstogo back to the Settings parametersrogress bar starts flashing and indicates thecontrast of the display. Press the or buttons to change the value. Presstogo back to the Settings parametersPress the or buttons to modify theselected language. Languages are:English, German, Espanola, Francis, Italian andPortuguese. Pressto confirm and storethe selected language. Pressto the Settings parameters.20vwr.com I Instruction manual VWR PCR Workstationto go back
Select “Time Format” and press on.Press the or buttons to modify theselected format between 24h and 12h am/pm.Pressto confirm and store the selectedparameter. PressSettings parameters.to go back to theSelect “Factory Reset” and press on.Press the or buttons to select YES or NOfor the reset. Pressto confirm and storethe settings. PressSettings parameters.to go back to theThe Default parameters are:21Language:EnglishTime Format:24hBrightness:60%Contrast:60%UV Surface Time:30 minAuto Deco:OFFvwr.com I Instruction manual VWR PCR Workstation
Measuring UV tube intensityAs UV tubes age, intensity and germicidal destruction rate decreases. We recommend you changethe UV tubes after 1000 – 1500 hours of operation (please refer to " Checking and resetting thehours of durty", page 19). Otherwise it is important to monitor the efficiency of the tubes to ensuregermicidal requirements are met. The germicidal destruction rate is a function of the UV intensityat wavelength 254 nm and exposure time. The lower the tube intensity, the longer the lamps mustbe on to accomplish the same objective.A UV Intensity Meter with 254 nm sensor will allow the user to measure the 254 nm emissions fromthe tubes. When it is time to measure the UV intensity inside the PCR Workstation, the sensors canbe placed on the floor of the PCR Workstation. Close the front panel and turn on the UV tubes.Please refer to the UV radiometer manual on how to perform the measurement. It is recommendedthat the user records an initial value upon receipt and assembly of the PCR Workstation.To measure the UV intensity from the UV Air Recirculator tube, open the cover lid on the back ofthe PCR Workstation and perform the measurement as described in the UV radiometer manual.Wear protective eyewear and shielding when operating the UV Air Recirculator with theventilation cover open. Replace the cover and screws after the measurement is completed.22vwr.com I Instruction manual VWR PCR Workstation
Bacterial destruction chartThe germicidal destruction rate calculation:Microwatt seconds/cm2 microwatts/cm2 x seconds of exposureThe bacterial destruction chart below indicates the amount of shortwave (254 nm) UV energyrequired for complete destruction of various organisms.Bacteria23Microwattseconds/cm2Other organismsMicrowattseconds/cm2Bacillus anthracis8700YEASTSS. enteritidis7600Saccharomyces ellipsoideus13200B. Megatherium sp.(veg.)2500Saccharomyces sp.17600B. Megatherium sp.(spores)5200Saccharomyces cerevisiae13200B. parathyphosus6100Brewer’s yeast6600B. subtilis11000Baker’s yeast8800B. subtilis spores22000Common yeast cake13200Clostridium tetani22000Corynebacteriumdiptheriae6500MOULD SPORESEberthella typosa4100Penicillium roqueforti26400Escherichia coli6600Penicillium expansum22000Micrococcus cadidus12300Penicillium us us flavus99000Neisseria catarrhalis8500Aspergillus niger330000Phytomonastumefaciens8500Rhisopus nigricans220000Proteus vulgaris6600Mucor racemosus A35200Pseudomonasaeruginosa10500Mucor racemosus B35200Pseudomonasfluorescens6600Oospora lactis11000S. typhimusium15200Salmonella10000VIRUSESSarcina lutea26400Bacteriophage (E. coli)vwr.com I Instruction manual VWR PCR Workstation6600
Sarratia marcescens6160Tobacco mosaic44000Dysentery Spirillum rubrum6160PROTOZOAStaphylococcus ematode eggs9200Streptococcushemolyticus5500Chlorella vulgaris (algae)22000Streptococcus : Polycarbonate ages in UV light, therefore crazing is considered as a normal process.Crazing will occur with time. Reduce crazing by keeping exposure to UV to a minimum. Crazingmay occur within the warranty period and is regarded as normal wear and not covered by thewarranty. Polycarbonate panels can be replaced.Care and cleaningThe front and side panels are made of polycarbonate and are subject to scuffing and scratches ifimproperly cleaned. Therefore, it is strongly recommended to use a soft cloth (preferentiallymicrofibre) for cleaning.‒‒‒‒‒Wipe excess water from inside the unit and outside the unit with an absorbent soft cloth orspongeUse mild detergent and water with a soft cloth or sponge to clean the exterior and interiorof the unitClean the front and side panels with a mild detergent onlyDo not use abrasive pads or cleansersA plastic cleaner solution is recommended to clean the front panel and is available fromlocal plastic supply distributorsNever use organic-based compounds like acetone or ammonia containing cleaners forpolycarbonate panels!Due to the specific qualities of polycarbonate panels made of Makrolon 70% ethanol can be usedfor cleaning.Warning: Unplug the unit before cleaning around the UV tube contacts and internal plug outlets.24vwr.com I Instruction manual VWR PCR Workstation
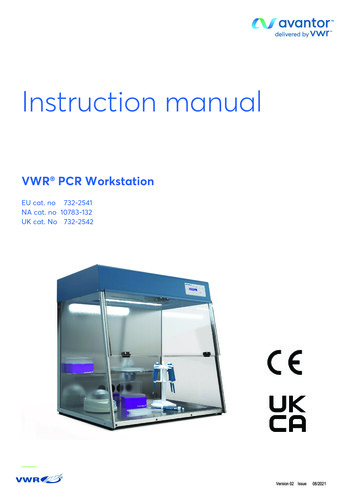
Replacing the UV germicidal or white light tubesTurn the unit power off and unplug the unit from the poweroutlet. Lift up the front panel and locate the tubes. The tube hastwo prongs on each end that first fit into a socket, then rotateinto place.Carefully hold the tube at the end and insert the tube into thesocket. Twist the tube 90 until the tube locks into place.Drawing shows tube location in top assem
Instruction manual VWR PCR Workstation EU cat. no 732-2541 NA cat. no 10783-132 UK cat. No 732-2542 _ Version 02 Issue 08/2021 . 2 vwr . The VWR PCR Workstation is designed as an ideal environment for the manipulation of DNA and RNA, especially for the set-up of PCR assays. Contamination can lead to false or misleading results