Transcription
6.13 05STO8344 S118B.qxd6/13/064:40 PMPage 1InstallationHandbookfor ExteriorInsulationand FinishSystems(EIFS)
6.13 05STO8344 S118B.qxd6/13/064:40 PMPage 2Table of ContentsSto is the innovative world leader in cladding, coating and restorationsystems. Sto was an Exterior Insulation and Finish Systems (EIFS) pioneer,introducing Sto EIFS to Europe in 1963. Headquartered in Atlanta, Georgia,Sto Corp., which is ISO 9001:2000 certified, continues to lead the NorthAmerican industry in innovation. For example, our silicone-enhanced productsfeaturing StoSilco Technology offer greatly improved properties over traditional acrylic-based products and make for high quality, long-lasting installations. StoMachine Technology, another example of Sto innovation, speedsproduction while supporting quality installations.Because of our pioneering experience and technology know-how, wehave produced wall systems for tomorrow that are renowned today for theiroutstanding performance and aesthetic beauty. We’ve developed a Sto wallsystem for virtually any substrate, circumstance and budget, products to solveor prevent a myriad of problems, and 100% synthetic resin coatings in colorsthat challenge the imagination.We at Sto hope that through our commitment to high standards of quality,innovation and service, we will gain your confidence in our company and ourproducts . . .because your success is ours.The Exterior Insulation and Finish System(EIFS)Introduction . . . . . . . . . . . . . . . . . . . . . . . . . . . . . . . . .6Project Preparation . . . . . . . . . . . . . . . . . . . . . . . . . . . .7Material Storage and Handling . . . . . . . . . . . . . . . . . . . . 7Substrates . . . . . . . . . . . . . . . . . . . . . . . . . . . . . . . . . . .8Liquid-applied Waterproofing/Air Barrier . . . . . . . . . . . .8Attachments . . . . . . . . . . . . . . . . . . . . . . . . . . . . . . . . .9Mechanical Fasteners . . . . . . . . . . . . . . . . . . . . . . . . .10Backwrapping . . . . . . . . . . . . . . . . . . . . . . . . . . . . . . .10Insulation Boards . . . . . . . . . . . . . . . . . . . . . . . . . . . .11Expanded Polystyrene (EPS) Quality Test . . . . . .11Storage . . . . . . . . . . . . . . . . . . . . . . . . . . . . . . .12Cutting EPS Boards . . . . . . . . . . . . . . . . . . . . . . . . . . .12Adhesive Application . . . . . . . . . . . . . . . . . . . . . . . . . .13EPS Board Application . . . . . . . . . . . . . . . . . . . . . . . . .13Filling EPS Voids . . . . . . . . . . . . . . . . . . . . . . . . . . . . .15Rasping . . . . . . . . . . . . . . . . . . . . . . . . . . . . . . . . . . . .16Base Coat & Mesh Application . . . . . . . . . . . . . . . . . .16Primer Application . . . . . . . . . . . . . . . . . . . . . . . . . . . .19Finish Application . . . . . . . . . . . . . . . . . . . . . . . . . . . .19Floating or Spraying Textures . . . . . . . . . . . . . . . . . . . .20Sealants . . . . . . . . . . . . . . . . . . . . . . . . . . . . . . . . . . .22Expansion Joints . . . . . . . . . . . . . . . . . . . . . . . . . . . . .23Sto EIFS NExT Installation . . . . . . . . . . . . . . . . . . . . .24Failure Prevention. . . . . . . . . . . . . . . . . . . . . . . . .27Moisture Intrusion and Critical Details . . . . . . . . . . . . .28The List of NEVERS . . . . . . . . . . . . . . . . . . . . . . . .29-31Systems and Products . . . . . . . . . . . . . . . . . . . . .33Sto EIF Systems . . . . . . . . . . . . . . . . . . . . . . . . . . .34-35Sto EIFS Products . . . . . . . . . . . . . . . . . . . . . . . . . .36-38Average Coverages for Sto Products . . . . . . . . . . . .38-40EIFS Industry Adhesives Coverage . . . . . . . . . . . . . . . .41StoMachine Technology. . . . . . . . . . . . . . . . . . .43StoSilo . . . . . . . . . . . . . . . . . . . . . . . . . . . . . . . . . . . .44Comparative Job Data . . . . . . . . . . . . . . . . . . . . . . . . .46Portable Equipment . . . . . . . . . . . . . . . . . . . . . . . . . . .47Product Reference Charts . . . . . . . . . . . . . . . . . . . .48-50Sto Power Rasp . . . . . . . . . . . . . . . . . . . . . . . . . . . . . .51Sto Jet Mixer . . . . . . . . . . . . . . . . . . . . . . . . . . . . . . . .52Estimating . . . . . . . . . . . . . . . . . . . . . . . . . . . . . . . . . .53Average Labor Production . . . . . . . . . . . . . . . . . . . . . .54Estimator Checklist . . . . . . . . . . . . . . . . . . . . . . . . . . .55General Information. . . . . . . . . . . . . . . . . . . . . . .57Sto EIFS Installation Inspection Checklists . . . . . . . .58-60Technical Support . . . . . . . . . . . . . . . . . . . . . . . . . . . .6123
6.13 05STO8344 S118B.qxd6/13/064:40 PMPage 4TheExteriorInsulationand FinishSystem(EIFS)45
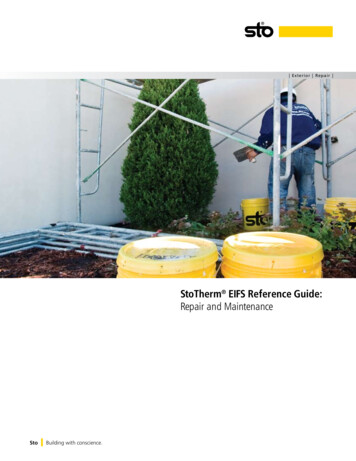
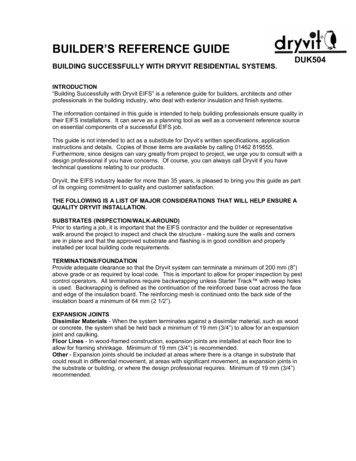
6.13 05STO8344 S118B.qxd6/13/064:40 PMPage 6IntroductionA traditional EIFS, also known as a Class PB EIFS, is a non-load bearingexterior wall cladding consisting of:1. Adhesive and/or mechanical attachment2. Insulation board3. Glass fiber reinforcing mesh4. Base Coat5. Finish CoatTraditional EIFS offer many advantages in comparison to othercladdings, including: Energy savings Excellent weather resistance Seamless wall covering Low installed cost Aesthetic versatility Low maintenanceBecause it provides moisture protection at the outer plane of the walla traditional EIFS is often called a barrier, or face seal, wall design. Incombination with other components of construction - windows, flashings and sealants - it resists moisture penetration at the outermost surface of the wall.Sto EIFS NExT is the next generation of EIFS which adds a seamlesswaterproofing/air barrier behind the EIFS wall covering. Sto EIFS NExT provides all the same benefits of traditional EIFS, plus it provides: Secondary moisture protection Increased air infiltration/exfiltration resistance Drainage of incidental moisture in the event of a breach in the EIFSwall covering (much like a cavity wall design), when combined withstarter track with weep holes and vertical ribbons of adhesive.Traditional orClass PB EIFS1. Adhesive2. Insulation Board3. Reinforcing Mesh4. Base Coat5. Finish CoatEIFS NExT :the NextGenerationof EIFS1. AIr/moisture barrier2. Adhesive3. Insulation board4. Reinforcing mesh5. Base coat6. Finish coatAs a manufacturer of high quality, technologically advanced products,Sto wishes to provide you with as much information as possible toensure that you, the professional installer, achieve a successful, highquality installation. This installation handbook presents in a brief formthe essential guidelines and information you need to install Sto Classic,Essence, and Premier EIF Systems and Sto EIFS NExT Systems. Thishandbook was compiled with expert input from Sto Technical Personneland from experienced applicators in the U.S.As we at Sto commit ourselves to manufacturing superior quality products and to innovating and introducing new technologies and products,we value and rely on your experience in the field. We hope that youwill continue to share it with us. If you have any suggestions, pleasecontact Sto at our headquarters in Atlanta, Georgia.Project PreparationCompleting the following tasks before beginning installation can helpsave you time and speed production. Set up correct scaffolding the day before you want to work on it.Much time is lost when workers wait for scaffolding or work oninadequate scaffolding. Make sure scaffolding is erected inaccordance with OSHA safety regulations. Protect necessary areas using masking tape and/or plastic coveringsBEFORE you start working. Sto materials, which are designed tostick, cannot be cleaned off easily after they have dried. Make sure the correct materials are on the job and properly stored. Follow the Sto EIFS Installation Inspection Checklist at the back ofthis book to verify conformance of work to installation requirements.Material Storage and Handling Pail Products: store and apply all pail products above 40 F (4 C).Store out of sunlight. Do not apply to frozen surfaces. Bag Products: store all bag products off the ground in a cool,dry location. Do not apply materials to frozen surfaces. Sto EPS Insulation Board: store flat (not on edge) in a dry area andprotect from sunlight.Important Note: EIFS require building code evaluation reports that recognizea particular system as an equivelant to the materials/methods of constructionprescribed in the code. Most Sto EIFS have model building code recognition.Often these reports are required for issuance of a building permit or to complywith architectural specifications.67
6.13 05STO8344 S118B.qxd6/13/064:40 PMPage 8SubstratesSto EIF Systems may be installed over the following substrates:Sheathing: Glass mat faced gypsum sheathing in compliance with ASTM C1177 Water-resistant exterior fiber-reinforced gypsum sheathing panelsin compliance with ASTM C1278 Gypsum sheathing in compliance with ASTM C79 Exterior or exposure1 wood - based sheathing - plywood and OSB(Oriented Strand Board) Sound, prepared masonry, concrete or Portland cement plaster/stucco.All sheathing substrates listed above can be treated with Sto Guard a liquid-applied waterproofing/air barrier, for added moisture protection and air infiltration resistance.All sheathing substrates should be handled and installed inaccordance with code requirements and manufacturer recommendations. Sheathing should be free from surface defects or moisture damage. Damaged sheathing should be replaced. Poured concrete must befree of form oil, curing compounds or release agents. A detergentwash, waterblasting or sandblasting is typically required to removesuch surface contaminants. Other masonry surfaces - brick or concreteblock - should be free of surface contamination such as efflorescence.Efflorescence is a white chalky deposit on the surface that is causedby moisture migration through the masonry. Generally wire brushingwill remove efflorescence from masonry surfaces. Failure to properlyprepare the substrate can result in delamination of the EIFS.Mechanical attachment is discouraged because fasteners are thermalsbridges to the exterior that defeat the purpose of exterior insulation.They can also “telegraph” through the finished wall surface as the EIFSages and they may limit wind load resistance of the system. The onlyinstance in which mechanical attachment is advised is when adhesionto the substrate is not possible or questionable, such as a painted substrate.Liquid Applied Waterproofing/Air BarrierThe Sto Guard assembly is a two-component, liquid-applied systemthat creates a continuous, seamless waterproofing/air barrier beneathSto EIF Systems as well as other claddings. Tough and durable, StoGuard will not tear like building wraps or paper and resists waterpenetration 5 times longer than leading brand building wraps and 28times longer than conventional building paper.8The Sto Guard assembly consists of:Sto Gold Fill – A flexible, trowel-applied jointtreatment that, combined with Sto Guard Mesh or StoDetail Mesh, bridges sheathing joints and protects roughopenings for windows and doors, and building corners. StoGold Fill is applied to sheathing joints and a minimum of4"(100 mm) wide Sto Guard Mesh or Sto Detail Mesh isimmediately embedded and troweled smooth.Sto Gold Coat – A ready-mixed flexible coating thatis applied by roller directly to the wall sheathing and oversheathing joints filled with Sto Gold Fill . It may also bespray applied. Sto Gold Coat may be used over exteriorgypsum Sheathing, Dens-Glass Gold, Aqua Tough ,exterior or exposure 1 plywood and oriented strandboard (OSB).AttachmentsThe most common way to attach the insulation on the building is withan adhesive. The most popular Sto adhesives are:1. Sto Dispersion Adhesive – Ready-to-use adhesive with highstrength and flexibility, used on most smooth, uniform surfaces. Mostcommonly used over gypsum sheathings or exterior grade wood-basedsheathings. Ribbons of adhesive are applied with a 3/16" x 3/8”(5 x 9mm) U-notched trowel. Not recommended over damp orirregular surfaces such as new concrete or masonry.2. Sto BTS -Plus – A pre-blended adhesive mixed with 6-8 quarts(5.7-7.6 L) of clean water for each 60 lb. (27 Kg) bag. Ribbons of StoBTS-Plus shall be applied to the insulation board using a 5/8"x 5/8”(16 x 16mm) square-notched or 1/2" x 1/2” (13 x 13mm) U-notchedtrowel. It is typically used over concrete, masonry, portland cementplaster, gypsum or cement sheathings.3. Sto Primer/Adhesive-B – A one component polymer modifiedcement based adhesive. Mix with 5-6.5 quarts (4.7-6.2 L) of cleanwater for each 50 lb. (23kg) bag. Apply with a 1/2” x 1/2”(13 x 13mm) U-notched trowel or 5/8” x 5/8” (16 x 16mm) squarenotched trowel. It is typically used over concrete, masonry, portlandcement plaster, gypsum or cement sheathings.4. Sto Primer/Adhesive – An acrylic-based adhesive that is mixedat the job-site with Portland cement and applied similar to StoPrimer/Adhesive-B.9
6.13 05STO8344 S118B.qxd6/13/064:40 PMPage 105. Sto BTS -FastSet Adhesive (a/k/a Sto FastSet Dry Adhesive/Base) –A one-component, polymer-modified cement-based adhesive that setsin less than half the time of conventional adhesives. Mix with 6-8quarts (5.7-7.6 L) of clean water for each 60- lb (27-kg) bag. Applyribbons of Sto BTS -FastSet Adhesive to the insulation board using a1/2" x 1/2” (13 x 13mm) U-notched trowel or a 5/8" x 5/8” (16 x16mm) square-notched trowel.6. Sto BTS -Silo – A one-component, polymer-modified cementbased adhesive designed for use with StoSilo spray equipment overexterior gypsum sheathing, Dens Glass Gold sheathing, exteriorcementitious sheathing and masonry/concrete substrates.Note: Sto Detail Mesh, a flexible mesh that is pre-cut in 9” (229 mm) wide rollsis convenient for backwrapping and other detail work.ProcedureUsing the proper adhesive and strips of Sto Mesh or Sto Detail Mesh,adhere approximately 4" (100 mm) of mesh to the base of the wall.Allow the remaining mesh to hang down; this will be “wrapped”around the insulation board at a later time with a minimum of 2-1/2"(64 mm) on the face of the board. Care should be taken to prevent theadhesive from collecting on the portion of mesh which will be used towrap the insulation.Note: when wood-based sheathings are protected with Sto Guard , Sto BTS Plus, Sto Primer/Adhesive, Sto Primer/Adhesive-B and Sto BTS -Silo may beapplied over the protected wood-based sheathings.Mechanical FastenersSto does not generally recommend the use of mechanical fasteners,except when the substrate is incompatible with adhesive or its condition is questionable, such as painted substrates. As an added securitysome architects will specify mechanical attachment. When they arerequired, the mechanical fastener supplier should be consulted. A minimum 1-1/2” (38mm) insulation board is recommended with mechanical attachment.NOTE: Depending on climate, surface mount fasteners may “telegraph”through the finish because of surface irregularities and the “thermal bridging”effect of fasteners.BackwrappingPrior to applying the insulation boards to the wall, a strip of reinforcingmesh is adhered to the base of the substrate. This mesh will eventuallywrap around the edge of the insulation. We refer to this procedure as“backwrapping.”This “backwrapping” procedure must be used wherever the insulationsystem starts or stops, including the following: At the base of the system At transitions where the insulation board meetswindow and door frames At roofs At expansion joints At openings around meter or utility boxes, pipes, etc. At any other system terminationInsulation BoardsThe insulation boards used are Expanded Polystyrene or “EPS” boards.Various thicknesses are available. The minimum thickness allowable is3/4" (19 mm). The maximum allowable thickness permitted by mostbuilding codes for most commercial construction is 4" (100 mm). Themaximum size board allowable is 2’ x 4’ (610 mm x 1,219 mm).The two main purposes of backwrapping are:1. To ensure the edges of insulation boards will be protected2. To ensure the entire edge of the insulation system will be welladhered10Expanded Polystyrene Quality Test:Prior to applying, EPS boards should be checked to ensure they meetSto Specifications. All EPS boards must be produced by a Sto licensedmanufacturer and can be checked in the field as follows:1. Upon DeliveryA. EPS boards are to be delivered in plastic bags labeled “Sto.”B. Each bag should identify technical properties of the Sto Board.11
6.13 05STO8344 S118B.qxd6/13/064:40 PMPage 12C. Each board should be clearly marked with the Sto Brand nameand the manufacturer quality control number.D. All boards are to be wire cut (not cast formed) and the edgesare to be square cut.E. Make sure the EPS boards have not been damaged inhandling.2. Random Sample TestsA. Proper bead fusion:Break a sample and examine beads; 80% of beads shouldbe split. If beads are broken in round shapes, do not useboards.B. Proper Curing:1. Break and smell for pentane gas (smells like lighter fluid).If smell is present, do not use boards.2. Hold a match near broken insulation. If there is a blue flashflame, do not use boards.C. Proper treatment for fire retardant:Test burn a sample. When the flame is removed, the insulationboard should not continue to burn.3. StorageA. Protect from direct sunlight during storage and afterapplication.B. Store flat in a dry area (not on edge).Adhesive ApplicationApply the adhesive to the insulation board using the correct sizenotched trowel. (See pages 9-10 for correct sizes.)Always hold the notched trowel at a minimum 30 angle to producethe correct size ribbons. When forming the ribbons, press the trowelfirmly (this will prevent excess adhesive from collecting between theribbons). Keep the trowel clean to prevent any adhesive build-up in thenotches.The ribbons should run horizontally (parallel to the long dimension ofthe board) when the boards are applied to the wall. Exception: StoEIFS NExT - when Sto EIF Systems are installed with Sto Guard , theribbons of adhesive are applied vertically (parallel to the short dimension of the board). This creates channels for moisture drainage.To make application easier and quicker, build an “easel” to hold theinsulation boards as you apply the adhesive.Cutting EPS BoardsCommonly, EPS boards are cut with a knife using a square to guidethe cut.Always keep the knife sharp and hold the blade at a low angle(approximately 30º or less ) when cutting the board. The low angleallows the knife to “slice” through the insulation.EPS boards may also be cut easily and accurately using the followingtools: table saw or hot wire machine.Adhesive may also be applied directly to the wall using the StoSiloCombo systems. These automated silo/mixer/spray machines will saveyou time and money and allow you to get to the next job more quickly.EPS Board ApplicationPrior to placing the EPS boards on the wall, be sure to wipe or scrapeany excess adhesive from the edges of the boards. Any adhesive collecting between the boards will create “thermal bridges”. Whenapplying the boards, butt them tightly together. This will preventany “thermal breaks” in the system. Gaps between the EPS boardscan cause cracking in the EIFS base coat and finish and telegraphingof joints through the finished wall surface.1213
6.13 05STO8344 S118B.qxd6/13/064:40 PMPage 14Filling EPS VoidsAlways place the boards so all vertical joints are staggered.When placing the boards on the wall, always apply the correct amountof pressure for the adhesive to “grab.” When using Sto Dispersion Adhesive, just press the boards on;the adhesive will do the rest. When using other Sto adhesives, press harder or “tamp” the boardto ensure a good “grab.” To apply uniform pressure over the entireboard, use a “Rasping Board” (see page 15) or a large block ofsimilar size.As noted in the previous section, the EPS board should be butted tightly together during application. A thorough inspection should be madefor any voids or spaces larger than 1/16" (1.6 mm) between the EPSboards. (If you can slip a credit card into the void, it must be filled.)ALL VOIDS MUST BE FILLED WITH AN INSULATING MATERIAL, either alow expanding polyurethane spray foam or slivers of scrap EPS board.Insulating all open joints between the boards achieves the followingimportant objectives: Eliminates thermal breaks so the wall will beproperly insulated Future problems with the finish due to uneven“vapor diffusion” will be prevented Base coat consumption will be reduced.At all inside and outside corners always stagger or interlock theboards. Offset joints in sheathing by a minimum of 6" (152 mm).This prevents cracking in the EIFS coatings in the event of movementat the sheathing joints.Important note: Make sure no adhesive is between the interlocked boardsat the outside corner.Cut insulation to fit around openings. Do not align board joints withcorners of openings.1415
6.13 05STO8344 S118B.qxd6/13/064:40 PMPage 16RaspingThe entire surface of the EPS wall must be level and uniform. EPSboards are very easy to level and shape using a “rasping board.”To make a rasping board, simply cut a straight scrap of 1/2" (13 mm)plywood, install a wooden handle on one face, then glue a piece of12 grit floor sanding paper to the other face of the plywood. Floorsanding paper is approximately 8" x 22" (203 x 599 mm) and shouldbe available at local equipment rental shops.When rasping the insulation boards level and even, it is important thatyou rasp the entire surface of the boards, not just the joints or edges.If you rasp just the edges/joints, then the wall will appear to havewaves in it during "critical" light.The most popular Sto base coats are:Sto RFP - A ready-mixed 100% synthetic base coat. Note: BecauseSto RFP is non-cementitious and dries by evaporation only, weatherconditions will affect drying times; cool or damp conditions lengthendrying times.Sto Flexyl - An acrylic-based, fiber-reinforced, flexible waterproofercombined with equal parts of Portland cement by weight. Sto Flexylfunctions as an air and moisture barrier on concrete, masonry or gypsum sheathing surfaces. It also functions as a waterproof base coat inSto EIFS for use on properly sloped trim or accents and splash areasnear grade.Sto BTS -Plus - A polymer-modified, cementitious material.Just add water.Sto Primer/Adhesive-B - A polymer-modified cementitious material.Just add water.Sto Primer/Adhesive - An acrylic base coat to which Portlandcement is added at the job site, equal parts by volume.Sto BTS -FastSet Base Coat - A polymer-modified cementitiousmaterial, designed to set in less than half the time of conventionalbase coat. It enables quality installation of EIFS in cold or dampweather.Rasping boards are also available commercially. For time and laborsavings, use the Sto Power Rasp. This automatic, electrical tool willsave you time, money, and labor. Adding the StoVac to the Sto PowerRasp allows you to vacuum up most of the EPS pellets dislodged during the rasping process. Together these tools allow for much cleanerrasping of jobs.Sto BTS -Silo - A polymer-modified cementitious material for usewith StoSilo spray equipment.Base Coat & Mesh ApplicationAfter the wall has been prepared or leveled, it must be protected fromsun/water damage. If EPS board is exposed to sunlight for extendedperiods, a powdery film develops on the surface. This film must beremoved by rasping. Reinforcement is then added to all the boards forimpact protection.To achieve this, apply the proper Sto base coat and embed appropriatemesh. This procedure is known as the “base coat application.”16Application at Detail WorkAdditional protection at doors and windows is achieved by applying“butterflies” or small strips of mesh diagonally at the sills and headersprior to application of field mesh.17
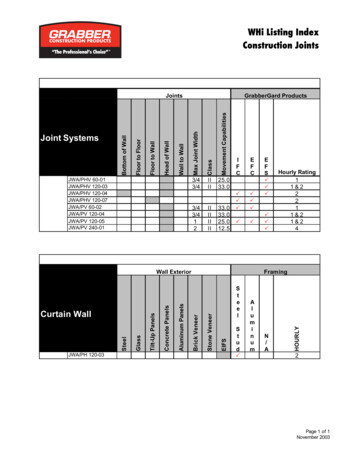
6.13 05STO8344 S118B.qxd6/13/064:40 PMPage 18Application at CornersAll inside and outside corners must have two layers of mesh. This canbe achieved in one of three ways: Double wrap Sto Mesh minimum 8“ (204mm) in each direction Apply Sto Corner Mat and overlap Sto Mesh up to the corner Apply Sto Detail Mesh and overlap with Sto Mesh minimum8” (204mm) onto adjacent wallApplication at Wall AreasApply the Sto base coat on the insulation boards in a layer approximately 1/8" (3 mm) thick. Work vertically or horizontally in strips of40” (1016mm). Immediately imbed the Sto Mesh in the wet base coat.Trowel off any excess base coat from the surface. The mesh must befully embedded so that no mesh color is visible. Apply additional basecoat if mesh color is visible when the base coat is dry. Do not buttmesh strips. Overlap the strip edges a minimum of 2-1/2" (64 mm).If the mesh is butted it will cause cracks in the base and finish coats.Feather the base coat at mesh overlaps.Drying before Finish ApplicationIMPORTANT: All EPS boards are to be covered with the base coatand mesh application and allowed to dry prior to applying any finish.Primer Application (Optional System Component)Priming is recommended as a color base for Stolit R finishes, or fineaggregate finishes such as .75 mm or 1 mm finishes. If Sto RFP basecoat is tinted to the same shade as the finish, the primer is notnecessary. In addition, priming provides uniform substrate absorption,enhances finish color and inhibits efflorescence in cementitious substrates. The primer is applied with a paint roller or brush to the substrate. Certain finishes, Sto Decocoat and Sto GraniTex, always requirethe base coat to be primed.Finish ApplicationPlan the finish application so enough workers are available to finishentire sections of wall area at one time without interruption.Mix the finish with a clean, rust-free mixer. Small amounts of cleanwater may be added to aid workability. Limit water to amount neededto achieve the finish texture. Use only stainless steel trowels to applythe finish. Work in pairs with the first person applying the finish to thewall, and the second person floating the finish to the proper texture(refer to page 20 for “floating textures”).Application for Level 1 (Ultra High) Impact AreasSto EIF Systems are engineered wall cladding systems and can beenhanced in several ways to accommodate higher impact needs.Where additional impact resistance is required, such as on groundfloors, garage areas, and areas accessible to pedestrian traffic, Storecommends the use of Sto Armor Mat to a minimum height of 6’-0”(1.8m). First apply a base coat layer and imbed Sto Armor Mat (ultrahigh impact mesh). When using Sto Armor Mat, the edges must bebutted, not overlapped, due to the thickness of the mesh. After thisapplication has dried, apply the base coat with regular Sto Mesh aspreviously described.18By following the guidelines listed below and shown in the adjacentpictures, problems can be prevented and an aesthetically pleasing wallsurface will be the result:1. Apply finish directly over the base coat (or primed base coat as specified) ONLY AFTER THE BASE COAT/PRIMER HAS THOROUGHLY DRIED.24 hours minimum drying time is recommended. If cool and/or dampconditions exist, allow additional drying time, minimum 72 hours.2. Avoid application in direct sunlight. This can cause shadow linesfrom scaffolding.19
6.13 05STO8344 S118B.qxd6/13/064:40 PMPage 203. Apply finish in a continuous application, always working a wet edgetoward the unfinished area.4. Aesthetic V-grooves may be designed into the system to accommodate workability on multi-level buildings. However, a minimum of 3/4"(19 mm) insulation board must be left after any grooves are cut. Referto Sto Detail 1.03 in the Sto Information Manual.5. “R” (rilled texture) finishes must be floated with a plastic trowel toachieve proper textures and avoid discoloration of the finish.6. Avoid installing separate batches of finish side-by-side.7. Interrupt application at natural breaks in construction: expansionjoints, changes of plane, system terminations, etc.NOTE: Weather conditions affect application and drying time. Hot or dry conditions limit working time and accelerate drying and may require adjustments inthe scheduling of work to achieve desired results. Cool or damp conditionsextend working time and slow down drying and may require added measuresof protection against wind, dust, dirt, rain and freezing.2. Rilled Pattern Texture using Stolit R, StoSilco Lit R, or StoSwirl. Any of these finishes is applied to the wall to approximately thethickness of the largest aggregate in the finish. The finish is thenscraped down to ensure it is no thicker than the largest aggregate size.Next, using a plastic float, float the finish in either a figure “8”,horizontal or vertical direction to produce the rills in the finish. Whenfloating you can either float it immediately (wet float) or allow thefinish to set a short time and float it (dry float). By allowing the finishto set and dry float, the finish will produce more flat areas (rills).NOTE: After applying pebbled or rilled texture finishes, if the plastic or stainlesssteel float sticks to the finish, then too much finish is on the wall. Remove theexcess finish by scraping with a stainless steel trowel down to the largestaggregate size. Then float the finish. This will save material and create a moreuniform finish texture.3. Freestyle Stucco Pattern Texture using Stolit Freeform. Thisfinish is applied to the wall in a uniform thickness and textured using aputty knife, sponge, trowel, brush or roller.4. Limestone Finish Texture is accomplished by first installingStolit 1.0, then applying Stolit Freeform in a tight coat on top of thedry Stolit 1.0 with both products tinted to the same color.5. Variegated Bead Texture using Sto Decocoat. This finish isapplied to the wall to approximately 1-1/2 times the thickness of thebead in the finish. Next work the trowel in one direction to make thesurface smooth. Press down firmly with the trowel held nearly flat. Forspray ap
A traditional EIFS, also known as a Class PB EIFS, is a non-load bearing exterior wall cladding consisting of: 1.Adhesive and/or mechanical attachment 2. Insulation board 3. Glass fiber reinforcing mesh 4. Base Coat 5. Finish Coat Traditional EIFS offer many advantages in comparison to other claddings, including: Energy savings