Transcription
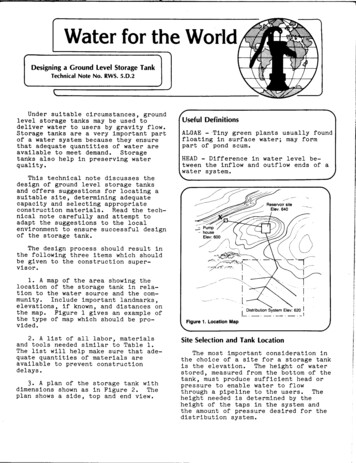
user guideRWSroof and wall scanner
RWS USER GUIDETABLE OF CONTENTSIntroduction.2Operating instructions.4Modes of operation.5How it works .6Principles of operation.7Prior to use.7Before conducting a moisture survey.9Conducting a moisture survey: EIFS mode.11-17Interpretation of readings.14Tracing a leak.16Conducting a moisture survey: Roof mode.18-21Procedure .19Tracing a leak.21Types of roofing structures.23Possible problems leading to moisture intrusion.23Moisture survey checklist .24Useful items when conducting a survey.24Correct use of RWS.25Maintenance of ty claims.29Product development.29Safety.291
RWS USER GUIDEINTRODUCTIONTo get maximum benefit from your Tramex RWS Roof and Wall Scanner, it is suggested that beforeundertaking a moisture survey, you read this manualto familiarize yourself with the operation, featuresand capabilities of this multi-mode non-destructivemoisture detection and scanning instrument.TRAMEX RWS AND THE BUILDING ENVELOPEThe building envelope is the physical separatorbetween the interior of a building and the externalenvironment in which it is located. It consists of theroof, walls and floor of a structure. It should be notedthat the entire roof (external covering or protectivelayer to finish on ceiling), walls (external finish tointernal finish), floor (sub-floor to floor finish) andwindows are considered to be part of the buildingenvelope. These are the elements that form theboundary between the interior of the building and theexternal environment. The building envelope can beconsidered as a filter between the internal and externalenvironments. The design of the building envelopegreatly influences the energy performance of abuilding. Moisture in elements of the building envelopecan significantly affect the performance of the buildingenvelope and have other serious consequences suchas damage to materials and deterioration of air quality.Tramex manufacture a complete range of instrumentsfor the detection and measurement of moisture in thebuilding envelope. For roofing, walls and many types offloor construction the Tramex Roof and Wall Scanner(RWS) is the complete instrument.2
RWS USER GUIDEAs originally developed the RWS is a hand-held, nondestructive, electronic moisture meter specifically fornon-destructive moisture evaluation and surveying ofbuilt-up or single-ply roofing and EIFS (Exterior Insulationand Finishing System).However its use by many professionals over the years has demonstrated that it goes farbeyond these applications and extends to all aspects ofthe building envelope.The Tramex RWS is an effective Leak Seeker and Moisture Scanner with 2 operating modes, with each modehaving 2 ranges of sensitivity. This affords the user theopportunity to scan roofing, walls and the buildingenvelope for excess moisture. The less sensitive yellowmode is designated for built-up and single-ply roofingwith the more sensitive red mode for EIFS and foaminstallation. With the large variety of constructions thatexist these designations are not always rigid and can varysignificantly e.g. the more sensitive mode can be used onfoamed-over roofing systems.For those familiar with Tramex moisture meters, the RWSincorporates two of the well-known moisture scannersfrom Tramex, with additional features and benefits, in oneinstrument. These are the Leak Seeker, launched in 1983,for the tracing of leaks and detection of moisture in roofing systems and the Wet Wall Detector (WWD), launchedin 1995, for the detection of moisture in EIFS.3
RWS USER GUIDEOPERATING INSTRUCTIONSA diagram of the instrument face with brief notes on thepush button controls is shown below:120mm25341 Moving coil meter.2 Sensitivity Knob3 Battery check / Audio ON/OFF4 Mode Selector5 ON/OFFSwitch6 Hold Switch7 Signal Penetration Selector4275mm167
RWS USER GUIDEMODES OF OPERATIONThe RWS (Roof and Wall Moisture Scanner) has twooperating modes, each with two ranges of signalpenetration. The mode and signal penetration areindicated by the white and orange boxes on the decal ofthe RWS instrument.ƕƕEIFS Mode (Red LED selected on White switch)is for moisture scanning of Exterior Insulationand Finishing System (EIFS) and similar type ofconstruction cladding as well as polyurethaneand polystyrene foam insulation and other typesof low-density insulation systems applied to thebuilding envelope.ƕƕRoof Mode (Yellow LED selected on Whiteswitch) is for moisture scanning and leak tracingof built-up and single ply roofing systems.Each of these measurement modes incorporatestwo sensitivities, which are activated by pressing theOrange switch: Yellow LED for lower sensitivity andlower penetration. Red LED for higher sensitivity anddeeper penetration.Audio can be turned ON/OFF by pressing Audio twicein quick succession.A telescopic handle is included for use on roofing.5
RWS USER GUIDEHOW IT WORKSThe RWS is an electronic instrument powered by one9volt PP3 or similar battery. It operates on the principalof electrical impedance measurement. This means thata harmless, low frequency, non-destructive signal issent from the two rubber coated electrodes at the baseof the instrument through the surface of the materialbeing tested, deep into this material. See Figure 2.Fig. 2. RWS Low Frequency Signals On EIFS6
RWS USER GUIDEPRINCIPLES OF OPERATIONTo measure / detect moisture, the rubber coated baseof the instrument is pressed onto the material beingtested. The detection signals from the instrumentpenetrate the material under test to a depth of up toapproximately 100 mm. (4 inches) depending on themode, the range of sensitivity selected and the materialbeing tested. The small current flowing through thefield is inversely proportional to the impedance ofthe material. This current is a measure of the changein the electrical impedance caused by a change in themoisture content. This change is translated by the RWSand instantly and continuously displayed on the largeclear analog dial which gives comparative readings of0 to 100.PRIOR TO USEAlthough the RWS is checked on manufacture and atquality control to ensure it is in working order beforeleaving the factory, a few minor checks should be carried out following transit. These are as follows :Depress ON/OFF switch (located on fascia to the rightof grab handle) to power on the RWS. Check batterystrength by depressing BATTERY check switch. Theneedle on the analog dial should go past the BATTERYline on the dial. If not, change the battery.7
RWS USER GUIDESet the sensitivity dial to 10, place your hand on thebase of the instrument, making contact with both electrodes, a full-scale reading of 100 should be obtained,irrespective of which mode or range is selected. SeePage 4 for graphic illustration of switches and controlsEnsure that your new RWS is received in pristinecondition, just as it left our factory. Complete andreturn warranty registration card to Tramex or thesupplier of your RWS.8
RWS USER GUIDEBEFORE CONDUCTING A MOISTURE SURVEY1. Before commencing moisture testing, it is advisable to familiarise yourself with the RWS, itsfunctions and principles of operation.2. It is also advisable, prior to commencing your moisture survey, to familiarise yourself with construction details and specification, in particular, typeand thickness of insulation, type and thickness oflamina, number of layers of lamina and its reinforcing, coating and covering materials. The composition and specification of the substrate material isalso worth knowing. This familiarisation will helpyou to make the best interpretation of the RWSreadings.3.Check battery strength by pressing down andholding the BATTERY button (Red switch). (TheRWS needs to be powered on to check batterystrength). The Power On switch is the Black switchlocated on the right hand side of grab handle. Thereading on the analog dial should be above BatteryLine (70). If the meter reading is below this, replace the 9 Volt battery (PP3, 1604, 6F22, 6LF22or equivalent).4. If meter does not power up, remove the batterycover and check if the battery is connected. Ifnot, connect and ensure that the battery is firmlypositioned within the battery retainer.9
RWS USER GUIDEIt is important that the battery is firmly positionedand not free to move, as due to the sensitivity ofthe RWS an incorrectly positioned or loose batterycould affect the readings. EIFS ModeFor Exterior Insulation and Finishing System (EIFS)and similar types of construction cladding (non-metalic), or foam-over roof insulation systems, the RWSis equipped to detect moisture present in the lamina,insulation or in the substrate behind or under the insulation and assists in tracing leaks back to source. ROOF ModeFor built up and single ply roofing, the RWS is equippedto detect elevated moisture within the insulationand thickness of the roof, assist in tracing leaks backto source and can also identify areas of inter-plymoisture.The RWS is designed to read through electrically nonconductive materials that are positioned between theelectrodes and the substrate. For example: a conductive layer with metal lath or a wet surface could givefalse positive readings.10
RWS USER GUIDECONDUCTING A MOISTURE SURVEY: EIFS ModeExterior Insulation Finishing System and similar typeof building envelope insulation and waterproofingsystems.1. Switch ON the RWS.2. Select Mode: To select EIFS Mode press MODEswitch. When EIFS mode is selected the RED LEDwill light.3. Select Signal penetration: press Orange switch totoggle from Low (Yellow LED) to High (Red LED) orvice versa.LOWER PENETRATION RANGE(Yellow LED inset in range switch will light) issuitable for use on systems incorporating up to 1”(25mm) thickness of insulation.HIGHER PENETRATION RANGE(Red LED inset in range switch will light) is for useon systems with greater than 1” (25mm) thickness of insulation.4. Hold the RWS by the grab handle and place it sothat the rubber electrode is in full and firm contactwith the surface over a known dry area. Adjust thesensitivity control knob until the needle is justabove zero on the analog meter.11
RWS USER GUIDENOTEOn a laboratory mock up on an area where a plywoodsheathing substrate had less than 15% moisturecontent, zero reading corresponded to a setting of 5on the sensitivity knob of RWS. This was on a 1” expanded polystyrene (EPS) insulation plus lamina overplywood. See Fig 3. (This setting may vary, dependingon site conditions, specifications and environmentalconditions).Fig 3. Laboratory Mock-Up12
RWS USER GUIDEIf you are not sure that you are starting over a dry area, apin-type resistance meter such as the Tramex Professional, with insulated deep wall probes may be useful inconfirming an acceptably dry area.An alternative method is to use the RWS on a seek andfind basis as follows: Place the RWS against the surface,adjust the sensitivity control knob so that the meterreads, say 50. Then, by moving from area to area and following in the direction of lowest reading until the area oflowest reading is found (lowest reading should indicate arelative dry area). Over this area, zero the meter readingas described above. You can then double check with a pintype resistance meter such as the Tramex Professionalto confirm a dry area.Having calibrated (zeroed) on a dry area, now proceedwith the moisture survey by moving the RWS across thesurface, making sure that electrodes are making full andfirm contact with the surface. Partial contact may resultin reduced readings. Also ensure that you are holdingthe RWS firmly by its grab handle as the RWS functionsmore efficiently when it is hand held while in EIFS mode.If you are setting up a grid pattern for your survey it isimportant to understand that the RWS is reading thearea directly below the footprint of the instrument.13
RWS USER GUIDEInterpretation of readingsWhen the RWS has been zeroed correctly on a dry areaand set on the correct range for the EIFS thickness,higher readings normally indicate higher moisturecontent.Example:The RWS was calibrated on a laboratory mock-up shownin Table 1. ( page 15 )Structural Wood:Sheathing:Insulation:Lamina:4” x 2” Stud1/2” Plywood1”Expanded polystyreneGlass Fibre Reinforced14
RWS USER GUIDECalibration was set on this as follows:Table 1. Comparison of RWS and Professional PinType Resistance Meter ReadingsIt should be noted that calibration of the RWS in EIFSMODE was based on the averaged results of numerous on-site and laboratory tests. Therefore readingsand results vary depending on construction detail andfrom site to site. The above chart was the result oftests conducted on a simulated wall construction, asdescribed above and is for guidance purposes only.Readings from the RWS are qualitative, not quantitative, and should be used for comparative purposesonly.15
RWS USER GUIDEAs EIFS systems, construction sites, environmentaland geographical conditions vary, results and readingswill vary also. It is recommended that when carryingout a survey the RWS is zeroed on individual walls andanywhere the operator would expect a change in wallmaterials, lamina, surface moisture or other conditionsthat may effect readings.For example, walls or roofs on ocean-side propertiesmay have higher salt content on the surface and thusslightly higher readings than inland properties, orsurface moisture may dry off more slowly depending onorientation of the wall or roofs.The RWS is designed to have the flexibility in sensitivityadjustment to cope with variances caused by materialand conditional differences from wall to wall.Tracing Moisture back to source in EIFS or similarconstructionOnce an area of excess moisture has been established,the RWS may be used to assist in tracing the moisture tothe source of ingress as follows:Having found a wet area, turn down the SENSITIVITYknob until the needle points to approximately half scale(approx 50).On this setting, take further readings around the area,note the highest reading and follow in the direction ofthe highest reading. If necessary, decrease sensitivityuntil the area of greatest moisture has been located.16
RWS USER GUIDEUsually the greatest moisture concentration is in theproximity of the area where the moisture is getting intothe system. A careful visual examination in this areashould be carried out to identify defects or damage inweatherproofing.Taking core samples of the EIFS or foamed roof insulation and / or the use of a pin type resistance meter suchas a TRAMEX PTM2.0 with deep wall probes is recommended to substantiate the RWS readings.Fig. 4. PTM2.0 With Deep Wall Probe.17
RWS USER GUIDECONDUCTING A MOISTURE SURVEY:ROOF ModeFor moisture scanning and leak tracing of Built-Up andSingle-Ply Roofing Systems.Conducting A Roof Survey1. Switch the RWS ON2. Select Mode: To select Roof Mode press WhiteMODE switch. When Roof mode is selected theYellow LED will light.3. Select Signal penetration: press Orange switch totoggle from Low Range (Yellow LED) to High Range(Red LED) or visa versa.LOWER PENETRATION RANGE(Yellow LED inset in Orange switch will light) is suitable for use on smooth or mineral surfaced roofs.HIGHER PENETRATION RANGE(Red LED inset in Orange switch will light) is moresensitive and will read through heavier membranesas well as most dry gravel or ballast roof coverings. (If satisfactory readings cannot be achievedthrough ballast, remove same and work directly onthe surface of the waterproofing material).18
RWS USER GUIDEProcedure1.2.3.Make a sketch of the roof, indicating openings andprotrusions etc.Select a convenient grid span e.g. 6ft (2m). On theNorth/South perimeter, mark 1,2,3 etc and on theEast/West perimeter mark A, B, C etc. Transfer thesegrid system markings to your roof sketch. See Fig. 5.Proceed by moving the RWS along the imaginaryline A and mark locations on the sketch graph paperand/or roof surface when moisture is indicated bythe RWS.Fig. 5. Roof Grid Sketch19
RWS USER GUIDE4.5.6.7.In Fig.5 position A4 is the first point of moisture contact. A telescopic aluminium handle can be attachedto the RWS when carrying out a moisture survey ona horizontal surface to avoid having to bend downwhen taking readings. As the survey continues, amoisture profile will build up, indicating areas whichrequire attention.On single ply roofing, particular attention must bepaid to laps and seams.Should a precise moisture percentage be required,a sample can be removed from the site, sealed in aplastic bag and checked in a laboratory, by weighing, drying and re-weighing, to calculate the exactamount of moisture present.It is important also to examine the plies of thewaterproofing layers after taking a test cut, asmoisture may be present between the plies or withinthe fibre of the felt.Areas of elevated moisture can be checked witha probe type moisture meter such as the TramexProfessional pin-type meter with deep wall insulatedprobes.20
RWS USER GUIDETracing a leak and checking suspected trouble areasIf, for instance, a leak has been noticed in a built-up-roof,it may be easy to identify where the water is dripping intothe building, but difficult to locate the point of ingress inthe waterproof layer. Take your RWS to the general areaof the roof over the leak. Switch on to activate the RWSand select the desired range. Turn the sensitivity knob to10 and place the RWS on the roof surface. (If no readingis received, the insulation directly beneath the instrument is dry). Take point readings around the area untilmoisture is located.This identifies where the elevated moisture is located.Mark the roof surface with crayon or paint, outlining thearea of wetness. See Fig 6. below.Fig 6. Tracing And Marking A Leak On Your Roof21
RWS USER GUIDETo trace the leak back to the source, turn down thesensitivity until the meter needle reads approximatelyhalf scale. Take point readings around the area of theleak, following the strongest signal. It may be necessaryto reduce the sensitivity a number of times until thearea of greatest moisture content is located. Based onthe usual pattern of greatest moisture concentrationbeing in proximity to the point at which the moisture getsthrough into the roof, a visual examination of the areashould be carried out to identify defects or damage tothe roof covering.Note: The reading on the RWS is 'Relative' or 'Comparative', indicating a greater or lesser signal. It is not anindicator of percentage moisture content. As a guide,approximately 20% moisture in wood fibreboard directlyunder a 3mm (1/8”) membrane, will give full-scale deflection in Roof Mode on the Yellow sensitivity range. Manytypes of insulation currently available can contain up to200% moisture by weight while others can hold very little mositure. If the precise moisture content is requiredwe recommend a sample core is cut and measured byweigh/dry/weigh method, or by use of a pin type resistance moisture meter. The Tramex Professional pin-typemeter can be used to give a better indication of moisturecontent.22
RWS USER GUIDETypes of roofing structures and their more commonproblems Built-up Roofing Systems: Comprising of 3 or 4 layers of roofing felt, with bitumen or asphalt adhesivebetween each layer. Modified Bitumen Systems: This type of material isusually heat applied as a single layer system or witha base layer of bituminous felt. Single Ply Roofing: Usually applied in welded sheetform, direct to the insulation. Note: Using the RWS on black EPDM or Butyl rubberroofing may result in false readings due to the highdielectric constant of this material.Possible problems leading to moisture intrusion of theroof system Mechanical damage from maintenance personnel. Fissures or cracks in the membrane, caused by building settlement or expansion and contraction. Blistering caused by moisture trapped in the roofingsystem during construction. Problems on the laps and up stands if material is notfully sealed during construction. Problems usually occur from mechanical damage andmaintenance personnel, pinholes, bird damage andfaulty seams during construction.23
RWS USER GUIDEMOISTURE SURVEY CHECKLISTRecording the following information will assist you incompleting a comprehensive moisture survey:1. Building name and number.2. Date of survey.3. Name of surveyor.4. Visual inspection of all detail work and flashingsaround doors, windows, openings etc5. Visual inspection of windows, doors, penetrations,roof lights & openings etc.6. Visual inspection of vents, chimneys and otherprotrusions.USEFUL ITEMS REQUIRED WHEN CONDUCTING ASURVEY1. Core cutter.2. Hole punch.3. Crayon, chalk or spray paint.4. Tape measure.5. Spatula, knife and cold mastic, and patching materialfor minor repairs.6. Plastic bags for sealing core samples.7.Pin-type resistance meter with deep wall insulatedprobes.24
RWS USER GUIDECORRECT USE OF RWS Make sure that the RWS is held firmly by its built-inplastic grab handle and that your hand is not incontact with the electrode or sides of the instrument.Extension handles, such as telescopic handles, shouldnot be used while in EIFS Mode, as these will affectreading and performance of the RWS, and the handleshould not be insulated or isolated from operator’shand when in use. The telescopic extension handleshould only be fitted to the RWS for use on roofing inRoof Mode.All of the rubber electrodes need to be placed in firmcontact with the surface. On narrow areas where fullelectrode contact is lacking or not possible, it may benecessary to recalibrate the meter.On areas where thickness of insulation or lamina varies from that at where the RWS was zeroed, readingsmay be affected. It may be necessary to compensatefor these differences in coatings or insulation specifications.At temperatures below 32 F (0 C) the RWS may notfunction efficiently due to the presence of moistureturning to ice.Readings at lower temperatures tend to be lowerthan those at higher temperatures.25
RWS USER GUIDEMAINTENANCE OF RWS Keep the electrodes clean and dry and regularlyinspect for wear.Clean electrodes with a damp cloth. Do not usesolvents to clean the RWS.Remove battery when the RWS is stored for longperiods.The replacement battery should be of good qualityand leak proof.The RWS will automatically power off after 30 minutes of inactivity. Avoid leaving the RWS switchedon while not in use.In the event of a malfunction, return to your supplier. The RWS carries a 12-month warranty. Detailsand warranty card are supplied with the instrument.26
RWS USER GUIDELIMITATIONSThe RWS will not detect or measure moisture throughany electrically conductive materials including metalsheeting or cladding, black EPDM roofing, butyl roofing,aluminum siding or wet surfaces.CALIBRATIONShould it be found that readings are outside the set tolerances, it is recommended that the RWS be returned forre-calibration. Calibration adjustments should not be carried out by anyone other than Tramex or their authorisedservice provider who will issue a calibration certificate oncompletion. Requirements for quality management andvalidation procedures, such as ISO 9001, have increasedthe need for regulation and verification of measuringand test instruments. It is therefore recommended thatcalibration of the RWS should be checked and certifiedin accordance with the standards and/or protocols laiddown by your industry (usually on an annual basis) by anauthorized test provider. The name of your nearest testprovider and estimate of cost is available on request.27
RWS USER GUIDEWARRANTYTramex warrants that this instrument will be free fromdefects and faulty workmanship for a period of one yearfrom date of first purchase. If a fault develops during thewarranty period, Tramex will, at its absolute discretion,either repair the defective product without charge forthe parts and labour, or will provide a replacement inexchange for the defective product returned to TramexLtd. This warranty shall not apply to any defect, failureor damage caused by improper use or improper or inadequate maintenance and care.In no event shall Tramex, its agents or distributors beliable to the customer or any other person, company ororganisation for any special, indirect, or consequentialloss or damage of any type whatsoever (including,without limitation, loss of business, revenue, profits,data, savings or goodwill), whether occasioned by theact, breach, omission, default, or negligence of TramexLtd., whether or not foreseeable, arising howsoever outof or in connection with the sale of this product includingarising out of breach of contract, tort, misrepresentationor arising from statute or indemnity. Without prejudice tothe above, all other warranties, representations and conditions whether made orally or implied by circumstances,custom, contract, equity, statute or common law arehereby excluded, including all terms implied by Section13, 14 and 15 of the Sale of Goods Act 1893, and Sale ofGoods and Supply of Services Act 1980.28
RWS USER GUIDEWarranty claimsA defective product should be returned shipping pre-paid,with full description of defect to your supplier or toTramex at address shown on the back of this guide.PRODUCT DEVELOPMENTIt is the policy of Tramex to continually improve andupdate all its products. We therefore reserve the rightto alter the specification or design of this instrumentwithout prior notice.SAFETYThis user guide does not purport to address the safetyconcerns, if any, associated with this instrument or itsuse. It is the responsibility of the user of this instrumentto establish appropriate safety and health practices anddetermine the applicability of regulatory limitations priorto use.29
www.tramexmeters.comFIND US ON:Tramex Ltd.Unit F, Glencormack Business Park, Kilmacanogue,County Wicklow, Ireland.Email: sales@tramexmeters.comUSA (toll free) & Canada:Tel: 1800-234-5849EU & Rest Of World:Tel: 353 1 681 4450
EIFS Mode For Exterior Insulation and Finishing System (EIFS) and similar types of construction cladding (non-met-alic), or foam-over roof insulation systems, the RWS is equipped to detect moisture present in the lamina, insulation or in the substrate behind or under the insu-lation and assists in tracing leaks back to source. ROOF Mode