Transcription
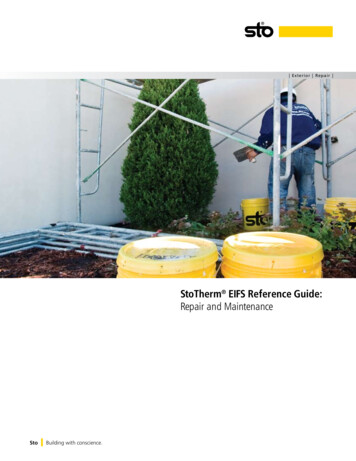
ExteriorRepairStoTherm EIFS Reference Guide:Repair and MaintenanceStoBuilding with conscience.
Table of ContentsSto is the innovative world leader in cladding, coating and restorationsystems. Sto was an Exterior Insulation and Finish Systems (EIFS)pioneer, introducing Sto EIFS to Europe in 1963. Headquarteredin Atlanta, Georgia, Sto Corp., which is ISO 9001:2008 andISO 14001: 2004 certified, continues to lead the North Americanindustry in innovation. For example, Sto Lotusan products featuringBionics Technology impart super hydrophobic properties --- the LotusEffect --- to help walls stay clean longer. StoMachine Technology,another example of Sto innovation, speeds production whilesupporting quality installations.Because of our pioneering experience and technology know-how, wehave produced wall claddings for tomorrow that are renowned todayfor their outstanding performance and aesthetic beauty. Sto hasdeveloped StoTherm Insulated Wall Cladding for virtually anysubstrate, circumstance and budget, products to solve or prevent amyriad of problems, and 100% synthetic resin coatings in colors thatchallenge the imagination.While StoTherm EIFS are low-maintenance claddings, regularinspection and attention to maintenance needs will help assure theirperformance and enhance the satisfaction of owners and usersyear after year.We at Sto hope that through our commitment to high standards ofquality, innovation and service, we will gain your confidence in ourcompany and our products . . .because your success is ours.Maintaining, Restoring or Changing EIFS AppearanceCleaning EIFS - 1.01Recoating EIFS - 1.02Resurfacing EIFS - 1.03345Minor EIFS RepairRepair of Surface Cracks in EIFS - 2.01Repair of Cracks in EIFS - 2.02Repair of Puncture Damage in EIFS - 2.03Repair of Cracks at Aesthetic Joints in EIFS - 2.0467810Sealant Repairs and EIFSRemoval and Replacementof Sealant at Joints in EIFS - 3.01Repair of Sealant Joints in EIFSwith Sealant “Tape” - 3.02Installation of Perimeter Fillet Sealat EIFS Abutting Window - 3.03Technical Support11121314
Maintaining, Restoring or Changing EIFS AppearanceCleaning EIFS 1.01Maintaining, Restoring or Changing EIFS AppearancePeriodically EIFS finishes may need to be cleaned to removedirt, algae, or mildew that can accumulate on the surface.CleaningEIFScan1.01A good cleaningoften restore the appearance of theEIFS. Cleaning is also necessary before recoating orPeriodically EIFS finishesmayneedto be cleanedto removeresurfacingto ensuregoodadhesionof thesurface.may be applied over the EIFS finish. This instruction providesA good cleaningcan oftenrestoreappearanceof theguidanceon cleaningmaterialsandthemethods.AlwaysfollowEIFS. Cleaningalso necessaryrecoatingorprecautionsonislabelingfor use,beforehandlingand coatsthatcleaning materials, and always test clean an inconspicuousmay beappliedoverthe EIFSfinish.This instructionareato besure ofdesiredresults.Estimatedtime of provides2guidance on cleaningmaterialsandftmethods.completion:1 man-hourfor 100(9.3m2).Always followprecautions on labeling for use, handling and disposal ofTools Required:cleaning materials, and always test clean an inconspicuous Soft-medium bristle brusharea to be sure of desired results. Estimated time of Garden hosecompletion: 1 man-hour for 100 ft2 (9.3m2). Pressure washerTools Required:Materials Required: Soft-medium bristle brush Trisodium phosphate detergent Garden hose Household bleach Pressure washer Clean, warm waterRequired: MaterialsClean emptybuckets Trisodium phosphate detergentProcedure: Household bleach1. Depending on the size of the area to be cleaned and the Clean, warm watertenacity of the dirt, algae or mildew accumulation, the tools Clean empty bucketsused for cleaning will vary, for example:Procedure:a.) hand cleaning with a soft-medium bristle brush1. Dependingon thesize ofthe area to be cleaned and thefor ewaccumulation,the toolsb.) a garden hose for a fullelevation,andusedcleaningwill vary,example:c.) forpressurewashingforforentirebuildings and/ora.) difficulthand cleaningwithaccumulationsa soft-medium bristle brushto removefor isolated surface spots,2. A generic cleaning solution consists of:b.) a garden hose for a full elevation, anda.) 1-2 cups (0.24-0.47 L) trisodium phosphatec.) pressure washing for entire buildings and/or(TSP) detergentdifficult to remove accumulationsb.) 1 gallon (3.8 L) of warm water2. A generic cleaning solution consists of:Add 1/2 to 1 quart (0.47-0.95 L) of bleach to remove algaea.) 1-2 cups (0.24-0.47 L) trisodium phosphate(usually green stains on the surface of the finish) or mildew(TSP) detergent(generally black stains that look like dirt). Bleach is necessaryb.) 1 gallon (3.8 L) of warm waterto kill micro-organisms that create the algae or mildew on1/2 to If1 ish.thebleachis used L)orofif itis nish)ormildewtime (about 15 minutes) to sit on the surface and kill the(generally black stainslook likecandirt).Bleach is necessarymicro-organisms,algaethator mildewrecur.to kill micro-organisms that create the algae or mildew onthe finish. If no bleach is used or if it is not allowed sufficienttime (about 15 minutes) to sit on the surface and kill themicro-organisms, algae or mildew can recur.Other commercially available cleaning solutions that can beused are:a.) General Cleaner by Wind-lock Corp.1 – a generalsurface that1 –can beb.) MiracleMildewRemoverby Wind-lockCorp.used are:dissolves algae and mildewa.)CleanerbybyDemandWind-lockCorp.12 –– aa generalc.) GeneralWash Down Productsgeneralsurface cleanerb.) Miracle Mildew Remover by Wind-lock Corp.1 –3. Apply the cleaning solution to the wall surface by brush ordissolves algae and mildewspray and allow to soak for a period of 15-20minutes. Forc.) Wash Down by Demand Products2 – a generalheavy deposits, lightly scrub the affected area with asurface cleanersoft-medium bristle scrub brush. If a pressure washer is used,3. Applycleaningsolution to the200-500wall surfaceby brush orkeepthe thepressureat approximatelypsi (1.4-3.4spray andfor severala periodof from15-20theminutes.MPa),and allowkeep ctedwithsurfaceanotexceed500 lightlypsi (1.4scrubMPa)thepressure,asareathe EIFSsoft-mediumbristlescrub brush.If a pressurewasheris used,integrity can bedestroyedwith higherpressurewashing.keep thepressureat approximatelySomevariationof theseinstructions200-500may existpsifor(1.4-3.4proprietaryMPa), andkeep Alwaysthe nozzlefeetandfromthe surface.Dobrandcleaners.readseveralthe labelfollowdirections.not exceed 500 psi (1.4 MPa) pressure, as the EIFS surface4. After the cleaning solution has soaked the surface, rinseintegrity can be destroyed with higher pressure washing.the surface thoroughly with clean water and allow to dry.Some variation of these instructions may exist for proprietarybrandcleaners. Always read the label and follow directions.5.Do Not:a.) Use solvent based cleaners – acetone, gasoline,4. After the cleaning solution has soaked the surface, rinseketones, mineral oils, or turpentine – for example,the surface thoroughly with clean water and allow to dry.since solvent can penetrate the EIFS finish and base5. Do Not:coat materials and damage the EPS insulation board.a.) Use steamsolventcleaningbased cleanersacetone,gasoline,b.)or other– hightemperatureketones, methods,mineral oils,or turpentine– for example,cleaningsincethe EPS shandbasein the EIFS has a service temperature limit of aboutcoat materials165 F(74 C). and damage the EPS insulation board.b.)cleaningor othertemperaturec.) Use steamexcessivescrubbing,stiffhighbristlebrushes or rushes, since this type of abrasion can damageintheEIFS has a service temperature limit of aboutEIFSfinish.(74 C).d.) 165 FUse highpressure washing (in excess of 500 psic.) [3.4Use excessivestiffsincebristleor wireMPa]), or scrubbing,sandblasting,thebrushesEIFS laminatebrushes,since thiswithtypeexcessof abrasioncanordamagethecanbe damagedpressureabrasion.EIFS finish.6. Always check local regulatory requirements for disposal ofd.) Use high pressure washing (in excess of 500 psicleaning solution and waste water.[3.4 MPa]), or sandblasting, since the EIFS laminatecan be damaged with excess pressure or abrasion.6. Always check local regulatory requirements for disposal ofcleaning solution and waste water.Note:1.Wind-lockTM Corp., 1055 Leisz’s Bridge Road, Leesport, PA 19355Tel: 1-800-USA-LOCK (872-5625)Web: www.wind-lock.com2.Demand Products, Inc., 1055 Nine North Drive, Alpharetta, GA 30004Tel: 1-800-325-7540Web: www.demandproducts.comNote:Maintaining, Restoring or Changing EIFS Appearance1.Wind-lockTM Corp., 1055 Leisz’s Bridge Road, Leesport, PA 19355Tel: 1-800-USA-LOCK (872-5625)Web: www.wind-lock.com2.Demand Products, Inc., 1055 Nine North Drive, Alpharetta, GA 300043
Recoating EIFS 1.02EIFS finishes are easily recoated to refresh the look of thecladding or to change the color. Sto produces coatingproducts engineered specifically for this purpose. StoCoat Lotusan is the preferred coating product for this application.Lotusan is an exterior wall coating modeled on themicrostructure of the lotus leaf. This BIONICS technology,engineered by Sto, imparts super-hydrophobic properties –the Lotus-Effect – to the coating. This helps the coatingstay cleaner longer. StoCoat Acryl is another Sto coatingthat can be considered for this purpose, when atmosphericpollutants are less of a concern. If hairline surface cracks ofless than 1/32” (0.8 mm) in width exist in the EIFS texturedfinish, StoSilco Lastic is recommended as an alternative. It isa high-build (10-17 dry mils) elastomeric coating designed toprovide needed crack-bridging. Before recoating, the finishsurface of the EIFS must be sound and free of defects such aspeeling, blistering, cracking or delamination. Surfaces mustbe thoroughly cleaned to remove contaminants including dirtand mildew that might affect adhesion of the coating. Referto procedure number ER 1.01, “Cleaning EIFS,” for detailedcleaning recommendations. Select colors with lightreflectance value of 20 or greater for use with EIFS.Tools Required: Spray equipment and/or paint roller and/or highquality paint brush Roller screens, etc. as neededMaterials Required: Sto Coating (StoCoat Lotusan or StoCoat Acryl arerecommended) Masking tape, plastic sheeting, etc. for oversprayprotectionProcedure:1. Repair and clean the EIFS surface to be recoated (includecaulk inspection and replacement as needed).2. Protect adjacent areas against overspray, splatter, etc.3. Apply recoating material by spray, roller or brush inaccordance with Sto recommendations (refer to appropriatespecifications and product bulletins). Protect installed coatingfrom rain and freezing until completely dry.4Maintaining, Restoring or Changing EIFS Appearance
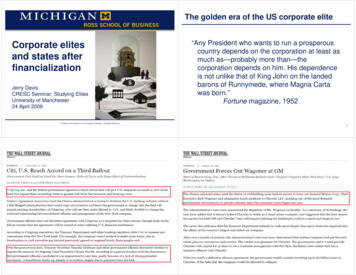
Resurfacing EIFS 1.03Resurfacing of EIFS is sometimes done for cosmetic reasons,for example, to restore the original appearance of an agedEIFS finish, or to change color, texture, or both, therebyrenewing the appearance of an EIFS facade. It may also be amore economical way to fix excess surface cracking or someother repetitive surface defect that exists in an area of theEIFS facade, rather than repairing each defect individually.This repair illustrates a method of resurfacing EIFS. It doesnot cover the analysis of defects such as cracks through theEIFS, which should be properly diagnosed and repaired priorto resurfacing. Estimated time of completion: 2 man-daysfor 500 ft2 (46 m2).Tools Required: Stainless steel trowel Plastic float Detail tools Paddle type mixerMaterials Required: Masking tape Sto RFP (or other Sto base coat material) Sto Mesh Sto Finish Clean empty bucketsProcedure:1. Generally, one should resurface up to an architecturalbreak in the wall such as an aesthetic reveal, change inplane, or change in elevation, to minimize any change inappearance of the resurfaced area compared to an adjacentarea (Fig. 1).2. Remove dirt, algae or any other surface contamination.Generally a trisodium phosphate detergent will remove mostdirt. The addition of bleach is necessary to remove algae ormildew. Referto “CleaningEIFS”, ER No.1.01. Afterapplying thecleaningsolution rinsethe surfacethoroughly withclean water andallow to dry.3. Apply Stobase coat to thesurface with astainless steeltrowel to auniformthickness ofapproximately1/8 inch (3 mm).Workhorizontally orvertically inFig. 2strips of 401. Existing EIFS finishinches (1 m),2. Sto Mesh3. So Mesh embedded in STO RFPand immediatelyembed the Sto Mesh into the wet base coat by trowelingfrom the center to the edge of the mesh. Overlap mesh notless than 2-1/2 inches (64 mm) at mesh seams and featherseams and edges. Allow to dry (Fig. 2).4. Apply Sto finish with a stainless steel trowel to a roughthickness slightly more than the largest aggregate size.Use the trowel to scrape the material down to a uniformthickness no greater than the largest aggregate size. Achievethe final texture by floating with the trowel in a figure eightmotion (Fig. 3). Use a plastic float for “R” (rilled texture)finishes, including Sto Swirl Finish.Fig. 3Area resurfaced with new EIFS finishImportant Note: the reinforcing mesh is not an important functional component of the resurfacingwork unless:1. There is a desire to increase impact resistance of the EIFSFig. 1Do not resurface an area up to an arbitrary line,since it will not match the adjacent area (1A).Resurface up to an architectural break in thewall or resurface the entire elevation fora uniform appearance (1B).2. It is needed to reinforce surface defects, such as cracking,or it in some way is being used to remedy other deficienciesIf neither of these conditions exist the reinforcing mesh can be omitted and the wall surface can beresurfaced with Sto RFP (followed by Sto finish). One should bear in mind that the mesh does aid inleveling the wall and in controlling thickness of Sto RFP. The decision to incorporate it into theresurfacing work should be made on a job-by-job basis.Maintaining, Restoring or Changing EIFS Appearance5
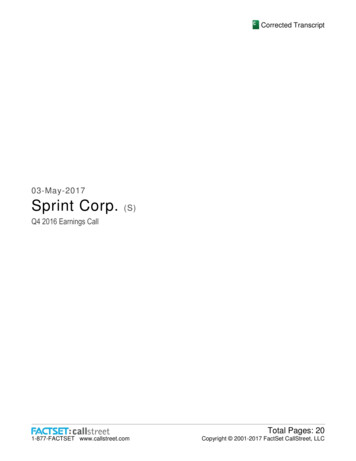
Minor EIFS RepairRepairSurfaceCracks in EIFS 2.01Minor ofEIFSRepairSurface cracks are defined as small surface defects such asRepairof orSurfaceCracksEIFS 2.01chips,spalls,cracks thatdo notinpenetratebeyond the EIFSbase coat, and in which the EIFS reinforcing mesh is notSurface cracksare definedas smallsurface defectsassevered.If the meshis severedsee procedureno. ERsuch2.02.chips, spalls,or cracks timethat dopenetratebeyond (doesthe EIFSEstimatedcompletionfor notrepair: 1 man-hourbaseincludecoat, andin whichthe EIFS reinforcingmesh is notnotdryingtime betweencoats of material).severed. If the mesh is severed see procedure no. ER 2.02.Tools Required:Estimated completion time for repair: 1 man-hour (does Stainless steel trowel and margin trowelnot include drying time between coats of material). Plastic float ToolsDetailRequired:toolsStainlesstrowelmargin trowel Newstiff steelbristlepaint andbrush Plastic floatMaterials Required: Detail tools Masking tape New stiff bristle paint brush Sto RFP (or other Sto base coat material) MaterialsSto FinishRequired: CleanMaskingtapebucketsempty Sto RFP (or other Sto base coat material)Procedure: Sto Finish1. Scrape or brush away loose finish or base coat material Clean empty buckets(Fig. 1). Clean if necessary to remove surface dirt.Procedure:2. Use a small stiff bristle paint brush to apply Sto base coat1. Scrape or brush away loose finish or base coat materialinto the crack (Fig. 2). Use a wet brush to remove excess Sto(Fig. 1). Clean if necessary to remove surface dirt.base coat that gets on the face of the finish. Allow to dry.2. Use a small stiff bristle paint brush to apply Sto base coat3. Fill the crack with color/texture matched Sto finish (Fig. 3).into the crack (Fig. 2). Use a wet brush to remove excess StoDepending on texture a stiff bristle paint brush or a plasticbase coat that gets on the face of the finish. Allow to dry.float works best for this application. Allow to dry.3. Fill the crack with color/texture matched Sto finish (Fig. 3).Depending on texture a stiff bristle paint brush or a plasticfloat works best for this application. Allow to dry.Fig. 1Fig. 1Fig. 2Fig. 2Fig. 3Fig. 36Minor EIFS Repair
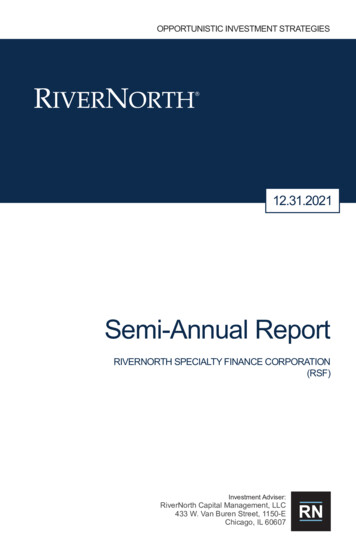
Repair of Cracks in EIFS 2.02Cracks are not a normal occurrence in EIFS. If they do occur,usually there is some underlying reason associated withapplication or unanticipated stresses in the EIFS. Someapplication errors that can cause cracks are:1. Alignment as opposed to offset of EPS board withsheathing joints2. Gapping as opposed to tightly abutting EPS boards3. Butting as opposed to overlapping reinforcing mesh,or insufficient mesh overlap.Whenever cracks occur an effort should be made todiagnose the cracks so the cause is clearly understood. Thenan appropriate repair method can be determined. This repairsimply illustrates the mechanics of repairing an isolated crackcaused by 2) or 3) above. Estimated completion time forrepair: 6-8 man-hours for 20 lineal feet (6.1 m). Does notinclude drying time between coats.Tools Required: Stainless steel trowel and margin trowel Detail tools Plastic float Stiff bristle paint brush Electric drill and paddle mixer Sharp scoring knife Scraper Hand held grinderMaterials Required: Water-based gel type paint remover* Masking tape Sto RFP (or other Sto base coat material) Sto Mesh or Sto Detail Mesh Sto Finish Clean empty buckets Low expanding urethane spray foamProcedure:1. Mark the cracklocation inpreparation forremoval of the EIFSfinish (Fig. 1).2. Apply awater-based gelFig. 1type paint removerDelineate the repair areain the marked areato soften the finish and use a scraper to remove the finishafter it has softened. Exercise care with the paint remover toavoid getting it onto surfaces that are not being repaired.Use coarse sand paper to remove the top layer of base coatto the mesh surface. Alternatively, a hand held grinder canbe used to removethe finish, taking carenot to grind ordeteriorate the meshlayer (Fig. 2).3A. If the cause ofthe crack is a gapbetween EPS boards,remove base coatfrom within the gapand fill the gap withEPS slivers or a lowexpanding urethanespray foam. Allowspray foam to cure.Shave or rasp flush withthe surface (Fig. 3A).Then embed reinforcingmesh in Sto base coatwith the mesh centeredover the crack andminimum 2-1/2 inch(64 mm) overlap oneach side of the crack(Fig. 3B). Feather theedges of the base coat.Fig. 2Remove the finishFig. 3APlug gap between EPS boards3B. If the cause ofFig. 3BReinforce with mesh splice stripthe cracks is mesh that is abutted orhas insufficient overlap, embed reinforcing mesh in Sto basecoat with the mesh centered over the crack and minimum2-1/2 inch (64 mm) overlap on each side of the crack (Fig.3B). Feather the edges of the base coat.4. Apply maskingtape around thearea to be refinished.Then apply matchingSto finish. Scrapeaggregate from themasking tape with amargin trowel. ThenFig. 4scrape the finish tightMask off area, reapply finish, t the wallsurface. Float with a plastic float to match the adjacenttexture. Remove the masking tape and use a brush to“stipple” the wet edge of the finish into the adjacent finish.Alternate between brush and float to blend the texture.*A product that has been found to be successful in removing EIFS finishes is 3MTM Safest StripperTMPaint and Varnish Remover, available from:3M Center, St. Paul, Minnesota 55144-1000Tel: 1-800 364-3577Web: www.3M.comMinor EIFS Repair7
Repair of Puncture Damage in EIFS 2.03Puncture damage is defined as any damage that fracturesthe EIFS reinforcing mesh and deforms the surface of theEPS board. Estimated time of repair: 4 hours (does notinclude drying time between coats of material).Tools Required: Stainless steel trowel and margin trowel Detail tools Plastic float Stiff bristle paint brush Electric drill and paddle mixer Sharp scoring knife Scraper Coarse sand paper Hand held grinderMaterials Required: Water-based gel type paint remover* Masking tape Sto RFP (or other Sto base coat material) Sto Mesh or Sto Detail Mesh Sto EPS Insulation Board to match thickness of existing Sto Primer Sto Finish Clean empty buckets NailsProcedure:1. Clean the areaaround the damage.Apply a water-basedgel type paint removerwith a stiff brush tothe finish in theimmediate areaFig. 1Asurrounding thedamage (Fig. 1A).Exercise care withthe paint remover toavoid getting it ontosurfaces that are notbeing repaired.Alternatively, a handheld grinder can beFig. 1Bused to remove thefinish, taking care not to grind or deteriorate the mesh layer.Use a scraper to remove at least 5 inches (130 mm) aroundthe puncture damage and to leave a sharp finished edge(Fig. 1B). Use coarse sand paper to remove the top layerof base coat to the mesh surface.8Minor EIFS Repair2. Cut the mesh atthe damaged area soat least 2-1/2 inches(64 mm) of intact basecoat and reinforcingmesh exist betweenthe puncture damageand the finished edge(Fig. 2A). Cut EPSslightly larger thanthe damaged EPSand temporarily “pin”it in place with a nail(Fig. 2B). Use a sharpknife to cut throughthe EPS. Cut at least1 inch (25 mm) awayfrom the mesh cut.Cut with a slightangle so that thenew EPS will beslightly larger than thehole to be pluggedwith it (Fig. 2C).3. Make a clean cutto the substrate andremove the old EPS(Fig. 3A). Dry fit thenew EPS to check forfit. Adjust size orre-cut new EPS if fit isnot snug. “Butter”the sheathing sideof the new EPS withSto base coat alongthe perimeter and inthe middle, then pressinto place (Fig. 3B).Make sure the newEPS is flush with orhigher than thesurface of the adjacentEPS (Fig. 3C). Allowthe adhesive to dry,then rasp or sand thesurface flush with theadjacent EPS andbrush clean.Fig. 2AFig. 2BFig. 2CFig. 3AFig. 3B
Fig. 3CFig. 4AFig. 4BFig. 5AFig. 5B4. Cut Mesh tooverlap existingmesh at least 1 inch(25 mm). Applymasking tape up tothe finished edgesurrounding therepair area (Fig. 4A).Apply Sto base coatand embed themesh patch in thewet base coat andlevel the base coatto match the surfaceprofile of the originalbase coat (Fig. 4B).Allow the base coatto dry and check thesurface profile tomake sure itmatches the original.Apply additionalbase coat ifnecessary andallow to dry.7. Remove maskingtape and use a brushto “stipple” the wetedge into theadjacent finish (Fig.6A). Alternatebetween brush andfloat to achieve thetexture match (Fig.6B).Fig. 6AFig. 6B5. If Primer wasused in the originalinstallation apply StoPrimer and allowto dry.6. Apply Sto finish(matched to existingtexture and color)with a stainless steeltrowel (Fig. 5A) andremove theaggregate in thefinish from themasking tape (Fig.5B). Scrape the finishtight against the wallto match theadjacent finishedsurface. Repeat ifnecessary. Then floatthe finish with aplastic float to matchthe adjacent texture.*A product that has been found to be successful in removing EIFS finishes is 3MTM Safest StripperTMPaint and Varnish Remover, available from:3M Center, St. Paul, Minnesota 55144-1000Tel: 1-800 364-3577Web: www.3M.comMinor EIFS Repair9
Repair of Cracks at Aesthetic Joints in EIFS 2.04An aesthetic joint in EIFS is defined as a joint that is scoredor routed into the EIFS insulation board. Minimum 3/4 inch(19 mm) of insulation board is required at the base of thejoint. The joint functions as a convenient starting andstopping point for application of the EIFS finish coat. It alsoserves to break up the monotony of a monolithic facade andto add visual interest to the facade. Cracks at aesthetic jointssometimes occur because of failure to properly embed EIFSreinforcing mesh, build-up of excessive base coat thickness,or too little thickness of insulation board at the base of thejoint. This repair illustrates how to effectively seal a crack atan aesthetic joint to prevent water intrusion. Estimatedcompletion time for repair: 1 man-hour for 20 lineal feet(6.1 m).Tools Required: Caulking gun Detail tool New stiff bristle paint brushMaterials Required: Bond breaker tape Sealant: low modulus silicone compatible with EIFS finishProcedure:1. Clean the joint surface area. Remove dirt, algae or anyother surface contamination. Generally a trisodiumphosphate detergent will remove most dirt. The additionof bleach is necessary to remove algae or mildew. Refer to“Cleaning EIFS,” ER No. 1.01. Allow the surface to dry.2. Center bond breaker tape over the crack to preventthree-sided adhesion of the sealant.3. Install the sealant material over the bond breaker tapeand tool the sealant in two directions.4. Protect from rain and freezing until dry.10Minor EIFS RepairsFig. 1EIFS aesthetic reveal with crack
Sealant Repairs and EIFSRemoval and Replacement of Sealant at Joints in EIFS 3.01Sealants generally function in wall assemblies as a waterproofing component between dissimilar materials andat other joints in the wall assembly. Sealants requiremaintenance, and sometimes replacement, because ofthe effects of aging, or because of design or installationdeficiencies that can cause premature failure. This repaircovers the removal of sealant from an EIFS wall assemblyand the preparation of joint surfaces to receive new sealant.Estimated time of completion: 2 man-days for 100 linealfeet (30 m) of joint (does not include drying time formaterials).Tools Required: Stainless Steel trowel and margin trowel Detail tools Stiff bristle brush Electric drill and paddle mixer Sharp scoring knife Scraper Coarse sand paper Hand held grinder Air compressor Caulking gun Tooling knife2. Pull the sealantand backer rodmaterial from thejoint. Remove the3. Remove residue ofsealant in the joint bygrinding with a handheld grinder, takingcare not to damageFig. 4Remove sealant residuethe EIFS finish on theface of the wall, or to grind through the layer of base coat inthe joint and damage the EIFS reinforcing mesh (Fig. 4).4. Brush or blow away dust on the joint surfaces with oil-freecompressed air.5. Apply a skim coatof Sto base coat tothe prepared jointsurfaces to create asmooth surface freeFig. 5Apply Sto RFP skim coatof ridges such that itcompletely hides the reinforcing mesh color (Fig. 5).Avoid heavy applications of Sto base coat. A thin coat,approximately 1/32” (0.8 mm) is sufficient. Protect Sto basecoat from rain and freezing until dry.Materials Required: Water-based gel type paint remover* Masking tape Sto RFP (or other Sto base coat material) Closed cell backer rod Sealant primer (if required) Low modulussilicone sealantcompatible with EIFSfinishProcedure:1. Slice along theterminating edges ofthe distressed sealant(Fig. 1) with a sharpscoring knife toseparate it from theadjacent EIFS finishor base coat material(Fig 2). Take care notto slice into the EIFSmaterials.EIFS finish (if present in the joint) by grinding with a handheld grinder or by softening the finish with a water-based geltype paint remover and then scraping to remove it (Fig. 3).Take care not to damage the EIFS finish on the face of thewall. Mask if using geltype paint remover.6. After Sto base coat is completely dry, generally 2 daysunder normal (70ºF, [21ºC], 50% RH) conditions, prepare thejoint surface for new sealant.Fig. 1Existing distressed sealantFig. 2Slice at the edges of the sealant7. Brush or blow the joint surface clean with oil-freecompressed air. Mask the adjacent EIFS finish on the face ofthe wall. Then prime with the sealant manufacturer’s primer(if required) and allow to dry.8. Install closed cellbacker rod to theproper depth in thejoint. Apply sealant(Fig. 6) and tool toensure intimatecontact with thejoint surfaces.Fig. 6New sealant and backer rod9. Protect sealant from rain and freezing until dry.*A product that has been found to be successful in removing EIFS finishes is 3MTM Safest StripperTMPaint and Varnish Remover, available from:3M Center, St. Paul, Minnesota 55144-1000Tel: 1-800 364-3577Web: www.3M.comFig. 3Remove finish texture residueSealant Repairs and EIFS 11
Repair of Sealant Joints in EIFS with Sealant “Tape” 3.02This repair covers the repair of sealant in an EIFS wallassembly with sealant “tape”. The repair is general innature and the specific instructions of the individual sealantmanufacturer should be followed in tandem with thisgeneral guide. Several sealant manufacturers* make “tapes”that come in multiple sizes for different size joints. The“tapes” are elastic and come in a small range of colors.One of the advantages of sealant “tape” is that it does notrequire grinding and removal of sealant and finish from jointsurfaces, as it simply spans across the existing joint like aBand-aid. Estimated time of completion: 1 man-day for100 lineal feet (30 m) of joint (does not include drying timefor materials).Tools Required: Caulking gun Detail tool New stiff bristle paint brush Vinyl rollerMaterials Required: Bond breaker tape Sealant primer (if required) Sealant adhesive Sealant “tape”Procedure:1. Clean the EIFSfinish surfacesadjacent to thedistressed joint witha trisodiumphosphate detergentsolution of warmwater (and bleach ifnecessary) to removedirt, algae, mold andany other surfacecontamination. Referto “Cleaning EIFS”,ER No. 1.01. Aftercleaning the surfacerinse thoroughly withclean water andallow to dry.Sealant Repairs and EIFS4. Apply two parallelbeads of the sealantmanufacturer’sadhesive slightly tothe inside (joint side)of the masking tapealong each side ofthe joint (Fig. 3).Fig. 3Prime the sur
Installation of Perimeter Fillet Seal at EIFS Abutting Window - 3.03 13 Technical Support 14. Maintaining, Restoring or Changing EIFS Appearance 3 Note: 1. Wind-lockTM Corp . Some variation of these instructions may exist for proprietary brand cleaners. Always read the label and follow directions. 4.