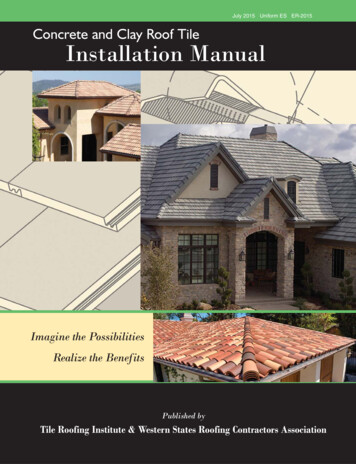
Transcription
2020 EditionRDTE NDA IOU P D ITENew Roof ConstructionM A N U A L
Cover House Photos:Top: Courtesy: Robert A. Cardello Architects. Photo Courtesy: Dennis Carbo PhotographyBottom left: Courtesy of BCIBottom right: Photo Courtesy: Tony Bonura
INTRODUCTIONNew Roof Construction ManualThis manual is intended for use with WesternRed Cedar and Alaskan Yellow Cedar shakeand shingle application only. Western RedCedar and Yellow Cedar productsmanufactured by Cedar Shake & ShingleBureau (”CSSB”) members are labeled withthe “Certi” brand name. The species isindicated by either “Yellow” or “Red” Cedar atthe top of the label. For ease of reference thismanual refers to “Certi-label Western Cedar”and the term is understood to include bothWestern Red Cedar and Alaskan Yellow Cedarproducts manufactured by CSSB members.Material for this manual has been compiledfrom various authoritative sources, and manyof the construction methods shown hereinhave been developed by the shake and shinglespecialists in both the United States andCanada. The design and application detailsand methods of construction reflect currentgood building practice. Other options arepossible but ensure that you check with yourlocal building code official for approval.Certi-label ProductsCedar shakes and shingles manufactured byCedar Shake & Shingle Bureau (”CSSB”)members are the only products labeled withthe ”Certi” brand name. Certi-label cedarshakes and shingles are made by experiencedcraftsmen who take pride in their trade andthe quality of their product. Despite theirvarying sizes and sometimes remotelocations, member mills are bound togetherby a rigid quality code. Unannouncedindependent inspections conducted byaccredited third party agencies ensure thatproduct quality is maintained. Products areinspected to conform with various local,national and international codes andstandards (contact the CSSB for specificdetails).Each bundle of product has the mill’sdistinctive Certi-label tucked under thebundle strap. Asking for “the Blue Label ” or“number one blue label” is not specificenough: CSSB members’ products are the onlyones with the Certi brand name on the label.Note: ONLY experienced professionals whofollow proper safety and workmanshippractices should implement theinformation contained herein. Different climates have different coderequirements. Ensure the right productsand installation methods are used perthe building code official in your area.The information herein is not intendedto supersede local building codes. Confirm labels required for warrantyregistration BEFORE purchasing product.Ensure warranty registration details arelisted on purchase order. Refer to www.cedarbureau.org for projectinspiration and photo portfolio.Note: This manual replaces all previousversions of the “Cedar Shake and ShingleBureau New Roof Construction Manual”.CONTENTSCerti-label Productspages 1-2General Design &Application Detailspages 3-5Mansard Roof Detailspage 6Low Slope Roof Detailspage 7Hip & Ridge Detailspage 8Roof Juncture Detailspages 9-10Roof ValleyFlashing Detailspage 11Roof ProjectionFlashing Detailspage 12Roof FastenerGuidelinespages 13-14Ventilation Detailspages 15-16Specialty RoofDeck Detailspages 17-18Cold Roof SystemDetailspages 18-19High HumidityArea Detailspages 20-21Care & MaintenanceOverviewpages 22-23Coverage &Exposure Tablespage 24Specification Guidelines pages 25-26How to Read aCerti-label page 27CSSB Historypages 28This manual presents best practices developed over more than a century of Cedar Shake and Shingle Bureau (“CSSB”) history. Please contact CSSB technical staff with Certi-label product or installation questions. The contentsof this manual are not intended to supersede local jurisdiction requirements or building code. ALWAYS check withyour local code jurisdiction for approval of any installation modifications, including accessory building materials.Check with building code official for local jurisdiction requirements
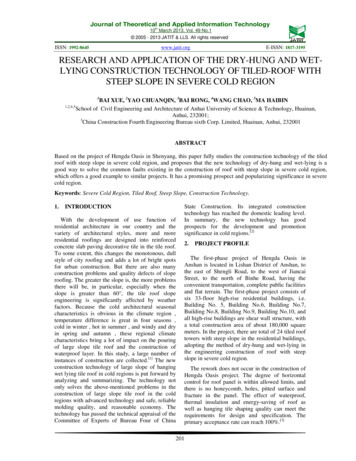
CERTI-LABEL PRODUCTS1CERTI-LABEL CEDAR SHAKESCerti-Split HandsplitCERTI-SPLITPREMIUM GRADE100% Edge GrainHandsplit Red Cedar ShakesCEDAR SHAKE & SHINGLE BUREAUTHE RECOGNIZED AUTHORITY SINCE 1915SUMAS, WASHINGTON(604) 820-7700These shakes have split faces and sawn backs. Cedar logs are first cut intodesired lengths. Blanks or boards of proper thickness are split and then rundiagonally through a bandsaw to produce two tapered shakes from eachblank. Available in Premium Grade (100% edge grain) or Number 1 Grade(Up to 20% flat grain allowed in each bundle).Certi-Sawn TapersawnPREMIUM GRADE100% Edge GrainTapersawn Red Cedar ShakesCEDAR SHAKE & SHINGLE BUREAUTHE RECOGNIZED AUTHORITY SINCE 1915SUMAS, WASHINGTON(604) 820-7700These shakes are sawn both sides. Premium and Number 1 Grades are themost common. Premium Grade is 100% edge grain, 100% clear and 100%heartwood. Number 1 Grade allows up to 20% flat grain in each bundle.Number 2 and 3 Grades are also available.Certi-Split TapersplitCERTI-SPLITPREMIUM GRADE100% Edge GrainHandsplit Red Cedar ShakesCEDAR SHAKE & SHINGLE BUREAUProduced by hand, using a sharp bladed steel froe and a mallet. The naturalshingle-like taper is achieved by reversing the block, end-for-end, with eachsplit. Premium Grade only. (100% edge grain).THE RECOGNIZED AUTHORITY SINCE 1915SUMAS, WASHINGTON(604) 820-7700Certi-Split Straight-SplitCERTI-SPLITPREMIUM GRADE100% Edge GrainHandsplit Red Cedar ShakesCEDAR SHAKE & SHINGLE BUREAUProduced by machine or in the same manner as tapersplit shakes exceptthat by splitting from the same end of the block, the shakes acquire thesame thickness throughout. Premium Grade only. (100% edge grain).THE RECOGNIZED AUTHORITY SINCE 1915SUMAS, WASHINGTON(604) 820-7700CERTIGRADE CEDAR SHINGLESNumber 1 Blue Label CERTIGRADERed Cedar Shingles- 100% Edge Grain - 100% All Clear - 100% Heartwood CEDAR SHAKE & SHINGLE BUREAUThe premium grade of shingles for roofs and sidewalls. These top-gradeshingles are 100% heartwood, 100% clear and 100% edge grain. Availablein 16" or 18" or 24" lengths.THE RECOGNIZED AUTHORITY SINCE 1915SUMAS, WASHINGTON(604) 820-7700Number 2 Red LabelA good grade for many applications. Not less than 10" clear on 16" shingles,11" clear on 18" shingles and 16" clear on 24" shingles. Flat grain andlimited sapwood are permitted in this grade.(604) 820-7700Number 3 Black LabelA utility grade for economy applications and secondary buildings. Not lessthan 6" clear on 16" and 18" shingles, 10" clear on 24" shingles.(604) 820-7700Number 4 UndercoursingA utility grade for undercoursing of double coursed sidewalls only. Not aroofing material and not to be used as a starter course for roofs.(604) 820-7700Check with building code official for local jurisdiction requirements
CERTI-LABEL PRODUCTSPressure-Impregnated Treated ProductsCERTI-GUARDRPRESSURE-TREATED FIRE-RETARDANT SHAKES & SHINGLESCEDAR SHAKE & SHINGLE BUREAUCerti-label products can also be treated. Products are available eitherfire-retardant-treated OR preservative-treated. Special care must be taken to follow thetreatment company’s recommended installation instructions.CERTI-GUARDRCerti-Guard Fire-Retardant Treated Cedar Shakes and ShinglesPRESSURE-TREATED FIRE-RETARDANT SHAKES & SHINGLESCEDAR SHAKE & SHINGLE BUREAUPremium and Number 1 Grades of Certi-Split shakes, Certi-Sawn shakes, and Number 1Grades of Certigrade shingles are available pressure-impregnated with fire retardants.Certi-Guard products may be used for Class A, B and C roof systems. Contact the treatmentcompany for treatment warranty information, accessory product requirements (includingrecommended fastener types) and application details for treated cedar material. Local codejurisdictions have additional information regarding applications in specific areas.Certi-Last Preservative-Treated Cedar Shakes and ShinglesCERTI-LASTRPRESERVATIVE TREATED CEDAR SHAKES & SHINGLESCEDAR SHAKE & SHINGLE BUREAUPremium and Number 1 Grades of Certi-Split shakes, Certi-Sawn shakes, and Number 1Grades of Certigrade shingles are available preservative-treated by pressure-impregnationprocess. This product is ideal in areas of high humidity. Specify the Certi-Last treating labelfor this extra protection. Contact the treatment company for treatment warranty information,accessory product requirements (including recommended fastener types) and applicationdetails for treated cedar material.Note: Once Western Cedar shakes and shingles are pressure-impregnated treated you mustcontact the treatment company to determine if a finish, such as paint or stain or cleaningsolution/agent, is allowable. Confirm product labels required for warranty registration BEFORE purchasing product.Ensure warranty registration details are listed on purchase order.TIPS Different climates have different code requirements. Ensure theright products and installation methods are used per the building Once Western Cedar shingles and shakes are pressureimpregnated treated you must contact the treatment company to code official in your area. Type of fastener used is critically important. DO NOT usedetermine if a finish, such as paint or stain or cleaningelectrogalvanized fasteners. Ring shank nails are used for bettersolution/agent, is allowable.withdrawal resistance and in designated high wind zone areas. Confirm product labels required for warranty registrationReadthis manual for further details.BEFORE purchasing product. Ensure warranty registration detailsNote: Recommended felt types are No. 30 ASTM D226 Type II or Be sure that felt interlay paper on shakes does not extend below No. 30 ASTM D4869 Type IV roofing felt. It is important that feltsare asphalt-saturated - certain code approvals can be misleadinga line that is twice the exposure above the butt (i.e. a 24" shakeregarding felt content, so check with your supplier.at 10", exposure would have felt applied 20” above the butt). Always use a permeable underlayment. There is no performance Never interlay shingles with felt.data available for cedar shake and shingle products over Keyways must not be aligned and must be a minimum 1 1/2”synthetic underlayment (over 80 different syntheticoffset from the course above.underlayments exist). If you elect to use a synthetic DO NOT drive nail heads or staple crowns below wood surface.underlayment, and have local building code official approval, be Overdriving or underdriving the fasteners can seriously damagesure that it is permeable and resistant to clogging from finethe integrity of your roofing system.particles, dust and resins.are listed on purchase order.Check with building code official for local jurisdiction requirements2
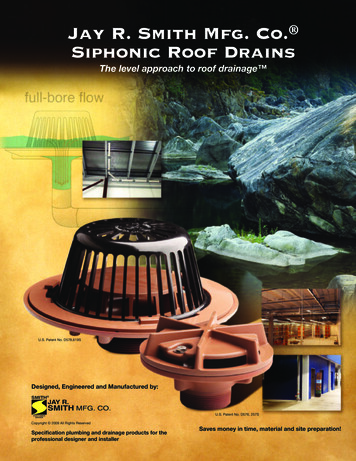
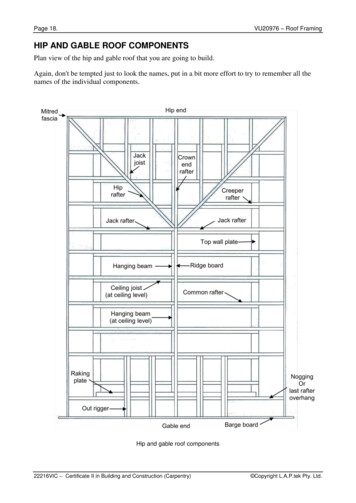
GENERAL DESIGN AND APPLICATION DETAILS3SheathingCerti-label shakesShakes and shingles may be applied overspaced sheathing. Spaced sheathing is usually1 x 4 or 1 x 6 softwood boards and shall notbe less than 1 x 4 boards.Solid sheathing is recommended for shakesand may be required in seismic regions orbeneath treated shakes and shingles. Solidsheathing is used in areas with wind-drivensnow. Please note that the only solid sheetsheathing tested with Certi-label shakesand shingles is plywood. Check with yourlocal building official for plywoodthickness/dimensions. Eave protection isused on the edge where 36" felt underlay isused and should extend up 24" beyond theexterior wall but it is not meant to cover theentire roof.Recommended felt types are No. 30 ASTMD226 Type II or No. 30 ASTM D4869 Type IVroofing felt. It is important that felts areasphalt-saturated - certain code approvals canbe misleading regarding felt content, so checkwith your supplier.Felt interlaySpaced sheathingProduct should project 1 1/2"beyond the fascia andapproximately 1"over the gableor rake endRafter fasciaGutterSolid sheathing at eaveRafterEave protection(extend to rake edge)FasciaRafter headerFigure 1: Spaced SheathingFor applications using varied exposures, the center of the sheathingboard should be equal to the distance of the exposure.Felt interlayCerti-label shakesProduct should project 1 1/2 "beyond the fascia andapproximately 1"over the gableor rake endSolid sheathingRafter fasciaGutterStaggered Butt ApplicationsFasciaStaggered butt applications are made byshortening the exposure less than the greatermaximum exposure. No shakes or shinglesshall be applied greater than the maximumexposure allowed. Check with local buildingcodes for approval of this installation method.Rafter headerRafterEave protection(extend to rake edge)Figure 2: Solid Sheathing2 x 4 spacers1 x 4 or 1 x 6nailing stripsCerti-label shinglesNote: Do not cover the entire deck withnon-permeable barrier (including nonpermeable underlayment). See CSSBtechnical bulletin “Asphalt-SaturatedOrganic Felt”.The CSSB recommends installing overplywood panel or dimensional lumbersheathing. If other sheathing materials areapproved for use by your local buildingcode official, the holding power of thefasteners should also be consideredcarefully. Contact local building codeofficial for substrate (plywood) attachmentfastener detail.Note: in areas of highhumidity, nailing strips or acontinuous ventilationproduct may be used, orCerti-Last treated shakesmay be applied directly tothe deck.Solid sheathingProduct should project 1 1/2beyond the fascia andapproximately 1"over the gableor rake endGutterSolid sheathing at eaveFasciaEave protection(extend to rake edge)Rafter headerRafterFigure 3: Spaced Over Solid Combination SheathingThis is the preferred system for shake and shingle application, in areas with high humidity or whereadditional ventilation is required. When using Certi-Last products, they may be applied directly tothe deck. Note: Figure 3 shows shingle application, shakes require felt interlay.Check with building code official for local jurisdiction requirements
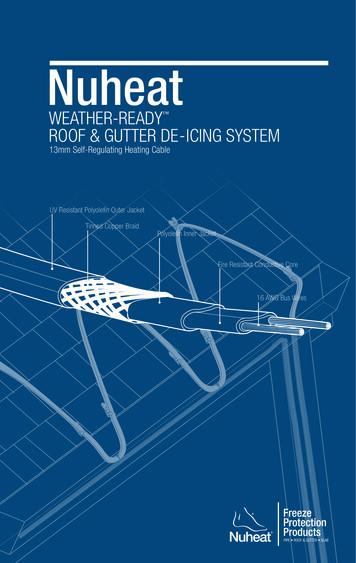
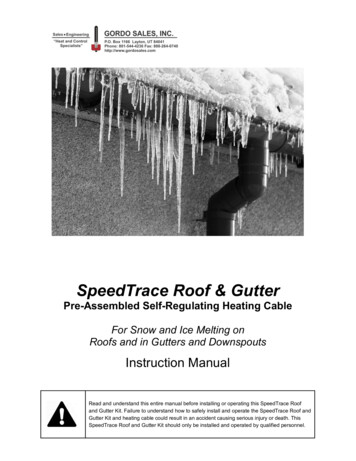
GENERAL DESIGN AND APPLICATION DETAILSCerti-label ShakesTwo nails (only) for each shakeapproximately 3/4" from edgeand approximately 1 1/2"above exposure line.The bottom edge of the felt should be positionedabove the butt of the shake at a distance equal totwice the weather exposure. Never interlay shingleswith felt.Space shakes 3/8"to 5/8" apartExposureRafter fasciaProduct shouldproject 1 1/2"beyond the fasciaand approximately 1"over the gable or rake endAdjacent course jointsshould be offset1 1/2" minimumGutterPlywood sheathingEave protection (extend to rake edge)Starter courseRafterRafter headerFasciaFigure 4: Certi-label Shake ApplicationCerti-label Shake ApplicationShakes, like shingles, are normally appliedin straight, single courses. The followingapplication details (Figure 4) must beobserved.1. The starter course may be one or twolayers of cedar shingles or shakes overlaidwith the desired shake. A 15" shake ismade expressly for starter and finishcourses.2. Butts of first course shakes shouldproject 1 1/2" beyond the fascia andapproximately 1" over the gable orrake end.edge of the felt should be positionedabove the butt of the shake at a distanceequal to twice the weather exposure. Forexample, 24" shakes, felt extends up 14"onto the sheathing forcing water to thesurface.4. Spacing between adjacent shakesshould be a minimum of 3/8" and amaximum of 5/8”.5. Shakes shall be laid with a side lap ofnot less than 1 1/2" between joints inadjacent courses.6. Straight-split shakes should be laid withthe froe-end (the end from which the3. The CSSB recommends using an 18"wide strip of No. 30 ASTM D226 Type II or shake has been split and which issmoother) towards the ridge.No. 30 ASTM D4869 Type IV roofing feltlaid over the top portion of shakes andextending on to the sheathing. (Check withyour local building code official for exactspecifications in your area). The bottomA solid deck is recommended in seismicactivity, hurricane and tornado regions and inareas where wind-driven snow isencountered. Roofing felt system interlaybetween the shake courses is requiredwhether the sheathing is spaced or solid. Thefelt interlay acts as a baffle that preventswind-driven snow or other foreign materialfrom entering the attic cavity during extremeweather conditions. The felt interlays alsoincrease the roof's insulation value. The feltinterlay system forces water to the surface.If spaced sheathing is used in shakeapplication, the sheathing is usually 1 x 6boards spaced on centers equal to theweather exposure, at which the shakes are tobe laid - but never more than 7 ½” for 18”shakes and 10” for 24” shakes on roofinstallations. When 1 x 4 spaced sheathing isinstalled at 10" on center, additional 1 x 4boards must be installed (i.e. maximumallowable spacing is approximately 3 1/2"measured from edge to edge between thesheathing boards). Please note that the onlysolid sheet sheathing tested withCerti-label shakes & shingles is plywood.Check with your local building official forplywood thickness/dimensions.Special care should be taken when installingthe felt interlays over spaced sheathing toensure that an effective baffle is formed(Figure 1). The felt should be applied over thetop portion of the shakes and extend on tothe spaced sheathing so that the bottom edgeof the felt is positioned at a distance abovethe butt equal to twice the weather exposure.Notes: See pages 20-21 for high humidityarea details Currently the only acceptable solidsheathing product tested for use withCerti-label shakes is plywood.Check with building code official for local jurisdiction requirements4
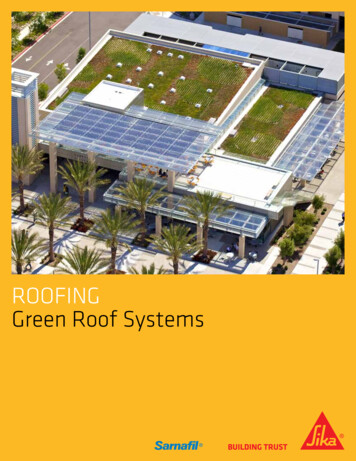
GENERAL DESIGN AND APPLICATION DETAILS5Certi-label ShinglesThere are two acceptable methods forapplication of spaced sheathing: One is tospace 1 x 4 boards to coincide with theweather exposure (Table 2, Page 24) of theshingles (Figure 5). Thus, if the shingles are tobe laid at 5 1/2" to the weather, the sheathingboards would also be spaced at 5 1/2" oncenter. In this method of application eachshingle is nailed to the center of the 1 x 4board. With 7 1/2" weather exposures, thecenter of the sheathing board shall equal thedistance of the weather exposure.Alternatively, although not commonly used, apermeable underlayment (i.e. breathable),such as roofing felt, may be applied overeither solid or spaced sheathing.Note: The only solid sheathing producttested for use with Certi-label shakes andshingles is plywood. Check with your localbuilding code official for plywoodthickness/dimensions.For 4:12 slope and steeper, useNumber 1 Grade shingles at 5", 5 1/2"and 7 1/2” exposures for 16", 18" and24" shingles respectively. For lowerroof slopes and lower product gradesuse reduced exposures.Two nails (only) for each shingleapproximately 3/4" from edge andapproximately 1 1/2” aboveexposure line.Spaced sheathing shouldbe 1 x 4 or 1 x 6Space shingles1/4" - 3/8" apartRafter fasciaAlternate coursejoints shouldnot alignSolid wood sheathingAdjacent course jointsshould be offset1 1/2" minimumGutterEave protection (extend to rake edge)Product should project1 1/2" beyond the fasciaand approximately 1" overthe gable or rake end"First course doubled or tripledRafterheaderFasciaRafterFigure 5: Certi-label Shingle ApplicationCerti-label Shingle ApplicationRegardless of style, the following basicapplication details (Figure 5) must beobserved.Centerline of heart1. Shingles must be doubled or tripled at alleaves.2. Butts of first course shingles should project1 1/2" beyond the fascia and approximately1" over the gable or rake end.3. Spacing between adjacent shingles (joints)should be a minimum of 1/4" and amaximum of 3/8".1 1/2"Knot or similar defect4. Certi-label shingles shall be laid with aside lap not less than 1 1/2" between joints inFigure 5a: Courseadjacent courses, and not more than 10%shall be in direct alignment in alternatecourses. Check with your local building code 6. Flat grain shingles wider than 8" should beofficial in your area.split in two before nailing. Knots and similardefects should be treated as the edge of the5. In lesser grade shingles (Figure 5a)shingle and the joint in the course abovecontaining both flat and vertical grain, jointsplaced 1 1/2" from the edge of the defect.should not be aligned with centerline ofheart.AlignmentCheck with building code official for local jurisdiction requirements
MANSARD ROOF DETAILSThe mansard is particularly well suited torenovation work on pitched roof housesbecause the upper story can be enlargedwithout adding extra height to the structure.The low downward slope of the mansard roofline acts visually to reduce the scale of abuilding and helps to eliminate a boxyappearance. This technique is used frequentlyon large commercial projects, particularlythose near residential neighborhoods. It isalso a common solution to the problem ofavoiding a monotonous appearance on flatroofed frame apartment buildings.Properly used, a mansard roof can strengthenthe design without substantially increasingconstruction costs. If raised up above the levelof a built-up roof the mansard can screen outroof penetrations or mechanical equipment.The variety of mansard roofs is practicallyinfinite. One of the most widely used (andmisused) roof designs, its proportions andscale are very important and care should betaken to avoid a mansard roof line that iseither too skimpy or too generous.Two of the most widely used roofingmaterials on the mansard roof areCerti-label cedar shakes and shingles.Cedar shakes, with their heavier texture andsolid appearance, are perhaps morefrequently specified for mansards althoughshingles are also used, particularly when alighter scale is desired.6The bottom edge of the felt should bepositioned above the butt of the shakeat a distance equal to twice theweather exposure.Two nails (only) for eachshake approximately 3/4"from edge and approximately1 1/2" above exposure line.Plywood SheathingCerti-label shakesSpace shakes 3/8"to 5/8" apartProduct should project1 1/2" beyond the fasciaand approximately 1" overthe gable or rake endEave protection min. 36"Figure 6: Mansard RoofThe light weight and ease of application ofCerti-label shakes and shingles contributesubstantially to economical construction.Construction details for typical mansard roofsare shown in Figure 6.Photo: Murray LevinCheck with building code official for local jurisdiction requirements
LOW SLOPE ROOF DETAILS7The minimum roof slope on whichCerti-label shakes are recommended is 4:12and for Certi-label shingles, 3:12. It ispossible, however, to apply Certi-label shakes or shingles to solid sheathed roofs oflow slope between 3:12 and 4:12. Certi-Last pressure-impregnated preservative-treatedshakes or shingles are recommended in lowslope installations. Shingles must be appliedat a reduced exposure. Never interlayshingles with felt. The prescribed methodprovides a double roof on which theCerti-label shakes or shingles are applied toa lattice-like framework embedded in abituminous surface coating.A hot mop or similar approved membraneshould be applied over the roof deck. Consultyour local building code official for approvedproducts in your area. With the final hot-mopapplication 2 x 4 spacers of Western RedCedar or preservative treated lumber areembedded in the bituminous coating. Thesespacers are installed over the rafters andextend from eave to ridge. Check with yourlocal building code official for theirpreference in your area.Next, 1 x 4 or 1 x 6 nailing strips, spacedaccording to the weather exposure selectedfor the Certi-label shakes or shingles,should be nailed across the spacers to form alattice-like nailing base. For example, if 24"shakes are to be installed at a weatherexposure of 10", the nailing strips would alsobe spaced at 10" on centers. When 1 x 4spaced sheathing is installed at 10" on center,additional 1 x 4 boards must be installed.18" felt interlay2 nails per shake4" overlap of felt2 x 4 spacers24" Certi-label shakesat 10" exposure1 x 4 or 1 x 6nailing stripsProduct should project1 1/2" beyond the fasciathe gable or rake endGutterShake startercourse36" felt underlaySolid sheathingFasciaRafter headerRafterHot mop or similarapproved membrane.Consult your localbuilding official forapproved products inyour area.Solid sheathing at eaveFigure 7: Certi-label Shake Application to Low Slope RoofsFinally, the Certi-label shakes or shinglesare applied in the normal manner with astarter course at the eave and felt interlaybetween each course of shakes (Figure 7).Note: When utilizing a non-permeable barrier (including non-permeable underlayment)over the entire roof deck/sheathing system, consult a Building Envelope Specialist. If installing shakes 4:12 slope or shingles 3:12 slope, check with your localbuilding code official for approval to make sure the application complies withjurisdictional requirements.Check with building code official for local jurisdiction requirements
HIP AND RIDGE DETAILSCerti-label Hip And Ridge DetailsIntersecting roof surfaces at hips and ridgesshould be capped to ensure a weather-tightjoint. Site-made or factory-assembled hip andridge units may be used, but both types musthave alternate overlaps and concealed nailing(Figure 8). When ridge cap and field productare the same length and grade, the weatherexposure of the ridge cap should be the sameexposure as the field product of the roof.Nails must be longer than those used on thefield of the roof and of sufficient length topenetrate 3/4" into or completely through thesheathing. Position fasteners approximately2” above exposure line. Install a strip of felt,eave protection material or metal over hip orridge under the ridge or hip cap. If longer orshorter ridge cap is used, adjust exposureaccordingly.Alternateoverlap8TIPSNote: Nails must be longer than those used on the field of the roof and of sufficient lengthto penetrate 3/4" into or completely through the sheathing. If making hip and ridge in the field, check warranty paperwork submissionrequirements. Face nailing is not aesthetically pleasing nor is it good for the roof system integrity. Ensure ridge is properly ventilated to comply with local building code requirements(check this manual for more details).Cut back edge of shingle or shakes on bevel.Join ridge material with type 304 or 316 stainless steel fastenersSee fastener details in this manual.43Notched21Notch first piece of starter coursePosition fastenersapproximately 2” aboveexposure lineDouble starter courseChoose material of uniform width between 4" and 5"(if making units with field material)Figure 8: Certi-label Hip and Ridge ApplicationCheck with building code official for local jurisdiction requirements
ROOF JUNCTURE DETAILS9Correct construction of roof junctures andslope transitions is vital to ensure the integrityof the roof system. In the following cases,where metal flashing is employed, check withyour local building code official for minimumgauge/thickness requirement. It should bepainted on both sides with a good metal orbituminous paint. Flashing materials shouldbe painted after bending to maintain theintegrity of the coating.Product should project1 1/2" beyond the fasciaand approximately 1" overthe gable or rake endDouble or triplestarter courseWood moldingMetal flashingSheathingConvex JunctureFigure 9: Convex Roof JunctureOn this type of juncture (Figure 9) metalflashings should be installed to cover the top4" of the wall and the bottom 8" of the roofslope before the final course of Certi-label shakes or shingles is nailed to the top of thewall. A strip of wood molding can be appliedafter final wall course is installed. A double ortriple starter course is then applied at theeave, with a 1 1/2" overhang over the outsidewall trim. The roof can then be completed inthe normal manner.Interwoven feltfor shakes onlySteeper slope roof36" starter feltDouble starter courseLower slope roofMetal flashing6" up - 6" belowConcave JunctureMetal flashings for the concave juncture aresimilar to those for the convex type. Theyshould be installed to cover the top of the roofslope and the bottom 4" of the wall before thefinal course of Certi-label shakes or shinglesis installed. The final roof course should beinstalled so that the tips fit as snugly aspossible against the wall at the juncture. Adouble starter course should be applied at thestart of the wall surface and the remainingwall courses applied in the recommendedmanner. If nails are not acceptable throughexposed metal, metal clips can be used tohold down the flashing.Solid sheathingProduct should project1 1/2" beyond the fascia andapproximately 1" overthe gable or rake endFigure 10: Low Slope to Steep Slope RoofTransition Detail - Certi-label shakes(Certigrade shingle application is similar but without felt interlay)Roof TransitionsRoof transitions (Figure 10) requireappropriate flashing, felt and productapplication. Changes in roof slope should bedetailed in a similar manner as concavejunctures, to ensure the integrity of the roofsystem. Solid sheathing is required above andbelow the change in slope, metal flashing isrequired across the change in slope, and a 36"strip of starter felt is required on the upperslope, installed in the same fashion as atthe eaves.Courtesy: Western Wood Products, Photo: John SpauldingCheck with building code official for local jurisdiction requirements
ROOF JUNCTURE DETAILS10Ridge capLast courseover flashingMetalflashingApex JunctureOn this roof juncture (Figure 11) metalflashing should cover the top 8" of the roofand the top 4" of the wall. It should beinstalled before the final course ofCerti-label shakes or shingles is applied tothe wall. The recommended sequence ofapplication is to apply Certi-label shakes orSheathingshingles first to the wall then to the roof. Theoverhanging roof material is then trimmedflush with the wall. Finally, specially preparedridge units are applied over the wall-roofjuncture so that in each matching pair theroof piece overlaps the wall piece each time.Figure 11: Apex Roof JunctureFor excessive sweepshingles may besteam bentSwept or Bell EaveWhen Ce
The premium grade of shingles for roofs and sidewalls. These top-grade shingles are 100% heartwood, 100% clear and 100% edge grain. Available - 100% Edge Grain - 100% All Clear - in 16" or 18" or 24" lengths. - 100% Heartwood - CE TRIGRADE Red Cedar Shingles CEDAR SHAKE & SHINGLE BUREAU THE RECOGNIZED AUTHORITY SINCE 1915