Transcription
How to attach Florida Probe Charts to thePatient’s Document Tree - SoftDentThere are 2 ways to attach a Florida Probe chart to the document center:1st Way:Use the print tool in Florida Probe to print a JPG digital copy to a “Florida Probe Charts”folder Florida Probe Corporation can remote in to your computer to set-up the “Florida ProbeCharts” folder on the server1. Click the print button at the top of the page.2. Check that “Create Digital Copy” is selected.3. Check that “JPG” is selected.4. If needed, click the “Select Folder” and choose the location where you would like to savethe images.5. Click “Print Selected Documents”.This will save a JPG copy of the patient’s chart into the “Florida Probe Charts” folder (orselected location).
You can access this through the desktop or through the favorites shortcut in the file explorer.
The next step is to import the saved chart into SoftDent patient’s document tree using thefollowing steps:1. Open the patient's information.2. Click Documents in the Express Bar. If using Classic workspace view, click Options Documents.3. Click Capture New Document.4. Enter a title for the document and set the document quality or category as desired, then clickOK.5. If importing a document, click File Import to open the file browser. Navigate to the folderthe document is saved in, then select the document and click Open. This will cause the image todisplay within the SoftDent preview window. Note: You may need to change the "Files ofType" drop-down to "All Files" if the document you are importing is not a supported imageformat.6. To save the document, click Save Capture. The document will now be listed in the patient'sDocuments tree.
2nd Way:Use the NEA attachment program.To use the Screen Capture feature:1. After creating an electronic claim, open the claims window. Making sure to only have the'Unsubmitted Elec' view checked, highlight and mark the desired claim. Select theAttachments button on the right to launch FastAttach.2. The NEA login screen will launch. Enter your user name and password then select LOGIN.
3. The NEA Flash screen will pop up - click Continue.4. From the FastAttach software, highlight the desired patient listing select Edit.
With the NEA Integration, this will pull the claim information from SoftDent and enter it intoNEA for you. You cannot change this information. Note: If you wish to include a narrativewith your attachment, you may do so at any time during the attachment process (up to 2000characters).5. You will then create the attachment by selecting the type of Acquire Method; then clickScreen Capture.
6. The NEA screen will then minimize and this will allow the user to pull up the image and selectthe Draw Rectangle.7. Open Florida Probe to the patient chart that you would like to capture.a. Select the “Full Page” button on the right side bar.8. Click and drag over the area of the chart you want to capture. Screen capture will NOT have the ledger, diagnosis or summary parts of the chart.Those are only included by printing through Florida Probe. Only the part of thechart highlighted in lime green will be shown when using the screen capture.
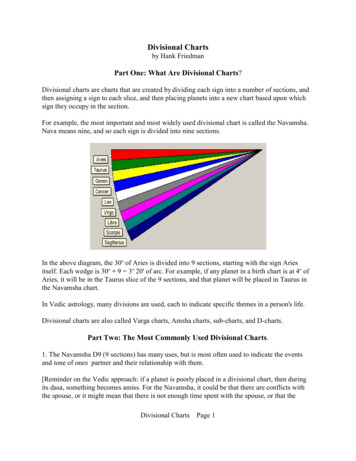
t Lor1da PR. ObG.Periodontal Chart001h.art ft a:me:Examiner:Your090HE.REDate:Compared wilh Visit On:2 1 Z Z 32 1 24!:i22/4Jut/ 26, 20111, 10-'47'"'Diagnosisr32.],Hrllltrf"F·r.1" ,,;d:;n t 0!lll;t'.t0s.,,Cth"Ci k r.11e()10111214f'SR1610G 0Leg8ndP.:,t;ilctGIA1h Cha. l!., . ;Ch:IIAD:o .-. ,,IITSl'V!rr l'ht-;:N»,:1111 i11""'friir-.t hrrt.'kMt,R :D ::a.,mD ;,I" 2711c""' tII ".!al -1CfflmDt,:;tfi:,,-5 0i-Tm La-mm, DrrmL1c:itl 4.0nnllNCKiHls f l, . R R§!.IM:. 1c-TimI In mn i\':t.2td!ed6ii!li' ft8 tlof d Gngr,aE1o.:1 SJi:pu7.1DiGf.1 -!iinJ"'d f.flU fl"IImp mCh i;D Rc.:i:-Y.J.:anTM!Alu""'"iefld:n;i'- . - .0:-ep ,!ml :!li:"Cdrg ,,J.t rr.nnfiletlil" onSummary2 lie!. )1' lie!. )nU 5t'ie1,,IS)C, ,O iolFu""""' - mr0-.,Hf'n".lii.:.r.,--.1.0m,
9. From the Edit Image screen, choose the type of image this is and make any needed imagequality changes and select NEXT.10. You may add any additional images. Select Acquire Method or if the attachment iscomplete, click Save to save your changes.
11. The status within FastAttach will be updated to Ready to Send. Select the SEND button tosend the attachment.12. The following screen will then appear. Select Print to print the NEA Report or Close toclose without printing.
13. Once the attachment has been sent, close Fast Attach. This will update the Attachmentscolumn within the Process Insurance Claims screen of SoftDent to 'Complete'.14. Process the eClaim. Click Process.
The next step is to import the saved chart into SoftDent patient's document tree using the following steps: 1. Open the patient's information. 2. Click Documents in the Express Bar. If using Classic workspace view, click Options Documents. 3. Click Capture New Document. 4. Enter a title for the document and set the document quality or .