Transcription
INITIAL TRAININGWORKBOOKCS SoftDentPractice Management SoftwareYour Guide to a Successful Transition 2017 Carestream Dental LLC16639 AL SD Cover al.com800.944.6365
DE1055-14CS SoftDent Practice Management SoftwareInitial Training Workbook
Notice 2018 Carestream Dental LLC. No part of this publication may be reproduced, stored in a retrieval system, translated to another language, or transmitted in any form by any means,electronic, mechanical, photocopied, recorded, or otherwise, without prior written permission.NEITHER CARESTREAM DENTAL LLC NOR ITS PARENTS, AFFILIATES, OR ANY OF ITS SUBSIDIARIES MAKE ANY WARRANTY OF ANY KIND WITH RESPECT TO THISMATERIAL, INCLUDING, BUT NOT LIMITED TO, THE IMPLIED WARRANTIES OF MERCHANTABILITY, NONINFRINGEMENT, AND FITNESS FOR A PARTICULARPURPOSE, WHICH ARE HEREBY DISCLAIMED IN THEIR ENTIRETY.The information in this document is subject to change. Neither Carestream Dental LLC nor its parents, affiliates, or any of its subsidiaries shall be liable for errors contained herein,omissions herefrom, or for indirect, incidental, consequential, or special damages (including, without limitation, lost profits or lost revenue) in conjunction with the furnishing,performance, or use of this material.SoftDent is a trademark of Carestream Dental Technology Topco Limited.All other trademarks and registered trademarks are the property of their respective holders.Current Dental Terminology (CDT) American Dental Association (ADA). All rights reserved.Manual Name: CS SoftDent Practice Management Software Initial Training WorkbookPart Number: DE1055Revision Number: 14Print Date: January 2018The names of persons and the data reflected in this guide are fictitious and are not intended to represent any real individual, event, or condition. Any resemblance or similarity of thenames of persons or data reflected in this guide to any actual person’s name or any event or condition is purely coincidental and unintended.
ContentsIntroductionLesson 1—Navigating in the SoftwareAccessing the Software . . . . . . . . . . . . . . . . . . . . . . . . . . . .3Using Practice Central . . . . . . . . . . . . . . . . . . . . . . . . . . . . .4Setting Preferences . . . . . . . . . . . . . . . . . . . . . . . . . . . .4Expanding Practice Central Content . . . . . . . . . . . . . . . . . . .5Navigating Through the Workspace. . . . . . . . . . . . . . . . . . . . . .5Main Menu Bar . . . . . . . . . . . . . . . . . . . . . . . . . . . . . .6Power Bar . . . . . . . . . . . . . . . . . . . . . . . . . . . . . . . . .6Client Area. . . . . . . . . . . . . . . . . . . . . . . . . . . . . . . . .8Express Bar . . . . . . . . . . . . . . . . . . . . . . . . . . . . . . . .8Current Views. . . . . . . . . . . . . . . . . . . . . . . . . . . . .9Options . . . . . . . . . . . . . . . . . . . . . . . . . . . . . . . .9General Operations. . . . . . . . . . . . . . . . . . . . . . . . . .9Docking the Express Bar . . . . . . . . . . . . . . . . . . . . . . .9Time Cards . . . . . . . . . . . . . . . . . . . . . . . . . . . . . . . . . . .9Clocking In and Out . . . . . . . . . . . . . . . . . . . . . . . . . . . .9Editing Time Card Entries . . . . . . . . . . . . . . . . . . . . . . . . 10Scheduler Toolbar . . . . . . . .Scheduler Icon Bar . . . . . . .Provider Detail Bar. . . . . . . .Different View of the Scheduler .Book Quick Glance . . . . .Month at a Glance . . . . .History Appointments. . . .Blocking the Scheduler . . . . .Holidays . . . . . . . . . . . . .Provider Vacations. . . . . . . . 16. 17. 17. 18. 18. 19. 19. 19. 19. 20Scheduling Appointments . . . . . . . . . . . . . . . . . . . . . . . . . . 21Scheduling Current Patients . . . . . . . . . .Making Appointments from Daily AppointmentsMaking Appointments from the Phone Center .Making an Appointment from the Patient List .Making a Family Appointment . . . . . . . . . .Filling Out the Appointment Card . . . . . . . .Editing an Appointment . . . . . . . . . . . . . 21. 21. 21. 22. 22. 22. 23Confirming Appointments . . . . . . . . . . . . . . . . . . . . . . . . . . 23Handling Canceled and Overlapped Appointments . . . . . . . . . . . . 24Lesson 2—Using the SchedulerComponents of the Scheduler . . . . . . . . . . . . . . . . . . . . . . . 13Daybook . . . . . . . . . . . . . . . . . . . . . . . . . . . . . . . . . 14Reading an Appointment . . . . . . . . . . . . . . . . . . . . . . 14Assistant Window . . . . . . . . . . . . . . . . . . . . . . . . . 15Resolving Canceled Appointments . . . . . . . . . . . . . .Resolving Overlapped Appointments . . . . . . . . . . . . .Adding Overlapped Appointments to the Tickler File ReportHandling Missed Appointments. . . . . . . . . . . . . . . .Generating the Missed Appointments Report . . . . . . . . 24. 24. 25. 25. 26Shortcut Menu . . . . . . . . . . . . . . . . . . . . . . . . . . . 15Scheduling New Patients . . . . . . . . . . . . . . . . . . . . . . . . . . 27Using the Calendar . . . . . . . . . . . . . . . . . . . . . . . . . . . 16Activating New Patients and Accounts . . . . . . . . . . . . . . . . . . . 28CS SoftDent Practice Management Software Initial Training Workbook (DE1055-14)iii of vi
Lesson 3—Using the Phone CenterGenerating Electronic Statements . . . . . . . . . . . . . . . . . . . . . 60Accessing the Phone Center Window. . . . . . . . . . . . . . . . . . . 31Information Button . .Insurance Info ButtonScheduling Button . .Prescription Button .Contacts Button . . .New Patient Button .Transactions Button .32323333333334Transmitting Electronic Statements . . . . . . . . . . . . . . . . . . . . 62Lesson 7—Using Electronic ServicesElectronic Services . . . . . . . . . . . . . . . . . . . . . . . . . . . . . 65Setting Up Communications . . . . . . . . . . . . . . . . . . . . . . . . 65Lesson 8—Using TeamTalk NotesViewing Existing TeamTalk Notes . . . . . . . . . . . . . . . . . . . . . 67Creating TeamTalk Notes. . . . . . . . . . . . . . . . . . . . . . . . . . 67Lesson 4—Adding Accounts and PatientsUsing the TeamTalk Button to Add TeamTalk Notes . . . . . . . . . 68Adding New Accounts . . . . . . . . . . . . . . . . . . . . . . . . . . . 37Using the Wizard to Add Patient TeamTalk Notes . . . . . . . . . . 68Adding Patients to Accounts . . . . . . . . . . . . . . . . . . . . . . . . 38Using the TeamTalk Window to Add Notes. . . . . . . . . . . . . . 69Adding Patients to New Accounts . . . . . . . . . . . . . . . . . . 39Adding Patients to Existing Accounts . . . . . . . . . . . . . . . . . 39Deleting TeamTalk Notes . . . . . . . . . . . . . . . . . . . . . . . . . . 69Adding Employers . . . . . . . . . . . . . . . . . . . . . . . . . . . . . 40Lesson 9—Using the InOffice FeatureAdding Insurance Companies . . . . . . . . . . . . . . . . . . . . . . . 41Displaying the InOffice Feature. . . . . . . . . . . . . . . . . . . . . . . 73Handling Insurance Plans . . . . . . . . . . . . . . . . . . . . . . . . . 42Processing a Patient . . . . . . . . . . . . . . . . . . . . . . . . . . . . 74Checking In and Changing a Patient’s Location . . . . . . . . . . . 74Lesson 5—Handling PaymentsChecking Out a Patient . . . . . . . . . . . . . . . . . . . . . . . . 74Posting Payments from Patients . . . . . . . . . . . . . . . . . . . . . . 47Payments by Cash . . . . . . . . . . . .Payments by Check . . . . . . . . . . .Payment from an Individual Patient .Payments by Credit Card . . . . . . . .47484849Using the Electronic Router . . . . . . . . . . . . . . . . . . . . . . . . 75Lesson 10—Managing Lab CasesManaging Labs . . . . . . . . . . . . . . . . . . . . . . . . . . . . . . . 77Adding a Lab . . . . . . . . . . . . . . . . . . . . . . . . . . . . . . 77Payments from Insurance Companies . . . . . . . . . . . . . . . . . . . 50Deleting a Lab . . . . . . . . . . . . . . . . . . . . . . . . . . . . . 77Individual Insurance Payments. . . . . . . . . . . . . . . . . . . . . 50Bulk Insurance Payments . . . . . . . . . . . . . . . . . . . . . . . 51Checking the Status of Unpaid Claims . . . . . . . . . . . . . . . . 52Editing a Lab . . . . . . . . . . . . . . . . . . . . . . . . . . . . . . 77Lesson 6—Generating StatementsSetting Statement Preferences . . . . . . . . . . . . . . . . . . . . . . 57Setting Printing Preferences . . . . . . . . . . . . . . . . . . . . . . . . 58Generating Paper Statements . . . . . . . . . . . . . . . . . . . . . . . 59iv of viCS SoftDent Practice Management Software Initial Training Workbook (DE1055-14)Managing Lab Cases . . . . . . . . . . . . . . . . . . . . . . . . . . . . 78Adding a Lab Case. . . . . . . . . . . . . . . . . . . . . . . . . . . 78Marking a Lab Case as Returned . . . . . . . . . . . . . . . . . . . 79Marking a Lab Case as Complete . . . . . . . . . . . . . . . . . . . 79
Lesson 11—Working with Routing SlipsSetting Routing Slip Preferences . . . . . . . . . . . . . . . . . . . . . . 81Configuring Printing for Routing Slips. . . . . . . . . . . . . . . . . . . . 82Lesson 12—Deactivating RecordsMarking Patient Records Inactive . . . . . . . . . . . . . . . . . . . . . . 85Marking Provider Records Inactive . . . . . . . . . . . . . . . . . . . . . 86Marking Account Records Inactive . . . . . . . . . . . . . . . . . . . . . 86Appendix A—Account and Patient User CodesIndexCS SoftDent Practice Management Software Initial Training Workbook (DE1055-14)v of vi
vi of viCS SoftDent Practice Management Software Initial Training Workbook (DE1055-14)
IntroductionYou can use this workbook to become acquainted with theCS SoftDent practice management software before you aretrained, to help while you are being trained, and to refresh yourmemory after training is completed.See the CS SoftDent online help, the CS SoftDent SchedulerInitial Training Workbook (NG941), and the CS SoftDentCharting Module Training Workbook (DE1075) for moreinformation.Backing Up DataUsing the Skill SharpenersThe software comes with a tutorial, which contains simulated data.The exercises in each lesson enable you to use the data and addyour own. After you do any of the exercises, you can reset thetutorial data to its original state.Printing the WorkbookFrom the Start ButtonDownloading Software Updates1From the Windows desktop, click the Start button.You can check for and download updates to your software usingthe Internet. To check for updates:2Click All Programs.3Select CS SoftDent Software Online Documentation Implementation and Training Workbook.4When the PDF file opens, select File Print.5Select the options you want and click Print.2On a computer with an active Internet connection, open thesoftware.Select Help Check for Updates. A message alerts you thatthe software is checking for available updates. If an update isavailable, a window is displayed, prompting you to downloadthe update.3Click Download. When the download is complete, amessage confirms that the download was successful.4Click Exit and restart the software. The software detects andinstalls the update automatically.The purpose of skillsharpeners is togive you practice inusing the software.Do not do anyexercise thatchanges yourdatabase unlessyou can reverse it.You can print the workbook from the Start button on yourcomputer and from the Carestream Dental Institute (CDI).You should have a backup for each day of the week, with copiesstored off-site. Keep your backups in a fire-resistant safe.1ImportantTo print from the Start button:NoteCustomer Supportdoes not provideassistance on yourbackup procedures.Contact your hardwarevendor to create andmaintain a backuproutine.From the CDITo print from the CDI:1Log in to the CDI.2Click Course Catalog. The catalogs are displayed.CS SoftDent Practice Management Software Initial Training Workbook (DE1055-14)1 of 2
2 of 23Click Product Training (Client Catalog).4Click SoftDent.5Click the Documentation tab.6Press Ctrl F, and type SoftDent Initial Training Workbook inthe Find field at the top of the window. The workbook isdisplayed in the list of documentation.7Click Click here to start this course.8When the PDF file opens, select File Print.9Select the options you want and click Print.CS SoftDent Practice Management Software Initial Training Workbook (DE1055-14)
Lesson 1Navigating in the SoftwareThis lesson includes: Accessing the Software Using Practice Central Setting Preferences Navigating Through the Workspace Time CardsDepending on your preferences, the first window displayed mightbe the Practice Central window.Accessing the SoftwareTo access the software:1From the Windows desktop, click Start.2Click All Programs.3Select CS SoftDent Software CS SoftDent Software. TheSoftDent Software Login window is displayed.4Type your name and password, and click OK.After you close the Practice Central window, click the PracticeCentral button on the Power bar to access it again.CS SoftDent Practice Management Software Initial Training Workbook (DE1055-14) 3 of 12
NoteYou must haveappropriate securityrights to specify yourpreferences.Using Practice CentralSetting PreferencesThe Practice Central window displays important daily information.The information can be customized for each person in the office.You can select which categories of notifications are displayed inthe Practice Central window. You can also change the order inwhich the categories are displayed.The following categories are examples of information available inthe Practice Central Preferences window: Patients due in today with appointments that will generatemore than a specified dollar amount New patients due in today Patients due in today who need x-rays Patients due in today whose birthdays are in the currentmonth Patients due in today who need perio screenings Patients due in today who have high balances Patients due in today who referred others Patients due in today with unconfirmed appointments Patients due in tomorrow with unconfirmed appointments Patients due in with more than one appointmentscheduled today Yesterday’s call backs Patients due in today who have unscheduled treatmentplan itemsPractice Central can be used in paperless offices as a morningreview: a way to see patients grouped by specific criteria, such aswho needs x-rays or who did not confirm today’s appointment.To set Practice Central preferences:1Click View Practice Central Preferences. The PracticeCentral Preferences window is displayed.2In the Practice Central Content section, select items toinclude in the Practice Central window. Change the order ofdisplay by selecting an item and using the Move Up or MoveDown button.3In the Content Settings section, you can set default valuesfor the following variables: 4 of 12 CS SoftDent Practice Management Software Initial Training Workbook (DE1055-14)High dollar amountHigh balance amount
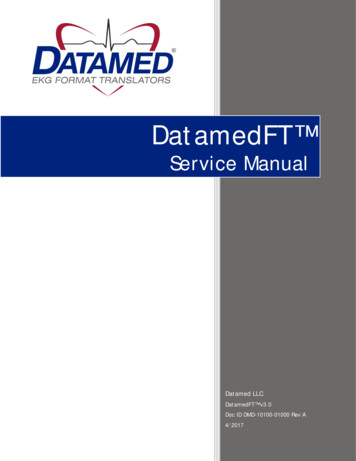
4In the X-Rays Due section, set default values for the length oftime between bitewings, full series, and panoral x-rays.5When you have finished modifying your preferences, click OK.Expanding Practice Central Content Client area—The primary work area. Status bar—Displays the user’s name, the date, and time.The following figure shows the workspace:Header barMenu barIf any section of the Practice Central window contains more thanten items, you can add an icon that enables you to expand the listand display all entries. To contract or expand the Practice Centralsections:1Select View Practice Central. The Practice Centralwindow is displayed.2Select My Preferences. The Practice Central Preferenceswindow is displayed.3To show the expansion icon, select Show Expansion Iconand click OK. To hide the expansion icon and display no morethan ten records in any section at one time, deselect ShowExpansion Icon and click OK.Navigating Through the WorkspaceAfter you close the Practice Central window, the following areasof the workspace are displayed: Title bar—Displays the name and version of the software. Main menu bar—Displays the menus that are available. Header bar—Displays the name of the active window. Express bar—Displays context-sensitive options in the leftpane of the enhanced workspace. Power bar—Displays buttons that are shortcuts tofrequently used features of the software.Express barPower barClient areaStatus barAll list windows have an Active Only option under the Find field. Ifyou check it, only active entities are displayed in the list.CS SoftDent Practice Management Software Initial Training Workbook (DE1055-14) 5 of 12
Main Menu Bar The Menu bar contains the following menus: File—Accesses Find windows that enable you to find aparticular record: account, patient, and so on. The defaultmethod for finding something is by last name, but typicallyyou can search by another variable, such as ID, chartnumber, or first name. List—Accesses lists, such as accounts and patients. View—Accesses options that enable you to customizeworkspace preferences, toolbars, the spell check feature,and Practice Central. Scheduler WizardInsurance WizardBilling Statements WizardQuestionnaire Creation WizardTeamTalk Wizard Internet—Provides access to Internet sites, such as theHome Page for CS SoftDent software. Window—This menu is currently disabled. Help—Provides online help; a What’s New video; links tothe system requirements, Online Resource Center, andCarestream Dental Institute; and information about thecurrent version of the software. Scheduler—Accesses options that enable you to viewappointments. Experts—Accesses a list of Experts: Office Expert, LetterExpert, and Contact Expert.Power Bar Insurance—Accesses a list of insurance-related options,including Carestream electronic services.The Power bar displays buttons that provide shortcuts to featuresthat are used frequently. These are some of the buttons that canappear on the Power bar: TeamTalk—Enables you to create notes that are triggeredwhen you perform a certain task. Reports—Accesses the Reports menu. System—Enables you to change default optionsthroughout the system, including:NoteTo hide elements ofthe enhancedworkspace, such asthe status bar or thePower bar, selectView, and then selectthe bar you want tohide.Wizards—Accesses the following wizards, which provideinstructions for the initial setup of these features: System settingsUser passwordFee schedules6 of 12 CS SoftDent Practice Management Software Initial Training Workbook (DE1055-14)When you hold the pointer over a button, a tool tip is displayed. Atool tip is a brief description of the function of the button. If thePower bar is not displayed, select View Power Bar.Double-click the Power bar to dock it at the top of the window.
To select the buttons to be displayed on the Power bar:1The following buttons are typically used:Right-click on the Power bar. A shortcut menu is displayed.Account List Window2Click Customize Toolbar. The Customize Toolbar window isdisplayed.NoteThe Power bar optionon the View menu is atoggle switch. Click itto hide the Power bar;click it again to displaythe Power bar.Patient List WindowGo to Daily AppointmentsInOffice WindowNoteButtons that are currently displayed on the toolbar are listed inthe right pane of the window. Use the scroll bar to scroll upand down through the list.Print Daily RegisterToday’s Memo List WindowButtons that are not currently displayed on the toolbar arelisted in the left pane of the window.Create a Memo3To hide a button that is currently displayed, select it in theright pane of the window, and click Remove.4To display a button on the toolbar that is not currentlydisplayed, select it in the left pane, and click Add.Run eClaims/eStatements5To change the order of the buttons, select a button in theCurrent toolbar buttons section, and click Move Up orMove Down.Insurance PaymentsYou can drag the Powerbar to a differentposition. If you drag it tothe extreme left or rightside of the window, thebuttons are displayedvertically. You cannotdrag the Power bar tothe bottom of thewindow.Send an E-MailCS SoftDent Practice Management Software Initial Training Workbook (DE1055-14) 7 of 12
View Phone CenterChange LoginPractice CentralTeam TalkYou can display other buttons on the Power bar, including: Pharmacy List Window Care Credit Integration Production Goals ADA Code List List Insurance Plans List Claims Clock In Clock OutClient AreaThe client area on the enhanced workspace contains the activewindow. At the top of the active window is a toolbar with shortcutbuttons. The buttons on the toolbar change, depending on theactive window. Run Scheduled Reports for Today List Insurance Plans Insurance Plan Rollover List Count of Forms Not Printed Electronic Statements Report Execute Microsoft Word List Referring Providers Current Views List Claims Options List Web Sites General Operations Trojan Employers Trojan Carriers Trojan Managed Care Plans Trojan Administrators Lab List Window8 of 12 CS SoftDent Practice Management Software Initial Training Workbook (DE1055-14)Express BarThe left pane of the enhanced workspace is called the Expressbar. The information on the Express bar depends on the activewindow in the client area. The Express bar is typically divided intothree areas:The two small red arrows between the Express bar and the clientarea display and hide the Express bar. Click on them once, and theExpress bar closes. The arrows are then at the left edge of thewindow. Click the arrows again, and the Express bar is displayed.
Click the double arrows to the right of the title of each area of theExpress bar, and that area closes. Click the double arrows again,and that area opens.Current ViewsDocking the Express BarBy default, the Express bar is docked on the left side of theworkspace. To dock it on the left side:1The Current Views section of the Express bar lists all of thewindows in the software that have been accessed and have notbeen closed.Click View Workspace Preferences. The WorkspacePreferences window is displayed.NoteYou must haveappropriate securityrights to specify yourpreferences.You can go to any of the windows you opened by clicking thatname in the Current Views section of the Express bar.OptionsThe Options section of the Express bar displays a list ofcommands and options available in the active window. As theactive window changes, the choices in the Options section of theExpress bar change.General OperationsIn the General Operations section of the Express bar, you can: Close all of the windows that you have opened. Access dental imaging software. Clock in. Clock out.2Select Dock Left.3Click OK.Time CardsYou can track attendance for each employee who clocks in andout of the software each business day. Employee clock-in andclock-out times are displayed in the Time Card List window.Clocking In and OutTo clock in or clock out:1To clock in, select Clock in from the General Operationssection of the Express bar. Type your user name andpassword, and click OK. A window is displayed forverification.2Review the information and click OK.3To clock out, select Clock out from the General Operationssection of the Express bar.CS SoftDent Practice Management Software Initial Training Workbook (DE1055-14) 9 of 12
NoteAn employee canreview his or her timecard entries.To review a time card entry:1The Time Card List window is displayed.Select List Employees. The Employees List window isdisplayed.2Select an employee, and click Time Card. The Time CardList window is displayed.3After you review the time card, click Close.3To add a time card entry, click Add. The Time Card window isdisplayed.4Enter the clock-in time and the clock-out time and click OK.5To edit an entry, double-click the entry.6Edit the entry and click OK.Editing Time Card EntriesIf you have the appropriate security level, you can edit time cardentries. To edit a time card:12Select List Employees. The Employee List window isdisplayed.Select an employee and click Time Card.10 of 12 CS SoftDent Practice Management Software Initial Training Workbook (DE1055-14)
Skill Sharpeners6Click OK, and click Close. The Referring Doctor List windowis displayed, with the doctor you added in the list.7Click Close.Exercise 1—Change System SettingsYou no longer want a default area code to display, so you mustchange the system setting.To change the default phone setting:Exercise 3—Change a Provider from Active to InactiveTo change a doctor from active to inactive:1Select System Change System Settings GeneralSystem. The General System Settings window is displayed.1Select List Provider. The Provider List window isdisplayed.2Click Phone Preferences at the top of the window. TheSystem Phone Preferences window is displayed.2Click the doctor you want to deactivate. This activates thetoolbar at the top of the window.3Clear the Default new Patient and Account area codes toPractice area code option.3Click Edit on the toolbar. The provider record for the doctor isdisplayed.4Click OK, and then click Close. The General SystemSettings window is displayed again.4Select Inactive.5Click OK and then Close.5Click Close.Exercise 2—Add Referring DoctorsTo add a referring doctor:1Select List Referring Dr. The Referring Doctor Listwindow is displayed.2Click any of the names in the list to activate the toolbar at thetop of the window.3Click Add on the toolbar. A blank Referring Doctor window isdisplayed.4Type the doctor’s first and last name, and select the specialtyfrom the drop-down list.5Press Tab.CS SoftDent Practice Management Software Initial Training Workbook (DE1055-14) 11 of 12
12 of 12 CS SoftDent Practice Management Software Initial Training Workbook (DE1055-14)
Lesson 2Using the SchedulerThe scheduler is an electronic version of an appointment book thatenables you to schedule and display appointments for the currentmonth and the next 21 months. See the CS SoftDent SchedulerInitial Training Workbook (NG941) for more information.This lesson describes: Components of the Scheduler Scheduling Appointments Confirming Appointments Handling Canceled and Overlapped Appointments Scheduling New Patients Activating New Patients and AccountsTo open the scheduler, click Scheduler Daily Appointments orclick the Go to Daily Appointments button.Components of the SchedulerYou can open the scheduler in these views: Daily Appointments (also called the daybook)—Typicallydisplays a single day’s existing appointments and emptyslots, which can be filled with new appointments. Book Quick Glance (also called Book at a Glance)—Presents multiple days simultaneously. The number ofdays displayed is a function of the number of rooms inyour office and the number of days your office is openduring a week. Month at a Glance—Displays the daily and monthlyproduction goals for either the office or an individualproducer. It also displays the actual production (in dollarsand as a percentage of the production goal) based onexisting appointments. History Appointments—Enables you to viewappointments that have occurred in the past. When youselect History Appointments, you are prompted for thedate range to display.The scheduler contains: Appointment book views Scheduler toolbar Scheduler Icon bar Provider Detail barTo select a view, click the drop-down list at the top of a schedulerwindow.CS SoftDent Practice Management Software Initial Training Workbook (DE1055-14) 13 of 30
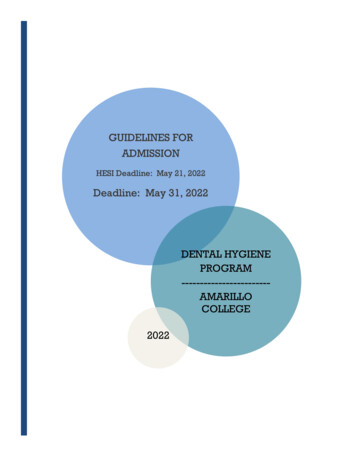
DaybookWhen the scheduler is opened, one of four views is displayed,typically the default daybook. The daybook view is used to monitorpatient appointments.A small red triangle in the upper-right corner of the appointmentindicates an appointment note. Hold the cursor over it, and thenote is displayed.In addition, these icons are displayed along the bottom of theappointment:Red X—Indicates that the appointment isscheduled at a time designated for another typeof appointment.Green check—Indicates the appointment isscheduled at a time designated for this type ofappointment.Zoom—Provides access to the Assistant, whichdisplays detailed information about theappointment and related financial information.NoteTo modify how data isdisplayed in anappointment,right-click anappointment andselect Properties.Each column in the daybook represents one room or operatory.The scroll bar at the bottom of the window is used to move leftand right to display more rooms. The scroll bar to the right is usedto move to earlier or later times of the day.At the top of the window is the header bar. The header barindicates the current view and the book and the day that aredisplayed.View Medical Alert—Displays information aboutany medical alerts on file for the patient.Dial Patient for Short call—A red telephoneindicates that Short Call is selected on theAppointment Card. Click the icon to display theauto dialer in the Patient Phone Numberswindow.Reading an AppointmentView Patient Portrait—Indicates that aphotograph of the patient is available. Click todisplay the portrait.The patient’s name is displayed unless HIPAA security is on, andthen only the initials are displayed. The numbers in columns at theright edge of the appointment identify the providers for theappointment. Procedure codes are displayed under the name.14 of 30 CS SoftDent Practice Management Software Initial Training Workbook (DE1055-14)Telephone Numbers—A yellow telephoneindicates there is not enough room to display allof the patient’s telephone numbers. Roll over theicon to display the telephone numbers. Click theicon to access the auto dialer in the PatientPhone Numbers window.
Assistant WindowNew Patient—Indi
2 of 2 CS SoftDent Practice Management Software Initial Training Workbook (DE1055-14) 3 Click Product Training (Client Catalog). 4 Click SoftDent. 5 Click the Documentation tab. 6 Press Ctrl F, and type SoftDent Initial Training Workbook in the Find field at the top of the window. The workbook is displayed in the list of documentation. 7 Click Click here to start this course.