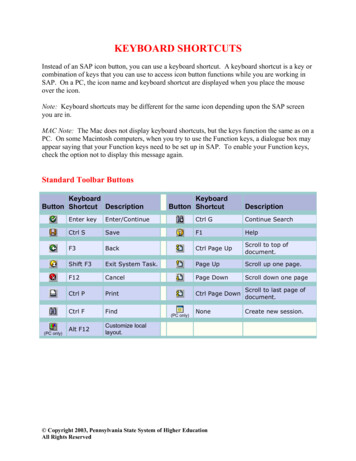
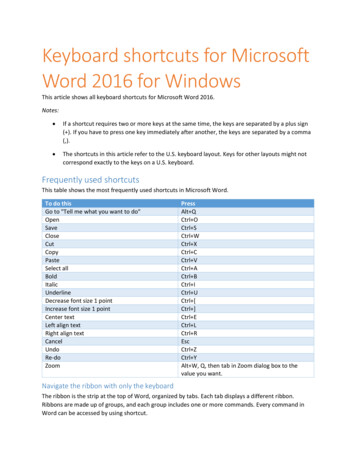
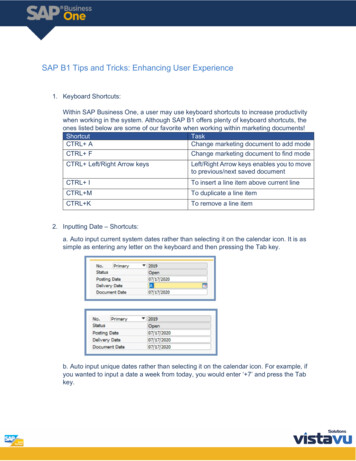
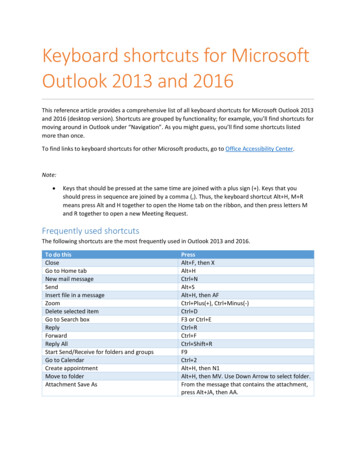
Transcription
First Steps in KeyboardPart 1 - Learn to Play 72 ChordsThese materials are part of the Chordmaps.com series of instructionalebooks, encouraging students to explore songwriting and creative musicalexpression on a variety of instruments.Copyright 2014 Stephen MugglinPermission is given to make not-for-profit copies for students or friends.Page 1
Table of ContentsFirst Steps in Keyboard (Part 1)Table of ContentsConcepts to Know FirstPage 3Concept - Naming the White NotesConcept - Half Steps and Whole StepsConcept - Sharps and FlatsConcept - Double Sharps and Double FlatsPage 4Page 5Page 6Page 7Seven ExercisesPage 8Exercise 1 - Perfect Fifths AscendingExercise 2 - Minor Sixths AscendingExercise 3 - Major Sixths AscendingExercise 4 - Moving the ThumbExercise 5 - Thumb and Index FingerExercise 6 - Index Finger and Little FingerExercise 7 - Middle Finger and Little FingerPage 9Page 11Page 13Page 15Page 16Page 17Page 18Learn to Play 72 ChordsPage 19Major and Minor Chords and InversionsThe 72 Chords ListedPage 2Pages 20 - 43Pages 44 - 45
Concepts to Know FirstFirst Steps in Keyboard (Part 1)Concepts to Know FirstEach page in this section presents a concept. If the concept is new to you, spend a little timestudying it. If the concept is something you already understand, move on to the next page.Concept - Naming the White NotesConcept - Half Steps and Whole StepsConcept - Sharps and FlatsConcept - Double Sharps and Double FlatsPage 3Page 4Page 5Page 6Page 7
Concepts to Know FirstFirst Steps in Keyboard (Part 1)Concept - Naming the White NotesThe white notes on the keyboard are named using the letters A, B, C, D, E, F, and G.CDEFGABCDEFGABCDEFGABCThe notes C, D, and E are found by looking for a group of two black notes. C will be to the left,D will be in the middle, and E will be to the right.CDEF, G, A, and B are found by looking for a group of three black notes. F will be to the far left,followed by G, A, and B in that order.FGAPage 4B
Concepts to Know FirstFirst Steps in Keyboard (Part 1)Concept - Half Steps and Whole StepsA half step is the distance from one note to its nearest neighbor. These are all half steps.CDEFGABCDEFGABCDEFGABCNotice that some half steps go from a black note to a white note (or a white note to a blacknote), while others go from a white note to another white note.A whole step is a jump of two half steps. From C to D is a whole step.CDEFrom F to G is a whole step. From A to B is also a whole step.FGAPage 5B
Concepts to Know FirstFirst Steps in Keyboard (Part 1)Concept - Sharps and FlatsThe symbol # is pronounced “sharp.” It means move one half step to the right. The black note tothe right of C can be called C# (C sharp).CDECDEThe symbol is pronounced “flat.” (It looks a little like the letter “b,” so in this book we willuse b instead.) It means move one half step to the left. The black note to the left of D can becalled Db (D flat).Notice that black notes have two names. C# and Db are the same note. D# and Eb are the samenote. The same is true for F# and Gb, G# and Ab, A# and Bb.C# D#or orDb EbCDEFGABCDEF# G# A#or or orGb Ab BbFGABCDEFGABCSometimes white notes are called by their sharp or flat names. For example, F can in certainsituations be written as E#, and E can sometimes be called Fb. (Similarly, C can in certainsituations be written as B#, and B can sometimes be called Cb.)Page 6
Concepts to Know FirstFirst Steps in Keyboard (Part 1)Concept - Double Sharps and Double FlatsDouble sharps and double flats are not seen very often, but it’s good to know about them.The symbol x is pronounced “double sharp.” It means move two half steps to the right. Forexample, the note D can in some situations be called Cx (C double sharp).CDEThe symbol is pronounced “double flat.” (It looks a little like “bb,” so in this book we willuse bb instead.) It means move two half steps to the left. For example, the note D can in somesituations be called Ebb (E double flat).CDPage 7E
Seven ExercisesFirst Steps in Keyboard (Part 1)Seven ExercisesLearning to play the 72 chords requires your right hand to get familiar with several differenthand positions. These seven exercises will help you learn the hand positions required.Exercise 1 - Perfect Fifths AscendingExercise 2 - Minor Sixths AscendingExercise 3 - Major Sixths AscendingExercise 4 - Moving the ThumbExercise 5 - Thumb and Index FingerExercise 6 - Index Finger and Little FingerExercise 7 - Middle Finger and Little FingerPage 9Page 11Page 13Page 15Page 16Page 17Page 18A NOTE ABOUT HAND POSITION: In the illustrations, the blue areas indicate which notes toplay, but not necessarily where the fingers are supposed to land on the keys. In general, you willwant to play with a very comfortable hand position. A chord that’s pictured like this.GCE.will probably be played with the finger tips landing something like this.GCEThis principle (finding a relaxed and comfortable hand position) applies to all the chord shapesfound in this book.Page 8
Seven ExercisesFirst Steps in Keyboard (Part 1)Exercise 1Perfect Fifths AscendingPlay each diagram on this page and the next with the right hand thumb and little finger.Page 9
Seven ExercisesFirst Steps in Keyboard (Part 1)Exercise 1Perfect Fifths Ascending - Second PagePage 10
Seven ExercisesFirst Steps in Keyboard (Part 1)Exercise 2Minor Sixths AscendingPlay each diagram on this page and the next with the right hand thumb and little finger.Page 11
Seven ExercisesFirst Steps in Keyboard (Part 1)Exercise 2Minor Sixths Ascending - Second PagePage 12
Seven ExercisesFirst Steps in Keyboard (Part 1)Exercise 3Major Sixths AscendingPlay each diagram on this page and the next with the right hand thumb and little finger.Page 13
Seven ExercisesFirst Steps in Keyboard (Part 1)Exercise 3Major Sixths Ascending - Second PagePage 14
Seven ExercisesFirst Steps in Keyboard (Part 1)Exercise 4Moving the ThumbThis exercise is played with the right hand, using the thumb, middle finger, and little finger.Notice that the middle and little fingers stay on E and G, while the rest of the hand stretches outto allow the thumb to move to B before returning to its original position.Th Thumb, M Middle, L LittleThThThThThMLMLMLMLMLPage 15
Seven ExercisesFirst Steps in Keyboard (Part 1)Exercise 5Thumb and Index FingerThis exercise is played with the right hand. The first chord is played with the thumb, middlefinger, and little finger. Notice that the little finger stays on G when the hand stretches to playthe notes B and D. The recommended fingering for the second chord is thumb, index finger, andlittle finger.Th Thumb, I Index, M Middle, L LittleThThMIThThLMIThLLLMLPage 16
Seven ExercisesFirst Steps in Keyboard (Part 1)Exercise 6Index Finger and Little FingerThis exercise is played with the right hand. The first chord is played with the thumb, middlefinger, and little finger. Though you could play the second chord the same way, by extending thelittle finger out, the recommended fingering is thumb, index finger, and little finger.Th Thumb, I Index, M Middle, L LittleThMThIThMThIThMLLLLLPage 17
Seven ExercisesFirst Steps in Keyboard (Part 1)Exercise 7Middle Finger and Little FingerThis exercise is played with the right hand, using the thumb, middle finger, and little finger.Notice that the thumb stays on C, while the rest of the hand stretches out and then returns to theposition played at the beginning.Th Thumb, I Index, M Middle, L LittleThMThThMMThThLLLMMLLPage 18
Learn to Play 72 ChordsFirst Steps in Keyboard (Part 1)Learn to Play 72 ChordsThe following 24 pages each have 3 chord diagrams similar to the ones below. Each diagram isintended to be played by the right hand. The left hand plays the one note listed in the leftcolumn, somewhere lower on the keyboard. Notice that the recommended fingering is alwaysThumb-Middle-Little except in the center diagram where using the Index finger gives a morecomfortable hand position.The Left Hand Plays.The Right Hand Plays.L.H.Chord SymbolCRight HandThe Name of the ChordThe C Major ChordRoot PositionCCEGEGCGCRecommended Fingering:Thumb - Middle - LittleFirst InversionCRecommended Fingering:Thumb - Index - LittleSecond InversionCA ReminderThe blue areas in these diagramsindicate which notes to play, but notnecessarily where your fingers aresupposed to land. For example, thelast chord above would probably beplayed like this.GPage 19CEERecommended Fingering:Thumb - Middle - Little
Learn to Play 72 ChordsFirst Steps in Keyboard (Part 1)L.H.CRight HandThe C Major ChordRoot PositionCCEGEGCGCFirst InversionCSecond InversionCEExplanation:The C major chord is constructed using the notes C, E, and G. These are the 1st, 3rd, and 5th notesof the C major scale.Page 20
Learn to Play 72 ChordsFirst Steps in Keyboard (Part 1)L.H.CmRight HandThe C Minor ChordRoot PositionCCEbGEbGCGCFirst InversionCSecond InversionCEbExplanation:The C minor chord is constructed using the notes C, Eb, and G. These are the 1st, 3rd, and 5thnotes of the C minor scale.Page 21
Learn to Play 72 ChordsFirst Steps in Keyboard (Part 1)This is a sample copy of First Steps in Keyboard - Part 1.Pages 22–45 are in the full version.Page 22
First Steps in KeyboardPart 1 - Learn to Play 72 ChordsFirst Steps in Keyboard is part of the Chordmaps.comseries of instructional ebooks.Copyright 2014 Stephen MugglinPermission is given to make not-for-profit copies for students or friends.First Steps in Keyboard - Part 1 - Learn to Play 72 Chords - Ver. 1.01Page 23
First Steps in Keyboard (Part 1) Page 20 C The C Major Chord Learn to Play 72 Chords C E G E G C G C E Root Position First Inversion Second Inversion Explanation: The C major chord is constructed using the notes C, E, and G. These are the 1st, 3rd,