Transcription
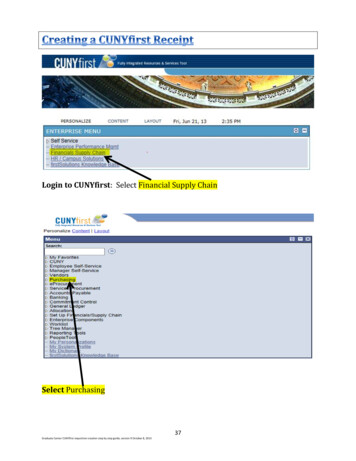
Login to CUNYfirst: Select Financial Supply ChainSelect Purchasing37Graduate Center CUNYfirst requisition creation step by step guide, version 9 October 8, 2013
Select ReceiptsSelect Add/Update Receipts38Graduate Center CUNYfirst requisition creation step by step guide, version 9 October 8, 2013
Click on the Look Up (magnifying glass)1. Select Business Unit – GRDPR Click ADDEnter the Purchase Order Numberin the “ID” field2. If you do not know the PO #, Leavethe ID field blank and select SEARCH.39Graduate Center CUNYfirst requisition creation step by step guide, version 9 October 8, 2013
1. All existing PO’s will populate inRetrieved Rows2. Select the PO you are receiving byclicking in box next to PO number3. Once you select the POClick OK40Graduate Center CUNYfirst requisition creation step by step guide, version 9 October 8, 2013
1. The Receiver records the‘Quantity’ or ‘Amount’ for thegood/services received for each POline.2. In the case of an Amount Only PO,the Price field will be available.After entering the quantity or dollar value received click SAVE41Graduate Center CUNYfirst requisition creation step by step guide, version 9 October 8, 2013
Go to ‘Add Comments’ to attach a signedreceipt; Packing Slip, Bill of Lading,Receiving Report or Invoice1. Click Attach and Upload documents2. Add any relevant information in Comment fieldie. Related PO number3. Click OK42Graduate Center CUNYfirst requisition creation step by step guide, version 9 October 8, 2013
Click ‘Header Details’Modify the Receipt Date to the date you received thegoods/services (receipt date will default as current date).Click OK43Graduate Center CUNYfirst requisition creation step by step guide, version 9 October 8, 2013
1. Note that Receipt ID has beengenerated2. Click on the ‘More Details” tab. If the box ischecked, then an inspection is needed3.Once the receipt is SAVED Document the Receipt ID. It is best practice to printthe Receipt ID page. The signed original documents along with a copy of theReceipt page shall be forwarded to Accounts Payable for processing.If an inspection is needed, notify the inspector to complete the receipt44Graduate Center CUNYfirst requisition creation step by step guide, version 9 October 8, 2013
The Receiver can cancel the Receipt by clicking the‘X’ at the header level or cancel a PO line at theReceipt Line(Cancelled transactions are irreversible)1. Click Find an Existing Value2. Select Business Unit3. Select “contains”4. Enter Receipt ID Number5. Click Search45Graduate Center CUNYfirst requisition creation step by step guide, version 9 October 8, 2013
Select Receipt NumberClick Document Status to View RelatedDocuments46Graduate Center CUNYfirst requisition creation step by step guide, version 9 October 8, 2013
View Requisition and Purchase Orderrelating to Receipt47Graduate Center CUNYfirst requisition creation step by step guide, version 9 October 8, 2013
1. Select Business Unit: GRDPR2. Add a new receipt3.Search for the PO by adding the PO number in the ID field and click Search4.Select checkbox of PO5. Click OK6. Enter Price shown on invoice for Amount Only PO or enter Quantity received for Quantity PO.Amount only PO’s will default to the original PO amount. This number must be changed to match theinvoice. Record the number of goods received per line in quantity PO’s. You will not see the amountoriginally ordered7. Click SaveIf an inspection is required a box will pop up notifying the receiver that they must contact theinspector with the Receipt ID number so they can complete an inspection receipt8. Click on Add Comments and add any relevant documentation (signed and dated packing slips orinvoices)Enter PO number in comments and other relevant information (recommended)9. Click on Header Details to modify Receipt Date10. Change receipt date to reflect the actual date of goods/services were received per packing slip,invoice or date(s) of service.Receipt date will default to current date, date is used to calculate interest charge by the State ifapplicable.11. Click on Document Status to review receipt and verify status (pending, approved, rejected).12. Print a screen shot of the Document Status page, sign, date, and attach it with all originaldocumentation and forward it to Accounts Payable.Accounts Payable Contact information – Room 8105Angella Bowley – Director – Extension 7668, abowley@gc.cuny.eduCarmen Ortiz – Extension 7665, cortiz@gc.cuny.eduCheryl Whyte-Weiss – Extension 7664, cwhyte-weiss@gc.cuny.eduAccounts Payable receipt section developed by Angella Bowley – Accounts PayableDirector48Graduate Center CUNYfirst requisition creation step by step guide, version 9 October 8, 2013
Graduate Center CUNYfirst requisition creation step by step guide, version 9 October 8, 2013 The Receiver can cancel the Receipt by clicking the 'X' at the header level or cancel a PO line at the Receipt Line (Cancelled transactions are irreversible) 1. Click Find an Existing Value 2. Select Business Unit 3. Select "contains" 4.