Transcription
ContentsIntroduction--1Product Features . . . . . . . . . . . . . . . . . . . . . . . . . . . . . . . . . . . . . . . . . 1Getting Started . . . . . . . . . . . . . . . . . . . . . . . . . . . . . . . . . . . . . . . . . . . 4Establishing Network Settings . . . . . . . . . . . . . . . . . . . . . . . . . . . . . . . 5Recovering from a Lost Password . . . . . . . . . . . . . . . . . . . . . . . . . . . . 9Rack PDU Front Panel--11About the Command Line Interface . . . . . . . . . . . . . . . . . . . . . . . . . . 14Logging on to the Command Line Interface . . . . . . . . . . . . . . . . . . . . 14About the Main Screen . . . . . . . . . . . . . . . . . . . . . . . . . . . . . . . . . . . . 17Using the Command Line Interface . . . . . . . . . . . . . . . . . . . . . . . . . . 20Metered Rack PDUUSER’S GUIDECommand Line Interface--14Command Syntax . . . . . . . . . . . . . . . . . . . . . . . . . . . . . . . . . . . . . . . . 21Command Response Codes . . . . . . . . . . . . . . . . . . . . . . . . . . . . . . . . 22Network Management Card Command Descriptions . . . . . . . . . . . . . 23Device Command Descriptions . . . . . . . . . . . . . . . . . . . . . . . . . . . . . 40Web Interface--54Supported Web Browsers . . . . . . . . . . . . . . . . . . . . . . . . . . . . . . . . . 54Logging On to the Web Interface . . . . . . . . . . . . . . . . . . . . . . . . . . . . 55Web Interface Features. . . . . . . . . . . . . . . . . . . . . . . . . . . . . . . . . . . . 57About the Home Tab . . . . . . . . . . . . . . . . . . . . . . . . . . . . . . . . . . . . . . 60Device Management--62About the Device Manager Tab . . . . . . . . . . . . . . . . . . . . . . . . . . . . . . 62Viewing the load status and peak load . . . . . . . . . . . . . . . . . . . . . . . . 62Configuring Load Thresholds . . . . . . . . . . . . . . . . . . . . . . . . . . . . . . . 63Configuring the Name and Location of the Rack PDU . . . . . . . . . . . . 64Resetting Peak Load and kWh . . . . . . . . . . . . . . . . . . . . . . . . . . . . . . 64I
Environment--65Configuring Temperature and Humidity Sensors . . . . . . . . . . . . . . . . 65Configuring Dry Contact Inputs . . . . . . . . . . . . . . . . . . . . . . . . . . . . . 67Logs--68Using the Event and Data Logs . . . . . . . . . . . . . . . . . . . . . . . . . . . . . 68Administration: Security--76Local Users . . . . . . . . . . . . . . . . . . . . . . . . . . . . . . . . . . . . . . . . . . . . 76Remote Users . . . . . . . . . . . . . . . . . . . . . . . . . . . . . . . . . . . . . . . . . . 77Configuring the RADIUS Server . . . . . . . . . . . . . . . . . . . . . . . . . . . . . 79Administration: Network Features--81TCP/IP and Communication Settings . . . . . . . . . . . . . . . . . . . . . . . . . 81Port Speed . . . . . . . . . . . . . . . . . . . . . . . . . . . . . . . . . . . . . . . . . . . . . 86Metered Rack PDUUSER’S GUIDEInactivity Timeout . . . . . . . . . . . . . . . . . . . . . . . . . . . . . . . . . . . . . . . 80DNS . . . . . . . . . . . . . . . . . . . . . . . . . . . . . . . . . . . . . . . . . . . . . . . . . . 86Web . . . . . . . . . . . . . . . . . . . . . . . . . . . . . . . . . . . . . . . . . . . . . . . . . . 88Console . . . . . . . . . . . . . . . . . . . . . . . . . . . . . . . . . . . . . . . . . . . . . . . 90SNMP . . . . . . . . . . . . . . . . . . . . . . . . . . . . . . . . . . . . . . . . . . . . . . . . . 92FTP Server . . . . . . . . . . . . . . . . . . . . . . . . . . . . . . . . . . . . . . . . . . . . . 97Administration: Notification--98Event Actions. . . . . . . . . . . . . . . . . . . . . . . . . . . . . . . . . . . . . . . . . . . 98Active, Automatic, Direct Notification . . . . . . . . . . . . . . . . . . . . . . . 101Administration: General Options--108Identification . . . . . . . . . . . . . . . . . . . . . . . . . . . . . . . . . . . . . . . . . . 108Set the Date and Time . . . . . . . . . . . . . . . . . . . . . . . . . . . . . . . . . . . 109Use an .ini File . . . . . . . . . . . . . . . . . . . . . . . . . . . . . . . . . . . . . . . . . 111Event Log and Temperature Units . . . . . . . . . . . . . . . . . . . . . . . . . . 112Reset the Rack PDU . . . . . . . . . . . . . . . . . . . . . . . . . . . . . . . . . . . . . 113Configure Links . . . . . . . . . . . . . . . . . . . . . . . . . . . . . . . . . . . . . . . . 114About the Rack PDU . . . . . . . . . . . . . . . . . . . . . . . . . . . . . . . . . . . . 114ii
How to Export Configuration Settings--115Retrieving and Exporting the .ini File . . . . . . . . . . . . . . . . . . . . . . . . 115The Upload Event and Error Messages . . . . . . . . . . . . . . . . . . . . . . 119File Transfers--121How to Upgrade Firmware . . . . . . . . . . . . . . . . . . . . . . . . . . . . . . . . 121Firmware File Transfer Methods . . . . . . . . . . . . . . . . . . . . . . . . . . . . 123Verifying Upgrades and Updates . . . . . . . . . . . . . . . . . . . . . . . . . . . 126Troubleshooting--127Appendix A: List of Supported Commands--129Appendix B: Security Handbook--131Content and Purpose of This Appendix . . . . . . . . . . . . . . . . . . . . . . 131Security Features . . . . . . . . . . . . . . . . . . . . . . . . . . . . . . . . . . . . . . . 132Metered Rack PDUUSER’S GUIDERack PDU Access Problems . . . . . . . . . . . . . . . . . . . . . . . . . . . . . . 127Authentication . . . . . . . . . . . . . . . . . . . . . . . . . . . . . . . . . . . . . . . . . 136Encryption . . . . . . . . . . . . . . . . . . . . . . . . . . . . . . . . . . . . . . . . . . . . 137Creating and Installing Digital Certificates . . . . . . . . . . . . . . . . . . . . 140Firewalls . . . . . . . . . . . . . . . . . . . . . . . . . . . . . . . . . . . . . . . . . . . . . 144Using the Rack PDU Security Wizard . . . . . . . . . . . . . . . . . . . . . . . . 145Create a Root Certificate and Server Certificates . . . . . . . . . . . . . . . 148Create a Server Certificate and Signing Request . . . . . . . . . . . . . . . 152Create an SSH Host Key . . . . . . . . . . . . . . . . . . . . . . . . . . . . . . . . . . 155Command Line Interface Access and Security . . . . . . . . . . . . . . . . . 158Telnet and Secure SHell (SSH) . . . . . . . . . . . . . . . . . . . . . . . . . . . . . 158Web Interface Access and Security: HTTP and HTTPS (with SSL) . . 159Supported RADIUS Functions and Servers . . . . . . . . . . . . . . . . . . . 163Configure the Rack PDU . . . . . . . . . . . . . . . . . . . . . . . . . . . . . . . . . 164Configure the RADIUS Server . . . . . . . . . . . . . . . . . . . . . . . . . . . . . 166Index--170iii
IntroductionProduct FeaturesThe Dell Metered Rack Power Distribution Unit (PDU) is a stand-alone, networkmanageable power distribution device that monitors the current, voltage, and power forthe Rack PDU. Access the Web interface using Hypertext Transfer Protocol or using secure HTTP(HTTPS) with Secure Sockets Layer (SSL). See Logging On to the Web Interface. Access the command line interface through a serial connection, Telnet, or SecureSHell (SSH). See About the Command Line Interface.Metered Rack PDUUSER’S GUIDEYou can manage a Rack PDU through its Web interface, its command line interface, orSimple Network Management Protocol (SNMP): Use an SNMP browser and the Dell Management Information Base (MIB) to manageyour Rack PDU.Rack PDUs have these additional features: Voltage, current, and power monitoring for the device and each phase as applicable. Configurable alarm thresholds that provide network and visual alarms to help avoidoverloaded circuits. Three levels of user access accounts: Administrator, Device User, andRead-Only User. Event and data logging. The event log is accessible by Telnet, Secure CoPy (SCP),File Transfer Protocol (FTP), serial connection, or Web browser (using HTTPSaccess with SSL, or using HTTP access). The data log is accessible by Webbrowser, SCP, or FTP.1
E-mail notifications for Rack PDU and system events. SNMP traps, Syslog messages, and e-mail notifications based on the severity levelor category of the Rack PDU and system events. Security protocols for authentication and encryption.The Rack PDU does not provide power surge protection. To ensurethat the device is protected from power failure or power surges,connect the Rack PDU to an uninterruptible power supply (UPS).Only one user at a time can log on to the Rack PDU. The priority for access, beginningwith the highest priority, is as follows: Local access to the command line interface from a computer with a direct serialconnection to the Rack PDUMetered Rack PDUUSER’S GUIDEAccess priorities for logging on Telnet or Secure SHell (SSH) access to the command line interface from a remotecomputer Web accessSee SNMP for information about how SNMP access to the Rack PDU iscontrolled.2
Types of user accountsThe Rack PDU has three levels of access (Administrator, Device User, and Read-OnlyUser), which are protected by user name and password requirements. An Administrator can use all of the menus in the Web interface and all of thecommands in the command line interface. The default user name and password areboth admin.– In the Web interface, the menus on the Device Manager tab, the Environmenttab, and the event and data logs, accessible under the Events and Data headingson the left navigation menu of the Logs tab. The event and data logs display nobutton to clear the log.– In the command line interface, the equivalent features and options.The default user name and password are both device. A Read-Only User has the following restricted access:Metered Rack PDUUSER’S GUIDE A Device User can access only the following:– Access through the Web interface only.– Access to the same tabs and menus as a Device User, but without the capability tochange configurations, control devices, delete data, or use file transfer options.Links to configuration options are visible but disabled. The event and data logsdisplay no button to clear the log.The default user name and password are both readonly.To set User Name and Password values for the three account types, seeSetting user access.3
Getting StartedTo start using the Rack PDU:1. Install the Rack PDU using the Rack Power Distribution Unit InstallationInstructions that were shipped with your Rack PDU.2. Apply power and connect to your network. Follow the directions in the RackPower Distribution Unit Installation Instructions.3. Establish network settings. (See Establishing Network Settings.)4. Begin using the Rack PDU by way of one of the following: Command Line Interface Rack PDU Front PanelMetered Rack PDUUSER’S GUIDE Web Interface4
Establishing Network SettingsYou must configure the following TCP/IP settings before the Rack PDU can operate ona network using one of the following: IP address of the Rack PDU Subnet maskIf a default gateway is unavailable, use the IP address of a computerthat is located on the same subnet as the Rack PDU and that isusually running. The Rack PDU uses the default gateway to test thenetwork when traffic is very light.Metered Rack PDUUSER’S GUIDE Default gatewayDo not use the loopback address (127.0.0.1) as the default gatewayaddress for the Rack PDU. It disables the card and requires you toreset TCP/IP settings to their defaults using a local serial login.TCP/IP configuration methodsUse one of the following methods to define the TCP/IP settings needed by the RackPDU: Appendix B: Security Handbook BOOTP and DHCP configuration Command Line Interface5
BOOTP and DHCP configurationThe Rack PDU default TCP/IP configuration setting of BOOTP & DHCP assumes thata properly configured BOOTP or DHCP server is available to provide TCP/IP settingsto Rack PDUs. The Rack PDU first attempts to discover a properly configured BOOTPserver, and then a DHCP server. It repeats this pattern until it discovers a BOOTP orDHCP server.A user configuration (INI) file can function as a BOOTP or DHCP boot file. For moreinformation, see Use an .ini File.Metered Rack PDUUSER’S GUIDEBOOTP. For the Rack PDU to use a BOOTP server to configure its TCP/IP settings, itmust find a properly configured RFC951-compliant BOOTP server.In the BOOTPTAB file of the BOOTP server, enter the Rack PDU’s MAC address, IPaddress, subnet mask, and default gateway, and, optionally, a bootup file name. Lookfor the MAC address on the bottom of the Rack PDU or on the Quality Assurance slipincluded in the package.When the Rack PDU reboots, the BOOTP server provides it with the TCP/IP settings. If you specified a bootup file name, the Rack PDU attempts to transfer that file fromthe BOOTP server using TFTP or FTP. The Rack PDU assumes all settings specifiedin the bootup file. If you did not specify a bootup file name, you can configure the other settings of theRack PDU remotely through its Web Interface or Command Line Interface.To create a bootup file, see your BOOTP server documentation.6
DHCP. You can use an RFC2131/RFC2132-compliant DHCP server to configure theTCP/IP settings for the Rack PDU.This section summarizes the Rack PDU’s communication with aDHCP server. For more detail about how a DHCP server can configurethe network settings for a Rack PDU, see DHCP response options.1. The Rack PDU sends out a DHCP request that uses the following to identifyitself: A Vendor Class Identifier A User Class Identifier (by default, the identification of the application firmwareinstalled on the Rack PDU)Metered Rack PDUUSER’S GUIDE A Client Identifier (by default, the MAC address of the Rack PDU)2. A properly configured DHCP server responds with a DHCP offer that includesall the settings that the Rack PDU needs for network communication. TheDHCP offer also includes the Vendor Specific Information option (DHCP option43). The Rack PDU can be configured to ignore DHCP offers that do notencapsulate the vendor cookie in DHCP option 43 using the followinghexadecimal format. (The Rack PDU does not require this cookie by default.)Option 43 01 04 31 41 50 43Where: The first byte (01) is the code. The second byte (04) is the length. The remaining bytes (31 41 50 43) are the vendor cookie.See your DHCP server documentation to add code to the VendorSpecific Information option.7
Note: By selecting the Require vendor specific cookie to acceptDHCP Address check box in the Web interface, you can require theDHCP server to provide a vendor cookie, which supplies informationto the Rack PDU Administration Network TCP/IP DHCP.Command Line Interface1. Log on to the command line interface. See Logging on to the Command LineInterface.3. Use these three commands to configure network settings. (Text in italicsindicates a variable.)a. tcpip -i yourIPaddressb. tcpip -s yourSubnetMaskMetered Rack PDUUSER’S GUIDE2. Contact your network administrator to obtain the IP address, subnet mask, anddefault gateway for the Rack PDU.c. tcpip -g yourDefaultGatewayFor each variable, type a numeric value that has the format xxx.xxx.xxx.xxx.For example, to set a system IP address of 156.205.14.141, type the followingcommand and press ENTER:tcpip -i 156.205.14.1414. Type exit. The Rack PDU restarts to apply the changes.8
Recovering from a Lost PasswordYou can use a local computer (a computer that connects to the Rack PDU or otherdevice through the serial port) to access the command line interface.1. Select a serial port at the local computer, and disable any service that uses thatport.2. Connect the provided serial cable to the selected port on the computer and tothe Serial port at the Rack PDU.4. Press ENTER, repeatedly if necessary, to display the User Name prompt. If youare unable to display the User Name prompt, verify the following:– The serial port is not in use by another application.– The terminal settings are correct as specified in step 3.Metered Rack PDUUSER’S GUIDE3. Run a terminal program (such as HyperTerminal ) and configure the selectedport for 9600 bps, 8 data bits, no parity, 1 stop bit, and no flow control.– The correct cable is being used as specified in step 2.5. Press the Reset button. The Status LED will flash alternately orange and green.Press the Reset button a second time immediately while the LED is flashing toreset the user name and password to their defaults temporarily.6. Press ENTER, repeatedly if necessary, to display the User Name prompt again,then use, dell, for the user name and password. (If you take longer than 30seconds to log on after the User Name prompt is redisplayed, you must repeatstep 5 and log on again.)7. At the command line interface, use the following commands to change the UserName and Password settings, both of which are now dell:user -an yourAdministratorNameuser -ap yourAdministratorPasswordFor example, to change the Administrator user name to Don Adams, type:user -an Don Adams9
Metered Rack PDUUSER’S GUIDE8. Type quit or exit to log off, reconnect any serial cable you disconnected, andrestart any service you disabled.10
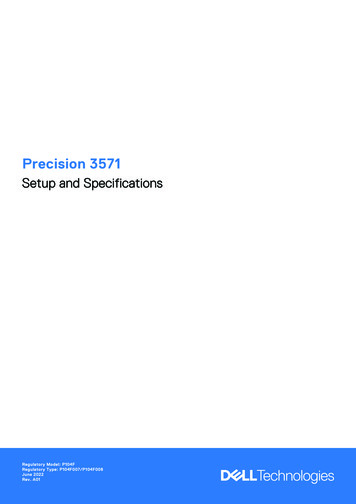
pdu0516aMetered Rack PDUUSER’S GUIDERack PDU Front PanelItemFunction Dry contact inputsConnector for two dry contact devices. Phase LEDsNote: for single-phase RackPDUs, only one LED ispresent.When no alarms are present, the LED displayshows a phase current, and a green Phase LEDindicates for which phase. The systemautomatically cycles through each phase,displaying the phase current for three seconds.If an alarm is present for one phase, the applicablePhase LED turns on and stays on while the alarmcondition is present. The LED will illuminate orangefor a Warning alarm or red for a Critical alarm. If analarm is present for more than one phase, thesystem will automatically cycle through each phasewith an alarm, illuminating the Phase LEDs for threeseconds. LED displayShows the phase current for the currentlyilluminated Phase LED.11
Metered Rack PDUUSER’S GUIDEItemFunction Function button To manually display the current for each phase,repeatedly press the button. The current displaysfor 30 seconds or until you press the button again.(This functionality is not available for single-phaseRack PDUs.) To display the IP address, press and hold for fiveseconds until IP appears; then release. On theLED display, the address will appear two digits ata time and then the cycle will repeat. To invert the display, press and hold for tenseconds until the AA pattern appears. Continueholding the button until AA is oriented as desiredthen release the button. 10/100 Base-T ConnectorPort for connecting the Rack PDU to the network. 10/100 LEDSee 10/100 LED. Network Status LEDSee Network Status LED. Temp/Humidity sensor portPort for connecting a Rack PDU TemperatureSensor (G853N) or a Rack PDU Temperature/Humidity Sensor (H621N). RJ-45 Serial PortPort for connecting the Rack PDU to a terminalemulator program for local access to the commandline interface. Use the supplied serial cable. Reset ButtonTo restart the interface of the Rack PDU withoutaffecting the outlets, press and release the Resetbutton.12
ConditionDescriptionOffThe Rack PDU is connected to an unknown network.Solid GreenThe Rack PDU has valid TCP/IP settings.Flashing GreenThe Rack PDU does not have valid TCP/IP settings.Solid OrangeA hardware failure has been detected in the Rack PDU.Flashing OrangeThe Rack PDU is making BOOTP requests.Flashing Orange andGreen (alternating)The Rack PDU is making DHCP requests.10/100 LEDMetered Rack PDUUSER’S GUIDENetwork Status LEDConditionDescriptionOffThe device that connects the Rack PDU to the network is off ornot operating correctly.Flashing GreenThe Rack PDU is receiving data packets from the network at 10Megabits per second (Mbps).Flashing OrangeThe Rack PDU is receiving data packets from the network at100 Megabits per second (Mbps).Solid Green orOrangeThe Rack PDU is receiving no network traffic.13
Command Line InterfaceAbout the Command Line InterfaceYou can configure all parameters of a Rack PDU (including those for which there arenot specific CLI commands) by using the CLI to transfer an INI file to the Rack PDU.The CLI uses XMODEM to perform the transfer. However, you cannot read the currentINI file through XMODEM.Metered Rack PDUUSER’S GUIDEYou can use the command line interface to view the status of and manage the RackPDU. In addition, the command line interface enables you to create scripts forautomated operation.Logging on to the Command Line InterfaceTo access the command line interface, you can use either a local (serial) connection ora remote (Telnet or SSH) connection with a computer on the same local area network(LAN) as the Rack PDU.Remote access to the command line interfaceYou can access the command line interface through Telnet or SSH. Telnet is enabledby default. Enabling SSH disables Telnet.To enable or disable these access methods, use the Web interface. On theAdministration tab, select Network on the top menu bar, and then the access optionunder Console on the left navigation menu.Telnet for basic access. Telnet provides the basic security of authentication by username and password, but not the high-security benefits of encryption.To use Telnet to access the command line interface:14
1 . From a computer on the same network as the Rack PDU, at a command prompt,type telnet and the IP address for the Rack PDU (for example, telnet139.225.6.133, when the Rack PDU uses the default Telnet port of 23), andpress ENTER.If the Rack PDU uses a non-default port number (from 5000 to 32768), you mustinclude a colon or a space, depending on your Telnet client, between the IP address(or DNS name) and the port number.2 . Enter the user name and password (by default, admin and admin for anAdministrator, or device and device for a Device User).Metered Rack PDUUSER’S GUIDEIf you cannot remember your user name or password, seeRecovering from a Lost Password.SSH for high-security access. If you use the high security of SSL for the Webinterface, use SSH for access to the command line interface. SSH encrypts usernames, passwords, and transmitted data. The interface, user accounts, and useraccess rights are the same whether you access the command line interface throughSSH or Telnet, but to use SSH, you must first configure SSH and have an SSH clientprogram installed on your computer.15
Local access to the command line interfaceFor local access, use a computer that connects to the Rack PDU through the serial portto access the command line interface:1 . Select a serial port at the computer and disable any service that uses that port.2 . Connect the supplied serial cable from the selected serial port on the computer tothe serial port on the Rack PDU.3 . Run a terminal program (e.g., HyperTerminal) and configure the selected port for9600 bps, 8 data bits, no parity, 1 stop bit, and no flow control.Metered Rack PDUUSER’S GUIDE4 . Press ENTER, and at the prompts, enter your user name and password.16
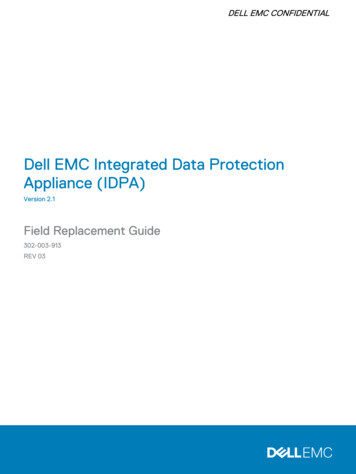
About the Main ScreenThe main screen that is displayed when you log on to the command line interfaceof a Rack PDU:cli Metered Rack PDUUSER’S GUIDEDell CorporationNetwork Management Card AOS vx.x.x(c)Copyright 2009 All Rights Reserved --------------------------------------Name: Test LabDate : 10/30/2009Contact : Don AdamsTime : 5:58:30Location : Building 3User : AdministratorUp Time : 0 Days, 21 Hours, 21 MinutesStat : P N A 17
Main screen information fields: Two fields identify the operating system (AOS) and application (APP) firmwareversions. The application firmware name identifies the type of device that connects tothe network. In the preceding example, the application firmware for the Rack PDU isdisplayed.Network Management Card AOSvx.x.xRPDUD vx.x.x Three fields identify the system name, contact person, and location of the Rack PDU.(In the control console, use the System menu to set these values.)Name: Test LabLocation: Building 3 An Up Time field reports how long the Rack PDU has been running since it was lastturned on or reset.Metered Rack PDUUSER’S GUIDEContact: Don AdamsUp Time: 0 Days, 21 Hours, 21 Minutes Two fields identify when you logged in, by date and time.Date: 10/30/2009Time: 5:58:30 A User field identifies whether you logged in through the Administrator or Deviceuser account. (The Read-Only User account cannot access the control console.)User : Administrator18
A Stat field reports the Rack PDU status.Metered Rack PDUUSER’S GUIDEStat : P N A P The Dell operating system is functioning properly.N The network is functioning properly.N?A BOOTP request cycle is in progress.N–The Rack PDU failed to connect to the network.N!Another device is using the Rack PDU IP address.A The application is functioning properly.A–The application has a bad checksum.A?The application is initializing.A!The application is not compatible with the AOS.If P is not displayed, contact Dell support staff.19
Using the Command Line InterfaceAt the command line interface, use commands to configure the Rack PDU. To use acommand, type the command and press ENTER. Commands and arguments are validin lowercase, uppercase, or mixed case. Options are case-sensitive.While using the command line interface, you can also do the following: To obtain information about the purpose and syntax of a specified command, type thecommand, a space, and ? or the word help. For example, to view RADIUSconfiguration options, type:radius ?orradius helpMetered Rack PDUUSER’S GUIDE Type ? and press ENTER to view a list of available commands, based on youraccount type. Press the UP arrow key to view the command that was entered most recently in thesession. Use the UP and DOWN arrow keys to scroll through a list of up to tenprevious commands. Type at least one letter of a command and press the TAB key to scroll through a list ofvalid commands that match the text you typed in the command line. Type exit or quit to close the connection to the command line interface.20
ItemDescription-Options are preceded by a hyphen. Definitions of options are enclosed in angle brackets. Forexample:-dp device password []If a command accepts multiple options or an option acceptsmutually exclusive arguments, the values may be enclosed inbrackets. A vertical line between items enclosed in brackets or anglebrackets indicates that the items are mutually exclusive. You mustuse one of the items.Example of a command that supports multiple options:Metered Rack PDUUSER’S GUIDECommand Syntaxuser [-an admin name ] [-ap admin password ]In this example, the user command accepts the option -an, which defines theAdministrator user name, and the option -ap, which defines the Administratorpassword. To change the Administrator user name and password to XYZ:1 . Type the user command, one option, and the argument XYZ:user -ap XYZ2 . After the first command succeeds, type the user command, the second option, andthe argument XYZ:user -an XYZ21
Example of a command that accepts mutually exclusive arguments for anoption:alarmcount -p [all warning critical]In this example, the option -p accepts only three arguments: all, warning, or critical. Forexample, to view the number of active critical alarms, type:alarmcount -p criticalThe command will fail if you type an argument that is not specified.The command response codes enable scripted operations to detect error conditionsreliably without having to match error message text:The CLI reports all command operations with the following format:Metered Rack PDUUSER’S GUIDECommand Response CodesE [0-9] [0-9] [0-9] : d PrefillE001Successfully IssuedE106Command failedE100Command failedE200Input errorE101Command not foundE201No responseE102Parameter errorE202User already existsE103Command line errorE203User does not existE104User level denialE204User does not haveaccess to this command22
Network Management Card CommandDescriptions?Access: Administrator, Device UserDescription: View a list of all the CLI commands available to your account type. Toview help text for a specific command, type the command followed by a question mark.alarmcount ?aboutMetered Rack PDUUSER’S GUIDEExample: To view a list of options that are accepted by the alarmcount command,type:Access: Administrator, Device UserDescription: View hardware and firmware information. This information is useful introubleshooting and enables you to determine if firmware upgrade is needed.23
alarmcountAccess: Administrator, Device UserOptionArgumentsDescription-pallView the number of active alarms reported by the Rack PDU.Information about the alarms is provided in the event log.warningView the number of active warning alarms.criticalView the number of active critical alarms.Example: To view all active warning alarms, type:alarmcount -p warningMetered Rack PDUUSER’S GUIDEDescription:24
bootAccess: Administrator onlyMetered Rack PDUUSER’S GUIDEDescription: Define how the Rack PDU will obtain its network settings, including theIP address, subnet mask, and default gateway. Then configure the BOOTP or DHCPserver settings.OptionArgumentDescription-b bootmode dhcpBootp dhcp bootp manualDefine how the TCP/IP settings will be configured when theRack PDU turns on, resets, or restarts. See TCP/IP andCommunication Settings for information about each bootmode setting.-aremainDhcpBootp gotoDhcpOrBootpdhcpBootp boot mode only. Specify whether the Rack PDUwill retain the dhcpBootp boot mode setting or switch tobootp or dhcp boot mode after it receives its networksettings.-ostop prevSettingsbootp and dhcpBootp boot modes only. If the Rack PDUreceives no valid response to five requests for a networkassignment, stop requesting network settings until the RackPDU is restarted or use the previously configured settingsso the Rack PDU remains accessible.-f # bootp and dhcpBootp boot modes only. Enter thenumber of retries that will occur when no valid response isreceived, or zero (0) for an unlimited number of r
Title: Dell Metered Rack Power Distribution Unit User's Guide (LED Display Models) Author: Dell Inc. Subject: User's Guide Keywords: esuprt_ser_stor_net#esuprt_rack .