Transcription
VisioneerPatriot 680 ScannerUser's Guide for Windows
VisioneerPatriot 680 ScannerUser’s GuideFOR WINDOWS
COPYRIGHT INFORMATIONCopyright 2008 Visioneer, Inc.Reproduction, adaptation, or translation without prior written permission is prohibited, except as allowed under the copyright laws.The Visioneer brand name and logo are registered trademarks of Visioneer, Inc. The OmniPage brand name and logo is a registered trademark of NuanceCommunications, Inc. Kofax VRS is a copyright of Kofax Image Products. QuickScan is a trademark and ISIS is a registered trademark of CaptivaSoftware Corporation. Adobe , Adobe Acrobat , Adobe Reader , the Adobe Acrobat logo and the Adobe PDF logo are registered trademarks ofAdobe Systems Incorporated in the United States and/or other countries. The Adobe PDF logo will appear in this product’s software, and full access to Adobesoftware features is only available if an Adobe product is installed on your computer.This product is covered by one or more of the following patents: 6, 480, 304; 5,818,976; 5,499,108; 5,517,332.Microsoft is a U.S. registered trademark of Microsoft Corporation. Windows is a trademark of Microsoft Corporation. ZyINDEX is a registered trademark ofZyLAB International, Inc. ZyINDEX toolkit portions, Copyright 1990-1998, ZyLAB International, Inc. All Rights Reserved. All other products mentionedherein may be trademarks of their respective companies.Information is subject to change without notice and does not represent a commitment on the part of Visioneer. The software described is furnished under alicensing agreement. The software may be used or copied only in accordance with the terms of such an agreement. It is against the law to copy the software onany medium except as specifically allowed in the licensing agreement. No part of this document may be reproduced or transmitted in any form or by anymeans, electronic or mechanical, including photocopying, recording, or information storage and retrieval systems, or translated to another language, for anypurpose other than the licensee's personal use and as specifically allowed in the licensing agreement, without the express written permission of Visioneer.Part Number: 05-0707-100Restricted Rights LegendUse, duplication, or disclosure is subject to restrictions as set forth in contract subdivision (c)(1)(ii) of the Rights in Technical Data and Computer SoftwareClause 52.227-FAR14. Material scanned by this product may be protected by governmental laws and other regulations, such as copyright laws. The customeris solely responsible for complying with all such laws and regulations.Visioneer's Limited Product WarrantyIF YOU FIND PHYSICAL DEFECTS IN THE MATERIALS OR THE WORKMANSHIP USED IN MAKING THE PRODUCT DESCRIBED INTHIS DOCUMENT, VISIONEER WILL REPAIR, OR AT ITS OPTION, REPLACE THE PRODUCT AT NO CHARGE TO YOU, PROVIDED YOURETURN IT (POSTAGE PREPAID, WITH PROOF OF YOUR PURCHASE FROM THE ORIGINAL RESELLER) DURING THE 90-DAY PERIODAFTER THE DATE OF YOUR ORIGINAL PURCHASE OF THE PRODUCT. UPON RECEIPT DURING THE INITIAL 90-PERIOD BYVISIONEER OF A VALID REGISTRATION OF THE PRODUCT, THIS LIMITED PRODUCT WARRANTY PERIOD IS EXTENDED TO THE12-MONTH PERIOD AFTER THE DATE OF YOUR ORIGINAL PURCHASE. IF A VALID REGISTRATION IS NOT RECEIVED DURING THEINITIAL 90-DAY PERIOD, THE 12-MONTH WARRANTY IS NO LONGER AVAILABLE AND YOUR PRODUCT WARRANTY WILLTERMINATE AFTER THE 90-DAY INITIAL PERIOD EXPIRES.THIS IS VISIONEER'S ONLY WARRANTY AND YOUR EXCLUSIVE REMEDY CONCERNING THE PRODUCT, ALL OTHERREPRESENTATIONS, WARRANTIES OR CONDITIONS, EXPRESS OR IMPLIED, WRITTEN OR ORAL, INCLUDING ANY WARRANTY OFMERCHANTABILITY, FITNESS FOR A PARTICULAR PURPOSE OR NON-INFRINGEMENT, ARE EXPRESSLY EXCLUDED. AS A RESULT,EXCEPT AS SET OUT ABOVE, THE PRODUCT IS SOLD “AS IS” AND YOU ARE ASSUMING THE ENTIRE RISK AS TO THE PRODUCT'SSUITABILITY TO YOUR NEEDS, ITS QUALITY AND ITS PERFORMANCE.IN NO EVENT WILL VISIONEER BE LIABLE FOR DIRECT, INDIRECT, SPECIAL, INCIDENTAL OR CONSEQUENTIAL DAMAGESRESULTING FROM ANY DEFECT IN THE PRODUCT OR FROM ITS USE, EVEN IF ADVISED OF THE POSSIBILITY OF SUCH DAMAGES.All exclusions and limitations in this warranty are made only to the extent permitted by applicable law and shall be of no effect to the extent in conflict with theexpress requirements of applicable law.RoHS and WEEE ComplianceThis product is compliant with RoHS Regulations of the European Parliament and Council Directive on the Restrictions of the Use of Certain HazardousSubstances in Electrical and Electronic Equipment (2002/95/EC), and with the Waste Electrical and Electronic Equipment (WEEE) Directive (2002/96/EC).FCC Radio Frequency Interference StatementThis equipment has been tested and found to comply with the limits for the class B digital device, pursuant to part 15 of the FCC Rules. These limits aredesigned to provide reasonable protection against interference in a residential installation. This equipment generates, uses and can radiate radio frequencyenergy and if not installed, and used in accordance with the instructions, may cause harmful interference to radio communications. However, there is noguarantee that interference will not occur in a particular installation. If this equipment does cause harmful interference to radio or television reception, whichcan be determined by turning the equipment off and on, the user is encouraged to try and correct the interference by one or more of the following measures: Reorient or relocate the receiving antenna. Increase the separation between the equipment and receiver. Connect the equipment into an outlet on a circuit different from that to which the receiver is connected. Consult the dealer or an experienced radio/TV technician for help.This equipment has been certified to comply with the limits for a class B computing device, pursuant to FCC Rules. In order to maintain compliance withFCC regulations, shielded cables must be used with this equipment. Operation with non-approved equipment or unshielded cables is likely to result ininterference to radio and TV reception. The user is cautioned that changes and modifications made to the equipment without the approval of manufacturercould void the user's authority to operate this equipment.This device complies with part 15 of the FCC Rules. Operation is subject to the following two conditions: (1) This device may not cause harmful interference,and (2) this device must accept any interference received, including interference that may cause undesired operation.
TABLE OF CONTENTSiTA B L E O F C O N T E N T SWelcome . . . . . . . . . . . . . . . . . . . . . . . . . . . . . . . . . . . . . . . . . . . . . . . . . . . 1What’s in the Box . . . . . . . . . . . . . . . . . . . . . . . . . . . . . . . . . . . . . . . . . . . . . 1The Visioneer Patriot 680 Scanner . . . . . . . . . . . . . . . . . . . . . . . . . . . . . . . . 2What You Need . . . . . . . . . . . . . . . . . . . . . . . . . . . . . . . . . . . . . . . . . . . . . . 3Documentation . . . . . . . . . . . . . . . . . . . . . . . . . . . . . . . . . . . . . . . . . . . . . . 4Installation . . . . . . . . . . . . . . . . . . . . . . . . . . . . . . . . . . . . . . . . . . . . 5Before You Begin . . . . . . . . . . . . . . . . . . . . . . . . . . . . . . . . . . . . . . . . . . . . . 5Step 1: Assemble the Scanner . . . . . . . . . . . . . . . . . . . . . . . . . . . . . . . . . . . . 6Step 2: Install the Software . . . . . . . . . . . . . . . . . . . . . . . . . . . . . . . . . . . . . . 8Step 3: Connect the Scanner . . . . . . . . . . . . . . . . . . . . . . . . . . . . . . . . . . . 12Step 4: Register Your Scanner . . . . . . . . . . . . . . . . . . . . . . . . . . . . . . . . . . . 15Additional Applications for Your Scanner . . . . . . . . . . . . . . . . . . . . . . . . . 16View and Save the User Guides . . . . . . . . . . . . . . . . . . . . . . . . . . . . . . . . . 19Scanning . . . . . . . . . . . . . . . . . . . . . . . . . . . . . . . . . . . . . . . . . . . . . 21Loading Documents to Scan . . . . . . . . . . . . . . . . . . . . . . . . . . . . . . . . . . . 22Automatic Document Feeder (ADF) . . . . . . . . . . . . . . . . . . . . . 22Flatbed Glass . . . . . . . . . . . . . . . . . . . . . . . . . . . . . . . . . . . . . . . 23Scanning from OneTouch . . . . . . . . . . . . . . . . . . . . . . . . . . . . . . . . . . . . . 24The Default OneTouch Settings . . . . . . . . . . . . . . . . . . . . . . . . 24Scan from the OneTouch Scanner Buttons . . . . . . . . . . . . . . . . 25Scan from the OneTouch Button Panel . . . . . . . . . . . . . . . . . . 26Features of the OneTouch Button Panel . . . . . . . . . . . . . . . . . . 27Configuring the OneTouch Buttons . . . . . . . . . . . . . . . . . . . . . . . . . . . . . 28Renaming a OneTouch Button . . . . . . . . . . . . . . . . . . . . . . . . . 31Creating a New Scan Configuration . . . . . . . . . . . . . . . . . . . . . 31Editing or Deleting Scan Configurations . . . . . . . . . . . . . . . . . . 38Configure Before Scan . . . . . . . . . . . . . . . . . . . . . . . . . . . . . . . . 39Selecting File Format Options . . . . . . . . . . . . . . . . . . . . . . . . . . 42Selecting Options for a Button . . . . . . . . . . . . . . . . . . . . . . . . . 46Setting Destination Application Properties . . . . . . . . . . . . . . . . 48
iiTABLE OF CONTENTSScanning with Optical Character Recognition (OCR) . . . . . . . . 55Scan and Burn to a CD . . . . . . . . . . . . . . . . . . . . . . . . . . . . . . . 56Scanning with Event Forwarding . . . . . . . . . . . . . . . . . . . . . . . . 57Scanning to an HTML Web Page . . . . . . . . . . . . . . . . . . . . . . . 58Transferring Scanned Documents to Storage . . . . . . . . . . . . . . . 59Checking the Hardware and Setting the Lamp Power Saving . . 64Scanning with the TWAIN Interface . . . . . . . . . . . . . . . . . . . . . . . 66Accessing the TWAIN Interface . . . . . . . . . . . . . . . . . . . . . . . . . . . . . . . . . 67The Two TWAIN Interface Options . . . . . . . . . . . . . . . . . . . . . . . . . . . . . 68Scanning from the TWAIN Basic Interface . . . . . . . . . . . . . . . . 69Scanning from the TWAIN Advanced Interface . . . . . . . . . . . . 70Adjusting the Image with the Advanced Interface . . . . . . . . . . . 72Creating a New Advanced Interface Profile . . . . . . . . . . . . . . . . 78Display the Device Configuration . . . . . . . . . . . . . . . . . . . . . . . 79Scanning with the Windows Image Acquisition . . . . . . . . . . . . . . 80Fine Tuning Your Scans . . . . . . . . . . . . . . . . . . . . . . . . . . . . . . . . . . . . . . . 82Scanning with the ISIS Interface . . . . . . . . . . . . . . . . . . . . . . . . . . 83Maintenance . . . . . . . . . . . . . . . . . . . . . . . . . . . . . . . . . . . . . . . . . . 84Cleaning the Scanner . . . . . . . . . . . . . . . . . . . . . . . . . . . . . . . . . . . . . . . . . 84Clearing Paper Jams . . . . . . . . . . . . . . . . . . . . . . . . . . . . . . . . . . . . . . . . . . 85Replacing the ADF Pad Assembly . . . . . . . . . . . . . . . . . . . . . . . . . . . . . . . 86Replacing the Roller Assembly . . . . . . . . . . . . . . . . . . . . . . . . . . . . . . . . . . 87Troubleshooting . . . . . . . . . . . . . . . . . . . . . . . . . . . . . . . . . . . . . . . . . . . . . 90Status Light Troubleshooting Codes . . . . . . . . . . . . . . . . . . . . . 92Uninstalling Your Scanner . . . . . . . . . . . . . . . . . . . . . . . . . . . . . . . . . . . . . 94Visioneer Patriot 680 Scanner Specifications . . . . . . . . . . . . . . . . . . . . . . . 95Visioneer Patriot 680 Scanner Parts List . . . . . . . . . . . . . . . . . . . . . . . . . . . 96Index . . . . . . . . . . . . . . . . . . . . . . . . . . . . . . . . . . . . . . . . . . . . . . . . 97
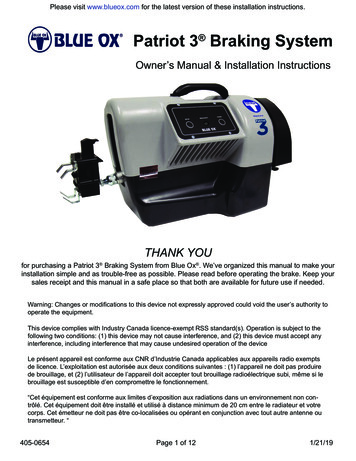
WELCOMEYour new Visioneer Patriot 680 scanner can quickly scan a single-sided ordouble-sided stack of documents, up to 8.5" x 14", and place their images onyour computer.WHAT’S IN THE BOXBefore proceeding, check the contents of the box. If items are missing ordamaged, contact the dealer where you purchased the scanner.ReplacementADF PadVisioneer Patriot 680 ScannerPower CordUser GuideInput TrayPower SupplyQuick Install GuideTwo DiscsUSB CableTechnical SupportCardVISIONEER PATRIOT 680 SCANNER USER’S GUIDE1
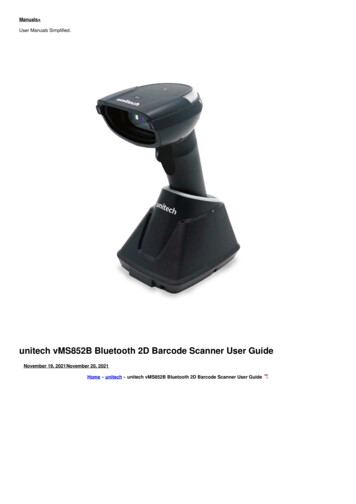
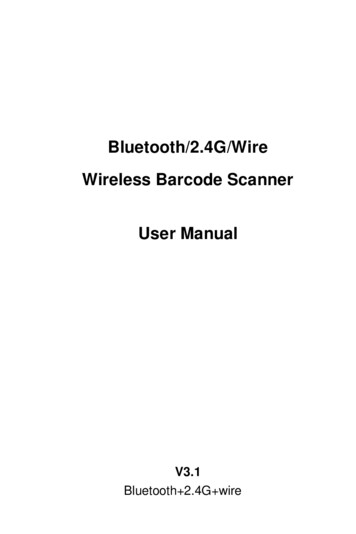
2VISIONEER PATRIOT 680 SCANNER USER’S GUIDETHE VISIONEER PATRIOT 680 SCANNERADF cover releaseInput TrayOutput trayPaper StopStatus lightSelector buttonsLED NumberDuplex buttonSimplex buttonPower switchPower jackUSB portADF cableScanner lock (on side of scanner)ADF cover release—Opens the cover on the ADF.Input tray—Holds documents in place.Output tray—Holds documents after being scanned.Paper Stop—Keeps scanned documents on the output tray.Status light—Shows the scanner’s status. Refer to “Troubleshooting” onpage 90 for additional details.Selector buttons—Selects the scan setting for the OneTouch buttons.LED Number—Shows the current scan setting for the Simplex and Duplexscanning buttons.Duplex button—Press to scan a two-sided document.Simplex button—Press to scan a one-sided document.Scanner lock—Locks the scanner’s scan head in place to protect it.ADF cable—Connects the ADF to the scanner body.Power switch—On/Off power switch.
WHAT YOU NEED3Power jack—Connects the power cord to the scanner.Universal Serial Bus (USB) port—Connects the scanner to the computer.WHAT YOU NEEDIBM-compatible Pentium PC, or AMD equivalent with: A CD-ROM drive An available Universal Serial Bus (USB) port Microsoft Windows operating system: 2000 (Service Pack 4),Windows XP (Service Pack 2), or Windows VistaThe scanner is compatible with Service Pack 3 for Windows XP and ServicePack 1 for Windows Vista. Windows 2000 and Windows XP: Minimum of 512 megabytes (MB) ofinternal memory (RAM)Windows Vista: Minimum of 1 gigabyte (GB) of internal memory (RAM) 350 MB minimum of free hard disk spaceA VGA or SVGA MonitorThe recommended settings for your monitor are: Color quality of 16-bit, 24-bit, or 32-bit. Resolution set to at least 800 x 600 pixelsTo set your monitor’s colors and resolution: Open the Windows Control Panel Right-click on your Windows desktop and select Properties from thelist, then click on the Settings tab
4VISIONEER PATRIOT 680 SCANNER USER’S GUIDEDOCUMENTATIONThe following documentation is provided with your scanner: Quick Install Guide—Abbreviated installation instructions. Visioneer Patriot 680 Scanner User’s Guide—Contains detailed installation,scanning, configuration, and maintenance information. Also on theInstallation Disc 1. Visioneer OneTouch Mini-Guides—On the Installation Disc 1; each miniguide contains detailed instructions on using the OneTouch VRS andOneTouch OmniPage features, and the SharePoint destination link. Pleasesee “View and Save the User Guides” on page 19 for more informationabout these mini-guides. Online Help—For the scanner configuration, TWAIN and WIA interfaces. Kofax VRS User’s Guide—On the Installation Disc 1; contains detailedinstructions on using the Kofax Virtual ReScan software provided withyour scanner. Captiva QuickScan User’s Guide—On the Installation Disc 1; containsdetailed feature information and instructions for using the QuickScansoftware provided with your scanner. Nuance OmniPage Pro User’s Guide—On the Installation Disc 2;contains detailed instructions for using the software and configuring theOCR features in the OmniPage software.
BEFORE YOU BEGIN5InstallationInstallation is a quick, four-step process:1.Assemble the scanner2.Install the software3.Connect the scanner4.Register your scannerBEFORE YOU BEGINPlease make sure of the following before you begin installation: The information in this guide may cover software not provided with thescanner you purchased. Disregard any information about the software notapplicable to your chosen product. Please visit our web site atwww.visioneer.com for the latest software updates for your Visioneer Patriot680 scanner. If your computer has AntiVirus or AntiSpyware software running, you maysee messages during installation asking you to allow the installation toproceed. Although the messages will differ based on the software yourcomputer is running, in each case you should allow the installation toproceed. Alternatively, you can turn off the AntiVirus or AntiSpywaresoftware before installing your scanner, but if you do, make sure to turn itback on again when installation is finished. If you already have a Visioneer or Xerox desktop scanner connected to yourcomputer, you should remove its driver programs first before beginning theinstallation of your Visioneer Patriot 680 scanner. Please see “UninstallingYour Scanner” on page 94 for basic instructions, or see the User’s Guide thatyou received with your other scanner for specific instructions. If your computer is running Windows Vista, you may see the Vista UserAccount Control screen asking you to confirm system changes. Click theContinue button to allow the installation to proceed.
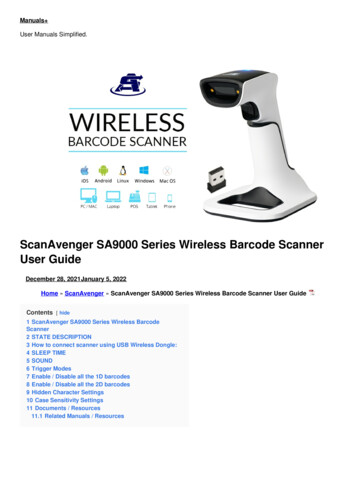
6VISIONEER PATRIOT 680 SCANNER USER’S GUIDESTEP 1: ASSEMBLE THE SCANNERTo assemble the scanner:1.Remove all shipping tape from the scanner and from the Paper Tray.2.Slide the tray in so the pins seat into the holes on the ADF.3.Lift the ADF cover release and open the Automatic Document Feeder.ADF Cover Release4.Carefully remove any foam particles that may have gotten inside thedocument feeder, and close the cover.
STEP 1: ASSEMBLE THE SCANNER5.Swing the input tray up until it snaps into place.6.Plug the ADF cable into the ADF port on the back of the scanner. TheADF will not work if the cable is loose or not plugged in.7.Push the locking tab down to the unlocked position.7Note: The locking tab protects the scanner’s scan head by holding it securelyin position. Lock the scanner when transporting it from one location toanother, but remember to unlock it before scanning. The scanner will notscan when locked.8.When you’re finished assembling the scanner, place it on a level surface onyour desk. If the scanner is on an uneven surface, it may stall whenscanning from the Flatbed.
8VISIONEER PATRIOT 680 SCANNER USER’S GUIDESTEP 2: INSTALL THE SOFTWARETo install the software:1.Start Microsoft Windows and make sure no other applications arerunning.2.Insert Disc 1 into your computer’s CD-ROM drive.The Installation menu automatically opens.Note: If the disc does not start, check the following: Make sure the drive’s door is completely shut. Make sure the disc was inserted in the drive in the proper direction(label side up).To launch the disc manually: Open the Windows option for My Computer. You can do this bydouble-clicking on the My Computer icon on your desktop. Double-click the icon for your CD-ROM drive. The Installation menu for the disc should now open.If the menu does not open: From the list of files on the disc, double-click the file namedSTART32.EXE.Note: The Scanner Readme file has late-breaking news about your scanner.The Scanner Readme file is in HTML format and will open in any standardbrowser.
STEP 2: INSTALL THE SOFTWARE3.On the Installation menu, select Install Products.4.Make sure the box for Scanner Driver is selected.9
10VISIONEER PATRIOT 680 SCANNER USER’S GUIDE5.Click Install Now.The Welcome to the OneTouch 4.0 Setup Wizard opens.6.Click Next.7.On the Visioneer License Agreement window, read the license agreement.If you accept the terms, select I Agree then click Next.If you choose not to accept the license agreement, the installation willterminate and the scanner driver will not be installed.The next window lists the choices of the drivers that you can install foryour scanner.
STEP 2: INSTALL THE SOFTWARE8.11Select the option you want then click Next. Full Install (OneTouch, TWAIN and ISIS)—This is therecommended installation. It installs the OneTouch 4.0 software whichprovides the necessary driver software for the scanner’s buttons towork. It also installs the TWAIN and ISIS drivers for scanning fromwithin TWAIN and ISIS scanning applications. TWAIN and ISIS—The TWAIN and ISIS drivers are installed andyou can scan from within TWAIN and ISIS scanning applications. Youwill not be able to use the buttons on the scanner. TWAIN only—The TWAIN driver is installed and you can scan fromTWAIN scanning applications only. You will not be able to use thebuttons on the scanner. ISIS only—The ISIS driver is installed and you can scan from withinISIS scanning applications only. You will not be able to use the buttonson the scanner.Note: If your computer is running Windows XP or Windows Vista,Microsoft’s Windows Image Acquisition (WIA) interface for scanning isalways available, regardless of your selection on this window.9.When you see this window asking you to select an image for your ColorSpace setting, select the option that looks best to you. Click Next.The Color Space setting sets the default gamma value for the scanner.
12VISIONEER PATRIOT 680 SCANNER USER’S GUIDE10. STOP when you see the “Complete the installation by connecting yourhardware” window. Do NOT click OK yet. Leave the window open andproceed to “Step 3: Connect the Scanner”.STEP 3: CONNECT THE SCANNERTo connect the power:1.Plug the power supply into the power port on the scanner.2.Plug the power cord into the power supply then into a wall outlet.Note: Only use the power supply (HEG42-240200-7L made by HiTron)included with your scanner. Connecting any other type of power supply maydamage your scanner, and will void its warranty.
STEP 3: CONNECT THE SCANNER13To connect to the computer:1.Remove any protective tape from the USB cable.2.Plug the USB cable into the USB port on the scanner then into a USBport on the computer. (Check your computer’s manual for USB portlocations.)If you use a USB hub, it must have its own power supply already pluggedinto an electrical outlet.3.Turn on the power switch, located on the back of the scanner.USBThe status light comes on and flashes indicating that the scanner isreceiving power.If you are using Windows XP or Windows Vista, and have plugged theUSB cable into a USB 1.1 port, an information bubble may openexplaining that “A HI-SPEED USB device is plugged into a non-HISPEED USB hub”. Plug the USB cable into a USB 2.0 port (if available)or just disregard the message. If you leave it plugged into the USB 1.1port, your scanner may scan a bit slower.4.Your computer then recognizes that a scanner has been plugged into theUSB port and automatically loads the appropriate software to run thescanner.If your computer is running Windows XP or Windows Vista, you will see aFound New Hardware message similar to the following.
14VISIONEER PATRIOT 680 SCANNER USER’S GUIDE5.When you’re certain that the software has completely loaded, return to the“Complete the installation by connecting your hardware” window.6.Click OK.The scanner’s status light is green when the scanner and computer arecommunicating properly.7.Click Close on the Installation Complete window to close and exit thesoftware installer.
STEP 4: REGISTER YOUR SCANNER15STEP 4: REGISTER YOUR SCANNERRegistering your scanner is important as it provides you with access to our freetelephone support service. Registration also gives you access to softwareupdates for your scanner.To register your scanner:1.Right-click on the OneTouch icon in the Windows Notification Area (atthe bottom right corner of the screen).2.Choose Check for Online Updates from the pop-up menu.The OneTouch Icon3.Follow the instructions on the screen and register your scanner by enteringyour scanner’s serial number and your email address.A valid email address is required.The serial number is located on the side of the scanner.The Serial NumberAfter registration is complete you will receive an email message with yourRegID.4.Write down your RegID below so you will be able to find it easily in thefuture.RegID:Note: If you did not choose the “Full Install” option for your scanner driver.You can go online to www.visioneer.com and select Register Your Productfrom the Support and Drivers section.
16VISIONEER PATRIOT 680 SCANNER USER’S GUIDEADDITIONAL APPLICATIONS FOR YOUR SCANNERYour scanner includes free, additional applications on the installation CD.To install the additional applications:1.Insert installation disc 1 into the CD-ROM drive. From the disc’s MainMenu click on Install Products.2.Select the additional applications you want to install, then click InstallNow.
ADDITIONAL APPLICATIONS FOR YOUR SCANNER3.17Follow the instructions on the screen to install each of the additionalproducts.The following table describes each of the additional applications available.SoftwareAdobe Reader About the SoftwareAdobe Reader is a stand-alone application that you use to open, view, search,and print PDF files. The user guides on the installation disc are in PDFformat and require Adobe Reader for you to view and save them.The Adobe Reader software is located on the installation disc 1 in the UserGuides section.Kofax VRS Kofax VRS automatically enhances scanned documents from less thanperfect originals. The VRS settings use the patented Virtual ReScan (VRS)technology, and ensures your scanning is as efficient and easy as possible,while also improving the quality of the scanned image.When installing the Kofax VRS software you will see a message “SVS001:The VRS installation does not install an ISIS driver for the scanner youselected. Please install the ISIS driver packaged with your scanner.”This is not an error, please disregard this message and click OK. The KofaxVRS Certified ISIS driver was installed correctly when you installed yourVisioneer Patriot 680 scanner driver.QuickScan DemoQuickScan is an out-of-the-box imaging solution that provides all thenecessary capabilities for high-speed scanning, image enhancement, viewing,annotation, printing, and storing images. It uses an ISIS-certified driver forscanning and includes flexible job separation and barcode recognition.The Demo version lets you try the application.OmniPage ProOmniPage Pro provides precision OCR analysis, advanced layout detection,and Logical Form Recognition (LFR) technology. Advanced securityfeatures quickly turn office documents and forms into over 30 different PCapplications for editing, searching and sharing. Custom workflows handlelarge volumes of documents, and you can use its tools to print to PDF.
18VISIONEER PATRIOT 680 SCANNER USER’S GUIDEInstalling OmniPage ProIf you selected OmniPage Pro for installation, a window tells you to insert thesecond CD to install it.1.Click Exit Disc 1 to close the disc’s interface.2.Remove Disc 1 from the CD-ROM drive.3.Insert Disc 2 into the CD-ROM drive.The OmniPage Pro Installation menu opens automatically.4.Select Install OmniPage Pro.5.Follow the instructions on the screen to install OmniPage Pro.6.When installation is finished return to the disc’s main menu and selectUser Guide to view and save the OmniPage Pro user guide to yourcomputer.7.Remove Disc 2 and store it in a safe place.
VIEW AND SAVE THE USER GUIDES19VIEW AND SAVE THE USER GUIDES1.On the Main Menu of Disc 1, click User Guides.2.The Visioneer user guides window opens, use this window to view andsave the user guides.The User Guides are in Adobe Reader PDF format. The ScannerReadme file is in HTML format and will open in any standard browser.If you need to, click Adobe Reader to install it now. Follow theinstructions on the installation windows.If your computer already has Adobe Reader installed, please do not select itunless the version provided on the installation CD is a newer version than theone currently installed on your computer.3.Click the name of a User Guide you want to view and it will open inAdobe Reader. Use the Adobe Reader Save command to save that UserGuide on your computer.
20VISIONEER PATRIOT 680 SCANNER USER’S GUIDE4.Return to the Visioneer User Guides window and repeat the process toopen, view, and save all the other User Guides you want. The SharePoint Mini-Guide has information about a feature in theOneTouch 4.0 software to link to Microsoft’s SharePoint application.This brief Mini-Guide explains how to setup the SharePoint link whencreating a new scan configuration. The OneTouch VRS Mini-Guide has information about a new featurein the OneTouch 4.0 software to use Kofax VRS settings whenscanning. This brief Mini-Guide explains what the feature is and howto use the VRS settings when creating or modifying a scanconfiguration. The settings described in this mini-guide are onlyavailable if the Kofax VRS software is installed. The OneTouch OmniPage Mini-Guide has information about theOmniPage Module in the OneTouch 4.0 software to use theOmniPage OCR settings when scanning. This brief Mini-Guideexplains what the feature is and how to use the OCR settings whencreating or modifying a scan configuration. The OmniPage Modulewas installed when you completed a full install of the scanner driver.Using the OmniPage Module’s settings does not require installation ofthe OmniPage Pro software.5.When you’re finished, click Main Menu to return to the main VisioneerInstallation window and click Exit.6.Remove the disc and store both discs in a safe place.That’s it! Installation is finished and your Visioneer scanner is ready to scan.
VIEW AND SAVE THE USER GUIDES21ScanningIf you selected the recommended Full Install option for your scanner’s driver(see page 11), you have several different scanning options with your VisioneerPatriot 680 scanner. Each method scans equally well, so use the one withappropriate options for the item you are scanning. OneTouch Scanner Buttons—When you press the Simplex or Duplexbutton, documents are scanned using the scan settings indicated by theLED number. The scanned images are then sent to a software application orto a storage folder on your computer. See “Loading Documents to Scan” onpage 22. OneTouch B
2 VISIONEER PATRIOT 680 SCANNER USER'S GUIDE THE VISIONEER PATRIOT 680 SCANNER ADF cover release—Opens the cover on the ADF. Input tray—Holds documents in place. Output tray—Holds documents after being scanned. Paper Stop—Keeps scanned documents on the output tray. Status light—Shows the scanner's status.Refer to "Troubleshooting" on page 90 for additional details.