Transcription
Kronos Workforce Central v8.0 UpgradeGuide for Timecard ApproversMarch 2017Getting Started . 2Logging On . 2Logging Off and Timing Out . 2Navigating in Workforce Central . 3Alerts and Notifications . 5Actions on Your Employees’ Requests (Request Manager Alert) . 5Adding Missed Punches (Exceptions Alert). 2Examples: How to Edit a Timecard. 4Open a Timecard and Edit A Punch to Cancel a Meal Deduction . 4Apply a Workrule Transfer . 6Enter a Mid-Shift Transfer. 6Individual Timecard Review (Manage My Department Workspace). 8Timecard Signoff Wizard (Manage My Department Workspace) . 9View an Audit Trail .12Editing Approved Time Off in Schedule Editor (Manage My Department Workspace) .14Finding Intermittent Leave Time and Using the Quick Leave Editor .15Using Workforce Genies.17Refreshing and Sorting Data in a Genie . 17Exporting Workforce Genie Data . 18Common Genies . 20HyperFind Queries (Get Support Workspace) .21Open Hyperfind Query Setup . 22Create a Personal or Ad Hoc Hyperfind Query . 23Tips for Creating a Successful HyperFind . 26Delegating Your Kronos Actions to Another Manager .28To Delegate . 28To Accept or Decline a Delegation . 29Enter and Approve My Own Timecard (My Information Workspace) .30Request Time Off on My Calendar (My Information Workspace) .31Generating Standard Reports (Manage My Department Workspace) .33
Kronos 8 Upgrade Guide for Timecard ApproversGetting StartedLogging OnThe Workforce Central log on page provides access to all the features of the Workforce Centralapplication, where you perform your time and attendance tasks.1Click Time Management at the top of any Children’s Star Net page2Enter your Children’s network user name and password in their designated fields.3Click the Log On buttonor press the Enter key on the keyboard.Logging Off and Timing OutUpon completion of your tasks, you mustlog off the application to ensure that youremployees’ information remainsconfidential. Click Sign Out under yourname.If you do not log out and the applicationdoes not detect activity within 25 minutes, the application times out. The inactivity timeoutprotects sensitive information in the application.2
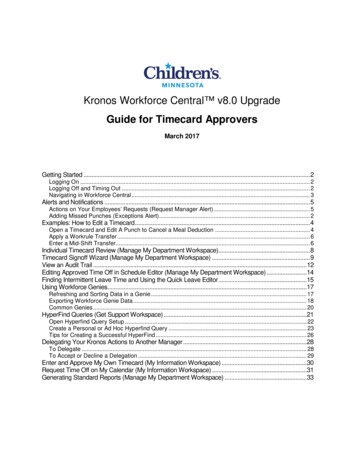
Kronos 8 Upgrade Guide for Timecard ApproversShortly before the application times out, you will be prompted to click Yes to continue workingor No to log out. Unsaved changes will be lost.Navigating in Workforce CentralNavigator provides a workspace designed to help you to perform job tasks easily and quickly.When you log on, the navigator assigned to you opens. The workspaces and widgets that you canaccess depend on your function access profile and user license.Note: If you cannot access what you need to do your job, submit a Kronos Security Form (underHuman Resources on the Children’s Star Net Forms page).This shows a navigator for a user with both manager and employee licenses.Click Quickfind to seelinks that you can use toreview each pay periodfor leaves, as well as anemployee listingThis is the Home/ActiveWorkspace Display AreaAlert icons – Employeeexceptions and time offrequests display here. Click toprocess them and Refresh thedisplay to clear.Your available time to submitrequests is also displayed.The Related Items Paneldisplays tools to use with thecurrently active workspace –Click to open a temporaryworkspace on a new tab orclick and drag to the ActiveWorkspace3WorkspacesCarousel – spin to goto My Information,Get Support, Go ToLinks – click to select
Kronos 8 Upgrade Guide for Timecard ApproversThe following table describes the main areas of the Workforce Central page for a Manager - themanager Home Workspace is the Manage My Department tab.Display AreaDescriptionAlerts widgetLocated at the top of the page,employee t ime off requests display here until you approve ordeny the requests. Your available time to submit requests is also displayed.Workspaces CarouselClick to pull another workspace into the Active area. Change from Manage My Departmentto My Timecard (where you request your time off) to Get Support (where you create yourown hyperfinds)Related Items PanelClick to open a temporary workspace on a new tab or click and drag to the ActiveWorkspaceHome/ActiveWorkspaceA work area that contains detailed information about the employees in the selected timeperiod, and the action bar, which contains selections for modifying data.QuickFindDescriptionEmployee SearchSearch your staff by name, ID, partial name, etc.With * displayed, click the Magnifying Glass to display all your employeesIntermittent timerequestsIntermittent time requests will allow you to see at a glance if any staff on an intermittentleave have recorded leave timeNote: There is no e-mail notification that intermittent time has been requested – since it isnot a request process in Kronos 8.Return to WorkThe return to work genie will show you if an employee that has returned from a leave hasrecorded the RTW paycode on their first day back to notify the leave administrator that theyare back to work. Please note that if they were out for a medical leave for themselves aprovider certification clearing them to work must be submitted into the LOA administrator.Employee DetailThe employee detail shows a listing of all your employees, with their standard hours, thepayrule they are in, dept, title and hire date.Leave CasesLeave Cases is a quick view of all the open and pending leaves cases for your staff. It willshow if the leave has been approved, the start date and projected end date and if there areany documents overdue. You can also find your leave cases in the Related Items Pane4
Kronos 8 Upgrade Guide for Timecard ApproversAlerts and NotificationsActions on Your Employees’ Requests (Request Manager Alert)Use the Request Manager to work with all employee requests. The Request Manager widgetprovides a summarized, sortable view of selected requests. You can enlarge the RequestManager grid using the sizing control in the upper right corner.1Open the Request Manager using the Request Manager Alert icon at the top of yourManage My Department window.2Click the Request Manager Alert icon at the top of the window, then click View All.3In the Alerts and Notification widget, click the Time-Off row to open the Request Manager.5
Kronos 8 Upgrade Guide for Timecard Approvers4In the Request Manager, use the dropdown lists to filter the requests that you want to see: By Date range or period By Group (All, All Home, 113, Departments, EEs, etc.) By Status (Submitted, Approved, All Status, etc.) By Date5If necessary, click6With your selected requests displayed, click one or more requests, then click the button to: Go To in the upper right to open additional tools or workspaces. See Details (and accruals)EditApproveRefuseNote: Click the Accruals button in the Details to see accruals.6Pending (for you)RetractRequest time off (for you)
Kronos 8 Upgrade Guide for Timecard ApproversAdding Missed Punches (Exceptions Alert)1Click the Exceptions Alert icon at the top of your Manage My Department page.2Click an exception to open the timecard, or View All to open the Alerts and Notifications widget toclick an exception and open the timecard.3Enter time in the missed punch (displays red) and right-click to open the Punch Actions window.4Click Comments.2
Kronos 8 Upgrade Guide for Timecard Approvers5In the Comment window, select a missed punch reason and add a freetext note. Freetext notes arevisible to the employee in their “My Audits”.6Click Add and then OK.7Click Save.8ClickRefresh next to your Notification and Alerts icons to clear the resolved exception.3
Kronos 8 Upgrade Guide for Timecard ApproversExamples: How to Edit a TimecardExamples: Open a timecard and edit a punch to cancel a meal deduction Then, apply a workrule transfer Then, apply a mid shift transfer and Save.Note: Always click Save in the upper right corner of the window tosave your updates to the timecard.If you attempt to leave the current page, you will see a warning if thereare unsaved changes – click No or Yes.Open a Timecard and Edit A Punch to Cancel a Meal Deduction1In the Manage My Department workspace, click Timecards in the Related Items Pane.2Select a non-exempt employee to open a timecard.4
Kronos 8 Upgrade Guide for Timecard Approvers3Right-click on one of the Out-punches and click Edit.4In the Cancel Deduction field, scroll to the bottom and select All.5Click OK – notice the red and white diagonal striped bar on the left side of the box. Hover and itshows the Cancel Deduction message.5
Kronos 8 Upgrade Guide for Timecard ApproversApply a Workrule TransferNext, apply a workrule transfer – moving the time for the shift to another cost center.1Click in the Transfer columnand select Search.2Select Labor Account.3Select the Department totransfer.4Select from the list or, in theSmart Search, put in a portionof the name or number andselect.5Click Apply.Enter a Mid-Shift TransferNext, do a mid-shift transfer to a new work rule.1Inserta new row – Click thein front of the Day Date to insert a new row.2In the new row, click the In column and put in the time they moved to a new work rule.6
Kronos 8 Upgrade Guide for Timecard Approvers3Click in the Transfer column, select from the list or Search for and select a work rule (e.g. EDU).Then, click Apply.View Your EditsNote: The canceled deduction on the out-punch for Fri 7/22 The department transfer to 10300 for the same day The second row for Wed 7/20 with the 1 PM in-punch – putting a phantom punch at the sametime on the prior row and then the Transfer column showing the work rule to EDU. So, the last3 hours are under the EDU pay code7
Kronos 8 Upgrade Guide for Timecard ApproversIndividual Timecard Review (Manage My Department Workspace)1Select Timecards from the Related Items Pane.2Highlight the area to open up and see the totals and accruals. Once open, it will remain open as youscroll through the rest of the time cards.3To print the time card, click4Items to review:5to create a printer-friendly view. Ensure that all PTO has been recorded appropriately on the time card, for most exemptemployees this time card will display nothing. That should be indicating that they have beenworking each day up to their FTE. Education would be common code that might be on anexempt time card – for attending conferences or internal education days, i.e. CrucialConversations, leading projects – etc. This allows for time to be properly accounted for. Other common paycodes in an exempt timecard might be funeral leave, jury duty, call pay orHOT, if the exempt employee is required to work a holiday and they are not part of an incentiveplan. The elearning for recording exception time for exempt staff covers this information.When the pay period is over, sign off on the timecard, or you can use the Timecard Signoff Wizardto review and sign off employees.8
Kronos 8 Upgrade Guide for Timecard ApproversTimecard Signoff Wizard (Manage My Department Workspace)“Sign off” is what each manager must do after the end of the pay period. Time cannot be written to thepayroll system until it is signed off.The Timecard Signoff Wizard guides you through the items to review prior to signing off on time cards.1In the Manage My Department workspace, click Timecard Signoff on the Related Items Pane.The first item opened is the Request Manager.You can set up the date range to review the Previous Pay Period, or you can select the PreviousSchedule Period to see the Previous Pay Period.2Look to see if any requests were canceled that should be approved, as well as new requests that needapproval.3When you have approved/processed all time off requests, click Next to open the Pay Period Closegenie.4Click theRefresh icon to update the status.The Pay Period Close genie shows whether employees have approved their time. Children’s policyrequires that all employees approve their time each pay period.This means that, for an exempt employee, when the timecard is blank, they have worked their fullschedule without taking any time off. The Non-Prod Hours will indicate the PTO hours taken.9
Kronos 8 Upgrade Guide for Timecard Approvers5Click to highlight specific rows for signoff, or if everything looks correct, click Select All Rows.6Click Approval, then select Sign Off.10
Kronos 8 Upgrade Guide for Timecard ApproversA message displays – Click Yes to continue.7Click Done in the upper right.8In the Info window, click OK to complete the sign off on the timecards; click Cancel to return toediting the timecards.11
Kronos 8 Upgrade Guide for Timecard ApproversView an Audit Trail1In the Manage My Department workspace, click Timecards on the Related Items Panel.2Where Go To is actively displayed, click it and select Audits.3Use the dropdown list to select the Category you are looking for (Comments, Schedule Audits,Corrections, Requests, etc).4Use the dropdown list to select the Type of Edit (All, Shifts, Pay Codes, etc)5Select the Pay Period or date range6Select the employee group to audit.12
Kronos 8 Upgrade Guide for Timecard Approvers7Search for or select the employee to see the results for that employee. The results are displayed oneemployee at a time.13
Kronos 8 Upgrade Guide for Timecard ApproversEditing Approved Time Off in Schedule Editor (Manage My DepartmentWorkspace)Use the Schedule Editor to edit time off that meets these three requirements: The time off is already approved through a time off request The approved time is not going through the cancelation process their time card is not yet approvedExamples:If someone submitted a request for 2 days and indicated 16 hours in the hours per day, instead of 8, andyou approved the request, you can Go To the Schedule Editor from the timecard or from any geniewhere you have highlighted the person.For managers with scheduled employees, you can select the Schedule Editor from your Related ItemsPane. To pull in your employees with schedules, select All Home Locations.Once your employees are loaded, right-click on the pay code you need to edit. The Edit Pay Code pagewill open. Make the appropriate change and click Apply.14
Kronos 8 Upgrade Guide for Timecard ApproversFinding Intermittent Leave Time and Using the Quick Leave EditorClick QuickFind and select Intermittent Time Requests to see if any employees on an intermittentLOA have recorded leave time.You will see hours in the FMLA Hours Taken column. If you need to adjust the hours, click tohighlight the employee and then click the Go To button in the upper right – Go to the Quick LeaveEditor.Kronos 8 Note: This process replaces the Kronos 6 intermittent time request that employees submittedand managers had to approve, project and commit to the timecard. Also, there is no email notification tomanagers that intermittent time has been requested, since it is not a request process.Note: Quick Leave Editor can also be opened from the Go To Link workspace on the WorkspaceCarousel.Note: If no employees are on an LOA, the Quick Leave Editor will show that there are no approvedLOAs. This page will only be open and available if an employee has an approved leave of absence.15
Kronos 8 Upgrade Guide for Timecard ApproversNormally, the employee will enter their intermittent time in the Quick Leave Editor. Managers will useIntermittent Time Requests QuickFind to view if an employee has submitted any time for the leave.The Quick Leave Editor also allows for time to be entered non-sequentially, so the employee can puttime in for the 8th, save that entry and go back and put something on the 1st. When you view thetimecard, you will see the FMLA hours credited and the system will appropriately apply time off (basedon the rules set up in their leave case) and apply any available balances.Note: Exempt staff on a FMLA should record time off in quarter-hour increments16
Kronos 8 Upgrade Guide for Timecard ApproversUsing Workforce GeniesA Workforce Genie allows for in-depth monitoring of time information in Workforce Central.Workforce Genies are QuickFind links in the navigator. They display employee information in asummarized, easy-to-read format.Using a Workforce Genie, you can: Locate employees and access their timecards Generate reports for one or more employees Review summarized information at-a-glance for quick analysisRefreshing and Sorting Data in a GenieYou can display the most current information in the application and sort the columns to group togetherspecific information. The following table describes the Refresh and Sort actions.RefreshClick the Refresh button to display the most current information. This ensures thatyou are viewing the most recent changes made to employee data.The Last Refreshed time in the upper-left corner of the page identifies the last timeyou accessed the page or the last time you clicked Refresh.Sort arrowsClick the column headings to sort data by the selected column. Clicking a columnheading a second time reverses the sort order. A down arrow shows the sort orderas descending; an up arrow shows the sort order as ascending.Sort numbersClick a second column heading to sort the data a second time according to thesecond column. The second column becomes the primary sort, and the first columnbecomes the secondary sort. A number appears in each column heading next to theup and down arrows to show the first and second sort criteria.17
Kronos 8 Upgrade Guide for Timecard ApproversExporting Workforce Genie DataYou can export information from a Genie to other applications, such as Microsoft Excel, where you cananalyze the data further.1Open a Genie.2Click the Share icon.3Select the format to download: Print, Excel or CSV.Note: You may prefer using the CSV format when working with numbers that you will use incalculations. Microsoft Excel can also open CSV files.4The downloaded files display at the bottom of the Kronos window.18
Kronos 8 Upgrade Guide for Timecard Approvers5Click the caret to continue.Or, click Show in Folder (your C:\Users\CE000000\Downloads folder) or Show All to open a newwindow with all of your downloads listed by date.19
Kronos 8 Upgrade Guide for Timecard ApproversCommon GeniesThese are common genies to use - some are focused on reviewing timecards, to help find where theremay be issues to review: Accrual Reporting Period Genie The Accrual Reporting Period Genie displays each employee’s accrued time for eachaccrual code in the employee’s assigned accrual profile. You can quickly see up-to-dateaccrued-time balances, such as vacation and sick time. Employees with PTO balances See current balances of all your employeesCheck Overtime Lists any employees with overtime and displays the overtime and their payrule. Thepayrule is helpful to see if an employee is set up in a rule that does not match how theyare being scheduled.Cancel Deduction Exception Identifies employees that have canceled a meal deduction. All employees should bereceiving a meal break if they are working more than 6 hours. Ideally we would not havecanceled meal breaksPhone list for all employees Provides up to three phone numbers for employeesWill see the same genies we have under the QuickFind Intermittent time requests Return to work Leave Cases20
Kronos 8 Upgrade Guide for Timecard ApproversHyperFind Queries (Get Support Workspace)HyperFind queries are used to define employees to be viewed in your genies. For example, the AnyOvertime HyperFind query only selects employees with overtime hours. The Exception HyperFindonly selects employees with exceptions.When you run a genie or report, you select a HyperFind query (as well as a time period) to define theemployees you will be viewing and working with.The HyperFind queries are listed in the dropdown list:So, when you run the Payroll Close genie, for example, you decide which group of employees to viewby selecting one of the HyperFind queries in the list.21
Kronos 8 Upgrade Guide for Timecard ApproversOpen Hyperfind Query Setup1On the Workspaces Carousel,click the arrows to see the GetSupport workspace.2Click the workspace in theCarousel.3Click Setup.4Click Hyperfind Queries.In the Visibility column, Public means the HyperFind query is available to all users; Personal meansonly you can view the HyperFind query.22
Kronos 8 Upgrade Guide for Timecard ApproversCreate a Personal or Ad Hoc Hyperfind QueryIn addition to the HyperFind queries that come with Kronos, you can create your own Personalhyperfinds. If you need assistance in creating a hyperfind, please contact HRIS@childrensmn.org.For example, to create a query of Department 9090 employees who have a FNL pay code, follow thesesteps:Step 1. Add Conditions1Select New.2The Select Conditions tab displays a list of filters. In the Filters list on the left side, click the signto the left of Time Management and select Pay Code. The Select Pay Code list displays.3Retain the default of Include, leave Worked set at more than, then enter an Amount of 0.00.23
Kronos 8 Upgrade Guide for Timecard ApproversTo exclude terminated employees in any Hyperfind Query, follow these steps: In the Timekeeperfilter, selectEmploymentStatus Keep the defaultof Include Keep the defaultof Status: Active Keep the defaultof As of: Today4Specify Visibility and a unique Query Name. Enter a Description if desired.Notes: If you select Ad Hoc, keep in mind that the conditions are saved and the title Ad Hoc displays inthe Genie list only until you log off the current session or you change the conditions. If you select Personal, the New Name field becomes active. Enter a name for the query andclick OK. Personal HyperFinds remain after logging off.5Click Save.Step 2. Edit a HyperFind Query:In the Get Support/Setup Workspace1Select the query from the Hyperfind Queries list and click Edit.2Change Visibility to Personal or Ad Hoc.24
Kronos 8 Upgrade Guide for Timecard Approvers3Add or remove conditions.4Save.As you select a HyperFind query for a genie1Select the query in the dropdown list and click the Edit button. The current query conditions aredisplayed.2Change the Visibility to Personal or Ad Hoc. Now you can add, edit and delete conditions.3To save an Ad Hoc or Personal HyperFind, click Save As.25
Kronos 8 Upgrade Guide for Timecard ApproversStep 3. Test the HyperFind Query1Click the Test tab to test the HyperFind query and make sure it includes employees you want.2Select a Time Period if you want one different from the default, and click Refresh:A list of employees who meet the conditions for the Time Period display.3Click the Save or Save As. options.Tips for Creating a Successful HyperFindA HyperFind query is a very powerful tool. Take the time to explore the many conditions you canchoose and how those conditions work together. Note the distinction between the following conditions:Primary accounts are the accounts employees are assignedto based on their labor level.Accounts worked are accounts an employee has worked in.This includes their primary account and as well as otheraccounts worked.26
Kronos 8 Upgrade Guide for Timecard Approvers A common mistake to avoid is adding a condition of Last Name when you really want a specificperson. If you select the Last Name condition and the person on whom you are creating a querydisplays in the Search Results box, it appears that you can select that one name and add it as acondition.In this example, it appears that you can select Joanie Hanson as a condition.However, the Selected Condition is Last name is Hanson. This means everyone with the last nameHanson in the organization will be included in the HyperFind query. Instead, to narrow yourcondition to one person, select the name in the Search Results list and then choose the By FullName condition:27
Kronos 8 Upgrade Guide for Timecard ApproversDelegating Your Kronos Actions to Another ManagerTo Delegate1Select Manager Delegation from the Related Items Pane. Leave the Categories set at All.2Select Mgr Delegation.3In the New Delegation window, choose the delegated manager and enter the dates. The start datemust be today or a future date.4Select the correct profile – either with Kronos schedules or without.28
Kronos 8 Upgrade Guide for Timecard ApproversTo Accept or Decline a Delegation1You will receive a Groupwise e-mail indicating that a delegation request has been sent to you.2Log into Kronos, click Inbox in the Related Items Pane and open the task.3Either Accept or Decline the delegation request. A Groupwise e-mail will be sent to the requestorwith your response.4To switch roles, once you accept a request, Sign Out and then log back into Kronos.29
Kronos 8 Upgrade Guide for Timecard ApproversEnter and Approve My Own Timecard (My Information Workspace)1Click the arrows to spin the WorkspacesCarousel to My Information, then clickthe workspace in the Carousel to open yourtimecard.2Select your pay codes from the Enter Pay Code dropdown list and put the number of hours on theday.3Click Save to update your timecard.4Before the end of each pay period, you need to verify that your timecard is accurate. Click ApproveTimecard and Save.30
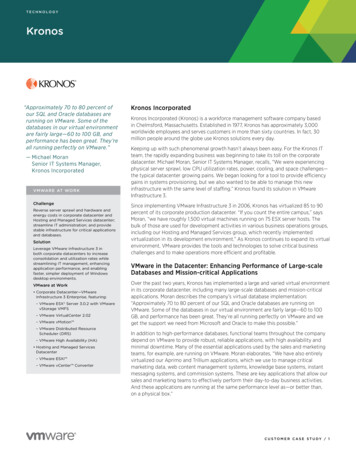
Kronos 8 Upgrade Guide for Timecard ApproversRequest Time Off on My Calendar (My Information Workspace)Use My Calendar to request time off and to see the status of your own requests and approved time off(PTO days are displayed in green).Important Note: PTO accrual totals are updated when requests are approved, not when submitted.Click for Day, Weekand Month viewsClick to request time offClick to select what isdisplayed on the calendarClick to select thetime period to view;clickto select adate range1Click the arrows to spin the WorkspacesCarousel to My Information, then clickthe workspace in the Carousel to open yourtimecard.2In the My Information workspace, click My Calendar in the Related Items Pane.31
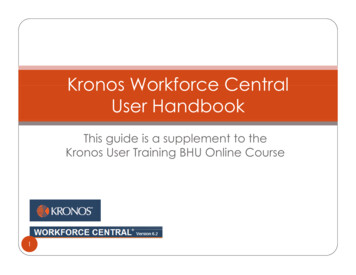
Kronos 8 Upgrade Guide for Timecard Approvers3Click the Request Time button to open the Request Time Off window.4Select the Type (PTO, PTOS)5Enter dates.6Enter your Start Time.7Enter the number of hours.8Enter Notes, if desired.9Click Draft to save the request on yourcalendar.10 Click Submit to send the request toyour manager for approval.Key things to remember: Your start and end dates should not cross over a weekend – or it will take PTO for Saturday andSunday. If you add another time off period – it should be for the following week to avoid theSaturday/Sunday issue – or is a single vacation.A separate request needs to used for a different date range. This makes it easier for the approvalprocess – as well as if any changes need to be made by canceling time. If everything is in onerequest and an employee wants to cancel just 1 day – the entire request is canceled. If they are doneseparately, it is easier to cancel. 32
Kronos 8 Upgrade Guide for Timecard ApproversGenerating Standard Reports (Manage My Department Workspace)You can generate reports on a daily, weekly, pay-period basis, or any time you need information toaccomplish your business tasks.12Determine if you want the report to include all employees or specific employees: To specify one or more employee, access a G
The Workforce Central log on page provides access to all the features of the Workforce Central application, where you perform your time and attendance tasks. 1 . Click . Time Management at the top of any Children's Star Net page . 2 . Enter your Children's network user name and password in their designated fields. 3


![Kronos Government Terms [reformatted 10.22.13] - immixGroup](/img/54/tcs-kronos.jpg)
