Transcription
Kronos Workforce CentralUser HandbookThis guide is a supplement to theKronos User Training BHU Online Course1
Table of Contents SECTION 1- General Information - pg 3Introduction Timecard Indicators and Exceptions Access Profiles Totals and Schedules Clocks Accruals and Audit Trail Timecard Rounding Phantom PunchesAccessing Workforce Central Management PTOBasic Navigation Entering Non-Productive Time Timecard Workspace Correcting Missing Punches Navigation Bar Breaks Full Day Transfers Partial Day TransfersTypes of Genies PaycodeyHours Quickfind Genie Reconcile Timecard GenieUsing Workrule Transfers for General Orientation, Education and ShiftPayLeave of Absence Genie Call Pay SECTION2 – Access and Navigation – pg 8 SECTION 3 - Workforce Genies – pg 14 SECTION 4 – Scheduling – pg 21 Scheduler Planner and RoundingSECTION 6 – Hyperfind Queries – pg 69 Hyperfind Queries Creating a New Hyperfind Query Patterns and Shifts Transfers in Pattern Editor On the Fly Cost Center Transfers Manager Approval Scheduling Paycode Hours Group ApprovalAnsos Onestaff Schedulingg Systemy Approving your Own Timecard 2SECTION 5- Timecard Maintenance and Editing –pg 35 SECTION 7 - Workforce Genies – pg 77SECTION 8 – Reports – pg 82 Time Detail Report Hours by Labor Account with Graph Timecard Audit Trail ExceptionsSECTION 9 – Reference Materials– pg 92
3
Introduction 4Baptist Health South Florida collects employee’s time and attendance electronicallyusing the Kronos Workforce Central software. The four basic methods of time entryare through:Clocks – employees swipe in and out Timestamp- employees clock in via the Kronos application Direct data entryentry- an employee missed a punch and you now need to enter itmanually Imports from ANSOS- Nursing managers enter schedules in ANSOS and they interfaceover into the Kronos scheduling area.
General InformationUser access profiles: Editor- Has the ability to edit timecards, add/edit schedules and run reports but noapproval rights. Manager- Able to perform all editor functions but has approval rights. Timestamp- Ability to clock in/out using the ‘Timestamp’ feature under the ‘MyInformation’ menu.It is important to note that if you are responsible for multiple cost centers that you needaccess to, that your CTT is aware and the Kronos Security form is filled out correctly. Ifyou are having issues with access, please contact your CTT.Clocks – Upon being hired, you will be assigned to a home clock which will be the clockthat you are able to view your PTO,PTO OSL,OSL EIB balances as well as a cumulative total ofhours for the pay period. You may also review your punches for the day by selecting theblue soft key and swiping your badge.5
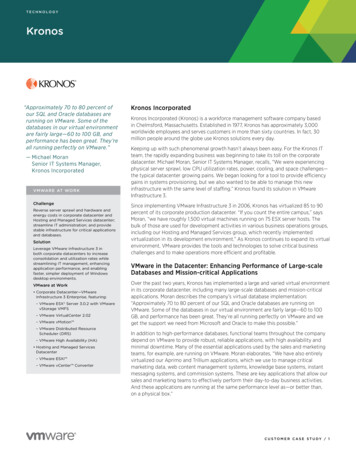
Time StampTime StampThis section allowsusers to clock invia the WFCapplication.My ReportsAllows users torun reportsbased on theirtimetime.6My Time CardAllows users toreview timeentered.
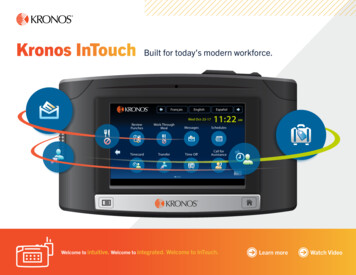
Time Stamp Users The Time Stamp view is where users record theirstart and stop times (if applicable). The currentdate and local time is displayed until time stampis selected. Click Record Time Stamp to record start andend time. Once Time Stamp is selected,selected the serveracknowledges the punch by applying itssystem time in the Recorded Time field.The time you see on Time Stamp isbased on the Kronos server time andadjusted to the local time zone.7
8
Accessing Workforce CentralKronos is accessible in multiple ways. It can be found on the Baptist intranet site by going toApplications/Financial/Kronos. You can also type the word Kronos in the address bar viaInternet Explorer.Explorer Lastly,Lastly you may have an icon located on your desktop,desktop which will also directyou to the Kronos application website.9
Enter your AD Log inand AD password,ththenclickli k arrow.How to Log into Kronos Workforce CentralIf you are logged on for a period of time and theWorkforce Central system detects no activity, amessage will appear stating your session is aboutto time out.out To continue your session where youleft off, enter your password and click Log On.10
Basic NavigationBrowsertoolbarand menuGeneral Workspace:The workspace is the primary area for displayingeach Workforce Timekeeper component. Theupper portion of the workspace contains aheader that displays the workspace title, fields,and buttons specific to that component.Depending on the permission granted, up to fivelaunch buttons might be located in the top leftcorner of the workspace. These can be selectedto navigate from one component to another.11
Time Card Work Space12 Use the arrows to move from oneentry to the next View totals on a daily basis at the endof each row: Shift Daily Cumulative Change the period to be viewed byclicking on the “Time Period” andselecting the desired period View the schedule in the bottom righthand corner of the screen View totals for the timecard on thebottom left hand side of the screen View Accrual balances for theemployee View Audits for all transactions in thetimecard
Navigation BarThe Navigation bar is the blue area located at the top of the screen. Selectedoptions control what is displayed in the general workspace within the bottom ofthe screen.screenSETUPUse Setup menu option to setup personal hyper finds. HyperFinds arecustom views and are covered later on in the user guide.gHELPHelp can also be accessed by clicking on the question mark on the upperright corner of the screen. Choosing the question mark will provide helpspecific to whatever is currently displayed in the workspace.13
14
Workforce Genies 15What is a Genie? Workforce Genies provide summarized data in an easy-to-read formatand are starting points to identify and correct exceptions in employeetimecards.
Quickfind Genie Use the Quickfind Genie to quickly find anemployee by entering part of the employeename or number and the wildcard (*)16
Reconcile Timecard Reconcile Timecard This is the default view when logging into the application. User must select ‘All Home’ from the‘Show’ dropp down listingg to see their assignedgemployees/departments.p y/ pUser can select one ormany timecards by highlighting the desired employees to view, then clicking in the Timecardlauncher button. Users can also select all timecards to review by clicking on Actions, Select All. 17Click on column heading for any column to sort by that column Click on ‘Miss Punch’ column 2X to bring all missing punches, right click, then select‘Timecard’. Click on ‘UnscheduledUnscheduled Hrs’Hrs 2X to see anyone who has clocked in on a day they were notscheduled to work.Payroll Monday-Compare Status Hrs and TC Hrs (timecard hours) to identify employees whomay need to have PTO hours added to their timecard.Setup individual hyperfinds for each cost center if you are responsible for multiple departmentsto view and approve each individually. Access them by clicking on the ‘Show’ drop downlistinglisting.
Leave of Absence Genie18 The Leave of Absence Kronos Genie is an additional tool to assist managers in monitoring thoseemployees within their departments in relation to timekeeping. The Genie queries employees forwhom managers have access toto, to view who is coded to a Leave StatusStatus, and punching in at theKronos clock. This tool will also help leaders comply with submission of leave return transactions inMSS according to policy. You will find the Leave of absence genie across the top under ‘My Genies’
Leave of Absence Genie 19Click the Leave of Absence Genie on the top portion of the screen, under My Genies. On thebottom, a query of employees who are on a Leave Status and fall within the cost centers that arewithin the useruser’ss access.accessIn the center of the screen, you will see the Show field, which contains the Leave ofAbsence query. In addition, in the Time Period field, you will see the default ofCurrent Pay Period. This field can be changed by selecting the drop down.
Leave of Absence GenieIn the content of the query a user will see the employees who meet the criteria of aLLeaveStatus.St tUserUshouldh ld noticetiththe PPerson’s’ NName, EmployeeElID,IDEntity/Department, Status, Leave Effective Date, and Regular hours for shift 1, 2,and 3.20Status: This is the employee’s current employment status as recorded by HR.Leave Effective Date: This is the date in which the employee’s leave began and is on record with HR.RG1, RG2, and RG3: These columns show the total number of hours for the pay period in the respective pay code column. These areregular hours which would include employees who have clocked in/out at a clock (Note: Salaried employees hours may showautomaticallytti ll iin purplel ffontt if ththey hhave a scheduleh d l planned,ld so pleaselverifyif if theth employeelhash actuallyt ll returnedtd fromfleave.lIf therethare hours showing in RG1, RG2, or RG3, please make sure that employees who are returning from leave for their own medical conditionhave been released to work by the Employee Health Office (Employee Health clearance is not needed for returns from Non-MedicalFMLA, such as caring for family member or covered service member, personal leave or domestic violence leave). Also, please makesure that ALL employees are returned in MSS. as follows: 1) enter the range of dates in the time period to include the leave effectivestart date and the date of the query 2) look for the first date the employee punched in and out after the leave effective start date 3)enter a return transaction in MSS using the first date the employee punched in and out as the effective date of return. NOTE: Anemployee may attempt to return from his/her medical leave without a release and may be asked to leave work or an employee mayattend a class or meeting during the approved leave period (which is against policy) – these punches may not be considered a returnto work.
21
SchedulingSchedule PlannerEvery employee must have a schedule entered into Kronos.The rounding in Kronos is based on the schedule entered for the employee.Rounding for an employee with no schedule is shown belowbelow. (to see what time the punch is beingrounded to, simply double click on the punch).The punch is rounded to 6:45, if the employee had a schedule that reflected 7:00 scheduled in, thepunch would have been rounded up to 7:00 based on the 7 minute grace period.22
Scheduling:Patterns and Shifts23
Scheduling:P ttPatternsandd ShiftsShiftYou are now in the Schedule Planner.Double click on the employee name to add/edit a schedule.schedule This willtake you to the shift/pattern editor.24
Scheduling:Patterns and ShiftsThere are several ways to enter schedules for employees: Using Patterns- for employees who work the same schedule each day UsingUiShiftsShift forf employeeslwhoh dod nott workk a sett patternttor sett hoursheach shift.25After all the steps have been completed, click OK and Save.
Scheduling:Transfers in Pattern EditorScheduled Cost Center TransfersCost center transfers can be entered into the Schedule Planner if the employeep yworks the same day or days each period in another cost center.To enter a cost center transfer in an employee’s schedule:1. Select the employee by clicking on the employee name to highlight the1row.2. Click on Shift, then Edit Pattern. The permanent schedule windowopens.26
Scheduling:Transfers in Pattern Editor3. Enter the Work Start Date, this must be the date of the Sunday for thebeginning of the pay period.period4. Right click on the desired day to enter the cost center transfer and select‘Edit’.27
Scheduling:Transfers in Schedule Planner5. Once the Shift Editor window opens, click in the ‘Transfer’ column andselect from the saved last 5 transfers used, or select ‘Search’ to search forthe appropriate cost center.6. Click on the green arrow to insert another row if additional transfers arenecessary for the shift.shift Click OK.OK28
Scheduling:Transfers in Schedule Planner7. An ‘x’ in parenthesis will appear in the shift box indicating it contains a costcenter transfertransfer. Repeat these steps for additional cost center transfers onother days. Click OK button when all cost center transfers have beenentered for the employee’s schedule.29
Scheduling:Transfers in Schedule PlannerClick on Save. Shifts that contain cost center transfers are indicated bythe ‘x’ in pparenthesis inthe shift.30
Scheduling:Cost Center TransfersOn the Fly Cost Center TransfersTo enter a cost center transfer for a pparticular shift as a one-timeoccurrence: Right click on the shift and select ‘Edit Shift’. Follow the same instructions as above once the ‘Shift Editor’ opens.Using this method adds the cost center transfer for just the day itis entered on for just this pay period.31
Scheduling:Paycode HoursScheduling Paycode HoursUsers can enter duration of hours in the timecard or in the Schedule Planner.T enterTot futuref tdatedd t d PTO,PTO entert theth TimeTiPeriodP i d suchh as JulyJ l 4.4 ClickCli k on thethemployee to highlight. Right click on the day and select Add Pay Code.32
Scheduling:Paycode HoursThe following window is displayed:Enter the Payy Code,, changeg theamount from 8.5 to 8.00 (the schedulehours reflect the shift hours prior to thelunch deduct)If the employee isautopaid click the box to override theautopaid,shift, otherwise the employee will bepaid both the added pay code andtheir regular hours.If the pay code added is in addition tothe scheduled hours, do not check thebox.Click OK.OKClick on Save once back on the mainscreen.33
SchedulingOneStaffOSt ff SchedulingS h d liSystemS tSchedules are also imported each night from Onestaff (nursing schedulingsystem). Pay edits that appear in the timecard in shaded gray and purple fontcannot be edited in the timecard as theyy come from the schedule. The difference between imported schedules and schedules entered into thetimecard is the server information contained in the user information field.Entries containing ‘bhssfbhssf.orgorg’ were entered directly into the Schedule Planner.PlannerOther entries not containing that identifier in the User information wasimported. To remove something imported fromthe OneStaff system, you mustcontact your Onestaff editor for yourarea. If you are unsure who that is,contact your CTT, they should beable to find out for you. OneStaff edits made in Kronos willbe overwritten once the import runsagain that evening.34
35
Timecard Maintenance Users should use the Reconcile Timecard genie to identify exceptions inemployeep ytimecards, select employeesp yto review and address: Missing Punches Enter PTO hours Enter other non-productive time Monitor for overtime Select multiple employees by highlighting the selected employees, then right clickon the screen and select Timecard.36
Timecard Maintenance37 Once you are in the timecard view, navigate to the next or previousemployeep ybyy usingg the arrows. Timecards must be reviewed daily or at the very least (weekly) to ensuremissing data is accurately provided. Payroll will send out reminders tousers on Friday prior to Payroll week and on Payroll Monday to remindusers to review and approve their employeeemployee’ss timecards. It is recommended that all departments have a primary and secondaryuser for back up purposes.
Timecard Indicators andE ceptionsExceptions Kronos uses color coding and icons to identify timecard exceptions. This isonlyyappartial view of the ggrid located in the HELP area of the application.ppAccess HELP by clicking on the question mark in the upper right corner ofthe screen. It will display HELP specific to the part of the application yourcurrent screen is on.There are manyreports available tosee specificexceptions such asexceptions,punch adds, latein, early out, etc 38
Kronos Floating TextVeryEarly InMissedPunchUnexcusedAbsenceFl tiFloatingttextt providesid helph l inidetermining what the exception isfor. Hover your mouse, over theexception, and the text will appear.Holding the mouse over theperson’s name displayspp y theabove information.39
Totals & ScheduleTotals and Schedules are displayed in the main view of thetimecard. Totals will allow you to view, shift, daily or total hours/paycode for allentities/cost centers charged through badge swipes or manualentries. Schedules are a must for all employee except per-diem employeeswho do not have a set schedule in placeplace. Unless the perper-diemdiememployee is on assignment and is working a steady schedule of atleast 8 weeks.TotalsSchedule40
AccrualsView Accrual Balances in TimecardTo view employee accrual balances in the timecard:Click on the ‘Accruals’ tab. The balance displayed is based on what day you have highlighted inth timecard.thetidThe projected balance is the balance after hours scheduled out in the future are taken intoconsideration. PTO hours entered for future periods should be entered in the Schedule Planner insteadof the timecard.41
Audits42
Timecard Punch Rounding43
Exempt Employees:MManagementt vs. Non-ManagementNMt Phantom Punches Management employees’ work hours are defaulted into the timecard based on their standard work hoursscheduled for their locationlocation. For exampleexample, if a manager is scheduled for 40 hours a week,week then there will be 8hours each day scheduled in purple, which indicates that they are coming from the schedule. Professional (non-management) no longer need to punch in. Schedules are automatically uploaded. Exempt employees should NOT punch 44
Exemptp Employees:p yManagement vs. Non-Management To edit the (purple) Hours Worked amounts, just click on whichever amount needs to be modified,override it, and click Save. After you click Save, you will notice that the revised day is no longer in purple, but in black. Thisindicates that it is no longer defaulted from the schedule, but has been modified.Please note:The purple default hours are not visible for thelater of seven days in the future of a pay period,or the most future-dated time off entry in atimecard.45
Performing Timecard Edits:ManagementManagement PTOManagers must enter their own PTO into their timecard.To enter PTO or other non-productiveptime:1. Click on Reconcile Timecard Genie.2. Choose the Time Period.3. Double Click on the Employee name to highlight and choose.46
Performing Timecard Edits:Management4. Click and highlight the date that you want to pay PTO time.5. Click on the eraser icon just to the left of the green arrow to erase thepunches for the day.py6. Click on drop down listing on the ‘Pay Code’ column and select the PT1for the PTO pay code.7. Click on the ‘Amount’ column and enter the number of hours, for example‘8’.8 Add a comment by right8.right-clickingclicking on the dayday, select a comment and click ‘Save’Save .47
Performing Timecard Edits:Non ProductiveProd cti e Time Entering Non Productive TimeEnter PTO hours for the absences if PTO hours are available.Some new employees may have insufficient PTO accrued when holidays occur. Other employeesmay be caught short for emergencies. An employee may borrow up to 24 hours of PTO time withapproval of the department director. As accrued time is earned, it reduces any advance that hasbeen used. (HR Policy 3800).To enter PTO hours or other non-productive time:48 Click on the ‘Pay Code’ column for the appropriate day; the drop down listing of pay codes isdisplayed. Select the appropriate pay code. Once you have selected the appropriate pay code, click on the ‘Amount’ column. Enter thenumber of hours for the day.day Click on Save. You can add a comment to the amount by right clicking in the ‘Amount’ columnand attaching the appropriate comment from the approved comments listing. Save Again.
Performing Timecard Edits:Non ProductiveProd cti e TimeEnteringg a Full Dayy PTO ((Refer to BHSF ppolicyy 3800 & 2250))To enter a 12 hour PTO allotment, you must break up the hours in the appropriate shifts:For example: if the employee is scheduled to work 7p to 730a, the PTO must be entered:Click on the blackarrow to get anadditional row for thesame day.This applies to splitting upother non-productive hourssuch as : BV1, BV2, BV3(Bereavement) and JD1,JD2, and JD3 (Jury Duty)Entering Partial Day PTO (Refer to BHSF policy 3800 & 2250)Employees may work part of the day and take partial PTO.The system will not allow duration of hours and punches on the same rowrow. To enter partial day PTO:491.Click on the green arrow to add a row for the partial worked day2.Enter the pay code in the inserted row in the ‘Pay Code’ column3.Enter the hours in the ‘Amount’ column4.Save the timecard.
Performing Timecard Edits:Missing PunchesP nches Moving Amounts Pay code moves are no longer allowed in the timecard. They create issues withthe payroll file and also open up too many avenues for errors. Payroll has initiated the use of work rule transfers to accomplish the same thing. Cost CeCosCentere Moveso es Instead of moving hours from one cost center to another, a work rule transfer tothe appropriate department should be utilized. Cost center transfers are coveredin this section. Pay Code Moves Similarly, if an employee attends orientation, do not move the hours from RG1 toGO1. Instead perform a work rule transfer to ‘Orientation’. The systemautomatically splits up with shift hours based on the punches. See “Using WorkRule Transfers for Orientation’. Work rule transfers are also used to change shift 1hours to shift 2. Manager PTO Do not move the hours from RG1 to PT1, PT2, or PT3. Remove the phantompunches for the day and enter the pay code on the row in its place along withthe hours entered into the ‘Amount’ column.50
Performing Timecard Edits:Missing PunchesP nches Entering Missing Punches To enter a missing punch, simply click inside the red cell and enter the time of theBeforemissing punch, go to the ‘Actions’ menu, ‘Calculate your Totals and then click‘Save’.After The timecard will not calculate ANY hours for any days where a punch is missing. Users should enter a comment for punches manually added to a timecard toindicate the reason. For example, clock broken, employee forgot to punch, etc.Editors and Managers should NOT be entering punches for employees on aregular basis. Policy requires employees to punch in (Managers excluded). Reports can be run on the comments at any time to assist in performancereviews, evaluations, etc.51
Performing Timecard Edits:Missing PunchesP nchesCorrecting Complex Missing PunchesWhene timecardseca ds aaree noto reviewede e ed dadaily,y, you runu theecchancea ce oof havinga geemployeesp oyees misssspunches and punching in twice. Similarly, if the schedule for the employee isincorrect or if there is no schedule, you may encounter a timecard that looks like theone below:The question is how do we fix this?!Correcting a timecard with complex missed punches is a 6step process.52
Performing Timecard Edits:Missing PunchesP nches1.2.3.4.Identify the punch in question.Right-clickg‘Edit Punch’Ask yourself. “What type of punch is this? In or Out?”Under the ‘Override’ drop down box, select youroverride.5 Click OK,5.OK go to Actions Calculate Totals6. If all is OK, click SAVETo prevent this:1. Have an accurate schedule in the schedule planner.2. Check your timecards are least every other day.3. Enforce that employees bring their badges everyday.RRemember,bemployeeslare responsibleibl ffor clockingl kiiin/out!/ t!53
Performing Timecard Edits:Breaks 54Breaks: Are defined by BHSF as two 15-minute breaks that are Baptist paid andone 30 minute meal break that is considered employee time. For anyemployeelwhoh worksk more thanth5.555hhours, a 30 minutei t meall bbreakk willill bebdeducted. Another 30min will be deducted after 16hrs worked. (Refer to BHSFpolicy #2295)If any hourly employee fails to take a meal or if they are interrupted during ameal break,break they must fill out the meal affidavit which their manager willprovide to document the missed meal.Breaks off-campus: Any hourly employee that leaves campus for a break,appointment or other reason must clock out.If an employee clocks out for a 30min break and is not back within the 30minwindow, Kronos will automatically dock the employee in 15min intervals untilthey clock in and return to work.Please note that Kronos does not take the two 15-min breaks into account inthe timecard as they are optional. For example, most clinical areas do not taketheir 15min breaks due to workload or other reasons. The manager may or maynot chose to credit this on the timecard.
Performing Timecard EditsBreaks:Cancel a meal deduction: (for hourly employees who did not take a lunch break)1.Rightg click on the ‘out’ punch.pSelect edit ppunch.22.Under ‘cancelcancel deductiondeduction’ select ‘30’30 to credit the 30min lunch break,break click OK.OK1.12.Go to Actions Calculate totalsIf timecard look ok, then Save.Before canceldeduction55After canceldeduction
Performing Timecard Edits:Transfers Cost Center TransfersA transfer is used to charge shift hours to another cost center other than the employee’s homecost center. Transfers performed at the clock are imported into the timecard and will be displayedas:To perform a manual transfer for a shift worked in the timecard to another cost center:1. Click in the ‘Transfer’ column for the appropriate day between the in and the out punch for the dayand select ‘Search’.56
Performing Timecard Edits:Transfers572.Double click on the desired entity to charge from the displayed selection in the box on the left.Your selection will be displayed in the box next to the ‘Entity’ radial button.3.Click on the “Cost Center” radial button. You can search for the cost center by entering it in the‘Name or Description’ box, then clicking the ‘Search’ button. If you don’t know the cost centernumber, you can search for part of the name of the cost center by entering.4.Double click on your selection from the results list, the selected cost center will be displayed in thebox next to the ‘Cost Center’ radial button.5.Click OK.6.Click on ‘Save’
Performing Timecard Edits:TransfersYour results should look like the below:Hours charged to a non-home cost center will appear with an ‘x’ in front of the labor accountinformation in the totals for the timecard.58
Performing Timecard Edits:TransfersOnce a cost center transfer is used, it appears in the drop down listing whenclicking on the transfer column again.again It will display the last 5 accounts usedused,which means you can select it from the drop down listing rather clicking on‘Search’ and opening the transfer window and selecting the entity and costcenter separately. This is handy if you are charging to the same non-homecost center several days in the period.Note: Cost center transfers that occur on a regular basis can be enteredinto the Schedule Planner. Those transactions are then automaticallytransferred on the timecard to the scheduled cost center.center59
Performing Timecard Edits:Partial DayDa TransfersIt may be necessary to transfer only part of the day to another cost center.If the transfer happens in the last part of the day:1. Have the employee swipe in for the first part of the day as normal, by default,charging hours to the home cost center and clocking out at the end of the shift.2. Upon clocking in for a second shift, the employee must hit the ‘transfer’ bluefunction key on the timeclock.timeclock3. The employee will enter the entity/cost center they will be working in for theduration of the shift. The manager is responsible for informing the employee of thecorrect entity/cost center.If the transfer happens in the first part of the day:1. The employee will swipe in for the shift by selecting the ‘transfer’ blue function keyon the timeclock and will clock out at the end of the shift. No transfer is neededat the end of a shift.2 Upon clocking in for their second shift back in their home cost center2.center, theemployee must select the ‘transfer’ blue function button and enter their homeentity/cost center. 60This will guarantee the shift hours are allocated correctly. If the transfer is notentered upon returning to their home cost center, Kronos will view the day as along continuous shift.
Performing Timecard Edits:Transfers for PaycodePa code HoursHo rsCost Center Transfer for Pay Code HoursTo charge another cost center for a duration of hours, simply enter the cost center to becharged in the Transfer column as shown below:61
Performing Timecard Edits:Work RRulele TransfersWork Rule TransferA work rule transfer allows the user to manipulate the pay code that will be calculated for theshift. This is used instead of ‘MOVING’ hours from one ppaycodeyto another. We are no longerg‘MOVING’ pay codes. Work rule transfers will be used instead. They are easier to use and there isno need to split out the shift data. IMPORTANT NOTE: Note what is currently calculated for a specific shift prior to performing thework rule transfertransfer. Additional pay such as weekend will have to be inserted after using the workrule transfer is completed.Using Work Rule Transfer for Orientation ShiftsFor example, an employee attends General Orientation and punches in and out.The timecard will calculate RG1, RG2 or RG3, whichever is appropriate to thepunch times.62
Performing Timecard Edits:Work RRulele TransfersPreviously, editors had to “MOVE” the hours from RG1 to GO1.We will now use a work rule transfer to accomplish the same thing.Below is an example of a timecard prior to the work rule transfer:63To change the hours to GO1:1. Click on the ‘Transfer’ column between the in and out punch for theappropriate day and select ‘Search’Search .2. Click on the drop down listing on the bottom right hand corner of thescreen and select ‘Orientation’. Click OK. Click on Save.
Performing Timecard Edits:Work RRulele Tr
Introduction Baptist Health South Florida collects employee's time and attendance electronically using the Kronos Workforce Central software . The four basic methods of time entry are through: Clocks - employees swipe in and out Timestamp- employees clock in via the Kronos application Direct data entry-an employee missed a punch and you now need to enter it


![Kronos Government Terms [reformatted 10.22.13] - immixGroup](/img/54/tcs-kronos.jpg)
