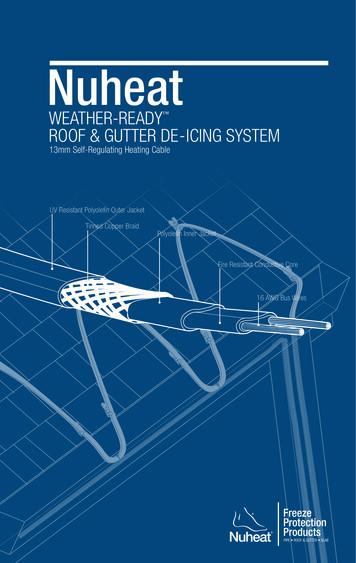
Transcription
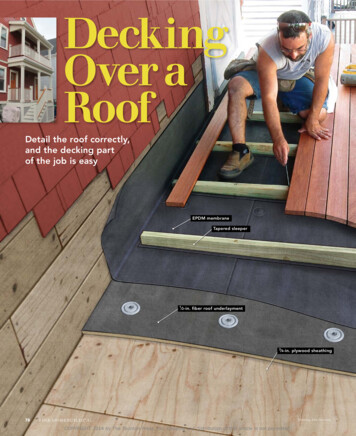
DeckingOver aRoofDetail the roof correctly,and the decking partof the job is easyEPDM membraneTapered sleeper1 2-in. fiber roof underlayment378 4-in. plywood sheathingFINE HOMEBUILDINGCOPYRIGHT 2014 by The Taunton Press, Inc. Copying and distribution of this article is not permitted.Drawing: John Hartman
BY EMANUEL A. SILVAThere are tons of reasons to build a deck over aroof, from creating a romantic outdoor breakfast nook off a second-floor master bedroomto providing a second-floor porch on a cityhouse. No matter the reason, the keys to a long-lastingdeck above a living space are the same: a reliable roofmembrane and details that minimize any damage to theroof from the deck loads. I like rubber roofing for this,combined with a floating deck floor. The rubber roofingI’ve been using for 15 years—a glue-down, 60-mil EPDMmembrane from International Diamond Systems—offersseveral advantages. It’s reliable, it’s fairly easy to workwith, and it requires no special tools. That said, a lot ofpeople subcontract the roofing work and build the deckthemselves. Either way, the roofing has to be right.Framing the roofWhenever I install decking over a roof, I make surethe framing is structurally sound and properly pitchedto drain water. The project illustrated here was a complete teardown and rebuild, so I framed the roof with2x8s spaced on 16-in. centers, supported by a beam anda ledger as on most decks. Because these 2x8s were alsofibeR unDeRlayMentPRoteCts Roofingnails can back out of plywood or osb over time. a layer offiberboard prevents them from penetrating the roofing.EPDMmembranePeel-and-stickEPDM tapewww.finehomebuilding.comDrip edgeDon’t overlap the seams. Offsettingthe joints in the fiberboard from thosein the sheathing makes a smoothsurface.Use the big washers. Screwsand 3-in.-dia. sheet-metalwashers mean that only 1615 8-in. fasteners are neededper sheet. The washers are soldby roofing-supply houses.OCTOBER/NOVEMBER 2014COPYRIGHT 2014 by The Taunton Press, Inc. Copying and distribution of this article is not permitted.79
Running the RubberInstalling large sheets of rubber is easierthan it looks, although it’s a big help tohave a second pair of hands on the job.Dry-fit first. Roll out the rubbersheet so that it’s square to the roof,then use scissors to make the cutsneeded around penetrations such asposts. Before gluing the rubber, besure to clean it with a manufacturerrecommended solvent.Roll the rubber membrane halfway back.Working in approximately 2-ft. swaths,spread the adhesive on both the rubber andthe substrate.80Make it permanent. Once the glue is barelytacky, unroll the rubber over the glued area,and smooth it out with a J-roller.Up the wall. Adhering the rubber about2 ft. up the adjacent wall is part of creatinga watertight system.FINE HOMEBUILDINGCOPYRIGHT 2014 by The Taunton Press, Inc. Copying and distribution of this article is not permitted.
the framing for the ceiling below, and because I wanted to keep allthe cuts square, I framed the roof level. To pitch the upper surface1 4 in. per ft. for drainage, I ripped 2x4s on a taper and screwed themto the tops of the joists.It might seem like it would have been easier to start with 2x12s andrip them to a taper. The trouble with that approach is that the allowable span of a joist or rafter depends on both its species and its grade.The grade depends largely on how close knots and other defects areto the edge of the board. In ripping a board, a knot that had existedharmlessly in the center is now close to the ripped edge, compromising the board’s strength. For that reason, code does not allow the useof ripped lumber for structural purposes.Continuous notched 4x6 posts support the framing and also serveas rail posts. The roof sheathing is 3 4-in. CDX plywood, glued andscrewed to the framing.To create a smooth surface and to protect the bottom of the rubberroofing from any fasteners or rough edges on the plywood, I installed1 2-in. fiber roof underlayment as a final substrate. Each board is secured with 16 15 8-in. screws and 3-in.-dia. sheet-metal washers.Where the roof ties into the house, I removed the siding about 2 ft.up the wall and about 1 ft. out on each side. This enabled me to fullyadhere the roofing membrane about 2 ft. up the sheathing and thencounterflash with a self-adhering butyl membrane. I pulled back theexisting building paper after stripping the siding, installed the butylmembrane, and lapped the building paper back over it. This procedure makes for a watertight connection on ordinary rainy days, butit also protects against wind-driven rain or deep snow sitting on thedeck up against the house.Detailing the Roof EdgeUse permanent trim around a permanent roof. PVC won’trot, it takes paint well, and you can glue rubber roofing to it.Glue the roofingto the fascia.Spread theadhesive on therubber roofingand about 2 in.onto the boardbelow.Drip edgeprotects thecorner. Nail a3-in. aluminumdrip edge overthe corner of theroof. Guide aknife along it totrim the excessrubber.Glue down the EPDM roofingEPDM roofing is available in a variety of widths and in lengths up to100 ft. Here, I needed enough rubber to overhang about 1 ft. on eachend, and it had to be wide enough to run about 2 ft. up the house walland to overhang the edge of the deck by at least 2 in. Because I wasusing up leftovers from another job, I did this roof with two pieces ofrubber, which I joined in the middle with Rubberall Splicing Adhe sive. In most cases, though, I’d simply buy membrane big enough tocover the roof in one piece. After sweeping the underlayment cleanand making sure there were no protruding fasteners, my helper andI laid the rubber down on the underlayment and fitted it to the houseand against the posts. I made cutouts for the posts, then split the rubber beyond the cutouts so it could be placed around each post.Next, we rolled back the rubber about halfway toward the posts.Working about 2 ft. at a time, we wiped the membrane with Rubberall’s membrane cleaner and then spread its bonding adhesive onboth the underlayment and the membrane using a paint roller. It’sa contact adhesive, so once the glue was set enough that my fingerbarely stuck to it, we slowly rolled the membrane over the gluedarea, making sure not to make any air bubbles, and smoothed it witha J-roller.We continued toward the house in 2-ft. sections and finished bygluing the rubber about 2 ft. up the wall. We then turned aroundand glued the rubber around the posts and over the PVC fascia. Theglue extends about 2 in. down the fascia. We let the excess rubberhang for the time being.To protect the outer edge from damage, we installed a 3-in. aluminum drip cap all around the perimeter, fastening it every foot withwww.finehomebuilding.comSeal the dripedge. Useuncured EPDMtape to cover thenails and seal thedrip edge to theroof. UncuredEPDM must beprotected fromUV rays, whichthe deckingwill do onceinstalled.october/november 2014COPYRIGHT 2014 by The Taunton Press, Inc. Copying and distribution of this article is not permitted.81
Flash thePostsAny penetration in theEPDM membrane is apotential leak, so theposts on this roof requiredspecial attention. Theywere wrapped with rubberand then flashed to theroof with scraps of rubberand splicing adhesive. Thechallenging areas to flashare the post corners.Wrap the post first. Wrapping thepost with membrane provides areliable base for gluing additionalrubber for flashing.Start at the bottom. Split a scrap of rubberso it can go around the corner while lyingflat on the roof. Stretch the rubber a littleso the apex of the split is placed above theroof plane.Overlap the first layer. Split a second scrapof rubber like the first. Install it to wrap thecorner and splay onto the roof. The apex ofits split must be on the roof so that the twoapexes don’t align and create a potential leak.2-in. hot-dipped galvanized roofing nails. I trimmed the rubber witha knife so that it would be even with the bottom of the drip edge.To waterproof the inside edge of the drip cap and to protect the nailpenetrations, I covered the joint with uncured-EPDM peel-and-sticktape. Starting with the bottom edge of the roof and finishing up withthe sides yields a shingle effect that will prevent water from entering.Integrating the posts into the roofing is the hardest part of this job;getting roofing to seal around the corners of the posts is both vital andchallenging. I could have bought premade corners for the posts, butthey’re expensive. Instead, I made corners from membrane scraps,overlapping them and gluing them in place with splice adhesive. I82Paint on the glue. Spread splice adhesiveon the roof and on the post wrap.Counterflash. Once the post is fully flashedto the roof, counterflash with layers ofbituminous membrane going up the postabout 3 ft.counterflashed with a butyl membrane to about 3 ft. up the post, andeventually wrapped the posts with PVC trim.Let the sleepers lieThe next step was to lay out the sleepers 16 in. on center, on top ofthe joists below. To prevent the sleepers from wearing through theEPDM roof, I laid additional 4-in.-wide strips of rubber membranebelow the sleepers’ locations.I wanted the tops of the sleepers to be level, so I ripped pressuretreated 2x6s in half so that their bottoms tapered to match the roofpitch. At their thinnest part, the sleepers are 11 2 in. deep, so the 2-in.FINE HOMEBUILDINGCOPYRIGHT 2014 by The Taunton Press, Inc. Copying and distribution of this article is not permitted.
Finally, it’sTime to DeckInstalling the decking isstraightforward. Taperedsleepers ripped from 2xmaterial ensure a levelwalking surface. Glue andnails secure the decking.Place the sleepers. Strips of 4-in.-wide EPDMprovide a layer of protection between thesleepers and the roof. The sleepers aren’tfastened in place, and the floor floats.Glue does the work. The decking nails aremainly there to clamp the boards until theurethane sealant sets up.Nail down the decking. Short, 2-in. stainlesssteel finish nails fasten the mahogany deckingto the sleepers. PVC trim will hide the gapbetween the decking and the post and helpto hold the decking down.decking fasteners won’t stick through. Cutting pressure-treated lumber exposes the untreated core, so I applied Wolman CopperCoatwood preservative to all the cut sides and ends to help prevent rot.Any penetrations in the roof membrane made by fasteners arepoten tial leaks, so the sleepers just rest in place. The post wraps helpprevent the decking from uplifting.So that the finish would have time to dry, I had coated all six sidesof the mahogany deck boards with Penofin a week earlier and hadstacked them with sticks between the layers. As I worked, I recoatedall the cut edges. To secure the decking, I used 3M 5200 MarineAdhe sive Sealant, a tough, waterproof urethane normally used aswww.finehomebuilding.comJust details left to go. A second coat ofPenofin (the boards were all coated anddried before installation), rails, trim, siding,and paint are all that’s left.boat glue. I followed the adhesive with stainless-steel finish nails.The nails’ main function is to clamp the boards while the glue cures,which is what provides the real strength. I finished up by applyinganother coat of Penofin to the boards. This helps to hide and seal allthe small nail holes and gives the boards one more layer of protection.With the decking down, the rest of the job was the same as anyother porch. I wrapped the posts with a 3 4-in. PVC trim board andadded railings, then replaced the siding and called in the painter. Emanuel A. Silva owns Silva Lightning Builders in North Andover,Mass. Photos by Andy Engel.october/november 2014COPYRIGHT 2014 by The Taunton Press, Inc. Copying and distribution of this article is not permitted.83
rot, it takes paint well, and you can glue rubber roofing to it. Glue the roofing to the fascia. Spread the adhesive on the rubber roofing and about 2 in. onto the board below. Drip edge protects the corner. Nail a 3-in. aluminum drip edge over the corner of the roof. Guide a knife along it to trim the excess rubber. Seal the drip edge. Use .