Transcription
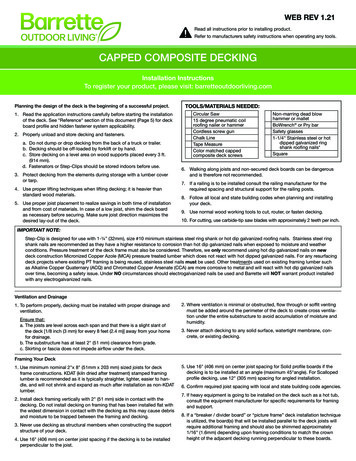
WEB REV 1.21Read all instructions prior to installing product.Refer to manufacturers safety instructions when operating any tools.CAPPED COMPOSITE DECKINGInstallation InstructionsTo register your product, please visit: barretteoutdoorliving.comPlanning the design of the deck is the beginning of a successful project.1. Read the application instructions carefully before starting the installationof the deck. See "Reference" section of this document (Page 5) for deckboard profile and hidden fastener system applicability.2. Properly unload and store decking and fasteners.a. Do not dump or drop decking from the back of a truck or trailer.b. Decking should be off-loaded by forklift or by hand.c. Store decking on a level area on wood supports placed every 3 ft.(914 mm).d. Fastenators or Step-Clips should be stored indoors before use.3. Protect decking from the elements during storage with a lumber coveror tarp.4. Use proper lifting techniques when lifting decking; it is heavier thanstandard wood materials.5. Use proper joist placement to realize savings in both time of installationand from cost of materials. In case of a low joist, shim the deck boardas necessary before securing. Make sure joist direction maximizes thedesired lay-out of the deck.TOOLS/MATERIALS NEEDED:Circular Saw15 degree pneumatic coilroofing nailer or hammerCordless screw gunChalk LineTape MeasureColor matched cappedcomposite deck screwsNon-marring dead blowhammer or malletBoWrench or Pry barSafety glasses1-1/4" Stainless steel or hotdipped galvanized ringshank roofing nails*Square6. Walking along joists and non-secured deck boards can be dangerousand is therefore not recommended.7. If a railing is to be installed consult the railing manufacturer for therequired spacing and structural support for the railing posts.8. Follow all local and state building codes when planning and installingyour deck.9. Use normal wood working tools to cut, router, or fasten decking.10. For cutting, use carbide-tip saw blades with approximately 2 teeth per inch.IMPORTANT NOTE:Step-Clip is designed for use with 1-¼” (32mm), size #10 minimum stainless steel ring shank or hot dip galvanized roofing nails. Stainless steel ringshank nails are recommended as they have a higher resistance to corrosion than hot dip galvanized nails when exposed to moisture and weatherconditions. Pressure treatment of the deck frame must also be considered. Therefore, we only recommend using hot dip galvanized nails on newdeck construction Micronized Copper Azole (MCA) pressure treated lumber which does not react with hot dipped galvanized nails. For any resurfacingdeck projects where existing PT framing is being reused, stainless steel nails must be used. Other treatments used on existing framing lumber suchas Alkaline Copper Quaternary (ACQ) and Chromated Copper Arsenate (CCA) are more corrosive to metal and will react with hot dip galvanized nailsover time, becoming a safety issue. Under NO circumstances should electrogalvanized nails be used and Barrette will NOT warrant product installedwith any electrogalvanized nails.Ventilation and Drainage1. To perform properly, decking must be installed with proper drainage andventilation.Ensure that:a. The joists are level across each span and that there is a slight slant ofthe deck [1/8 inch (3 mm) for every 8 feet (2.4 m)] away from your homefor drainage.b. The substructure has at least 2" (51 mm) clearance from grade.c. Skirting or fascia does not impede airflow under the deck.2. Where ventilation is minimal or obstructed, flow through or soffit ventingmust be added around the perimeter of the deck to create cross ventilation under the entire substructure to avoid accumulation of moisture andhumidity.3. Never attach decking to any solid surface, watertight membrane, concrete, or existing decking.Framing Your Deck1. Use minimum nominal 2"x 8" (51mm x 203 mm) sized joists for deckframe constructions. KDAT (kiln dried after treatment) stamped framinglumber is recommended as it is typically straighter, lighter, easier to handle, and will not shrink and expand as much after installation as non-KDATlumber.2. Install deck framing vertically with 2" (51 mm) side in contact with thedecking. Do not install decking on framing that has been installed flat withthe widest dimension in contact with the decking as this may cause debrisand moisture to be trapped between the framing and decking.3. Never use decking as structural members when constructing the supportstructure of your deck.4. Use 16" (406 mm) on center joist spacing if the decking is to be installedperpendicular to the joist.5. Use 16" (406 mm) on center joist spacing for Solid profile boards if thedecking is to be installed at an angle (maximum 45 angle). For Scallopedprofile decking, use 12" (305 mm) spacing for angled installation.6. Confirm required joist spacing with local and state building code agencies.7. If heavy equipment is going to be installed on the deck such as a hot tub,consult the equipment manufacturer for specific requirements for framingand support.8. If a “breaker / divider board” or “picture frame” deck installation techniqueis utilized, the board(s) that will be installed parallel to the deck joists willrequire additional framing and should also be shimmed approximately1/16" (1.6mm) depending upon framing conditions to match the crownheight of the adjacent decking running perpendicular to these boards.
Using Decking as Stair Treads1. Do not space stringers wider than 12" (305 mm) on center for Starter andSolid profile decking on stair treads. For Scalloped profile decking, do notspace stringers wider than 8" (203 mm) on center.2. Overhang for stair treads must not exceed 2" (51 mm).NOTE:Step-Clips can not be used on stairs. Stairs must be installed usingFastenators or face screwed.Blocking Is REQUIRED Where the End of Two Deck Boards MeetWhen the design of the deck requires a run that is longer than the boardlength or it is a unique design, blocking (“sistering”) or additional framing isrequired. (Fig. 1)2. Two inline boards cannot share a Step-Clip. Sister additional framingwhere butt joint occurs then trim a Step-Clip to accommodate each boardand attach separately to the additional framing. (Fig. 2)1. Sharing Fastenators between two boards at butt joints is allowed, but theends of each deck board must be individually supported.3. Transition/divider boards or other intricate designs require additionalblocking or framing.See “Framing Your Deck” section above.Fig 1.Fig 2.Board Spacing or GappingDeck Spacing (Chart #1)All decking expands and contracts slightly as a result of temperature change.Capped composite decking will expand and contract slightly due totemperature change. Use the chart below to determine the spacing betweenboard ends. A gap of at least 1/4" (6.4mm) is recommended between deckboards and fixed elements like foundations, walls, pool edges, etc. If thedeck is located near or around a tree, be sure to allow for future growth ofthe tree.1. When installing Solid or Scalloped profile deck boards using any of thefastening methods outlined below Always space boards to provide the following minimum gaps to allow forthese changes:a. Side to Side 3/16" (4.8 mm). (Fastenators and Step-Clips willautomatically set this spacing)b. End to End typically 3/16" (4.8mm depending on board length andtemperature (see Chart 1 - “Deck Spacing”).Temperature at Install ( F)40-5556-7071-9596-110Over 1101/4"3/16"1/8"1/16"1/32"c. Structure typically 1/4" (6.4mm) between all decking and anystructure or post (see Chart 1 - “Deck Spacing”).NOTE:If the deck is located near or around a tree, be sure to allow for futuregrowth of the tree.Temperature at Install ( C)4-1314-2122-3536-43Over 436.4mm4.8mm3.2mm1.6mm0.8mmColor and Orientation of Deck BoardsWe recommend that you lay out the deck boards before final installationto ensure an acceptable color mix. Hardwood colors feature a variegatedappearance with contrasting light and dark shades of color. Laying out apreferred pattern of deck boards before installation will help to achieve adesired appearance.NOTE:The semi-gloss surface of the decking will weather to a natural mattefinish over time.Deck Board Fastening MethodsThere are three methods that can be used to fasten Solid and Scallopedprofile decking.1. Step-Clip Systema. NOTE: Outer edge (Starter) and divider boards that run perpendicular tothe main rows of deck boards will require additional framing and shouldbe shimmed approximately 1/16" (1.6 mm) to match the crown of theadjoining boards and the thickness of the Step-Clips. These boardsshould be fastened every 16" (404mm) using two #10 x 2-3/4" or #9 x 3"color-matched capped composite deck screws or the Starborn colormatched plug system* (Solid and Starter profiles only).
Deck Board Fastening Methodsb. Locate the first deck board at outer rim joist away from the house orstructure and work towards the house. For outer edge board installation(Starter, Solid, or Scalloped profile), do not overhang the board more than1" (25 mm) widthwise or 2" (51 mm) lengthwise. For a standard 1" (25 mm)overhang, measure and mark a location 22" (559 mm)* from the outer rimjoist on the outermost joists that run perpendicular to that joist and snapa chalk line across the entire length of the deck. Position the Step-Clipswith one edge along chalk line and fasten the first row of strips to eachjoist with a 1-1/4" (32 mm) stainless steel ring shank roofing nail using2 nails between each set of clips. (Nails MUST be located within 3/4"(19 mm) of the clip with a total of 8 nails per each four board strip (fig 3).NOTE: the side tabs on all of the strips should be orientated on the sameside of the joists and flush against the joist to allow for linking subsequentstrips together along each row of clips. Trim the overhang of the first rowof hidden fastening strips flush with the outer rim joist. Slide the outerdeck board securely into the first clip (ensure it is properly engaged inthe groove of the board) and screw down the opposite, outer edge ofthe board at each joist location using color-matched, capped compositedeck screws like Starborn Deckfast Cap-tor xd or the Starborn Pro-Plugsystem (Solid and Starter profiles only).Helpful hints: Store strips indoors before use. The strips install best between 40 F and80 F (4 C and 27 C). Use a non-marring dead blow or rubber mallet to set the leading edgeof the deck boards into the clips prior to stepping down on the oppositeedge of the board. Tapping the boards at a 45 degree angle on the highedge works best. If “re-skinning” a deck, ensure that all joists are level to each other beforeinstalling the Step-Clip system. If not level, shim or shave joists as neededto get them within 1/8" (3.2 mm). Walking along joists and non-secured deck boards can be dangerous andis therefore not recommended. * When using a thicker fascia board (greater than our standard 1/2"fascia), adjust the alignment chalk line for the first course of stripsaccordingly.c. Once the first 4 boards have been installed into the outer hidden fasteningstrip and proper alignment has been confirmed (measured for “square”on joists), position the remaining strips and fasten until all of the joistshave been covered. For elevated decks, install Step-Clips in 4 boardincrements as an added safety precaution. An interlocking tab is locatedat the end of each strip to allow for proper spacing along the length ofeach joist. The strip closest to house or structure will likely need to betrimmed and the final board fastened in a similar manner as the firstboard.3/4"d. Measure and trim each deck board to your desired length and place oneedge of the board into the side of the hidden fastening strip adjacent to apreviously installed board. Step down (or tap with a non-marring rubbermallet) on the opposite elevated edge of the board to secure it in place.You should hear an audible “click” sound as the clip engages with thegroove on the edge of board. If a board does not properly engage the clipwhile stepping down on the elevated edge, strike the board adjacent at a45 degree angle to the clip with a non-marring dead blow rubber malletto secure it in place. Repeat this process until all deck boards have beeninstalled.Fig 3.2. The Fastenator Systema. Install a Starter profile board using capped composite deck screws 5/8"(16 mm) from the outer board edge. Screw down the outer edge of theStarter profile board at every joist location. For arched starter profile,screws MUST be placed through full section of board, not through centerarch. Using #10 x 2-3/4" or #9 x 3" color matched, capped compositedeck screws (similar to Starborn Deckfast Cap-tor xd or the Starborn Pro-Plug system in a grooved profile decking installation.g. Always face-fasten the outer most edge of the first and last board withcapped composite deck screws or the Starborn Pro-Plug system (Solidand Starter profiles only).b. Do not overhang Starter profile boards over joists by more than 1"(25 mm) widthwise and 2" (51 mm) lengthwise. Use a non-marring dead blow hammer as necessary to tap the hiddenfastening clip into the slot.c. Always place one Fastenator in the slot in the board edge at every joist,between deck boards, regardless of the joist spacing. (Side to sidespacing is maintained by the hidden fastening clips.) A non-marring dead blow hammer or BoWrench tool can also be used tohelp secure the next Solid or Scalloped profile board into place.d. Use a #7 x 2-1/4" stainless steel screw through the center of the hiddenfastening clip at a 90 angle (or use a hidden fastening clip with a preinstalled #7 x 2 ¼" star drive trim head screw).e. Starting at one end slide the next Solid or Scalloped profile board ontothe exposed Fastenator of the first board and install a single Fastenator atone end of the out-board edge to hold the board in place.f. While standing on the new board and straddling each joist, pound it tightinto the clip with a non-marring dead blow hammer. Repeat steps “c”through “f” for the remaining boards, installing Fastenators at each joist.Helpful Hints: Store hidden fastening clip indoors before use. Fastenators install bestbetween 40 F and 80 F (4 C and 27 C). If the joists are uneven, apply pressure to the deck board where it doesnot touch the joist. As pressure is being applied, tap the board into theFastenator using the non-marring dead blow hammer. In the case of a low joist, shim the Fastenator as necessary to seat in theslot in the edge of the deck board. Take a measurement of the total width of the installed boards to makesure they are parallel every 3-4 courses Walking along joists and non-secured deck boards can be dangerous andis therefore not recommended.
3. Installing Solid, Scalloped, and Starter profile decking via surfacescrews method using capped composite decking screw fasteners likeStarborn Deckfast Cap-tor xd or the Starborn Pro-Plug System:f. For the best appearance, use a white chalk line to ensure straight fastenerlines. Colored chalk can stain the decking and can be very difficult toremove.a. Use #10 x 2-3/4" or #9 x 3" capped composite deck screws wheninstalling Solid or Scalloped profile decking. For arched starter profile,screws MUST be placed through full section of board, not through centerarch. (Similar to Starborn Deckfast Cap-Tor xd color matched cappedcomposite deck screws.)g. When using the Starborn Pro-Plug system (for Solid & Starter profilesonly) with surface screws and plugs, please refer to the instructions insidethe box to ensure the most up-to-date installation method.b. When using non-capped composite decking fasteners (as outlined above),pre-drill and countersink for the screw size (#8 x 2-1/2" typical.)c. Two fasteners are required at each joist, one on each side of the board,regardless of the joist spacing.d. Drive fasteners straight and directly through the deck boards at a 90 angle to the decking surface. Do not “toe nail” or drill at an angle.e. Never place fasteners closer than 5/8” (16mm) from the ends or edge ofthe board. When installing, ensure screws are flush with the deck surfaceand not sunk into the board. Pre-drilling is recommended. See screwmanufacturers instructions for additional information if needed.Helpful Hints: In the case of a low joist, shim the deck board as necessary beforesecuring the deck board. Take a measurement of the total width of the installed boards to makesure they are parallel every 3-4 courses Walking along joists and non-secured deck boards can be dangerous andis therefore not recommended.Fascia and Riser Board Installation1. Fasten fascia and riser boards using #8 x 2" stainless steel cappedcomposite deck screws or #9 x 1-7/8" fascia screws (similar to theStarborn Deckfast Fascia System). Use three fasteners equally spacedacross the width of the fascia board at the top, middle and bottom locationsof the board (2 fasteners for riser board) and spaced approximately every12" (305mm) along the length of the board. Never place fasteners closerthan 5/8" (16 mm) from the edge or ends of the board.2. When decking boards are installed picture framing the deck, fasten thefascia board to the rim joist, leaving a 1/8" (3.2 mm) gap between the topof the fascia and the bottom of the deck boards. Decking boards shouldnot overhang the outer rim joists by more than 2" (51 mm).3. When decking boards are installed without picture framing the deck, trimthe deck boards so they run past the outer rim joists by less than 2"(51 mm). Fasten the fascia board to the rim joist, leaving a 1/8" (3.2 mm)gap between the top of the fascia and the bottom of the deck boards.Do not extend fascia to cover deck board ends.NOTE:When using fascia to cover joists wider than 11-1/2" (292 mm), eitherstack multiple layers of fascia or use a combination of fascia boards, deckboards and 2x4s as accents to create a unique look. (Fig. 2)Fig 2.Care & Maintenance1. To maintain the appearance of your decking, sweep periodically and cleanspills with soap and water.2. The use of pressure washers is not recommended unless using for lowpressure (1500 psi or less with fan tip) wetting and rinsing. High pressurewashing may damage the surface of the decking. Always test all cleaningproducts on an inconspicuous area before using on the entire deck surface.3. The appearance of minor surface scratches or scuffs should diminishafter a few months of exposure to the weather and elements. For largerscratches or scuffs, a heat gun (available at most building product orhardware stores) may be used to carefully heat and blend the blemishedportion of the polypropylene cap material into the adjacent deck surfacearea. NOTE: The tip of the heat gun should never be placed closer than 2"(51 mm) from the deck surface and should be in continuous motion so asnot to permanently damage the surface of the deck board. Do not lay theheat gun on the decking after use.
Reference:5.5"Solid / Siesta Profile0.910"5.5"Scalloped / MVP Profile0.910"5.5"Starter Profile0.910"5.5"Arched Starter Profile0.910"5.5"Arched Profile0.910"Step-ClipFastenatorTo obtain and review a copy of the warranty please visit barretteoutdoorliving.com.You may also contact us at 1-800-336 2383 or email Cs.outdoorliving@ebarrette.comBarrette Outdoor Living545 Tilton Rd, Egg Harbor City, NJ. 08215barretteoutdoorliving.com (800) 336-2383REV 1.21
4. Use 16" (406 mm) on center joist spacing if the decking is to be installed perpendicular to the joist. 5. Use 16" (406 mm) on center joist spacing for Solid profile boards if the decking is to be installed at an angle (maximum 45 angle). For Scalloped profile decking, use 12" (305 mm) spacing for angled installation. 6.